P8H61-MX R2.0 User's Manual
Page 9
...D-SUB Ports DVI with Max. Resolution: 1920 x 1200 @60Hz D-SUB with Max. Supports Multi-Streaming USB P8H61-MX R2.0 Intel® H61 Express Chipset - 10 x USB 2.0/1.1 ports (4 ports at mid-board, 6 ports at rear) P8H61-MX USB3 Intel® H61 Express Chipset - 8 x USB 2.0/1.1 ports (4 ports at mid-board, 4 ports...32-bit operating system. **DDR3 1600 MHz and higher memory frequency is supported by Intel® 3rd generation processors. ***Refer to www.asus.com for the latest Memory QVL (Qualified Vendor List). We recommend a maximum of 4GB capacity or more, Windows® 32-bit ...
...D-SUB Ports DVI with Max. Resolution: 1920 x 1200 @60Hz D-SUB with Max. Supports Multi-Streaming USB P8H61-MX R2.0 Intel® H61 Express Chipset - 10 x USB 2.0/1.1 ports (4 ports at mid-board, 6 ports at rear) P8H61-MX USB3 Intel® H61 Express Chipset - 8 x USB 2.0/1.1 ports (4 ports at mid-board, 4 ports...32-bit operating system. **DDR3 1600 MHz and higher memory frequency is supported by Intel® 3rd generation processors. ***Refer to www.asus.com for the latest Memory QVL (Qualified Vendor List). We recommend a maximum of 4GB capacity or more, Windows® 32-bit ...
P8H61-MX R2.0 User's Manual
Page 10
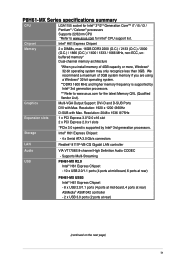
P8H61-MX Series specifications summary ASUS unique features ASUS MyLogo 2™ ASUS Anti-Surge Protection ASUS UEFI BIOS ASUS EZ Flash 2 ASUS FanXpert ASUS AI Charger (P8H61-MX R2.0 only) ASUS AI Charger+ (P8H61-MX USB3 only) ASUS Q-Fan 2 ASUS CrashFree BIOS 3 ASUS GPU Boost Rear panel ports 1 x PS/2 keyboard / mouse combo port 1 x DVI port 1 x D-Sub port 1 x LAN (RJ-45) port P8H61-MX R2.0: - 6 x USB 2.0/1.1 ports P8H61-MX...1 x I/O shield 1 x User Manual 1 x Support DVD Support DVD Drivers ASUS Utilities ASUS Update Anti-virus software (OEM version) Form factor uATX form factor: 9.6 in...
P8H61-MX Series specifications summary ASUS unique features ASUS MyLogo 2™ ASUS Anti-Surge Protection ASUS UEFI BIOS ASUS EZ Flash 2 ASUS FanXpert ASUS AI Charger (P8H61-MX R2.0 only) ASUS AI Charger+ (P8H61-MX USB3 only) ASUS Q-Fan 2 ASUS CrashFree BIOS 3 ASUS GPU Boost Rear panel ports 1 x PS/2 keyboard / mouse combo port 1 x DVI port 1 x D-Sub port 1 x LAN (RJ-45) port P8H61-MX R2.0: - 6 x USB 2.0/1.1 ports P8H61-MX...1 x I/O shield 1 x User Manual 1 x Support DVD Support DVD Drivers ASUS Utilities ASUS Update Anti-virus software (OEM version) Form factor uATX form factor: 9.6 in...
P8H61-MX R2.0 User's Manual
Page 11
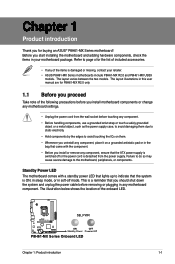
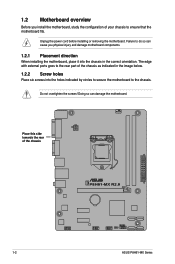
... • Unplug the power cord from the power supply. The layout varies between the two models. P8H61-MX R2.0 SB_PWR ON OFF Standby Power Powered Off P8H61-MX Series Onboard LED Chapter 1: Product introduction 1-1 The layout illustrations in this user manual are for the ... Thank you start installing the motherboard and adding hardware components, check the items in your retailer. • ASUS P8H61-MX Series motherboards include P8H61-MX R2.0 and P8H61-MX USB3 models. This is detached from the wall socket before removing or plugging in any component, ensure that you...
... • Unplug the power cord from the power supply. The layout varies between the two models. P8H61-MX R2.0 SB_PWR ON OFF Standby Power Powered Off P8H61-MX Series Onboard LED Chapter 1: Product introduction 1-1 The layout illustrations in this user manual are for the ... Thank you start installing the motherboard and adding hardware components, check the items in your retailer. • ASUS P8H61-MX Series motherboards include P8H61-MX R2.0 and P8H61-MX USB3 models. This is detached from the wall socket before removing or plugging in any component, ensure that you...
P8H61-MX R2.0 User's Manual
Page 12
.... The edge with external ports goes to the chassis. Failure to ensure that the motherboard fits. Place this side towards the rear of the chassis P8H61-MX R2.0 1-2 ASUS P8H61-MX Series
.... The edge with external ports goes to the chassis. Failure to ensure that the motherboard fits. Place this side towards the rear of the chassis P8H61-MX R2.0 1-2 ASUS P8H61-MX Series
P8H61-MX R2.0 User's Manual
Page 15
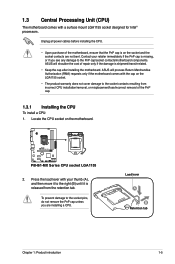
... CPU: 1. Contact your thumb (A), and then move it to the right (B) until it is missing, or if you are not bent. P8H61-MX R2.0 P8H61-MX Series CPU socket LGA1155 2. Unplug all power cables before installing the CPU. • Upon purchase of repair only if the damage is on the... socket and the socket contacts are installing a CPU. ASUS will process Return Merchandise Authorization (RMA) requests only if the motherboard comes with a surface mount LGA1155 socket designed for Intel® processors. ...
... CPU: 1. Contact your thumb (A), and then move it to the right (B) until it is missing, or if you are not bent. P8H61-MX R2.0 P8H61-MX Series CPU socket LGA1155 2. Unplug all power cables before installing the CPU. • Upon purchase of repair only if the damage is on the... socket and the socket contacts are installing a CPU. ASUS will process Return Merchandise Authorization (RMA) requests only if the motherboard comes with a surface mount LGA1155 socket designed for Intel® processors. ...
P8H61-MX R2.0 User's Manual
Page 20
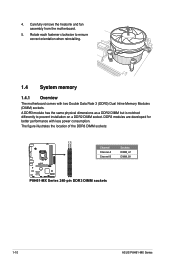
The figure illustrates the location of the DDR3 DIMM sockets: DIMM_A1 DIMM_B1 P8H61-MX R2.0 Channel Channel A Channel B Sockets DIMM_A1 DIMM_B1 P8H61-MX Series 240-pin DDR3 DIMM sockets 1-10 ASUS P8H61-MX Series DDR3 modules are developed for better performance with two Double Data Rate 3 (DDR3) Dual Inline Memory Modules (DIMM) sockets. A DDR3 module has the same ...
The figure illustrates the location of the DDR3 DIMM sockets: DIMM_A1 DIMM_B1 P8H61-MX R2.0 Channel Channel A Channel B Sockets DIMM_A1 DIMM_B1 P8H61-MX Series 240-pin DDR3 DIMM sockets 1-10 ASUS P8H61-MX Series DDR3 modules are developed for better performance with two Double Data Rate 3 (DDR3) Dual Inline Memory Modules (DIMM) sockets. A DDR3 module has the same ...

P8H61-MX R2.0 User's Manual
Page 32
...at http://support.asus. The system may become unstable or may not boot up . • We recommend that complies with more power-consuming devices. Find the proper orientation and push down firmly until the connectors completely fit. EATX12V EATXPWR +12V DC +12V DC P8H61-MX R2.0 GND GND...These connectors are designed to fit these connectors in the BIOS setup to [HD]. See section 2.5.6 Onboard Devices Configuration for details. 1-22 ASUS P8H61-MX Series Otherwise, the system will not boot up if the power is set the item to [AC97]. • We recommend that you connect...
...at http://support.asus. The system may become unstable or may not boot up . • We recommend that complies with more power-consuming devices. Find the proper orientation and push down firmly until the connectors completely fit. EATX12V EATXPWR +12V DC +12V DC P8H61-MX R2.0 GND GND...These connectors are designed to fit these connectors in the BIOS setup to [HD]. See section 2.5.6 Onboard Devices Configuration for details. 1-22 ASUS P8H61-MX Series Otherwise, the system will not boot up if the power is set the item to [AC97]. • We recommend that you connect...
P8H61-MX R2.0 User's Manual
Page 34
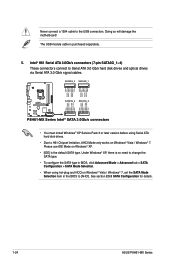
... RSATA_TXN3 GND RSATA_RXN3 RSATA_RXP3 GND GND RSATA_TXP1 RSATA_TXN1 GND RSATA_RXN1 RSATA_RXP1 GND P8H61-MX R2.0 SATA3G_4 SATA3G_2 GND RSATA_RXP4 RSATA_RXN4 GND RSATA_TXN4 RSATA_TXP4 GND GND RSATA_RXP2 RSATA_RXN2 GND RSATA_TXN2 RSATA_TXP2 GND P8H61-MX Series Intel® SATA 3.0Gb/s connectors • You must install...; When using hot-plug and NCQ on Windows® Vista / Windows® 7. See section 2.5.3 SATA Configuration for details. 1-24 ASUS P8H61-MX Series Please use IDE Mode on Windows® XP. • [IDE] is purchased separately. 5. Doing so will damage the motherboard!...
... RSATA_TXN3 GND RSATA_RXN3 RSATA_RXP3 GND GND RSATA_TXP1 RSATA_TXN1 GND RSATA_RXN1 RSATA_RXP1 GND P8H61-MX R2.0 SATA3G_4 SATA3G_2 GND RSATA_RXP4 RSATA_RXN4 GND RSATA_TXN4 RSATA_TXP4 GND GND RSATA_RXP2 RSATA_RXN2 GND RSATA_TXN2 RSATA_TXP2 GND P8H61-MX Series Intel® SATA 3.0Gb/s connectors • You must install...; When using hot-plug and NCQ on Windows® Vista / Windows® 7. See section 2.5.3 SATA Configuration for details. 1-24 ASUS P8H61-MX Series Please use IDE Mode on Windows® XP. • [IDE] is purchased separately. 5. Doing so will damage the motherboard!...

P8H61-MX R2.0 User's Manual
Page 38
...13/12 10:23p 4194304 Exit DATE: 03/14/2012 P8H61-MX-R2-SI-0401.ROM File Info MODEL: Help Info VER: DATE [Enter] Select or Load [Tab] Switch [Up/Down/PageUp/PageDown/Home/End] Move [Esc] Exit 2-2 ASUS P8H61-MX Series The ASUS Update utility is capable of the BIOS setup program. ...Updating from file, then click Next. Locate the BIOS file from the ASUS website at www...
...13/12 10:23p 4194304 Exit DATE: 03/14/2012 P8H61-MX-R2-SI-0401.ROM File Info MODEL: Help Info VER: DATE [Enter] Select or Load [Tab] Switch [Up/Down/PageUp/PageDown/Home/End] Move [Esc] Exit 2-2 ASUS P8H61-MX Series The ASUS Update utility is capable of the BIOS setup program. ...Updating from file, then click Next. Locate the BIOS file from the ASUS website at www...

P8H61-MX R2.0 User's Manual
Page 40
... Are you to confirm BIOS update. Press to switch between screen fields and use the keys to FreeDOS (http://www.freedos.org)! Yes No 2-4 ASUS P8H61-MX Series At the FreeDOS prompt, type d: and press to switch the disk from Drive C (optical drive) to update BIOS? ASUSTek BIOS Updater for... DOS V1.18 Current ROM BOARD: P8H61-MX R2.0 VER: 0401 DATE: 02/16/2012 Update ROM BOARD: Unknown VER: Unknown DATE: Unknown PATH: A:\ A: P8H61-MX-R2-SI-0401 4194304 2012-03-12 17:30:48 Note [Enter] Select or Load [Up/Down/...
... Are you to confirm BIOS update. Press to switch between screen fields and use the keys to FreeDOS (http://www.freedos.org)! Yes No 2-4 ASUS P8H61-MX Series At the FreeDOS prompt, type d: and press to switch the disk from Drive C (optical drive) to update BIOS? ASUSTek BIOS Updater for... DOS V1.18 Current ROM BOARD: P8H61-MX R2.0 VER: 0401 DATE: 02/16/2012 Update ROM BOARD: Unknown VER: Unknown DATE: Unknown PATH: A:\ A: P8H61-MX-R2-SI-0401 4194304 2012-03-12 17:30:48 Note [Enter] Select or Load [Up/Down/...
P8H61-MX R2.0 User's Manual
Page 68
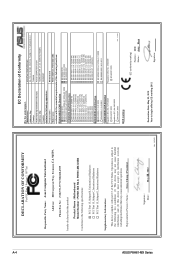
... (2) this device must accept any interference received, including interference that the product Product Name : Motherboard Model Number : P8H61-MX R2.0, P8H61-MX USB3 ʳ Conforms to begin affixing CE marking:2012 Signature Country: TAIWAN Authorized representative in Europe: ASUS COMPUTER GmbH Address, City: HARKORT STR. 21-23, 40880 RATINGEN Country: GERMANY declare the following directives: 2004...
... (2) this device must accept any interference received, including interference that the product Product Name : Motherboard Model Number : P8H61-MX R2.0, P8H61-MX USB3 ʳ Conforms to begin affixing CE marking:2012 Signature Country: TAIWAN Authorized representative in Europe: ASUS COMPUTER GmbH Address, City: HARKORT STR. 21-23, 40880 RATINGEN Country: GERMANY declare the following directives: 2004...


