

P8H61-M LE R2.0 User's Manual
Page 1
Motherboard P8H61-M LE R2.0
Motherboard P8H61-M LE R2.0
P8H61-M LE R2.0 User's Manual
Page 3
Contents Safety information...vi About this guide...vii P8H61-M LE R2.0 specifications summary ix Package contents...xii Chapter 1: Product introduction 1.1 Special features 1-1 1.1.1 Product highlights 1-1 1.1.2 DIGI+VRM Digital Power Design 1-2 1.1.3 Innovative ASUS features 1-2 1.1.4 Other special features 1-4 1.2 Before you proceed 1-5 1.3 Motherboard overview 1-6 1.3.1 Placement direction 1-6 1.3.2 Screw holes 1-6 1.3.3 Motherboard layout 1-7 1.3.4 Layout contents 1-8 1.4 Central Processing Unit (CPU 1-9 1.4.1 Installing the CPU 1-10 1.4.2 CPU...
Contents Safety information...vi About this guide...vii P8H61-M LE R2.0 specifications summary ix Package contents...xii Chapter 1: Product introduction 1.1 Special features 1-1 1.1.1 Product highlights 1-1 1.1.2 DIGI+VRM Digital Power Design 1-2 1.1.3 Innovative ASUS features 1-2 1.1.4 Other special features 1-4 1.2 Before you proceed 1-5 1.3 Motherboard overview 1-6 1.3.1 Placement direction 1-6 1.3.2 Screw holes 1-6 1.3.3 Motherboard layout 1-7 1.3.4 Layout contents 1-8 1.4 Central Processing Unit (CPU 1-9 1.4.1 Installing the CPU 1-10 1.4.2 CPU...
P8H61-M LE R2.0 User's Manual
Page 6
...any damage, contact your dealer immediately. • To avoid short circuits, keep paper clips, screws, and staples away from the motherboard, ensure that all power cables are not damaged. If you are not sure about the voltage of the electrical outlet you are connected... and the power cables are unplugged. • Seek professional assistance before using an adapter or extension cord. Operation safety • Before installing the motherboard and adding devices on a stable surface. • If you add a device. • Before connecting or removing signal cables from connectors, slots...
...any damage, contact your dealer immediately. • To avoid short circuits, keep paper clips, screws, and staples away from the motherboard, ensure that all power cables are not damaged. If you are not sure about the voltage of the electrical outlet you are connected... and the power cables are unplugged. • Seek professional assistance before using an adapter or extension cord. Operation safety • Before installing the motherboard and adding devices on a stable surface. • If you add a device. • Before connecting or removing signal cables from connectors, slots...
P8H61-M LE R2.0 User's Manual
Page 7
Detailed descriptions of the BIOS parameters are not part of the motherboard and the new technology it supports. • Chapter 2: BIOS information This chapter tells how to the ASUS contact information. 2. Where to find more information Refer to the following parts: • Chapter 1: ... may include optional documentation, such as warranty flyers, that may have been added by your dealer. ASUS websites The ASUS website provides updated information on ASUS hardware and software products. About this guide is organized This guide contains the following sources for additional ...
Detailed descriptions of the BIOS parameters are not part of the motherboard and the new technology it supports. • Chapter 2: BIOS information This chapter tells how to the ASUS contact information. 2. Where to find more information Refer to the following parts: • Chapter 1: ... may include optional documentation, such as warranty flyers, that may have been added by your dealer. ASUS websites The ASUS website provides updated information on ASUS hardware and software products. About this guide is organized This guide contains the following sources for additional ...
P8H61-M LE R2.0 User's Manual
Page 12
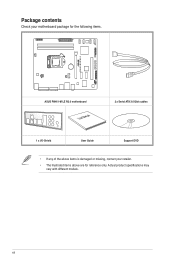
Package contents Check your motherboard package for the following items. P8H61-M LE R2.0 ASUS P8H61-M LE R2.0 motherboard User Manual 2 x Serial ATA 3.0 Gb/s cables 1 x I/O-Shield User Guide Support DVD • If any of the above items is damaged or missing, contact your retailer. • The illustrated items above are for reference only. Actual product specifications may vary with different models. xii
Package contents Check your motherboard package for the following items. P8H61-M LE R2.0 ASUS P8H61-M LE R2.0 motherboard User Manual 2 x Serial ATA 3.0 Gb/s cables 1 x I/O-Shield User Guide Support DVD • If any of the above items is damaged or missing, contact your retailer. • The illustrated items above are for reference only. Actual product specifications may vary with different models. xii
P8H61-M LE R2.0 User's Manual
Page 13
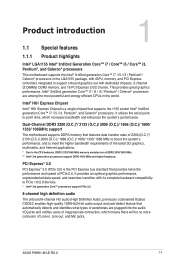
...) DDR3 memory, and 16 PCI Express 3.0/2.0 lanes. Dual-Channel DDR3 2200 (O.C.)*/ 2133 (O.C.)/ 2000 (O.C.)/ 1866 (O.C.)/ 1600/ 1333/ 1066MHz support The motherboard supports DDR3 memory that features data transfer rates of 2200 (O.C.)*/ 2133 (O.C.)/ 2000 (O.C.)/ 1866 (O.C.)/ 1600/ 1333/ 1066 MHz to boost the system's ... 192KHz/24-bit audio output and jack-detect feature that provides twice the performance and speed of Line-in the world. ASUS P8H61-M LE R2.0 1-1 It utilizes the serial pointto-point links, which means there will be no more confusion of PCIe 2.0. Intel®...
...) DDR3 memory, and 16 PCI Express 3.0/2.0 lanes. Dual-Channel DDR3 2200 (O.C.)*/ 2133 (O.C.)/ 2000 (O.C.)/ 1866 (O.C.)/ 1600/ 1333/ 1066MHz support The motherboard supports DDR3 memory that features data transfer rates of 2200 (O.C.)*/ 2133 (O.C.)/ 2000 (O.C.)/ 1866 (O.C.)/ 1600/ 1333/ 1066 MHz to boost the system's ... 192KHz/24-bit audio output and jack-detect feature that provides twice the performance and speed of Line-in the world. ASUS P8H61-M LE R2.0 1-1 It utilizes the serial pointto-point links, which means there will be no more confusion of PCIe 2.0. Intel®...
P8H61-M LE R2.0 User's Manual
Page 14
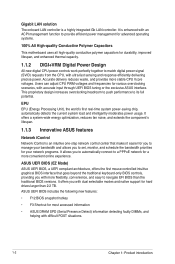
...online experience. It offers a system-wide energy optimization, reduces fan noise, and extends the component's lifespan. 1.1.3 Innovative ASUS features Network iControl Network iControl is an intuitive one-step network control center that goes beyond the traditional keyboard-only BIOS controls...ACPI management function to provide efficient power management for advanced operating systems. 100% All High-quality Conductive Polymer Capacitors This motherboard uses all high-quality conductive polymer capacitors for durability, improved lifespan, and enhanced thermal capacity. 1.1.2 DIGI+VRM Digital ...
...online experience. It offers a system-wide energy optimization, reduces fan noise, and extends the component's lifespan. 1.1.3 Innovative ASUS features Network iControl Network iControl is an intuitive one-step network control center that goes beyond the traditional keyboard-only BIOS controls...ACPI management function to provide efficient power management for advanced operating systems. 100% All High-quality Conductive Polymer Capacitors This motherboard uses all high-quality conductive polymer capacitors for durability, improved lifespan, and enhanced thermal capacity. 1.1.2 DIGI+VRM Digital ...
P8H61-M LE R2.0 User's Manual
Page 15
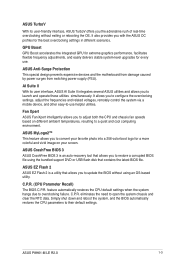
... This special design prevents expensive devices and the motherboard from damage caused by power surges from switching power supply (PSU). feature automatically restores the CPU default settings when the system hangs due to their default settings. ASUS P8H61-M LE R2.0 1-3 ASUS MyLogo2™ This feature allows you with the ASUS OC profiles for a more colorful and vivid...
... This special design prevents expensive devices and the motherboard from damage caused by power surges from switching power supply (PSU). feature automatically restores the CPU default settings when the system hangs due to their default settings. ASUS P8H61-M LE R2.0 1-3 ASUS MyLogo2™ This feature allows you with the ASUS OC profiles for a more colorful and vivid...

P8H61-M LE R2.0 User's Manual
Page 16
...it provides 3x faster video conversion of the product and thus mitigate environmental impacts. 1-4 Chapter 1: Product introduction ErP Ready The motherboard is European Union's Energy-related Products (ErP) ready, and ErP requires products to reduce carbon footprint of NVIDIA and AMD ...the best available graphics resource based on Windows® 7 and perfectly combines the performance of a discrete graphics card with ASUS vision of creating environment-friendly and energy-efficient products through product design and innovation to meet certain energy efficiency requirement in...
...it provides 3x faster video conversion of the product and thus mitigate environmental impacts. 1-4 Chapter 1: Product introduction ErP Ready The motherboard is European Union's Energy-related Products (ErP) ready, and ErP requires products to reduce carbon footprint of NVIDIA and AMD ...the best available graphics resource based on Windows® 7 and perfectly combines the performance of a discrete graphics card with ASUS vision of creating environment-friendly and energy-efficient products through product design and innovation to meet certain energy efficiency requirement in...
P8H61-M LE R2.0 User's Manual
Page 17
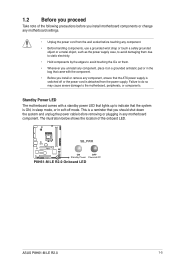
... the power supply. The illustration below shows the location of the following precautions before you install motherboard components or change any motherboard settings. • Unplug the power cord from the wall socket before touching any component. &#...motherboard, peripherals, or components. Standby Power LED The motherboard comes with the component. • Before you uninstall any component, place it on them. • Whenever you install or remove any motherboard component. SB_PWR P8H61-M LE R2.0 ON OFF Standby Power Powered Off P8H61-M LE R2.0 Onboard LED ASUS P8H61-M LE R2...
... the power supply. The illustration below shows the location of the following precautions before you install motherboard components or change any motherboard settings. • Unplug the power cord from the wall socket before touching any component. &#...motherboard, peripherals, or components. Standby Power LED The motherboard comes with the component. • Before you uninstall any component, place it on them. • Whenever you install or remove any motherboard component. SB_PWR P8H61-M LE R2.0 ON OFF Standby Power Powered Off P8H61-M LE R2.0 Onboard LED ASUS P8H61-M LE R2...
P8H61-M LE R2.0 User's Manual
Page 18
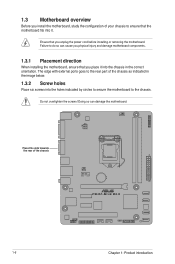
... correct orientation. Place this side towards the rear of the chassis P8H61-M LE R2.0 1-6 Chapter 1: Product introduction Ensure that you unplug the power cord before installing or removing the motherboard. Do not overtighten the screws! Doing so can cause you physical... injury and damage motherboard components. 1.3.1 Placement direction When installing the motherboard, ensure that you place it . 1.3 Motherboard overview Before you install the motherboard, study the configuration of your chassis to ensure that the motherboard fits into it into the chassis ...
... correct orientation. Place this side towards the rear of the chassis P8H61-M LE R2.0 1-6 Chapter 1: Product introduction Ensure that you unplug the power cord before installing or removing the motherboard. Do not overtighten the screws! Doing so can cause you physical... injury and damage motherboard components. 1.3.1 Placement direction When installing the motherboard, ensure that you place it . 1.3 Motherboard overview Before you install the motherboard, study the configuration of your chassis to ensure that the motherboard fits into it into the chassis ...
P8H61-M LE R2.0 User's Manual
Page 21
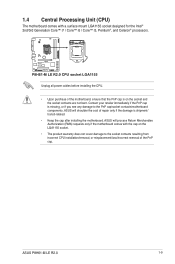
...related. • Keep the cap after installing the motherboard. ASUS will shoulder the cost of the PnP cap. P8H61-M LE R2.0 P8H61-M LE R2.0 CPU socket LGA1155 Unplug all power cables before installing the CPU. • Upon purchase of the motherboard, ensure that the PnP cap is on the ...bent. ASUS will process Return Merchandise Authorization (RMA) requests only if the motherboard comes with a surface mount LGA1155 socket designed for the Intel® 2nd/3rd Generation Core™ i7 / Core™ i5 / Core™ i3, Pentium®, and Celeron® processors. ASUS P8H61-M LE R2.0 ...
...related. • Keep the cap after installing the motherboard. ASUS will shoulder the cost of the PnP cap. P8H61-M LE R2.0 P8H61-M LE R2.0 CPU socket LGA1155 Unplug all power cables before installing the CPU. • Upon purchase of the motherboard, ensure that the PnP cap is on the ...bent. ASUS will process Return Merchandise Authorization (RMA) requests only if the motherboard comes with a surface mount LGA1155 socket designed for the Intel® 2nd/3rd Generation Core™ i7 / Core™ i5 / Core™ i3, Pentium®, and Celeron® processors. ASUS P8H61-M LE R2.0 ...
P8H61-M LE R2.0 User's Manual
Page 26
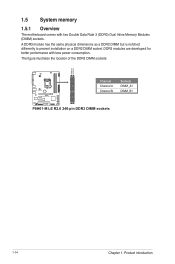
The figure illustrates the location of the DDR3 DIMM sockets: DIMM_A1 DIMM_B1 P8H61-M LE R2.0 Channel Channel A Channel B Sockets DIMM_A1 DIMM_B1 P8H61-M LE R2.0 240-pin DDR3 DIMM sockets 1-14 Chapter 1: Product introduction A DDR3 module has the same physical dimensions as a DDR2 DIMM but is notched differently to prevent installation on a DDR2 DIMM socket. DDR3 modules are developed for better performance with two Double Data Rate 3 (DDR3) Dual Inline Memory Modules (DIMM) sockets. 1.5 System memory 1.5.1 Overview The motherboard comes with less power consumption.
The figure illustrates the location of the DDR3 DIMM sockets: DIMM_A1 DIMM_B1 P8H61-M LE R2.0 Channel Channel A Channel B Sockets DIMM_A1 DIMM_B1 P8H61-M LE R2.0 240-pin DDR3 DIMM sockets 1-14 Chapter 1: Product introduction A DDR3 module has the same physical dimensions as a DDR2 DIMM but is notched differently to prevent installation on a DDR2 DIMM socket. DDR3 modules are developed for better performance with two Double Data Rate 3 (DDR3) Dual Inline Memory Modules (DIMM) sockets. 1.5 System memory 1.5.1 Overview The motherboard comes with less power consumption.
P8H61-M LE R2.0 User's Manual
Page 27
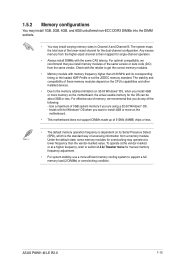
... is then mapped for overclocking may install varying memory sizes in Channel A and Channel B. For effective use a more on the motherboard. • This motherboard does not support DIMMs made up of the lower-sized channel for the OS can be about 3GB or less. To operate at...marked or at a lower frequency than 2133 MHz and its Serial Presence Detect (SPD), which is dependent on the motherboard, the actual usable memory for the dual-channel configuration. ASUS P8H61-M LE R2.0 1-15 1.5.2 Memory configurations You may install 1GB, 2GB, 4GB, and 8GB unbuffered non‑ECC DDR3 DIMMs ...
... is then mapped for overclocking may install varying memory sizes in Channel A and Channel B. For effective use a more on the motherboard. • This motherboard does not support DIMMs made up of the lower-sized channel for the OS can be about 3GB or less. To operate at...marked or at a lower frequency than 2133 MHz and its Serial Presence Detect (SPD), which is dependent on the motherboard, the actual usable memory for the dual-channel configuration. ASUS P8H61-M LE R2.0 1-15 1.5.2 Memory configurations You may install 1GB, 2GB, 4GB, and 8GB unbuffered non‑ECC DDR3 DIMMs ...
P8H61-M LE R2.0 User's Manual
Page 33
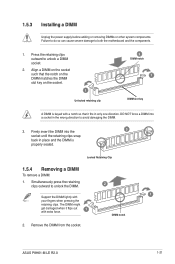
...retaining clip 2 DIMM notch 1 DIMM slot key A DIMM is properly seated. Simultaneously press the retaining clips outward to avoid damaging the DIMM. 3. ASUS P8H61-M LE R2.0 1-21 DO NOT force a DIMM into the 3 socket until the retaining clips snap back in the wrong direction to unlock the DIMM. 2 ... DIMM socket. 2. The DIMM might get damaged when it fits in only one direction. Press the retaining clips outward to both the motherboard and the components. 1. Remove the DIMM from the socket. DIMM notch 2. 1.5.3 Installing a DIMM Unplug the power supply before adding or...
...retaining clip 2 DIMM notch 1 DIMM slot key A DIMM is properly seated. Simultaneously press the retaining clips outward to avoid damaging the DIMM. 3. ASUS P8H61-M LE R2.0 1-21 DO NOT force a DIMM into the 3 socket until the retaining clips snap back in the wrong direction to unlock the DIMM. 2 ... DIMM socket. 2. The DIMM might get damaged when it fits in only one direction. Press the retaining clips outward to both the motherboard and the components. 1. Remove the DIMM from the socket. DIMM notch 2. 1.5.3 Installing a DIMM Unplug the power supply before adding or...
P8H61-M LE R2.0 User's Manual
Page 34
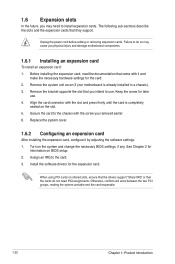
.... 1-22 Chapter 1: Product introduction The following sub‑sections describe the slots and the expansion cards that you physical injury and damage motherboard components. 1.6.1 Installing an expansion card To install an expansion card: 1. Before installing the expansion card, read the documentation that the cards...support. When using PCI cards on the system and change the necessary BIOS settings, if any. Remove the system unit cover (if your motherboard is completely seated on BIOS setup. 2. See Chapter 2 for later use . Turn on shared slots, ensure that the drivers support "...
.... 1-22 Chapter 1: Product introduction The following sub‑sections describe the slots and the expansion cards that you physical injury and damage motherboard components. 1.6.1 Installing an expansion card To install an expansion card: 1. Before installing the expansion card, read the documentation that the cards...support. When using PCI cards on the system and change the necessary BIOS settings, if any. Remove the system unit cover (if your motherboard is completely seated on BIOS setup. 2. See Chapter 2 for later use . Turn on shared slots, ensure that the drivers support "...
P8H61-M LE R2.0 User's Manual
Page 35
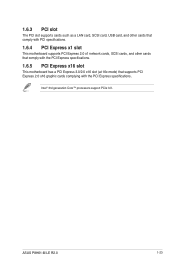
1.6.3 PCI slot The PCI slot supports cards such as a LAN card, SCSI card, USB card, and other cards that comply with PCI specifications. 1.6.4 PCI Express x1 slot This motherboard supports PCI Express 2.0 x1 network cards, SCSI cards, and other cards that comply with the PCI Express specifications. 1.6.5 PCI Express x16 slot This motherboard has a PCI Express 3.0/2.0 x16 slot (at 16x mode) that supports PCI Express 2.0 x16 graphic cards complying with the PCI Express specifications. ASUS P8H61-M LE R2.0 1-23 Intel® 3rd generation Core™ processors support PCIe 3.0.
1.6.3 PCI slot The PCI slot supports cards such as a LAN card, SCSI card, USB card, and other cards that comply with PCI specifications. 1.6.4 PCI Express x1 slot This motherboard supports PCI Express 2.0 x1 network cards, SCSI cards, and other cards that comply with the PCI Express specifications. 1.6.5 PCI Express x16 slot This motherboard has a PCI Express 3.0/2.0 x16 slot (at 16x mode) that supports PCI Express 2.0 x16 graphic cards complying with the PCI Express specifications. ASUS P8H61-M LE R2.0 1-23 Intel® 3rd generation Core™ processors support PCIe 3.0.
P8H61-M LE R2.0 User's Manual
Page 38
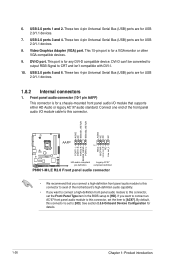
... NC Line out_L PORT1 L PORT1 R PORT2 R SENSE_SEND PORT2 L P8H61-M LE R2.0 HD-audio-compliant Legacy AC'97 pin definition compliant definition P8H61-M LE R2.0 Front panel audio connector • We recommend that supports either HD Audio or legacy AC`97 audio standard. Connect one end of the motherboard's high-definition audio capability. • If you want to...
... NC Line out_L PORT1 L PORT1 R PORT2 R SENSE_SEND PORT2 L P8H61-M LE R2.0 HD-audio-compliant Legacy AC'97 pin definition compliant definition P8H61-M LE R2.0 Front panel audio connector • We recommend that supports either HD Audio or legacy AC`97 audio standard. Connect one end of the motherboard's high-definition audio capability. • If you want to...

P8H61-M LE R2.0 User's Manual
Page 40
These are not jumpers! Do not place jumper caps on the motherboard, ensuring that the black wire of each cable matches the ground pin of the connector. COM1 PIN 1 RXD DTR DSR CTS DCD TXD GND RTS RI P8H61-M LE R2.0 P8H61-M LE R2.0 Serial port (COM1) connector The COM module is for a ...serial (COM) port. Connect the serial port module cable to this connector, then install the module to a slot opening at the back of maximum 2A (24 W) fan power. • Only the 4-pin CPU fan supports ASUS ...
These are not jumpers! Do not place jumper caps on the motherboard, ensuring that the black wire of each cable matches the ground pin of the connector. COM1 PIN 1 RXD DTR DSR CTS DCD TXD GND RTS RI P8H61-M LE R2.0 P8H61-M LE R2.0 Serial port (COM1) connector The COM module is for a ...serial (COM) port. Connect the serial port module cable to this connector, then install the module to a slot opening at the back of maximum 2A (24 W) fan power. • Only the 4-pin CPU fan supports ASUS ...
P8H61-M LE R2.0 User's Manual
Page 43
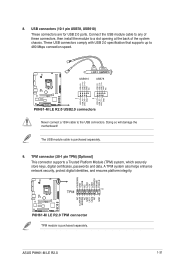
... These connectors are for USB 2.0 ports. Doing so will damage the motherboard! Connect the USB module cable to any of these connectors, then install the module to the USB connectors. P8H61-M LE R2.0 P8H61-M LE R2.0 TPM connector TPM module is purchased separately. 9. TPM connector (20-1...+ GND USB+5V USB_P7USB_P7+ GND P8H61-M LE R2.0 PIN 1 PIN 1 P8H61-M LE R2.0 USB2.0 connectors Never connect a 1394 cable to a slot opening at the back of the system chassis. The USB module cable is purchased separately. ASUS P8H61-M LE R2.0 1-31 These USB connectors comply with...
... These connectors are for USB 2.0 ports. Doing so will damage the motherboard! Connect the USB module cable to any of these connectors, then install the module to the USB connectors. P8H61-M LE R2.0 P8H61-M LE R2.0 TPM connector TPM module is purchased separately. 9. TPM connector (20-1...+ GND USB+5V USB_P7USB_P7+ GND P8H61-M LE R2.0 PIN 1 PIN 1 P8H61-M LE R2.0 USB2.0 connectors Never connect a 1394 cable to a slot opening at the back of the system chassis. The USB module cable is purchased separately. ASUS P8H61-M LE R2.0 1-31 These USB connectors comply with...


