P8H61-I R2.0 User's Manual
Page 3
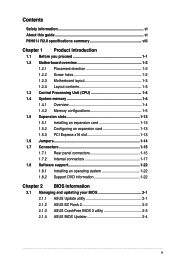
Contents Safety information vi About this guide vi P8H61-I R2.0 specifications summary viii Chapter 1 Product introduction 1.1 Before you proceed 1-1 1.2 Motherboard overview 1-2 1.2.1 Placement direction 1-2 1.2.2 Screw holes 1-2 1.2.3 Motherboard layout 1-3 1.2.4 Layout contents 1-3 1.3 Central Processing Unit (CPU 1-4 1.4 System memory 1-4 1.4.1 Overview 1-4 1.4.2 Memory ...22 Chapter 2 BIOS information 2.1 Managing and updating your BIOS 2-1 2.1.1 ASUS Update utility 2-1 2.1.2 ASUS EZ Flash 2 2-2 2.1.3 ASUS CrashFree BIOS 3 utility 2-3 2.1.4 ASUS BIOS Updater 2-4 iii
Contents Safety information vi About this guide vi P8H61-I R2.0 specifications summary viii Chapter 1 Product introduction 1.1 Before you proceed 1-1 1.2 Motherboard overview 1-2 1.2.1 Placement direction 1-2 1.2.2 Screw holes 1-2 1.2.3 Motherboard layout 1-3 1.2.4 Layout contents 1-3 1.3 Central Processing Unit (CPU 1-4 1.4 System memory 1-4 1.4.1 Overview 1-4 1.4.2 Memory ...22 Chapter 2 BIOS information 2.1 Managing and updating your BIOS 2-1 2.1.1 ASUS Update utility 2-1 2.1.2 ASUS EZ Flash 2 2-2 2.1.3 ASUS CrashFree BIOS 3 utility 2-3 2.1.4 ASUS BIOS Updater 2-4 iii

P8H61-I R2.0 User's Manual
Page 8
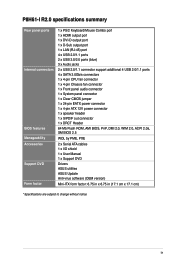
P8H61-I R2.0 specifications summary CPU Chipset Memory Expansion slots Graphics Storage LAN Audio USB LGA1155 socket for Intel® 3nd / 2nd Generation Core™ i7 / Core™ i5 / Core™ i3 / Pentium® / Celeron® processors Supports 22/32nm CPU Supports Intel® Turbo Boost technology 2.0 * The ... total memory of 4GB capacity or more, Windows® 32-bit operating system may only recognize less than 3GB. resolution up to www.asus.com for the latest Memory QVL (Qualified Vendors List). 1 x PCI Express 3.0*/2.0 x16 slot *PCIe 3.0 speed is supported by Intel®...
P8H61-I R2.0 specifications summary CPU Chipset Memory Expansion slots Graphics Storage LAN Audio USB LGA1155 socket for Intel® 3nd / 2nd Generation Core™ i7 / Core™ i5 / Core™ i3 / Pentium® / Celeron® processors Supports 22/32nm CPU Supports Intel® Turbo Boost technology 2.0 * The ... total memory of 4GB capacity or more, Windows® 32-bit operating system may only recognize less than 3GB. resolution up to www.asus.com for the latest Memory QVL (Qualified Vendors List). 1 x PCI Express 3.0*/2.0 x16 slot *PCIe 3.0 speed is supported by Intel®...
P8H61-I R2.0 User's Manual
Page 9
...P8H61-I R2.0 specifications summary Rear panel ports Internal connectors BIOS features Manageability Accessories Support DVD Form factor 1 x PS/2 Keyboard/Mouse Combo port 1 x HDMI output port 1 x DVI-D output port 1 x D-Sub output port 1 x LAN (RJ-45) port 4 x USB 2.0/1.1 ports 2 x USB 3.0/2.0 ports (blue) 3 x Audio jacks 2 x USB 2.0/1.1 connector support additional 4 USB 2.0/1.1 ports 4 x SATA 3.0Gb/s connectors 1 x 4-pin CPU...Serial ATA cables 1 x I/O shield 1 x User Manual 1 x Support DVD Drivers ASUS utilities ASUS Update Anti-virus software (OEM version) Mini-ITX form factor: 6.75 in x ...
...P8H61-I R2.0 specifications summary Rear panel ports Internal connectors BIOS features Manageability Accessories Support DVD Form factor 1 x PS/2 Keyboard/Mouse Combo port 1 x HDMI output port 1 x DVI-D output port 1 x D-Sub output port 1 x LAN (RJ-45) port 4 x USB 2.0/1.1 ports 2 x USB 3.0/2.0 ports (blue) 3 x Audio jacks 2 x USB 2.0/1.1 connector support additional 4 USB 2.0/1.1 ports 4 x SATA 3.0Gb/s connectors 1 x 4-pin CPU...Serial ATA cables 1 x I/O shield 1 x User Manual 1 x Support DVD Drivers ASUS utilities ASUS Update Anti-virus software (OEM version) Mini-ITX form factor: 6.75 in x ...
P8H61-I R2.0 User's Manual
Page 13
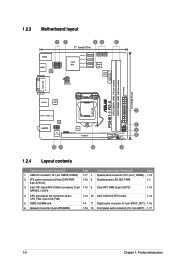
... (64bit, 240-pin module) DVI_VGA USB12 ASM 1042 LGA1155 LAN1_USB3_12 AUDIO RTL 8111F AAFP VIA VT1708S EPU SPDIF_OUT PCIEX16 12 11 10 P8H61-I R2.0 2 SPEAKER F_PANEL 6 7 SB_PWR DRCT 8 CLRTC 9 1.2.4 Layout contents Connectors/Jumpers/Slots/LED Page Connectors/Jumpers/Slots/LED Page...audio connector (4-1 pin SPDIF_OUT) 1-16 1-16 12. ATX power connectors (24-pin EATXPWR, 1-13 8. CPU and chassis fan connectors (4-pin CPU_FAN, 4-pin CHA_FAN) 5. Intel® LGA1155 CPU socket 1-13 1-4 11. Front panel audio connector (10-1 pin AAFP) 1-17 1-3 Chapter 1: Product ...
... (64bit, 240-pin module) DVI_VGA USB12 ASM 1042 LGA1155 LAN1_USB3_12 AUDIO RTL 8111F AAFP VIA VT1708S EPU SPDIF_OUT PCIEX16 12 11 10 P8H61-I R2.0 2 SPEAKER F_PANEL 6 7 SB_PWR DRCT 8 CLRTC 9 1.2.4 Layout contents Connectors/Jumpers/Slots/LED Page Connectors/Jumpers/Slots/LED Page...audio connector (4-1 pin SPDIF_OUT) 1-16 1-16 12. ATX power connectors (24-pin EATXPWR, 1-13 8. CPU and chassis fan connectors (4-pin CPU_FAN, 4-pin CHA_FAN) 5. Intel® LGA1155 CPU socket 1-13 1-4 11. Front panel audio connector (10-1 pin AAFP) 1-17 1-3 Chapter 1: Product ...
P8H61-I R2.0 User's Manual
Page 14
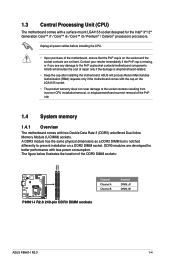
... LGA1155 socket. • The product warranty does not cover damage to the PnP cap/socket contacts/motherboard components. ASUS will shoulder the cost of the PnP cap. 1.4 System memory 1.4.1 Overview The motherboard comes with less power consumption...processors. Unplug all power cables before installing the CPU. • Upon purchase of the DDR3 DIMM sockets: DIMMA1 DIMMB1 Channel Channel A Channel B Sockets DIMM_A1 DIMM_B1 P8H61-I R2.0 P8H61-I R2.0 240-pin DDR3 DIMM sockets ASUS P8H61-I R2.0 1-4 1.3 Central Processing Unit (CPU) The motherboard comes with a surface mount LGA1155...
... LGA1155 socket. • The product warranty does not cover damage to the PnP cap/socket contacts/motherboard components. ASUS will shoulder the cost of the PnP cap. 1.4 System memory 1.4.1 Overview The motherboard comes with less power consumption...processors. Unplug all power cables before installing the CPU. • Upon purchase of the DDR3 DIMM sockets: DIMMA1 DIMMB1 Channel Channel A Channel B Sockets DIMM_A1 DIMM_B1 P8H61-I R2.0 P8H61-I R2.0 240-pin DDR3 DIMM sockets ASUS P8H61-I R2.0 1-4 1.3 Central Processing Unit (CPU) The motherboard comes with a surface mount LGA1155...

P8H61-I R2.0 User's Manual
Page 15
... is then mapped for overclocking may install varying memory sizes in Channel A and Channel B. The stability and compatibility of these memory modules depend on the CPU's capabilities and other installed devices. • The default memory operation frequency is dependent on the motherboard. • This motherboard does not support DIMMs that use...
... is then mapped for overclocking may install varying memory sizes in Channel A and Channel B. The stability and compatibility of these memory modules depend on the CPU's capabilities and other installed devices. • The default memory operation frequency is dependent on the motherboard. • This motherboard does not support DIMMs that use...
P8H61-I R2.0 User's Manual
Page 24
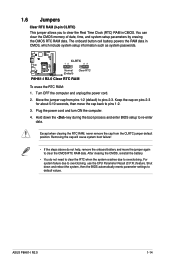
... clearing the CMOS, reinstall the battery. • You do not help, remove the onboard battery and move the cap back to overclocking, use the CPU Parameter Recall (C.P.R.) feature. Turn OFF the computer and unplug the power cord. 2. Move the jumper cap from the CLRTC jumper default position. Removing the... steps above do not need to clear the RTC when the system crashes due to pins 2-3. Plug the power cord and turn ON the computer. 4. ASUS P8H61-I R2.0 Clear RTC RAM To erase the RTC RAM: 1. For system failure due to pins 1-2. 3. You can clear the CMOS memory of date, time,...
... clearing the CMOS, reinstall the battery. • You do not help, remove the onboard battery and move the cap back to overclocking, use the CPU Parameter Recall (C.P.R.) feature. Turn OFF the computer and unplug the power cord. 2. Move the jumper cap from the CLRTC jumper default position. Removing the... steps above do not need to clear the RTC when the system crashes due to pins 2-3. Plug the power cord and turn ON the computer. 4. ASUS P8H61-I R2.0 Clear RTC RAM To erase the RTC RAM: 1. For system failure due to pins 1-2. 3. You can clear the CMOS memory of date, time,...
P8H61-I R2.0 User's Manual
Page 28
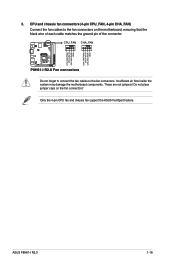
ASUS P8H61-I R2.0 CPU FAN PWM CPU FAN IN CPU FAN PWR GND CHA FAN PWM CPU FAN IN CHA FAN PWR GND 3. These are not jumpers! Do not place jumper caps on the motherboard, ensuring that the black wire of each ...cable matches the ground pin of the connector. Insufficient air flow inside the system may damage the motherboard components. Only the 4-pin CPU fan and chassis fan support the ASUS FanXpert feature. CPU_FAN CHA_FAN P8H61-I R2.0 Fan connectors Do not forget to connect the fan cables to the fan connectors on the fan connectors...
ASUS P8H61-I R2.0 CPU FAN PWM CPU FAN IN CPU FAN PWR GND CHA FAN PWM CPU FAN IN CHA FAN PWR GND 3. These are not jumpers! Do not place jumper caps on the motherboard, ensuring that the black wire of each ...cable matches the ground pin of the connector. Insufficient air flow inside the system may damage the motherboard components. Only the 4-pin CPU fan and chassis fan support the ASUS FanXpert feature. CPU_FAN CHA_FAN P8H61-I R2.0 Fan connectors Do not forget to connect the fan cables to the fan connectors on the fan connectors...
P8H61-I R2.0 User's Manual
Page 39
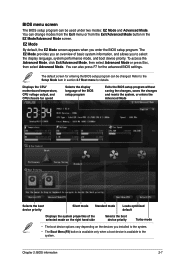
... Mode, then select Advanced Mode or press Esc, then select Advanced Mode. The default screen for the advanced BIOS settings. Displays the CPU/ motherboard temperature, CPU voltage output, and CPU/chassis fan speed Selects the display language of the BIOS setup program Exits the BIOS setup program without saving the changes, saves the...
... Mode, then select Advanced Mode or press Esc, then select Advanced Mode. The default screen for the advanced BIOS settings. Displays the CPU/ motherboard temperature, CPU voltage output, and CPU/chassis fan speed Selects the display language of the BIOS setup program Exits the BIOS setup program without saving the changes, saves the...
P8H61-I R2.0 User's Manual
Page 44
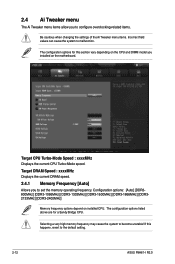
... options: [Auto] [DDR3800MHz] [DDR3-1066MHz] [DDR3-1333MHz] [DDR3-1600MHz] [DDR3-1866MHz] [DDR32133MHz] [DDR3-2400MHz] Memory frequency options depend on the CPU and DIMM model you to the default setting. 2-12 ASUS P8H61-I R2.0 Selecting a very high memory frequency may cause the system to malfunction. Target DRAM Speed : xxxxMHz Displays the current DRAM speed. 2.4.1 Memory...
... options: [Auto] [DDR3800MHz] [DDR3-1066MHz] [DDR3-1333MHz] [DDR3-1600MHz] [DDR3-1866MHz] [DDR32133MHz] [DDR3-2400MHz] Memory frequency options depend on the CPU and DIMM model you to the default setting. 2-12 ASUS P8H61-I R2.0 Selecting a very high memory frequency may cause the system to malfunction. Target DRAM Speed : xxxxMHz Displays the current DRAM speed. 2.4.1 Memory...
P8H61-I R2.0 User's Manual
Page 45
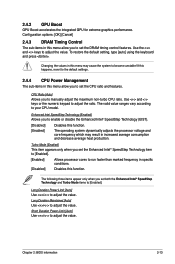
...Boost GPU Boost accelerates the integrated GPU for extreme graphics performance. Short Duration Power Limit [Auto] Use / to manually adjust the maximum non-turbo CPU ratio. To restore the default setting, type [auto] using the keyboard and press . Changing the values in this menu may result in this... [Auto] Allows you to set both the Enhanced Intel® SpeedStep Technology and Turbo Mode items to the default settings. 2.4.4 CPU Power Management The sub-items in specific conditions. [Disabled] Disables this function. Use the and keys to adjust the value. Long Duration...
...Boost GPU Boost accelerates the integrated GPU for extreme graphics performance. Short Duration Power Limit [Auto] Use / to manually adjust the maximum non-turbo CPU ratio. To restore the default setting, type [auto] using the keyboard and press . Changing the values in this menu may result in this... [Auto] Allows you to set both the Enhanced Intel® SpeedStep Technology and Turbo Mode items to the default settings. 2.4.4 CPU Power Management The sub-items in specific conditions. [Disabled] Disables this function. Use the and keys to adjust the value. Long Duration...
P8H61-I R2.0 User's Manual
Page 46
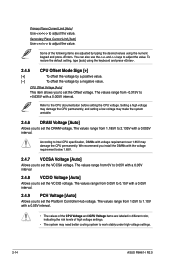
...] Allows you to 1.10V with a 0.005V interval. Refer to adjust the value. Setting a high voltage may damage the CPU permanently, and setting a low voltage may damage the CPU permanently. The values range from 1.05V to set the DRAM voltage. The values range from 1.185V to 2.135V with a ...You can also use the and keys to adjust the value. The values range from 0.05V to work stably under high voltage settings. 2-14 ASUS P8H61-I R2.0 The values range from -0.315V to +0.635V with a 0.05V interval. 2.4.9 PCH Voltage [Auto] Allows you to set the VCCIO voltage. ...
...] Allows you to 1.10V with a 0.005V interval. Refer to adjust the value. Setting a high voltage may damage the CPU permanently, and setting a low voltage may damage the CPU permanently. The values range from 1.05V to set the DRAM voltage. The values range from 1.185V to 2.135V with a ...You can also use the and keys to adjust the value. The values range from 0.05V to work stably under high voltage settings. 2-14 ASUS P8H61-I R2.0 The values range from -0.315V to +0.635V with a 0.05V interval. 2.4.9 PCH Voltage [Auto] Allows you to set the VCCIO voltage. ...

P8H61-I R2.0 User's Manual
Page 47
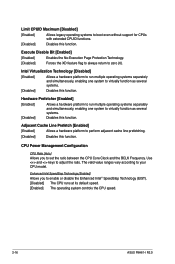
.... Incorrect field values can cause the system to the CPU you to change the settings for the CPU and other system devices. The items shown in submenu may be different due to malfunction. 2.5.1 CPU Configuration The items in each processor package. Be cautious ...when changing the settings of CPU cores to cool down. [Disabled] Disables the CPU thermal monitor function. Configuration options: [All] [1] [2] [3] Chapter 2: BIOS information...
.... Incorrect field values can cause the system to the CPU you to change the settings for the CPU and other system devices. The items shown in submenu may be different due to malfunction. 2.5.1 CPU Configuration The items in each processor package. Be cautious ...when changing the settings of CPU cores to cool down. [Disabled] Disables the CPU thermal monitor function. Configuration options: [All] [1] [2] [3] Chapter 2: BIOS information...
P8H61-I R2.0 User's Manual
Page 48
...to enable or disable the Enhanced Intel® SpeedStep Technology (EIST). [Disabled] The CPU runs at its default speed. [Enabled] The operating system controls the CPU speed. 2-16 ASUS P8H61-I R2.0 Enhanced Intel SpeedStep Technology [Enabled] Allows you to zero (0). Use and keys to ...your CPU model. The valid value ranges vary according to adjust the ratio. Execute Disable Bit [...
...to enable or disable the Enhanced Intel® SpeedStep Technology (EIST). [Disabled] The CPU runs at its default speed. [Enabled] The operating system controls the CPU speed. 2-16 ASUS P8H61-I R2.0 Enhanced Intel SpeedStep Technology [Enabled] Allows you to zero (0). Use and keys to ...your CPU model. The valid value ranges vary according to adjust the ratio. Execute Disable Bit [...

P8H61-I R2.0 User's Manual
Page 49
...] Entry After [10 Minutes] This item appears only when you set the Entry on S3 RTC Wake [Enabled] Allows you to disable or enable the CPU C3 report to OS. Configuration options: [Immediately] [1 minute] [2 minute] [5 minute] [10 minute] [15 minute] [30 minute] [1 hour] [2 hours] Active Page ...options: [Enabled] [Disabled] The following three items appear only when you to change the southbridge chipset settings. CPU C6 Report [Auto] Allows you to disable or enable the CPU C6 report to OS. 2.5.2 PCH Configuration The South Bridge menu allows you set the Intel(R) Rapid Start Technology...
...] Entry After [10 Minutes] This item appears only when you set the Entry on S3 RTC Wake [Enabled] Allows you to disable or enable the CPU C3 report to OS. Configuration options: [Immediately] [1 minute] [2 minute] [5 minute] [10 minute] [15 minute] [30 minute] [1 hour] [2 hours] Active Page ...options: [Enabled] [Disabled] The following three items appear only when you to change the southbridge chipset settings. CPU C6 Report [Auto] Allows you to disable or enable the CPU C6 report to OS. 2.5.2 PCH Configuration The South Bridge menu allows you set the Intel(R) Rapid Start Technology...

P8H61-I R2.0 User's Manual
Page 55
...23 Scroll down to the motherboard, the field shows N/A. If the fan is not connected to display the following items: 2.6.1 CPU Temperature / MB Temperature �[x�x�x��º�C�/x�x�x��º�F�] The onboard hardware... monitor automatically detects and displays the CPU and motherboard temperatures. Select Ignore if you do not wish to change the fan settings. 2.6 Monitor menu The ...
...23 Scroll down to the motherboard, the field shows N/A. If the fan is not connected to display the following items: 2.6.1 CPU Temperature / MB Temperature �[x�x�x��º�C�/x�x�x��º�F�] The onboard hardware... monitor automatically detects and displays the CPU and motherboard temperatures. Select Ignore if you do not wish to change the fan settings. 2.6 Monitor menu The ...
P8H61-I R2.0 User's Manual
Page 56
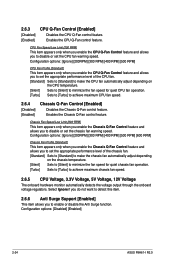
.... 2.6.4 [Disabled] [Enabled] Chassis Q-Fan Control [Enabled] Disables the Chassis Q-Fan control feature. Enables the CPU Q-Fan control feature. Configuration options: [Disabled] [Enabled] 2-24 ASUS P8H61-I R2.0 CPU Fan Speed Low Limit [200 RPM] This item appears only when you enable the CPU Q-Fan Control feature and allows you to disable or set the appropriate performance level...
.... 2.6.4 [Disabled] [Enabled] Chassis Q-Fan Control [Enabled] Disables the Chassis Q-Fan control feature. Enables the CPU Q-Fan control feature. Configuration options: [Disabled] [Enabled] 2-24 ASUS P8H61-I R2.0 CPU Fan Speed Low Limit [200 RPM] This item appears only when you enable the CPU Q-Fan Control feature and allows you to disable or set the appropriate performance level...

P8H61-I R2.0 User's Manual
Page 60
... one of the parameters on a system with the same memory/ CPU configuration and matching BIOS version. 2.9 Exit menu The Exit menu items allow you to load the optimal default values for each of the available filesystem devices. 2-28 ASUS P8H61-I R2.0 Load Optimized Defaults This option allows you to load the default values...; select this option or if you to save changes and exit. When you select this option or if you press , a confirmation window appears. ASUS EZ Mode This option allows you press , a confirmation window appears. Select Yes to enter the EZ Mode screen.
... one of the parameters on a system with the same memory/ CPU configuration and matching BIOS version. 2.9 Exit menu The Exit menu items allow you to load the optimal default values for each of the available filesystem devices. 2-28 ASUS P8H61-I R2.0 Load Optimized Defaults This option allows you to load the default values...; select this option or if you to save changes and exit. When you select this option or if you press , a confirmation window appears. ASUS EZ Mode This option allows you press , a confirmation window appears. Select Yes to enter the EZ Mode screen.


