User Guide
Page 3
Contents Notices...vii Safety information viii About this guide ix P8B-M specifications summary xi Chapter 1: Product introduction 1.1 Welcome 1-3 1.2 Package contents 1-3 1.3 Serial number label 1-4 1.4 Special features 1-4 1.4.1 Product highlights 1-4 1.4.2 Innovative ASUS features 1-6 Chapter 2: Hardware information 2.1 Before you proceed 2-3 ... the CPU heatsink and fan 2-13 2.3.4 Installing the CPU heatsink in rack 2-14 2.4 System memory 2-15 2.4.1 Overview 2-15 2.4.2 Memory Configurations 2-15 2.4.3 Installing a DIMM 2-16 2.4.4 Removing a DIMM 2-16 2.5 Expansion slots 2-...
Contents Notices...vii Safety information viii About this guide ix P8B-M specifications summary xi Chapter 1: Product introduction 1.1 Welcome 1-3 1.2 Package contents 1-3 1.3 Serial number label 1-4 1.4 Special features 1-4 1.4.1 Product highlights 1-4 1.4.2 Innovative ASUS features 1-6 Chapter 2: Hardware information 2.1 Before you proceed 2-3 ... the CPU heatsink and fan 2-13 2.3.4 Installing the CPU heatsink in rack 2-14 2.4 System memory 2-15 2.4.1 Overview 2-15 2.4.2 Memory Configurations 2-15 2.4.3 Installing a DIMM 2-16 2.4.4 Removing a DIMM 2-16 2.5 Expansion slots 2-...
User Guide
Page 11
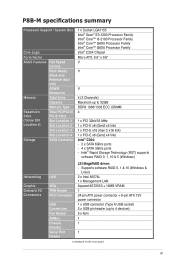
P8B-M specifications summary Processor Support / System Bus Core Logic Form Factor ASUS Features Fan Speed Control Rack Ready (Rack and Pedestal dual use) ASWM Enterprise Memory Total Slots Capacity Memory Type Expansion Total PCI/PCI-X/ Slots PCI-E Slots (follow SSI Location #) Slot Location 1 Slot Location 2 Slot Location 3 Slot Location 4 Storage SATA Controller 1 x Socket LGA1155 Intel...
P8B-M specifications summary Processor Support / System Bus Core Logic Form Factor ASUS Features Fan Speed Control Rack Ready (Rack and Pedestal dual use) ASWM Enterprise Memory Total Slots Capacity Memory Type Expansion Total PCI/PCI-X/ Slots PCI-E Slots (follow SSI Location #) Slot Location 1 Slot Location 2 Slot Location 3 Slot Location 4 Storage SATA Controller 1 x Socket LGA1155 Intel...

User Guide
Page 16
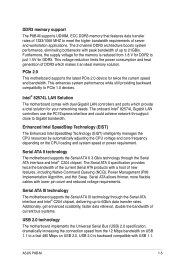
...174; EM64T The motherboard supports Intel® processors with the Intel® EM64T (Extended Memory 64 Technology). The Intel® EM64T feature allows your computer to your problems. P8B-M xxS2xxxxxxxx Made in China 合格 1.4 Special features 1.4.1 Product highlights Latest processor ... automatically allows the processor to support 2-channel (4 DIMMs) DDR3 memory and 20 PCI Express 2.0 lanes, providing great graphics performance. 1.3 Serial number label Before requesting support from the ASUS Technical Support team, you must take note of the motherboard's serial...
...174; EM64T The motherboard supports Intel® processors with the Intel® EM64T (Extended Memory 64 Technology). The Intel® EM64T feature allows your computer to your problems. P8B-M xxS2xxxxxxxx Made in China 合格 1.4 Special features 1.4.1 Product highlights Latest processor ... automatically allows the processor to support 2-channel (4 DIMMs) DDR3 memory and 20 PCI Express 2.0 lanes, providing great graphics performance. 1.3 Serial number label Before requesting support from the ASUS Technical Support team, you must take note of the motherboard's serial...
User Guide
Page 17
...2.0. Serial ATA III technology The motherboard supports the Serial ATA III technology through the Serial ATA interface and Intel® C204 chipset. ASUS P8B-M 1-5 PCIe 2.0 This motherboard supports the latest PCIe 2.0 device for DDR3. Additionally, get enhanced scalability, faster data retrieval, double the... allows thinner, more flexible cables with dual Gigabit LAN controllers and ports which makes it an ideal memory solution. Furthermore, the supply voltage for the memory is backward compatible with peak bandwidth of up to just 1.5V for twice the current speed and ...
...2.0. Serial ATA III technology The motherboard supports the Serial ATA III technology through the Serial ATA interface and Intel® C204 chipset. ASUS P8B-M 1-5 PCIe 2.0 This motherboard supports the latest PCIe 2.0 device for DDR3. Additionally, get enhanced scalability, faster data retrieval, double the... allows thinner, more flexible cables with dual Gigabit LAN controllers and ports which makes it an ideal memory solution. Furthermore, the supply voltage for the memory is backward compatible with peak bandwidth of up to just 1.5V for twice the current speed and ...

User Guide
Page 20
Chapter summary 2 2.1 Before you proceed 2-3 2.2 Motherboard overview 2-5 2.3 Central Processing Unit (CPU 2-9 2.4 System memory 2-15 2.5 Expansion slots 2-17 2.6 Jumpers 2-21 2.7 Connectors 2-27 ASUS P8B-M
Chapter summary 2 2.1 Before you proceed 2-3 2.2 Motherboard overview 2-5 2.3 Central Processing Unit (CPU 2-9 2.4 System memory 2-15 2.5 Expansion slots 2-17 2.6 Jumpers 2-21 2.7 Connectors 2-27 ASUS P8B-M

User Guide
Page 33
The figure illustrates the location of the DDR3 DIMM sockets: 2.4.2 Memory Configurations You may install 1GB, 2GB, 4GB and 8GB Unbuffered with less power consumption. For optimum compatibility, it is notched differently to prevent installation on.../1333 Single Rank, Dual Rank 2 2 Unbuffered DDR3 ECC 1066/1333 Single Rank, Dual Rank • Start installing the DIMMs from the same vendor. ASUS P8B-M 2-15 2.4 System memory 2.4.1 Overview The motherboard comes with the same CAS latency. A DDR3 module has the same physical dimensions as a DDR2 DIMM but is recommended that you...
The figure illustrates the location of the DDR3 DIMM sockets: 2.4.2 Memory Configurations You may install 1GB, 2GB, 4GB and 8GB Unbuffered with less power consumption. For optimum compatibility, it is notched differently to prevent installation on.../1333 Single Rank, Dual Rank 2 2 Unbuffered DDR3 ECC 1066/1333 Single Rank, Dual Rank • Start installing the DIMMs from the same vendor. ASUS P8B-M 2-15 2.4 System memory 2.4.1 Overview The motherboard comes with the same CAS latency. A DDR3 module has the same physical dimensions as a DDR2 DIMM but is recommended that you...
User Guide
Page 39
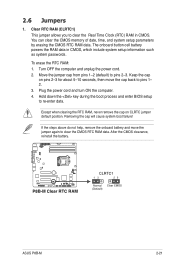
... default position. After the CMOS clearance, reinstall the battery. To erase the RTC RAM: 1. Move the jumper cap from pins 1-2 (default) to re-enter data. ASUS P8B-M 2-21 If the steps above do not help, remove the onboard battery and move the cap back to pins 1- 2. 3. Removing the cap will cause system... boot failure! Clear RTC RAM (CLRTC1) This jumper allows you to clear the CMOS RTC RAM data. You can clear the CMOS memory of date, time, and system setup parameters by erasing the CMOS RTC RAM data. Except when clearing the RTC RAM, never remove the cap on...
... default position. After the CMOS clearance, reinstall the battery. To erase the RTC RAM: 1. Move the jumper cap from pins 1-2 (default) to re-enter data. ASUS P8B-M 2-21 If the steps above do not help, remove the onboard battery and move the cap back to pins 1- 2. 3. Removing the cap will cause system... boot failure! Clear RTC RAM (CLRTC1) This jumper allows you to clear the CMOS RTC RAM data. You can clear the CMOS memory of date, time, and system setup parameters by erasing the CMOS RTC RAM data. Except when clearing the RTC RAM, never remove the cap on...

User Guide
Page 66
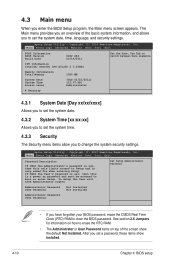
... right or left arrow key on the keyboard until the desired item is highlighted. 4-8 Chapter 4: BIOS setup CPU Information Intel(R) Xeon(R) CPU E31230 @ 3.20GHz Memory Information Total Memory 1024 MB System Date System Time Access Level [Tue 02/15/2011] [15:07:28] Administrator Security →←: Select Screen ↑↓: Select...
... right or left arrow key on the keyboard until the desired item is highlighted. 4-8 Chapter 4: BIOS setup CPU Information Intel(R) Xeon(R) CPU E31230 @ 3.20GHz Memory Information Total Memory 1024 MB System Date System Time Access Level [Tue 02/15/2011] [15:07:28] Administrator Security →←: Select Screen ↑↓: Select...
User Guide
Page 68
... Logs Advanced Monitor Boot Tool Exit BIOS Information BIOS Version Build Date 0202 x64 02/14/2011 CPU Information Intel(R) Xeon(R) CPU E31230 @ 3.20GHz Memory Information Total Memory 1024 MB System Date System Time Access Level [Tue 02/15/2011] [15:07:28] Administrator Security Set the Date, Use Tab to switch...
... Logs Advanced Monitor Boot Tool Exit BIOS Information BIOS Version Build Date 0202 x64 02/14/2011 CPU Information Intel(R) Xeon(R) CPU E31230 @ 3.20GHz Memory Information Total Memory 1024 MB System Date System Time Access Level [Tue 02/15/2011] [15:07:28] Administrator Security Set the Date, Use Tab to switch...
User Guide
Page 76
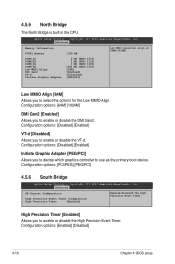
.../PCI] 4.5.6 South Bridge Aptio Setup Utility - High Precision Timer [Enabled] Allows you to decide which graphics controller to enable or disable the VT-d. Advanced Memory Information TOTAL Memory DIMM_A1 DIMM_A2 DIMM_B1 DIMM_B2 Low MMIO Align DMI Gen2 VT-d Initate Graphic Adapter 1024 MB 0 MB (DDR3 1333) 0 MB (DDR3 1333) 0 MB (DDR3 1333...
.../PCI] 4.5.6 South Bridge Aptio Setup Utility - High Precision Timer [Enabled] Allows you to decide which graphics controller to enable or disable the VT-d. Advanced Memory Information TOTAL Memory DIMM_A1 DIMM_A2 DIMM_B1 DIMM_B2 Low MMIO Align DMI Gen2 VT-d Initate Graphic Adapter 1024 MB 0 MB (DDR3 1333) 0 MB (DDR3 1333) 0 MB (DDR3 1333...

User Guide
Page 132
...from the SUSE OS installation CD. 2. Boot the system from Hard Disk Installation Repair Installed System Rescue System Check Installation Media Firmware Test Memory Test Boot Options | F1 Help F2 Language F3 Video Mode English(US) 1024 X768 F4 Source DVD Yes No File URL F5 Kernel ... the Boot Options menu. Use the arrow keys to select Installation from Hard Disk Installation Repair Installed System Rescue System Check Installation Media Firmware Test Memory Test Boot Options | F1 Help F2 Language F3 Video Mode F4 Source F5 Kernel F6 Driver English(US) 1024 X768 DVD Default No 3....
...from the SUSE OS installation CD. 2. Boot the system from Hard Disk Installation Repair Installed System Rescue System Check Installation Media Firmware Test Memory Test Boot Options | F1 Help F2 Language F3 Video Mode English(US) 1024 X768 F4 Source DVD Yes No File URL F5 Kernel ... the Boot Options menu. Use the arrow keys to select Installation from Hard Disk Installation Repair Installed System Rescue System Check Installation Media Firmware Test Memory Test Boot Options | F1 Help F2 Language F3 Video Mode F4 Source F5 Kernel F6 Driver English(US) 1024 X768 DVD Default No 3....
User Guide
Page 133
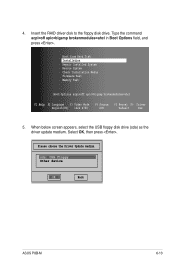
...below screen appears, select the USB floppy disk drive (sda) as the driver update medium. sda: USB Floppy Other device OK Back ASUS P8B-M 6-13 Type the command acpi=off apic=bigsmp brokenmodules=ahci F1 Help F2 Language F3 Video Mode F4 Source F5 Kernel F6 Driver ...English(US) 1024 X768 DVD Default Yes 5. Boot from Hard Disk Installation Repair Installed System Rescue System Check Installation Media Firmware Test Memory Test Boot Options acpi=off apic=bigsmp brokenmodules=ahci in Boot Options field, and press . Please choose the Driver Update medium. Select OK,...
...below screen appears, select the USB floppy disk drive (sda) as the driver update medium. sda: USB Floppy Other device OK Back ASUS P8B-M 6-13 Type the command acpi=off apic=bigsmp brokenmodules=ahci F1 Help F2 Language F3 Video Mode F4 Source F5 Kernel F6 Driver ...English(US) 1024 X768 DVD Default Yes 5. Boot from Hard Disk Installation Repair Installed System Rescue System Check Installation Media Firmware Test Memory Test Boot Options acpi=off apic=bigsmp brokenmodules=ahci in Boot Options field, and press . Please choose the Driver Update medium. Select OK,...


