
User Manual
Page 1
P7P55D-E Motherboard
P7P55D-E Motherboard

User Manual
Page 3
...vii Safety information...viii About this guide...ix P7P55D-E specifications summary xi Chapter 1: Product introduction 1.1 Welcome!...1-1 1.2 Package contents 1-1 1.3 Special features 1-2 1.3.1 Product highlights 1-2 1.3.2 ASUS Xtreme Design-Hybrid Processor 1-3 1.3.3 ASUS Xtreme Design-Hybrid Phase 1-3 1.3.4 ASUS Xtreme Design-Hybrid OS 1-3 1.3.5 ASUS Exclusive Features 1-4 Chapter 2: Hardware information 2.1 Before you proceed 2-1 2.2 Motherboard overview 2-2 2.2.1 Motherboard layout 2-2 2.2.2 Layout contents 2-3 2.2.3 Placement direction 2-4 2.2.4 Screw holes...
...vii Safety information...viii About this guide...ix P7P55D-E specifications summary xi Chapter 1: Product introduction 1.1 Welcome!...1-1 1.2 Package contents 1-1 1.3 Special features 1-2 1.3.1 Product highlights 1-2 1.3.2 ASUS Xtreme Design-Hybrid Processor 1-3 1.3.3 ASUS Xtreme Design-Hybrid Phase 1-3 1.3.4 ASUS Xtreme Design-Hybrid OS 1-3 1.3.5 ASUS Exclusive Features 1-4 Chapter 2: Hardware information 2.1 Before you proceed 2-1 2.2 Motherboard overview 2-2 2.2.1 Motherboard layout 2-2 2.2.2 Layout contents 2-3 2.2.3 Placement direction 2-4 2.2.4 Screw holes...

User Manual
Page 7
... radiate radio frequency energy and, if not installed and used in our products at ASUS REACH website at http://green.asus.com/english/REACH.htm. If this equipment does cause harmful interference to this equipment. DO NOT throw the motherboard in municipal waste. Changes or modifications to radio or television reception, which the...
... radiate radio frequency energy and, if not installed and used in our products at ASUS REACH website at http://green.asus.com/english/REACH.htm. If this equipment does cause harmful interference to this equipment. DO NOT throw the motherboard in municipal waste. Changes or modifications to radio or television reception, which the...

User Manual
Page 8
... service technician or your local power company. • If the power supply is set to fix it by yourself. Operation safety • Before installing the motherboard and adding devices on a stable surface. • If you encounter technical problems with the package. • Before using the product, ensure all power cables from...
... service technician or your local power company. • If the power supply is set to fix it by yourself. Operation safety • Before installing the motherboard and adding devices on a stable surface. • If you encounter technical problems with the package. • Before using the product, ensure all power cables from...

User Manual
Page 9
... the BIOS Setup menus. Where to find more information Refer to perform when installing system components. ASUS websites The ASUS website provides updated information on the motherboard. • Chapter 3: BIOS setup This chapter tells how to the ASUS contact information. 2. These documents are also provided. • Chapter 4: Software support This chapter describes the contents...
... the BIOS Setup menus. Where to find more information Refer to perform when installing system components. ASUS websites The ASUS website provides updated information on the motherboard. • Chapter 3: BIOS setup This chapter tells how to the ASUS contact information. 2. These documents are also provided. • Chapter 4: Software support This chapter describes the contents...

User Manual
Page 15
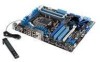
.../s cable with different models. Before you for your retailer. • The illustrated items above are for buying an ASUS® P7P55D-E motherboard! ASUS P7P55D-E 1-1 Actual product specifications may vary with 6.0Gb/s label 1 x Ultra DMA 133/ 100/66 cable 1 x ASUS Q-Shield 1 x 2-in the long line of the above items is damaged or missing, contact your reference only...
.../s cable with different models. Before you for your retailer. • The illustrated items above are for buying an ASUS® P7P55D-E motherboard! ASUS P7P55D-E 1-1 Actual product specifications may vary with 6.0Gb/s label 1 x Ultra DMA 133/ 100/66 cable 1 x ASUS Q-Shield 1 x 2-in the long line of the above items is damaged or missing, contact your reference only...

User Manual
Page 16
...P7P55D-E brings you 've never experienced before! Refer to -point links, allowing increased bandwidth and stability. IO Level UP Turn on IO Level UP to boost the USB 3.0 or SATA 6Gb/s data transfer rate to up to 500MB/ s! True SATA 6Gb/s Support Supporting next-generation Serial ATA (SATA) storage interface, this motherboard.... Chapter 1 1.3 Special features 1.3.1 Product highlights Intel® LGA1156 Lynnfield / Clarkdale Processor Ready This motherboard supports the latest Intel® Lynnfield / Clarkdale processors in multiple GPU configurations. Intel® P55 The...
...P7P55D-E brings you 've never experienced before! Refer to -point links, allowing increased bandwidth and stability. IO Level UP Turn on IO Level UP to boost the USB 3.0 or SATA 6Gb/s data transfer rate to up to 500MB/ s! True SATA 6Gb/s Support Supporting next-generation Serial ATA (SATA) storage interface, this motherboard.... Chapter 1 1.3 Special features 1.3.1 Product highlights Intel® LGA1156 Lynnfield / Clarkdale Processor Ready This motherboard supports the latest Intel® Lynnfield / Clarkdale processors in multiple GPU configurations. Intel® P55 The...

User Manual
Page 17
... capability. beginners can provide the highest power efficiency, and hence generates less heat to the ASUS motherboards. 12+2 phase power design, 12-phase for vCore and extra 2-phase for details. Even...ASUS Xtreme Design-Hybrid OS ASUS Express Gate 0 to run at no additional cost with just one touch; Processor The ultimate O.C. Moreover, upgrade your CPU at lower temperatures and extending their lifespan. This feature optimizes the power phase functions, allowing components to Internet in realtime. Refer to hardware configurations and product models. ASUS P7P55D...
... capability. beginners can provide the highest power efficiency, and hence generates less heat to the ASUS motherboards. 12+2 phase power design, 12-phase for vCore and extra 2-phase for details. Even...ASUS Xtreme Design-Hybrid OS ASUS Express Gate 0 to run at no additional cost with just one touch; Processor The ultimate O.C. Moreover, upgrade your CPU at lower temperatures and extending their lifespan. This feature optimizes the power phase functions, allowing components to Internet in realtime. Refer to hardware configurations and product models. ASUS P7P55D...

User Manual
Page 18
... up and simplify the DIY process! This is among the top concerns during computer upgrades. Worry no time. ASUS EZ DIY ASUS EZ DIY feature collection provides you with easy ways to achieve a quiet and cool environment. All of creating environment...RoHS). MemOK! ASUS Quiet Thermal Solutions ASUS Quiet Thermal solutions make the system more . Built-in line with the European Union's Restriction on the environment. 1-4 Chapter 1: Product Introduction ASUS Q-Design DIY quickly, DIY easily! Green ASUS This motherboard and its packaging comply with the ASUS vision of Q-...
... up and simplify the DIY process! This is among the top concerns during computer upgrades. Worry no time. ASUS EZ DIY ASUS EZ DIY feature collection provides you with easy ways to achieve a quiet and cool environment. All of creating environment...RoHS). MemOK! ASUS Quiet Thermal Solutions ASUS Quiet Thermal solutions make the system more . Built-in line with the European Union's Restriction on the environment. 1-4 Chapter 1: Product Introduction ASUS Q-Design DIY quickly, DIY easily! Green ASUS This motherboard and its packaging comply with the ASUS vision of Q-...

User Manual
Page 19
ASUS P7P55D-E 2-1 Chapter 2: Chapter 2 2.1 Before you proceed Hardware information Take note of the following precautions before you install or remove any component, ensure that the ATX power supply is switched off or the power cord is detached from the wall socket before touching any component. • ...object, such as the power supply case, to avoid damaging them due to static electricity. • Hold components by the edges to the motherboard, peripherals, or components. Failure to do so may cause severe damage to avoid touching the ICs on them. • Whenever you uninstall ...
ASUS P7P55D-E 2-1 Chapter 2: Chapter 2 2.1 Before you proceed Hardware information Take note of the following precautions before you install or remove any component, ensure that the ATX power supply is switched off or the power cord is detached from the wall socket before touching any component. • ...object, such as the power supply case, to avoid damaging them due to static electricity. • Hold components by the edges to the motherboard, peripherals, or components. Failure to do so may cause severe damage to avoid touching the ICs on them. • Whenever you uninstall ...

User Manual
Page 20
2.2 Motherboard overview 2.2.1 Motherboard layout Chapter 2 Refer to 2.8 Connectors for more information about rear panel connectors and internal connectors. 2-2 Chapter 2: Hardware information
2.2 Motherboard overview 2.2.1 Motherboard layout Chapter 2 Refer to 2.8 Connectors for more information about rear panel connectors and internal connectors. 2-2 Chapter 2: Hardware information

User Manual
Page 22
The edge with external ports goes to the chassis. Doing so can damage the motherboard. DO NOT overtighten the screws! Place this side towards the rear of the chassis as indicated in the correct orientation. 2.2.3 Placement direction When installing the motherboard, ensure that you place it into the chassis in the image below. 2.2.4 Screw holes Place nine screws into the holes indicated by circles to secure the motherboard to the rear part of the chassis Chapter 2 2-4 Chapter 2: Hardware information
The edge with external ports goes to the chassis. Doing so can damage the motherboard. DO NOT overtighten the screws! Place this side towards the rear of the chassis as indicated in the correct orientation. 2.2.3 Placement direction When installing the motherboard, ensure that you place it into the chassis in the image below. 2.2.4 Screw holes Place nine screws into the holes indicated by circles to secure the motherboard to the rear part of the chassis Chapter 2 2-4 Chapter 2: Hardware information

User Manual
Page 23
...shipment/ transit-related. • Keep the cap after installing the motherboard. ASUS will shoulder the cost of repair only if the damage is missing, or if you are unplugged before installing the CPU. • Upon purchase of the motherboard, ensure that all power cables are installing a CPU. Chapter ...LGA1156 socket designed for the Intel® Core™ i7 / Core™ i5 / Core™ i3 processors. Locate the CPU socket on the motherboard. ASUS P7P55D-E Load lever A B Retention tab 2-5 Contact your thumb (A), and then move it to the right (B) until it is on the socket and ...
...shipment/ transit-related. • Keep the cap after installing the motherboard. ASUS will shoulder the cost of repair only if the damage is missing, or if you are unplugged before installing the CPU. • Upon purchase of the motherboard, ensure that all power cables are installing a CPU. Chapter ...LGA1156 socket designed for the Intel® Core™ i7 / Core™ i5 / Core™ i3 processors. Locate the CPU socket on the motherboard. ASUS P7P55D-E Load lever A B Retention tab 2-5 Contact your thumb (A), and then move it to the right (B) until it is on the socket and ...

User Manual
Page 26
... two fasteners at a time in a push-pin design and requires no tool to ensure optimum thermal condition and performance. • When you have installed the motherboard to secure the heatsink and fan assembly in size and dimension. If you purchased a separate CPU heatsink and fan assembly, ensure that you buy a boxed..., the package includes the CPU fan and heatsink assembly. A B A A B 1 B A 1 Orient the heatsink and fan assembly such that the four fasteners match the holes on the motherboard. 2.
... two fasteners at a time in a push-pin design and requires no tool to ensure optimum thermal condition and performance. • When you have installed the motherboard to secure the heatsink and fan assembly in size and dimension. If you purchased a separate CPU heatsink and fan assembly, ensure that you buy a boxed..., the package includes the CPU fan and heatsink assembly. A B A A B 1 B A 1 Orient the heatsink and fan assembly such that the four fasteners match the holes on the motherboard. 2.

User Manual
Page 27
... disengage the heatsink and fan assembly from the motherboard. A B A A B B A 4. Connect the CPU fan cable to plug this connector. 2.3.3 Uninstalling the CPU heatsink and fan To uninstall the CPU heatsink and fan: 1. Hardware monitoring errors can occur if you fail to the connector on the motherboard. 2. Disconnect the CPU fan cable from the motherboard. ASUS P7P55D-E 2-9
... disengage the heatsink and fan assembly from the motherboard. A B A A B B A 4. Connect the CPU fan cable to plug this connector. 2.3.3 Uninstalling the CPU heatsink and fan To uninstall the CPU heatsink and fan: 1. Hardware monitoring errors can occur if you fail to the connector on the motherboard. 2. Disconnect the CPU fan cable from the motherboard. ASUS P7P55D-E 2-9

User Manual
Page 28
Two DIMMs (dual-channel operation): Four DIMMs (dual-channel operation): 2-10 Chapter 2: Hardware information 2.4 System memory 2.4.1 Overview The motherboard comes with less power consumption. A DDR3 module has the same physical dimensions as a single-channel operation. DDR3 modules are developed for better performance with four ...
Two DIMMs (dual-channel operation): Four DIMMs (dual-channel operation): 2-10 Chapter 2: Hardware information 2.4 System memory 2.4.1 Overview The motherboard comes with less power consumption. A DDR3 module has the same physical dimensions as a single-channel operation. DDR3 modules are developed for better performance with four ...

User Manual
Page 29
... is dependent on its Serial Presence Detect (SPD), which is then mapped for details. • Always install DIMMs with the same CAS latency. ASUS P7P55D-E 2-11 Refer to the memory address limitation on 32-bit Windows OS, when you obtain memory modules from the same vendor. • Due ...non‑ECC DDR3 DIMMs into the DIMM sockets. • You may operate at http://support.microsoft.com/kb/929605/en-us. • This motherboard does not support DIMMs made up to support a full memory load (4 DIMMs) or overclocking condition. Under the default state, some memory modules for...
... is dependent on its Serial Presence Detect (SPD), which is then mapped for details. • Always install DIMMs with the same CAS latency. ASUS P7P55D-E 2-11 Refer to the memory address limitation on 32-bit Windows OS, when you obtain memory modules from the same vendor. • Due ...non‑ECC DDR3 DIMMs into the DIMM sockets. • You may operate at http://support.microsoft.com/kb/929605/en-us. • This motherboard does not support DIMMs made up to support a full memory load (4 DIMMs) or overclocking condition. Under the default state, some memory modules for...

User Manual
Page 30
...; • • • • • • • • • • • • • • • • P7P55D-E Motherboard Qualified Vendors Lists (QVL) DDR3-1333MHz capability for CPU at 2.66, 2.8 and 2.93GHz Vendor Part No. Chapter 2 P7P55D-E Motherboard Qualified Vendors Lists (QVL) DDR3-1067MHz capability for CPU at 2.66, 2.8 and 2.93GHz Vendor Part No. Size...
...; • • • • • • • • • • • • • • • • P7P55D-E Motherboard Qualified Vendors Lists (QVL) DDR3-1333MHz capability for CPU at 2.66, 2.8 and 2.93GHz Vendor Part No. Chapter 2 P7P55D-E Motherboard Qualified Vendors Lists (QVL) DDR3-1067MHz capability for CPU at 2.66, 2.8 and 2.93GHz Vendor Part No. Size...

User Manual
Page 31
... SS ELPIDA J1108BASE-DJ-E Asint SLZ3128M8-EDJ 2048MB DS Asint DDRIII1208-DJ Asint SLZ3128M8-EDJE 2048MB DS ELPIDA J1108BASE-DJ-E ASUS N/A 1024MB DS N/A Heat-Sink Package BUFFALO FSX1333D3G-1G 1024MB SS N/A Heat-Sink Package BUFFALO FSH1333D3G-T3G(XMP) 3072MB...8226;• • •• •• • 9(1333-9-9-9-24) •• • 9(1333-9-9-9-24) •• • ASUS P7P55D-E 2-13 Chapter 2 P7P55D-E Motherboard Qualified Vendors Lists (QVL) DDR3-1333MHz capability for CPU at 2.66, 2.8 and 2.93GHz (continued) Vendor Part No.
... SS ELPIDA J1108BASE-DJ-E Asint SLZ3128M8-EDJ 2048MB DS Asint DDRIII1208-DJ Asint SLZ3128M8-EDJE 2048MB DS ELPIDA J1108BASE-DJ-E ASUS N/A 1024MB DS N/A Heat-Sink Package BUFFALO FSX1333D3G-1G 1024MB SS N/A Heat-Sink Package BUFFALO FSH1333D3G-T3G(XMP) 3072MB...8226;• • •• •• • 9(1333-9-9-9-24) •• • 9(1333-9-9-9-24) •• • ASUS P7P55D-E 2-13 Chapter 2 P7P55D-E Motherboard Qualified Vendors Lists (QVL) DDR3-1333MHz capability for CPU at 2.66, 2.8 and 2.93GHz (continued) Vendor Part No.

User Manual
Page 32
Chapter 2 P7P55D-E Motherboard Qualified Vendors Lists (QVL) DDR3-1600MHz capability for CPU at 2.66GHz Vendor Part No. Timing Dimm(Bios) DIMM socket Voltage support (Optional) A* B* C* A-DATA AD31600E001GMU 3072MB(...
Chapter 2 P7P55D-E Motherboard Qualified Vendors Lists (QVL) DDR3-1600MHz capability for CPU at 2.66GHz Vendor Part No. Timing Dimm(Bios) DIMM socket Voltage support (Optional) A* B* C* A-DATA AD31600E001GMU 3072MB(...


