User Manual
Page 15
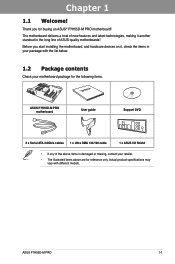
... may vary with the list below. 1.2 Package contents Check your motherboard package for the following items. User Manual ASUS P7H55D-M PRO motherboard User guide Support DVD 2 x Serial ATA 3.0Gb/s cables 1 x Ultra DMA 133/100 cable 1 x ASUS I/O Shield • If any of the above items is damaged or missing, contact your package with different models...
... may vary with the list below. 1.2 Package contents Check your motherboard package for the following items. User Manual ASUS P7H55D-M PRO motherboard User guide Support DVD 2 x Serial ATA 3.0Gb/s cables 1 x Ultra DMA 133/100 cable 1 x ASUS I/O Shield • If any of the above items is damaged or missing, contact your package with different models...

User Manual
Page 17
... without interrupting ongoing work or games, simply through pressing the button. ASUS P7H55D-M PRO 1-3 tool allows you to page 4-8 for details. Refer to turn the PC power button into a physical overclocking button. Turbo Key ASUS Turbo Key allows you with just a few clicks away. Refer to... deliver multiple overclocking profiles also provides rapid and stable system-level upgrades. Chapter 1 Green ASUS This motherboard and its user-friendly interface makes overclock with quick access to safeguard consumers' health while minimizing the impact on ...
... without interrupting ongoing work or games, simply through pressing the button. ASUS P7H55D-M PRO 1-3 tool allows you to page 4-8 for details. Refer to turn the PC power button into a physical overclocking button. Turbo Key ASUS Turbo Key allows you with just a few clicks away. Refer to... deliver multiple overclocking profiles also provides rapid and stable system-level upgrades. Chapter 1 Green ASUS This motherboard and its user-friendly interface makes overclock with quick access to safeguard consumers' health while minimizing the impact on ...

User Manual
Page 19
... can update your DIY experience by speeding up and simplifying the DIY process! ASUS P7H55D-M PRO 1-5 Refer to page 3-4 for details. Profile Freely share and distribute favorite overclocking settings. The motherboard features the ASUS O.C. Refer to page 3-5 for details. You can be stored in a few... clicks without preparing an additional floppy diskette or using an OS-based flash utility. ASUS O.C. Chapter 1 ASUS EZ-Flash 2 Simply update BIOS from a USB flash drive before entering the OS EZ Flash 2 is a user-friendly BIOS update...
... can update your DIY experience by speeding up and simplifying the DIY process! ASUS P7H55D-M PRO 1-5 Refer to page 3-4 for details. Profile Freely share and distribute favorite overclocking settings. The motherboard features the ASUS O.C. Refer to page 3-5 for details. You can be stored in a few... clicks without preparing an additional floppy diskette or using an OS-based flash utility. ASUS O.C. Chapter 1 ASUS EZ-Flash 2 Simply update BIOS from a USB flash drive before entering the OS EZ Flash 2 is a user-friendly BIOS update...

User Manual
Page 21
... removing or plugging in soft-off or the power cord is a reminder that the system is ON, in sleep mode, or in any motherboard component. ASUS P7H55D-M PRO 2-1 This is detached from the wall socket before touching any component. • Before handling components, use a grounded wrist strap or touch a safely grounded object or...
... removing or plugging in soft-off or the power cord is a reminder that the system is ON, in sleep mode, or in any motherboard component. ASUS P7H55D-M PRO 2-1 This is detached from the wall socket before touching any component. • Before handling components, use a grounded wrist strap or touch a safely grounded object or...

User Manual
Page 25
...socket on the socket and the socket contacts are installing a CPU. To prevent damage to the socket contacts resulting from the retention tab. ASUS P7H55D-M PRO Load lever A B Retention tab 2-5 Ensure that all power cables are unplugged before installing the CPU. • Upon purchase of the ...loss/incorrect removal of repair only if the damage is shipment/ transit-related. • Keep the cap after installing the motherboard. Chapter 2 2. ASUS will shoulder the cost of the PnP cap. 2.3.1 Installing the CPU To install a CPU: 1. Press the load lever with a surface mount ...
...socket on the socket and the socket contacts are installing a CPU. To prevent damage to the socket contacts resulting from the retention tab. ASUS P7H55D-M PRO Load lever A B Retention tab 2-5 Ensure that all power cables are unplugged before installing the CPU. • Upon purchase of the ...loss/incorrect removal of repair only if the damage is shipment/ transit-related. • Keep the cap after installing the motherboard. Chapter 2 2. ASUS will shoulder the cost of the PnP cap. 2.3.1 Installing the CPU To install a CPU: 1. Press the load lever with a surface mount ...

User Manual
Page 27
... this step. The Thermal Interface Material is spread in contact with preapplied thermal paste. DO NOT eat it off immediately, and seek professional medical help. 7. ASUS P7H55D-M PRO 2-7 B A C 8. Some heatsinks come with , ensuring that the front edge of the CPU that the heatsink will be in an even thin layer. Chapter 2 6. Apply some...
... this step. The Thermal Interface Material is spread in contact with preapplied thermal paste. DO NOT eat it off immediately, and seek professional medical help. 7. ASUS P7H55D-M PRO 2-7 B A C 8. Some heatsinks come with , ensuring that the front edge of the CPU that the heatsink will be in an even thin layer. Chapter 2 6. Apply some...

User Manual
Page 29
3. A B A A B B A 4. Disconnect the CPU fan cable from the connector on the motherboard labeled CPU_FAN. ASUS P7H55D-M PRO 2-9 Carefully remove the heatsink and fan assembly from the motherboard. Rotate each fastener counterclockwise. 3. Connect the CPU fan cable to plug this connector. 2.3.3 Uninstalling the ...
3. A B A A B B A 4. Disconnect the CPU fan cable from the connector on the motherboard labeled CPU_FAN. ASUS P7H55D-M PRO 2-9 Carefully remove the heatsink and fan assembly from the motherboard. Rotate each fastener counterclockwise. 3. Connect the CPU fan cable to plug this connector. 2.3.3 Uninstalling the ...

User Manual
Page 31
...://support.microsoft.com/kb/929605/en-us. • This motherboard does not support DIMMs made up to Intel spec definition, X.M.P. Use a maximum of the following: - ASUS P7H55D-M PRO 2-11 To use of memory, we recommend that you do any of 3GB system memory if you are supported for one DIMM per channel only...
...://support.microsoft.com/kb/929605/en-us. • This motherboard does not support DIMMs made up to Intel spec definition, X.M.P. Use a maximum of the following: - ASUS P7H55D-M PRO 2-11 To use of memory, we recommend that you do any of 3GB system memory if you are supported for one DIMM per channel only...

User Manual
Page 35
...;• 2GB DS Asint DDRIII1208-AE - - ••• 2GB DS - - - - ••• 1GB DS Qimonda IDSH51-03A1F1C-10F 7 - •• Side(s): SS - Chapter 2 ASUS P7H55D-M PRO 2-15 To use DIMMs of a higher frequency with a 2.66G CPU, enable the DRAM O.C.
...;• 2GB DS Asint DDRIII1208-AE - - ••• 2GB DS - - - - ••• 1GB DS Qimonda IDSH51-03A1F1C-10F 7 - •• Side(s): SS - Chapter 2 ASUS P7H55D-M PRO 2-15 To use DIMMs of a higher frequency with a 2.66G CPU, enable the DRAM O.C.
User Manual
Page 37
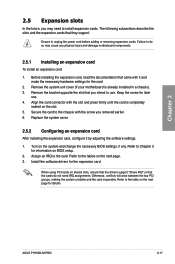
... power cord before adding or removing expansion cards. Otherwise, conflicts will arise between the two PCI groups, making the system unstable and the card inoperable. ASUS P7H55D-M PRO 2-17 Ensure to Chapter 3 for information on shared slots, ensure that the drivers support "Share IRQ" or that they support. When using PCI cards on...
... power cord before adding or removing expansion cards. Otherwise, conflicts will arise between the two PCI groups, making the system unstable and the card inoperable. ASUS P7H55D-M PRO 2-17 Ensure to Chapter 3 for information on shared slots, ensure that the drivers support "Share IRQ" or that they support. When using PCI cards on...

User Manual
Page 39
... support PCI Express x16 2.0 graphic cards complying with the PCI Express specifications. Chapter 2 PCI slot 2 PCI slot 1 PCI Express 2.0 x16_1 slot PCI Express 2.0 x1_1 (2.5GT/s) ASUS P7H55D-M PRO 2-19 Refer to the figure below for the location of the slot. Refer to the figure below for the location of the slot. 2.5.5 PCI Express...
... support PCI Express x16 2.0 graphic cards complying with the PCI Express specifications. Chapter 2 PCI slot 2 PCI slot 1 PCI Express 2.0 x16_1 slot PCI Express 2.0 x1_1 (2.5GT/s) ASUS P7H55D-M PRO 2-19 Refer to the figure below for the location of the slot. Refer to the figure below for the location of the slot. 2.5.5 PCI Express...

User Manual
Page 41
USB 2.0 ports 3 and 4 9. 2.7 Connectors 2.7.1 Rear panel connectors Chapter 2 Rear panel connectors 1. VGA out port 4. USB 2.0 ports 1 and 2 10. Optical S/PDIF Out port 3. HDMI out port*** 7. USB 2.0 ports 5 and 6 6. DVI-D out port 8. ASUS P7H55D-M PRO 2-21 Audio I/O ports** *and **: Refer to the tables on the next page for LAN port and audio port definitions. ***: Refer to the notes and troubleshooting on monitor overscan / underscan problem on the next pages. PS/2 keyboard port (purple) 2. LAN (RJ-45) port 5.
USB 2.0 ports 3 and 4 9. 2.7 Connectors 2.7.1 Rear panel connectors Chapter 2 Rear panel connectors 1. VGA out port 4. USB 2.0 ports 1 and 2 10. Optical S/PDIF Out port 3. HDMI out port*** 7. USB 2.0 ports 5 and 6 6. DVI-D out port 8. ASUS P7H55D-M PRO 2-21 Audio I/O ports** *and **: Refer to the tables on the next page for LAN port and audio port definitions. ***: Refer to the notes and troubleshooting on monitor overscan / underscan problem on the next pages. PS/2 keyboard port (purple) 2. LAN (RJ-45) port 5.
User Manual
Page 43
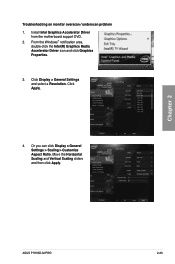
Move the Horizontal Scaling and Vertical Scaling sliders and then click Apply. Troubleshooting on monitor overscan / underscan problem 1. From the Windows® notification area, double-click the Intel(R) Graphics Media Accelerator Driver icon and click Graphics Properties. 3. Or you can click Display > General Settings > Scaling > Customize Aspect Ratio. Click Apply. 4. Chapter 2 ASUS P7H55D-M PRO 2-23 Click Display > General Settings and select a Resolution. Install Intel Graphics Accelerator Driver from the motherboard support DVD. 2.
Move the Horizontal Scaling and Vertical Scaling sliders and then click Apply. Troubleshooting on monitor overscan / underscan problem 1. From the Windows® notification area, double-click the Intel(R) Graphics Media Accelerator Driver icon and click Graphics Properties. 3. Or you can click Display > General Settings > Scaling > Customize Aspect Ratio. Click Apply. 4. Chapter 2 ASUS P7H55D-M PRO 2-23 Click Display > General Settings and select a Resolution. Install Intel Graphics Accelerator Driver from the motherboard support DVD. 2.

User Manual
Page 45
Connect to 4.1-channel Speakers Connect to 5.1-channel Speakers Chapter 2 Connect to 7.1-channel Speakers ASUS P7H55D-M PRO 2-25
Connect to 4.1-channel Speakers Connect to 5.1-channel Speakers Chapter 2 Connect to 7.1-channel Speakers ASUS P7H55D-M PRO 2-25

User Manual
Page 47
2. Intel® H55 Serial ATA connectors (7-pin SATA 1-6) These connectors connect to Serial ATA hard disk drives and optical disc drives via Serial ATA signal cables. Chapter 2 You must install Windows® XP Service Pack 2 or later versions before using Serial ATA hard disk drives. ASUS P7H55D-M PRO 2-27
2. Intel® H55 Serial ATA connectors (7-pin SATA 1-6) These connectors connect to Serial ATA hard disk drives and optical disc drives via Serial ATA signal cables. Chapter 2 You must install Windows® XP Service Pack 2 or later versions before using Serial ATA hard disk drives. ASUS P7H55D-M PRO 2-27

User Manual
Page 49
These are not jumpers! Chapter 2 ASUS P7H55D-M PRO 2-29 5. CPU, chassis, and power fan connectors (4-pin CPU_FAN; 4-pin CHA_FAN1; 3-pin PWR_FAN) Connect the fan cables to the fan connectors. Do not place jumper ... the black wire of each cable matches the ground pin of maximum 2A (24 W) fan power. • Only the CPU_FAN and CHA_FAN 1 connectors support the ASUS FAN Xpert feature. Insufficient air flow inside the system may damage the motherboard components. Do not forget to connect the fan cables to the fan...
These are not jumpers! Chapter 2 ASUS P7H55D-M PRO 2-29 5. CPU, chassis, and power fan connectors (4-pin CPU_FAN; 4-pin CHA_FAN1; 3-pin PWR_FAN) Connect the fan cables to the fan connectors. Do not place jumper ... the black wire of each cable matches the ground pin of maximum 2A (24 W) fan power. • Only the CPU_FAN and CHA_FAN 1 connectors support the ASUS FAN Xpert feature. Insufficient air flow inside the system may damage the motherboard components. Do not forget to connect the fan cables to the fan...

User Manual
Page 51
...system, we recommend that complies with more power-consuming devices. Seventeam ST-522HLP Seventeam ST550EAJ-05F ASUS P-50GA ASUS P-55GA ASUS U-65GA ASUS U-75HA AXE-AA1000U-C Be quiet P6-PRO-850W Be quiet BN077 CoolerMaster RS-850EMBA Corsair CMPSU-620HX Corsair HX1000W EnerMAX EGX1000EWL HECHUAN ST-ATX330...I-cuteAP-600S OCZ OCZ780MXS Seasonic SS-351HT Thermaltake TWV500W-AP Thermaltake PUREPower-600AP Zippy HP2-6500PE (G1) Zippy PSL6720P ASUS P7H55D-M PRO 2-31 com/PowerSupplyCalculator/PSCalculator.aspx?SLanguage=en-us for ATX power supply plugs. The system may become unstable or may...
...system, we recommend that complies with more power-consuming devices. Seventeam ST-522HLP Seventeam ST550EAJ-05F ASUS P-50GA ASUS P-55GA ASUS U-65GA ASUS U-75HA AXE-AA1000U-C Be quiet P6-PRO-850W Be quiet BN077 CoolerMaster RS-850EMBA Corsair CMPSU-620HX Corsair HX1000W EnerMAX EGX1000EWL HECHUAN ST-ATX330...I-cuteAP-600S OCZ OCZ780MXS Seasonic SS-351HT Thermaltake TWV500W-AP Thermaltake PUREPower-600AP Zippy HP2-6500PE (G1) Zippy PSL6720P ASUS P7H55D-M PRO 2-31 com/PowerSupplyCalculator/PSCalculator.aspx?SLanguage=en-us for ATX power supply plugs. The system may become unstable or may...

User Manual
Page 53
... continuous beep followed by four short beeps Description VGA detected Quick boot set to enter the BIOS Setup. At power on self tests or POST. ASUS P7H55D-M PRO 2-33 While the tests are off. 3. Be sure that is ON, pressing the power switch for less than four seconds lets the system enter the...
... continuous beep followed by four short beeps Description VGA detected Quick boot set to enter the BIOS Setup. At power on self tests or POST. ASUS P7H55D-M PRO 2-33 While the tests are off. 3. Be sure that is ON, pressing the power switch for less than four seconds lets the system enter the...

User Manual
Page 55
... the BIOS in the system's failure to boot. ASUS EZ Flash 2: Updates the BIOS using the motherboard support DVD or a USB flash drive when the BIOS file fails or gets corrupted. 4. Refer to restore the BIOS in the future. ASUS P7H55D-M PRO 3-1 Save a copy of the original motherboard BIOS ...file to a USB flash drive in DOS environment using the ASUS Update utility. We strongly recommend that you to run the BIOS Setup. • You...
... the BIOS in the system's failure to boot. ASUS EZ Flash 2: Updates the BIOS using the motherboard support DVD or a USB flash drive when the BIOS file fails or gets corrupted. 4. Refer to restore the BIOS in the future. ASUS P7H55D-M PRO 3-1 Save a copy of the original motherboard BIOS ...file to a USB flash drive in DOS environment using the ASUS Update utility. We strongly recommend that you to run the BIOS Setup. • You...

User Manual
Page 57
... file from the dropdown menu, then click Next. 3. The ASUS Update utility is capable of updating itself through a BIOS file: 1. The ASUS Update main window appears. 2. 3. Chapter 3 5. P7H55DPRO.ROM ASUS P7H55D-M PRO P7H55DPRO Ensure to load the BIOS default settings to avail all... its features. Fom the Windows® desktop, click Start > Programs > ASUS > ASUSUpdate > ASUSUpdate. See section 3.10...
... file from the dropdown menu, then click Next. 3. The ASUS Update utility is capable of updating itself through a BIOS file: 1. The ASUS Update main window appears. 2. 3. Chapter 3 5. P7H55DPRO.ROM ASUS P7H55D-M PRO P7H55DPRO Ensure to load the BIOS default settings to avail all... its features. Fom the Windows® desktop, click Start > Programs > ASUS > ASUSUpdate > ASUSUpdate. See section 3.10...


