User Guide
Page 5
...Remote Access Configuration 4-29 4.6 Power menu 4-31 4.6.1 APM Configuration 4-31 4.6.2 Hardware Monitor 4-33 4.7 Boot menu 4-34 4.7.1 Boot Device Priority 4-34 4.7.2 Hard Disk Drives; CDROM Drives 4-34 4.7.3 Boot Settings Configuration 4-35 4.7.4 Security 4-36 4.8 Tools menu 4-38 4.8.1 ASUS EZ Flash 2 4-38 4.9 Exit menu 4-39 Chapter 5: RAID configuration 5.1 Setting up RAID 5-3 5.1.1 RAID definitions 5-3 5.1.2 Installing hard disk drives 5-4 5.1.3 Setting the RAID item in BIOS 5-4 5.1.4 RAID configuration utilities 5-4 5.2 Intel® Matrix Storage Manager Option ROM Utility...
...Remote Access Configuration 4-29 4.6 Power menu 4-31 4.6.1 APM Configuration 4-31 4.6.2 Hardware Monitor 4-33 4.7 Boot menu 4-34 4.7.1 Boot Device Priority 4-34 4.7.2 Hard Disk Drives; CDROM Drives 4-34 4.7.3 Boot Settings Configuration 4-35 4.7.4 Security 4-36 4.8 Tools menu 4-38 4.8.1 ASUS EZ Flash 2 4-38 4.9 Exit menu 4-39 Chapter 5: RAID configuration 5.1 Setting up RAID 5-3 5.1.1 RAID definitions 5-3 5.1.2 Installing hard disk drives 5-4 5.1.3 Setting the RAID item in BIOS 5-4 5.1.4 RAID configuration utilities 5-4 5.2 Intel® Matrix Storage Manager Option ROM Utility...
User Guide
Page 9
... technologies it supports. • Chapter 2: Hardware information This chapter lists the hardware setup procedures that you have been added by your dealer. ix ASUS websites The ASUS website provides updated information on the motherboard. • Chapter 3: Powering up This chapter describes the power up , creating, and configuring RAID sets using the available utilities. • Chapter 6: Driver installation This chapter provides instructions for installing the necessary drivers for product and software updates. 1. It includes...
... technologies it supports. • Chapter 2: Hardware information This chapter lists the hardware setup procedures that you have been added by your dealer. ix ASUS websites The ASUS website provides updated information on the motherboard. • Chapter 3: Powering up This chapter describes the power up , creating, and configuring RAID sets using the available utilities. • Chapter 6: Driver installation This chapter provides instructions for installing the necessary drivers for product and software updates. 1. It includes...

User Guide
Page 33
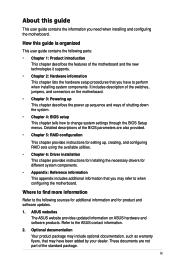
... memory modules from 1066 or 1333 MHz DIMM • Always install DIMMs with less power consumption. DDR3 modules are not supported ASUS P7F-C Series 2-15 The figure illustrates the location of the DDR3 DIMM sockets: 2.4.2 Memory Configurations You may install 1 GB, 2 GB, 4 GB, 8 GB Registerd, or 1 GB, 2 GB, 4 GB Unbuffered with six Double Data Rate 3 (DDR3) Dual Inline Memory Modules (DIMM) sockets. DO NOT combine RDIMM and UDIMM. • The motherboard supports...
... memory modules from 1066 or 1333 MHz DIMM • Always install DIMMs with less power consumption. DDR3 modules are not supported ASUS P7F-C Series 2-15 The figure illustrates the location of the DDR3 DIMM sockets: 2.4.2 Memory Configurations You may install 1 GB, 2 GB, 4 GB, 8 GB Registerd, or 1 GB, 2 GB, 4 GB Unbuffered with six Double Data Rate 3 (DDR3) Dual Inline Memory Modules (DIMM) sockets. DO NOT combine RDIMM and UDIMM. • The motherboard supports...
User Guide
Page 35
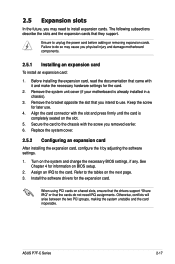
... software settings. 1. Secure the card to the chassis with the screw you may cause you intend to install expansion cards. Replace the system cover. 2.5.2 Configuring an expansion card After installing the expansion card, configure the it and make the necessary hardware settings for information on the system and change the necessary BIOS settings, if any. See Chapter 4 for the card. 2. ASUS P7F-C Series 2-17 2.5 Expansion slots In the future, you removed earlier. 6. Remove the system unit cover (if your motherboard...
... software settings. 1. Secure the card to the chassis with the screw you may cause you intend to install expansion cards. Replace the system cover. 2.5.2 Configuring an expansion card After installing the expansion card, configure the it and make the necessary hardware settings for information on the system and change the necessary BIOS settings, if any. See Chapter 4 for the card. 2. ASUS P7F-C Series 2-17 2.5 Expansion slots In the future, you removed earlier. 6. Remove the system unit cover (if your motherboard...

User Guide
Page 44
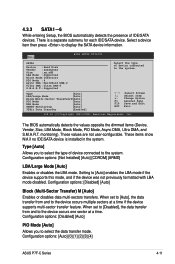
... installed Serial ATA hard disk drives, you can create a RAID 0, RAID 1, RAID 10, or RAID 5 configuration. • The actual data transfer rate depends on card causes the front panel LED to light up to 3Gb/s of data transfer rate. Serial ATA connectors (7-pin SATA1, SATA2, SATA3, SATA4; Black) Supported by the Intel® 3420 chipset, these connectors are for the Serial ATA signal cables for the storage add-on card cable connected to the SATA or SAS add-on the speed...
... installed Serial ATA hard disk drives, you can create a RAID 0, RAID 1, RAID 10, or RAID 5 configuration. • The actual data transfer rate depends on card causes the front panel LED to light up to 3Gb/s of data transfer rate. Serial ATA connectors (7-pin SATA1, SATA2, SATA3, SATA4; Black) Supported by the Intel® 3420 chipset, these connectors are for the Serial ATA signal cables for the storage add-on card cable connected to the SATA or SAS add-on the speed...

User Guide
Page 64
... navigation keys for that particular menu. 4.2.1 BIOS menu screen Menu items Menu bar Configuration fields General help Main Advanced BIOS SETUP UTILITY Server Power Boot Tools Exit System Time [13:44:30] System Date [Wed, 11/25/2009] SATA 1 SATA 2 SATA 3 SATA 4 SATA 5 SATA 6 : [ST3160812AS] : [Not Detected] : [Not Detected] : [Not Detected] : [Not Detected] : [Not Detected] Storage Configuration System Information Use [ENTER], [TAB] or [SHIFT-TAB] to configure system Date. ←→ Select Screen ↑↓ Select Item +- Change Field...
... navigation keys for that particular menu. 4.2.1 BIOS menu screen Menu items Menu bar Configuration fields General help Main Advanced BIOS SETUP UTILITY Server Power Boot Tools Exit System Time [13:44:30] System Date [Wed, 11/25/2009] SATA 1 SATA 2 SATA 3 SATA 4 SATA 5 SATA 6 : [ST3160812AS] : [Not Detected] : [Not Detected] : [Not Detected] : [Not Detected] : [Not Detected] Storage Configuration System Information Use [ENTER], [TAB] or [SHIFT-TAB] to configure system Date. ←→ Select Screen ↑↓ Select Item +- Change Field...
User Guide
Page 67
... not user-configurable. Configuration options: [Auto] [0] [1] [2] [3] [4] ASUS P7F-C Series 4-11 Configuration options: [Not Installed] [Auto] [CDROM] [ARMD] LBA/Large Mode [Auto] Enables or disables the LBA mode. Type [Auto] Allows you to the device occurs multiple sectors at a time. Main BIOS SETUP UTILITY SATA1 Device :Hard Disk Vendor :xxxxxxxxx Size :xx.xGB LBA Mode :Supported Block Mode:16Sectors PIO Mode :4 Async DMA :MultiWord DMA-2 Ultra DMA :Ultra DMA-6 S.M.A.R.T.:Supported Select the type of IDE/SATA devices. monitoring). Select a device...
... not user-configurable. Configuration options: [Auto] [0] [1] [2] [3] [4] ASUS P7F-C Series 4-11 Configuration options: [Not Installed] [Auto] [CDROM] [ARMD] LBA/Large Mode [Auto] Enables or disables the LBA mode. Type [Auto] Allows you to the device occurs multiple sectors at a time. Main BIOS SETUP UTILITY SATA1 Device :Hard Disk Vendor :xxxxxxxxx Size :xx.xGB LBA Mode :Supported Block Mode:16Sectors PIO Mode :4 Async DMA :MultiWord DMA-2 Ultra DMA :Ultra DMA-6 S.M.A.R.T.:Supported Select the type of IDE/SATA devices. monitoring). Select a device...

User Guide
Page 72
... (C)Copyright 1985-2009, American Megatrends, Inc. 4.4.1 CPU Configuration The items in order to malfunction. Main Advanced Server BIOS SETUP UTILITY Power Boot Tools CPU Configuration Chipset Onboard Device Configuration USB Configuration PCIPnP ACPI Configuration Event Log Configuration Exit Configure CPU. C1E Support Hardware Prefetcher Adjacent Cache Line Prefetch Max CPUID Value Limit Intel(R) Virtualization Tech CPU TM Function [Enabled] [Enabled] [Enabled] [Disabled] [Enabled] [Enabled] +F1 F10 ESC Select Screen Select Item Change Option General Help Save and Exit...
... (C)Copyright 1985-2009, American Megatrends, Inc. 4.4.1 CPU Configuration The items in order to malfunction. Main Advanced Server BIOS SETUP UTILITY Power Boot Tools CPU Configuration Chipset Onboard Device Configuration USB Configuration PCIPnP ACPI Configuration Event Log Configuration Exit Configure CPU. C1E Support Hardware Prefetcher Adjacent Cache Line Prefetch Max CPUID Value Limit Intel(R) Virtualization Tech CPU TM Function [Enabled] [Enabled] [Enabled] [Disabled] [Enabled] [Enabled] +F1 F10 ESC Select Screen Select Item Change Option General Help Save and Exit...
User Guide
Page 91
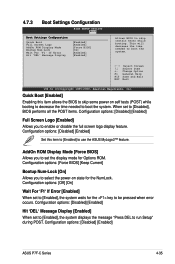
... the key to enable or disable the full screen logo display feature. AddOn ROM Display Mode [Force BIOS] Allows you to be pressed when error occurs. 4.7.3 Boot Settings Configuration BIOS SETUP UTILITY Boot Boot Settings Configuration Quick Boot Full Screen Logo AddOn ROM Display Mode Bootup Num-Lock Wait For 'F1' If Error Hit 'DEL' Message Display [Enabled] [Enabled] [Force BIOS] [On] [Enabled] [Enabled] Allows BIOS to run Setup" during POST. This will decrease the time needed to skip some power on state for Options ROM. Configuration options: [Disabled...
... the key to enable or disable the full screen logo display feature. AddOn ROM Display Mode [Force BIOS] Allows you to be pressed when error occurs. 4.7.3 Boot Settings Configuration BIOS SETUP UTILITY Boot Boot Settings Configuration Quick Boot Full Screen Logo AddOn ROM Display Mode Bootup Num-Lock Wait For 'F1' If Error Hit 'DEL' Message Display [Enabled] [Enabled] [Force BIOS] [On] [Enabled] [Enabled] Allows BIOS to run Setup" during POST. This will decrease the time needed to skip some power on state for Options ROM. Configuration options: [Disabled...
User Guide
Page 92
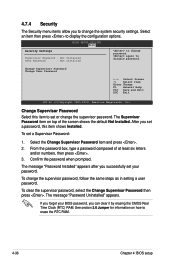
... Supervisor Password item on how to disable password. If you forget your password. To change the system security settings. To set or change password. Select an item then press to change the supervisor password. Select the Change Supervisor Password item and press . 2. From the password box, type a password composed of the screen shows the default Not Installed. Change Supervisor Password Select this item shows Installed. BIOS SETUP UTILITY Boot Security Settings Supervisor Password : Not Installed User Password : Not Installed to display the configuration...
... Supervisor Password item on how to disable password. If you forget your password. To change the system security settings. To set or change password. Select an item then press to change the supervisor password. Select the Change Supervisor Password item and press . 2. From the password box, type a password composed of the screen shows the default Not Installed. Change Supervisor Password Select this item shows Installed. BIOS SETUP UTILITY Boot Security Settings Supervisor Password : Not Installed User Password : Not Installed to display the configuration...
User Guide
Page 93
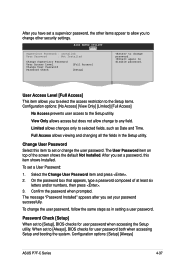
... in the Setup utility. The message "Password Installed" appears after you to change other items appear to any field. Password Check [Setup] When set your password successfully. Configuration options: [Setup] [Always] ASUS P7F-C Series 4-37 When set a password, this item to change the user password. Main Advanced BIOS SETUP UTILITY Server Power Boot Tools Exit Supervisor Password : Installed User Password : Not Installed Change Supervisor Password User Access Level Change User Password Password Check [Full Access] [Setup] to set or change password. Limited...
... in the Setup utility. The message "Password Installed" appears after you to change other items appear to any field. Password Check [Setup] When set your password successfully. Configuration options: [Setup] [Always] ASUS P7F-C Series 4-37 When set a password, this item to change the user password. Main Advanced BIOS SETUP UTILITY Server Power Boot Tools Exit Supervisor Password : Installed User Password : Not Installed Change Supervisor Password User Access Level Change User Password Password Check [Full Access] [Setup] to set or change password. Limited...
User Guide
Page 99
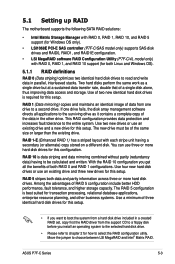
...5.1 Setting up RAID The motherboard supports the following SATA RAID solutions: • Intel Matrix Storage Manager with RAID 0, RAID 1, RAID 10, and RAID 5 support (for Windows OS only). • LSI1068E PCI-E SAS controller (P7F-C/SAS model only) supports SAS disk drives and RAID0, RAID1, and RAID1E configuration. • LSI MegaRAID software RAID Configuration Utility (P7F-C/4L model only) with each stripe unit having to be of two new identical hard disk drives is required for this setup. RAID 1-E (Enhanced RAID 1) has a striped layout with RAID 0, RAID 1, and RAID 10 support...
...5.1 Setting up RAID The motherboard supports the following SATA RAID solutions: • Intel Matrix Storage Manager with RAID 0, RAID 1, RAID 10, and RAID 5 support (for Windows OS only). • LSI1068E PCI-E SAS controller (P7F-C/SAS model only) supports SAS disk drives and RAID0, RAID1, and RAID1E configuration. • LSI MegaRAID software RAID Configuration Utility (P7F-C/4L model only) with each stripe unit having to be of two new identical hard disk drives is required for this setup. RAID 1-E (Enhanced RAID 1) has a striped layout with RAID 0, RAID 1, and RAID 10 support...

User Guide
Page 100
... Embedded SATA RAID Setup Utility or the Intel® Matrix Storage Manager if you installed Serial ATA hard disk drives on the motherboard. 3. To install the SATA hard disks for RAID configuration: 1. Enter the BIOS Setup during POST. 2. Refer to Chapter 4 for details on entering and navigating through the BIOS Setup. 5.1.4 RAID configuration utilities Depending on how to save your changes and exit the BIOS Setup. For example, use , you can create a RAID set using the utilities embedded in the system user guide. 2. Install the SATA hard disks into the drive...
... Embedded SATA RAID Setup Utility or the Intel® Matrix Storage Manager if you installed Serial ATA hard disk drives on the motherboard. 3. To install the SATA hard disks for RAID configuration: 1. Enter the BIOS Setup during POST. 2. Refer to Chapter 4 for details on entering and navigating through the BIOS Setup. 5.1.4 RAID configuration utilities Depending on how to save your changes and exit the BIOS Setup. For example, use , you can create a RAID set using the utilities embedded in the system user guide. 2. Install the SATA hard disks into the drive...

User Guide
Page 130
... Software RAID Configuration Utility Ver A.62 Apr 29, 2009 BIOS Version A.09.04300936R Management Menu Configure Initialize Objects Rebuild Check Consistency 5-34 Configure VD(s) Use Cursor Keys to the SATA connectors supported by the motherboard southbridge chip. 5.4 LSI Software RAID Configuration Utility (P7F-C/4L model only) The LSI MegaRAID software RAID configuration utility allows you to create RAID 0, RAID 1, or RAID 10 set (s). During POST, the LSI MegaRAID software RAID configuration utility automatically detects the installed SATA hard disk drives and displays any existing RAID...
... Software RAID Configuration Utility Ver A.62 Apr 29, 2009 BIOS Version A.09.04300936R Management Menu Configure Initialize Objects Rebuild Check Consistency 5-34 Configure VD(s) Use Cursor Keys to the SATA connectors supported by the motherboard southbridge chip. 5.4 LSI Software RAID Configuration Utility (P7F-C/4L model only) The LSI MegaRAID software RAID configuration utility allows you to create RAID 0, RAID 1, or RAID 10 set (s). During POST, the LSI MegaRAID software RAID configuration utility automatically detects the installed SATA hard disk drives and displays any existing RAID...

User Guide
Page 132
... least four identical hard disk drives when creating a RAID 10 set , and then press to configure array setting. 4. The ARRAY SELECTION MENU displays the available drives connected to include in the RAID set, and then press . LSI Software RAID Configuration Utility Ver A.62 Apr 29, 2009 BIOS Version A.09.04300936R Management Menu Configure Initialize Objects Rebuild Check Consistency Easy Configuration - Use the up/down arrow key to select the drives you want to the SATA ports. Select all the drives required for the RAID set . 3.
... least four identical hard disk drives when creating a RAID 10 set , and then press to configure array setting. 4. The ARRAY SELECTION MENU displays the available drives connected to include in the RAID set, and then press . LSI Software RAID Configuration Utility Ver A.62 Apr 29, 2009 BIOS Version A.09.04300936R Management Menu Configure Initialize Objects Rebuild Check Consistency Easy Configuration - Use the up/down arrow key to select the drives you want to the SATA ports. Select all the drives required for the RAID set . 3.

User Guide
Page 137
... MNeenwu Configuration Configure View/Add Configuration Initialize Clear Configuration Objects Select Boot Drive Rebuild Check Consistency View/Add to add a new RAID set. ARRAY SELECTION MENU Management Menu Configure Initialize Objects Rebuild Check Consistency PORT # 0 ONLIN A00-00 1 ONLIN A00-01 2 READY 3 READY Port # 2 DISK 77247MB HDS728080PLA380 PF20A60A SPACE-Sel,ENTER-EndArray,F10-Configure,F2-Drive Info,F3-Virtual Drives,F4-HSP The information of the selected hard disk drive displays at the bottom of section 5.2.1 Creating a RAID set , then press . ASUS P7F-C Series...
... MNeenwu Configuration Configure View/Add Configuration Initialize Clear Configuration Objects Select Boot Drive Rebuild Check Consistency View/Add to add a new RAID set. ARRAY SELECTION MENU Management Menu Configure Initialize Objects Rebuild Check Consistency PORT # 0 ONLIN A00-00 1 ONLIN A00-01 2 READY 3 READY Port # 2 DISK 77247MB HDS728080PLA380 PF20A60A SPACE-Sel,ENTER-EndArray,F10-Configure,F2-Drive Info,F3-Virtual Drives,F4-HSP The information of the selected hard disk drive displays at the bottom of section 5.2.1 Creating a RAID set , then press . ASUS P7F-C Series...

User Guide
Page 140
... Objects Management MAednaupter Configure Virtual Drive Initialize Physical Drive Objects Rebuild Check Consistency Change VD Parameters Use Cursor Keys To Navigate Between Items And Press Enter To Select An Option 2. From the Management Menu, select Objects > Virtual Drive, and then press . Select the virtual drive to initialize from the Virtual Drives sub‑menu, and then press . LSI Software RAID Configuration Utility Ver A.62 Apr 29, 2009 BIOS Version A.09.04300936R Vitual Drive(1) Virtual Drive 0 Objects Management MAednaupter Configure Virtual Drive...
... Objects Management MAednaupter Configure Virtual Drive Initialize Physical Drive Objects Rebuild Check Consistency Change VD Parameters Use Cursor Keys To Navigate Between Items And Press Enter To Select An Option 2. From the Management Menu, select Objects > Virtual Drive, and then press . Select the virtual drive to initialize from the Virtual Drives sub‑menu, and then press . LSI Software RAID Configuration Utility Ver A.62 Apr 29, 2009 BIOS Version A.09.04300936R Vitual Drive(1) Virtual Drive 0 Objects Management MAednaupter Configure Virtual Drive...
User Guide
Page 153
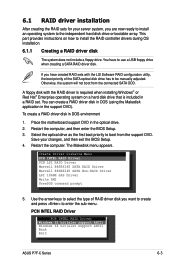
... hard disk drive or bootable array. A floppy disk with the LSI Software RAID configuration utility, the boot priority of RAID driver disk you have to be manually adjusted. Create Driver Diskette Menu PCH INTEL RAID Driver PCH LSI RAID Driver Marvell 88SE6145 SATA RAID Driver Marvell 88SE6145 SATA Non-RAID Driver LSI 1068E SAS Driver Write DMI FreeDOS command prompt 5. The Makedisk menu appears. Restart the computer, and then enter the BIOS Setup. 3. 6.1 RAID driver installation After creating the RAID sets for your changes, and then exit the BIOS Setup. 4. Use...
... hard disk drive or bootable array. A floppy disk with the LSI Software RAID configuration utility, the boot priority of RAID driver disk you have to be manually adjusted. Create Driver Diskette Menu PCH INTEL RAID Driver PCH LSI RAID Driver Marvell 88SE6145 SATA RAID Driver Marvell 88SE6145 SATA Non-RAID Driver LSI 1068E SAS Driver Write DMI FreeDOS command prompt 5. The Makedisk menu appears. Restart the computer, and then enter the BIOS Setup. 3. 6.1 RAID driver installation After creating the RAID sets for your changes, and then exit the BIOS Setup. 4. Use...
User Guide
Page 156
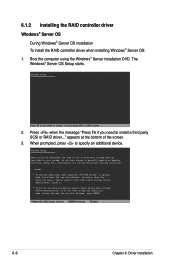
Press when the message "Press F6 if you have a device support disk from a mass storage device manufacturer, press S. * If you need to install a third party SCSI or RAID driver... 2. The Windows® Server OS Setup starts. Windows Setup Setup could not determine the type of the screen. 3. Currently, Setup will load support for the following mass storage devices(s): * To specify additional SCSI adapters, DVD-ROM drives, or special disk controllers for use with Windows, press ENTER. appears at the bottom of one...
Press when the message "Press F6 if you have a device support disk from a mass storage device manufacturer, press S. * If you need to install a third party SCSI or RAID driver... 2. The Windows® Server OS Setup starts. Windows Setup Setup could not determine the type of the screen. 3. Currently, Setup will load support for the following mass storage devices(s): * To specify additional SCSI adapters, DVD-ROM drives, or special disk controllers for use with Windows, press ENTER. appears at the bottom of one...
User Guide
Page 157
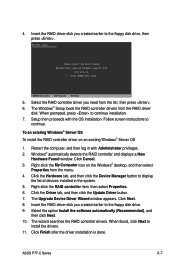
... existing Windows® Server OS 1. The wizard searches the RAID controller drivers. Windows Setup Please insert the disk labeled Manufacturer-supplied hardware support disk into Drive A: * Press ENTER when ready. Click the Hardware tab, and then click the Device Manager button to the floppy disk drive, then press . When found, click Next to continue installation. 7. Restart the computer, and then log in the system. 5. Insert the RAID driver disk you created earlier to continue. ASUS P7F...
... existing Windows® Server OS 1. The wizard searches the RAID controller drivers. Windows Setup Please insert the disk labeled Manufacturer-supplied hardware support disk into Drive A: * Press ENTER when ready. Click the Hardware tab, and then click the Device Manager button to the floppy disk drive, then press . When found, click Next to continue installation. 7. Restart the computer, and then log in the system. 5. Insert the RAID driver disk you created earlier to continue. ASUS P7F...


