
User Manual
Page 3
...this guide...ix P6X58D Premium specifications summary xi Chapter 1: Product introduction 1.1 Welcome!...1-1 1.2 Package contents 1-1 1.3 Special features 1-2 1.3.1 Product highlights 1-2 1.3.2 ASUS unique features 1-3 1.3.3 ASUS exclusive overclocking features 1-5 Chapter 2: Hardware information 2.1 Before you proceed 2-1 2.2 Motherboard overview 2-2 2.2.1 Motherboard layout 2-2 2.2.2 Layout contents 2-3 2.2.3 Placement direction 2-4 2.2.4 Screw holes 2-4 2.3 Central Processing Unit (CPU 2-5 2.3.1 Installing the CPU 2-5 2.3.2 Installing the CPU heatsink and fan...
...this guide...ix P6X58D Premium specifications summary xi Chapter 1: Product introduction 1.1 Welcome!...1-1 1.2 Package contents 1-1 1.3 Special features 1-2 1.3.1 Product highlights 1-2 1.3.2 ASUS unique features 1-3 1.3.3 ASUS exclusive overclocking features 1-5 Chapter 2: Hardware information 2.1 Before you proceed 2-1 2.2 Motherboard overview 2-2 2.2.1 Motherboard layout 2-2 2.2.2 Layout contents 2-3 2.2.3 Placement direction 2-4 2.2.4 Screw holes 2-4 2.3 Central Processing Unit (CPU 2-5 2.3.1 Installing the CPU 2-5 2.3.2 Installing the CPU heatsink and fan...
User Manual
Page 4
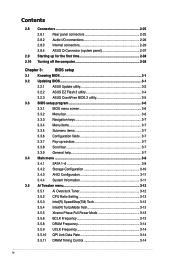
... 3-2 3.2.2 ASUS EZ Flash 2 utility 3-4 3.2.3 ASUS CrashFree BIOS 3 utility 3-5 3.3 BIOS setup program 3-6 3.3.1 BIOS menu screen 3-6 3.3.2 Menu bar 3-6 3.3.3 Navigation keys 3-7 3.3.4 Menu items 3-7 3.3.5 Submenu items 3-7 3.3.6 Configuration fields 3-7 3.3.7 Pop-up window 3-7 3.3.8 Scroll bar 3-7 3.3.9 General help 3-7 3.4 Main menu 3-8 3.4.1 SATA 1-6 3-8 3.4.2 Storage Configuration 3-10 3.4.3 AHCI Configuration 3-11 3.4.4 System Information 3-11 3.5 Ai Tweaker menu 3-12 3.5.1 Ai Overclock Tuner 3-12 3.5.2 CPU Ratio...
... 3-2 3.2.2 ASUS EZ Flash 2 utility 3-4 3.2.3 ASUS CrashFree BIOS 3 utility 3-5 3.3 BIOS setup program 3-6 3.3.1 BIOS menu screen 3-6 3.3.2 Menu bar 3-6 3.3.3 Navigation keys 3-7 3.3.4 Menu items 3-7 3.3.5 Submenu items 3-7 3.3.6 Configuration fields 3-7 3.3.7 Pop-up window 3-7 3.3.8 Scroll bar 3-7 3.3.9 General help 3-7 3.4 Main menu 3-8 3.4.1 SATA 1-6 3-8 3.4.2 Storage Configuration 3-10 3.4.3 AHCI Configuration 3-11 3.4.4 System Information 3-11 3.5 Ai Tweaker menu 3-12 3.5.1 Ai Overclock Tuner 3-12 3.5.2 CPU Ratio...
User Manual
Page 5
... Bus Voltage 3-17 3.5.21 DRAM DATA REF Voltage on CHA/B/C 3-18 3.5.22 DRAM CTRL REF Voltage on CHA/B/C 3-18 3.5.23 Load-Line Calibration 3-18 3.5.24 CPU Differential Amplitude 3-18 3.5.25 CPU Clock Skew 3-18 3.5.26 CPU Spread Spectrum 3-18 3.5.27 IOH Clock Skew 3-18 3.5.28 PCIE Spread Spectrum 3-18 3.6 Advanced menu 3-19...3.7.5 EuP Ready 3-26 3.7.6 APM Configuration 3-27 3.7.7 Hardware Monitor 3-28 3.8 Boot menu 3-29 3.8.1 Boot Device Priority 3-29 3.8.2 Boot Settings Configuration 3-30 3.8.3 Security 3-31 3.9 Tools menu 3-33 3.9.1 ASUS EZ Flash 2 3-33 3.9.2 Express Gate 3-34...
... Bus Voltage 3-17 3.5.21 DRAM DATA REF Voltage on CHA/B/C 3-18 3.5.22 DRAM CTRL REF Voltage on CHA/B/C 3-18 3.5.23 Load-Line Calibration 3-18 3.5.24 CPU Differential Amplitude 3-18 3.5.25 CPU Clock Skew 3-18 3.5.26 CPU Spread Spectrum 3-18 3.5.27 IOH Clock Skew 3-18 3.5.28 PCIE Spread Spectrum 3-18 3.6 Advanced menu 3-19...3.7.5 EuP Ready 3-26 3.7.6 APM Configuration 3-27 3.7.7 Hardware Monitor 3-28 3.8 Boot menu 3-29 3.8.1 Boot Device Priority 3-29 3.8.2 Boot Settings Configuration 3-30 3.8.3 Security 3-31 3.9 Tools menu 3-33 3.9.1 ASUS EZ Flash 2 3-33 3.9.2 Express Gate 3-34...
User Manual
Page 11
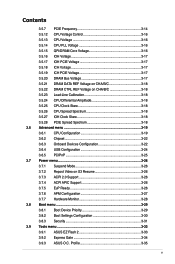
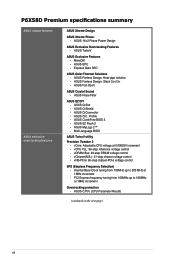
...P6X58D Premium specifications summary CPU Chipset System bus Memory Expansion slots Multi-GPU support Storage LAN Audio IEEE 1394 USB LGA1366 socket for Intel® Core™ i7 Processor Extreme Edition / Core™ i7 Processor Supports Intel® Turbo Boost Technology * Refer to www.asus.com for Intel CPU ...support list Intel® X58 / ICH10R Up to www.asus.com or this user manual for the Memory QVL (Qualified Vendors Lists) 3 x PCI Express 2.0 x16 ...
...P6X58D Premium specifications summary CPU Chipset System bus Memory Expansion slots Multi-GPU support Storage LAN Audio IEEE 1394 USB LGA1366 socket for Intel® Core™ i7 Processor Extreme Edition / Core™ i7 Processor Supports Intel® Turbo Boost Technology * Refer to www.asus.com for Intel CPU ...support list Intel® X58 / ICH10R Up to www.asus.com or this user manual for the Memory QVL (Qualified Vendors Lists) 3 x PCI Express 2.0 x16 ...
User Manual
Page 12
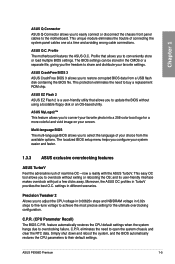
... frequency tuning from 100MHz up to 500 MHz at 1MHz increment - ASUS C.P.R. (CPU Parameter Recall) (continued on the next page) xii P6X58D Premium specifications summary ASUS unique features ASUS exclusive overclocking features ASUS Xtreme Design ASUS Xtreme Phase: - ASUS Q-Connector - Express Gate SSD ASUS Quiet Thermal Solutions - ASUS EZ Flash 2 - ASUS Q-Shield - vChipset(N.B.): 31-step chipset voltage control - vNB-PCIe: 65-step...
... frequency tuning from 100MHz up to 500 MHz at 1MHz increment - ASUS C.P.R. (CPU Parameter Recall) (continued on the next page) xii P6X58D Premium specifications summary ASUS unique features ASUS exclusive overclocking features ASUS Xtreme Design ASUS Xtreme Phase: - ASUS Q-Connector - Express Gate SSD ASUS Quiet Thermal Solutions - ASUS EZ Flash 2 - ASUS Q-Shield - vChipset(N.B.): 31-step chipset voltage control - vNB-PCIe: 65-step...
User Manual
Page 13
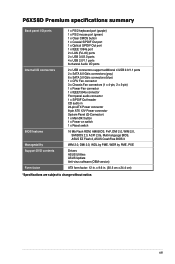
P6X58D Premium specifications summary Back panel I/O ports Internal I/O connectors ...channel Audio I/O ports 2 x USB connectors support additional 4 USB 2.0/1.1 ports 2 x SATA 6.0 Gb/s connectors (gray) 6 x SATA 3.0 Gb/s connectors (blue) 1 x CPU Fan connector 3 x Chassis Fan connectors (1 x 4-pin, 2 x 3-pin) 1 x Power Fan connector 1 x IEEE1394a connector Front panel audio connector 1 x S/PDIF Out ... 2.3, ACPI 2.0a, Multi-language BIOS, ASUS EZ Flash 2, ASUS CrashFree BIOS 3 WfM 2.0, DMI 2.0, WOL by PME, WOR by PME, PXE Drivers ASUS Utilities ASUS Update Anti-virus software (OEM version) ATX...
P6X58D Premium specifications summary Back panel I/O ports Internal I/O connectors ...channel Audio I/O ports 2 x USB connectors support additional 4 USB 2.0/1.1 ports 2 x SATA 6.0 Gb/s connectors (gray) 6 x SATA 3.0 Gb/s connectors (blue) 1 x CPU Fan connector 3 x Chassis Fan connectors (1 x 4-pin, 2 x 3-pin) 1 x Power Fan connector 1 x IEEE1394a connector Front panel audio connector 1 x S/PDIF Out ... 2.3, ACPI 2.0a, Multi-language BIOS, ASUS EZ Flash 2, ASUS CrashFree BIOS 3 WfM 2.0, DMI 2.0, WOL by PME, WOR by PME, PXE Drivers ASUS Utilities ASUS Update Anti-virus software (OEM version) ATX...
User Manual
Page 17
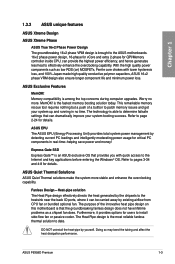
...or passive cooler. Fanless Design-Heat-pipe solution The Heat Pipe design effectively directs the heat generated by existing airflow from CPU fan or bundled optional fan. The Heat Pipe design is the fastest memory booting solution today. Doing so may bend ...for details. Furthermore, it can dramatically improve your system up and running in real-time-helping save power and money! ASUS P6X58D Premium 1-3 ASUS Quiet Thermal Solutions ASUS Quiet Thermal solutions make the system more . The purpose of a buttton to effectively enhance the overclocking capability. MemOK! ...
...or passive cooler. Fanless Design-Heat-pipe solution The Heat Pipe design effectively directs the heat generated by existing airflow from CPU fan or bundled optional fan. The Heat Pipe design is the fastest memory booting solution today. Doing so may bend ...for details. Furthermore, it can dramatically improve your system up and running in real-time-helping save power and money! ASUS P6X58D Premium 1-3 ASUS Quiet Thermal Solutions ASUS Quiet Thermal solutions make the system more . The purpose of a buttton to effectively enhance the overclocking capability. MemOK! ...
User Manual
Page 18
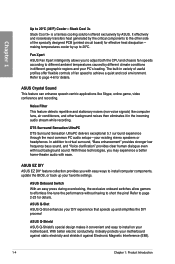
...allows you to adjust both the CPU and chassis fan speeds according to different ambient temperatures caused by the critical components to the other background noises then eliminates it convenient and easy to install on your PC's loading. ASUS Crystal Sound This feature can enhance... UltraPC delivers exceptional 5.1 surround experience through the most common PC audio setups-your DIY experience that speeds up and simplifies the DIY process! ASUS Q-Slot ASUS Q-Slot enhances your existing stereo speakers or headphones. Chapter 1 Up to 20ºC (36ºF) Cooler-Stack Cool 3+ Stack Cool...
...allows you to adjust both the CPU and chassis fan speeds according to different ambient temperatures caused by the critical components to the other background noises then eliminates it convenient and easy to install on your PC's loading. ASUS Crystal Sound This feature can enhance... UltraPC delivers exceptional 5.1 surround experience through the most common PC audio setups-your DIY experience that speeds up and simplifies the DIY process! ASUS Q-Slot ASUS Q-Slot enhances your existing stereo speakers or headphones. Chapter 1 Up to 20ºC (36ºF) Cooler-Stack Cool 3+ Stack Cool...
User Manual
Page 19
.... Simply shut down and reboot the system, and the BIOS automatically restores the CPU parameters to overclocking failure. Profile The motherboard features the ASUS O.C. ASUS EZ Flash 2 ASUS EZ Flash 2 is a user-friendly utility that allows you to overclock without ...data. and its user-friendly interface makes overclock with the ASUS TurboV. feature automatically restores the CPU default settings when the system hangs due to their default settings. ASUS P6X58D Premium 1-5 Chapter 1 ASUS Q-Connector ASUS Q-Connector allows you the freedom to share and distribute ...
.... Simply shut down and reboot the system, and the BIOS automatically restores the CPU parameters to overclocking failure. Profile The motherboard features the ASUS O.C. ASUS EZ Flash 2 ASUS EZ Flash 2 is a user-friendly utility that allows you to overclock without ...data. and its user-friendly interface makes overclock with the ASUS TurboV. feature automatically restores the CPU default settings when the system hangs due to their default settings. ASUS P6X58D Premium 1-5 Chapter 1 ASUS Q-Connector ASUS Q-Connector allows you the freedom to share and distribute ...
User Manual
Page 23
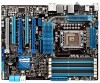
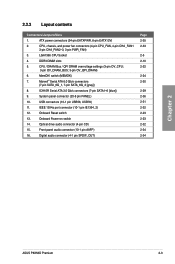
...) 10. LGA1366 CPU Socket 4. MemOK! USB connectors (10-1 pin USB56, USB78) 11. Digital audio connector (4-1 pin SPDIF_OUT) Page 2-35 2-33 2-5 2-10 2-22 2-24 2-30 2-29 2-36 2-31 2-32 2-23 2-23 2-32 2-34 2-34 Chapter 2 ASUS P6X58D Premium 2-3 DDR3 DIMM slots...Layout contents Connectors/Jumpers/Slots 1. Optical drive audio connector (4-pin CD) 15. CPU / DRAM Bus / QPI DRAM overvoltage settings (3-pin OV_CPU; 3-pin OV_DRAM_BUS; 3-pin OV_QPI_DRAM) 6. Onboard Reset switch 13. CPU, chassis, and power fan connectors (4-pin CPU_FAN, 4-pin CHA_FAN1 3-pin CHA_FAN2-3, ...
...) 10. LGA1366 CPU Socket 4. MemOK! USB connectors (10-1 pin USB56, USB78) 11. Digital audio connector (4-1 pin SPDIF_OUT) Page 2-35 2-33 2-5 2-10 2-22 2-24 2-30 2-29 2-36 2-31 2-32 2-23 2-23 2-32 2-34 2-34 Chapter 2 ASUS P6X58D Premium 2-3 DDR3 DIMM slots...Layout contents Connectors/Jumpers/Slots 1. Optical drive audio connector (4-pin CD) 15. CPU / DRAM Bus / QPI DRAM overvoltage settings (3-pin OV_CPU; 3-pin OV_DRAM_BUS; 3-pin OV_QPI_DRAM) 6. Onboard Reset switch 13. CPU, chassis, and power fan connectors (4-pin CPU_FAN, 4-pin CHA_FAN1 3-pin CHA_FAN2-3, ...
User Manual
Page 25
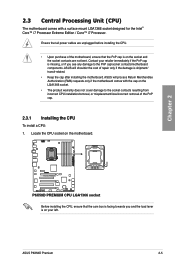
... shoulder the cost of the PnP cap. 2.3.1 Installing the CPU To install a CPU: 1. ASUS P6X58D Premium 2-5 Locate the CPU socket on the LGA1366 socket. • The product warranty does not cover damage to the PnP cap/socket contacts/motherboard components. ASUS will process Return Merchandise Authorization (RMA) requests only if the motherboard comes with a surface mount LGA1366...
... shoulder the cost of the PnP cap. 2.3.1 Installing the CPU To install a CPU: 1. ASUS P6X58D Premium 2-5 Locate the CPU socket on the LGA1366 socket. • The product warranty does not cover damage to the PnP cap/socket contacts/motherboard components. ASUS will process Return Merchandise Authorization (RMA) requests only if the motherboard comes with a surface mount LGA1366...

User Manual
Page 26
Press the load lever with your thumb (A), then move it to a 100º angle. Lift the load lever in the direction of the arrow to the socket pins, do not remove the PnP cap unless you are installing a CPU. Load plate 4 3 5. Lift the load plate with your thumb and forefinger to the left (B) until it is released from the CPU socket. To prevent damage to a 135º angle. 4. Remove the PnP cap from the retention tab. PnP cap 2-6 Chapter 2: Hardware information Retention tab A B Load lever 3. Chapter 2 2.
Press the load lever with your thumb (A), then move it to a 100º angle. Lift the load lever in the direction of the arrow to the socket pins, do not remove the PnP cap unless you are installing a CPU. Load plate 4 3 5. Lift the load plate with your thumb and forefinger to the left (B) until it is released from the CPU socket. To prevent damage to a 135º angle. 4. Remove the PnP cap from the retention tab. PnP cap 2-6 Chapter 2: Hardware information Retention tab A B Load lever 3. Chapter 2 2.
User Manual
Page 27
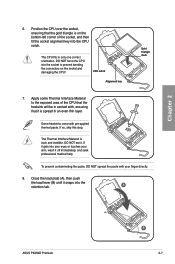
... your eyes or touches your finger directly. 8. A ASUS P6X58D Premium B 2-7 The CPU fits in an even thin layer. DO NOT eat it...Apply some Thermal Interface Material to prevent bending the connectors on the bottom‑left corner of the CPU that the heatsink will be in contact with pre-applied thermal paste. Some heatsinks come with , ensuring... that the gold triangle is on the socket and damaging the CPU! If it snaps into the CPU notch. The Thermal Interface Material is spread in only one correct orientation. If so, skip ...
... your eyes or touches your finger directly. 8. A ASUS P6X58D Premium B 2-7 The CPU fits in an even thin layer. DO NOT eat it...Apply some Thermal Interface Material to prevent bending the connectors on the bottom‑left corner of the CPU that the heatsink will be in contact with pre-applied thermal paste. Some heatsinks come with , ensuring... that the gold triangle is on the socket and damaging the CPU! If it snaps into the CPU notch. The Thermal Interface Material is spread in only one correct orientation. If so, skip ...

User Manual
Page 28
...directional heatsink and fan. • Your Intel® LGA1366 heatsink and fan assembly comes in a push-pin design and requires no tool to the CPU fan connector. 2-8 Chapter 2: Hardware information Push down two fasteners at a time in place. A B A B A B A 1 1 Orient the heatsink and...fan The Intel® LGA1366 processor requires a specially designed heatsink and fan assembly to the CPU heatsink or CPU before you install the CPU fan and heatsink assembly. If you purchased a separate CPU heatsink and fan assembly, ensure that the four fasteners match the holes on the motherboard....
...directional heatsink and fan. • Your Intel® LGA1366 heatsink and fan assembly comes in a push-pin design and requires no tool to the CPU fan connector. 2-8 Chapter 2: Hardware information Push down two fasteners at a time in place. A B A B A B A 1 1 Orient the heatsink and...fan The Intel® LGA1366 processor requires a specially designed heatsink and fan assembly to the CPU heatsink or CPU before you install the CPU fan and heatsink assembly. If you purchased a separate CPU heatsink and fan assembly, ensure that the four fasteners match the holes on the motherboard....
User Manual
Page 29
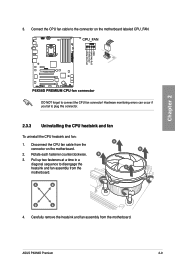
... connector. 2.3.3 Uninstalling the CPU heatsink and fan To uninstall the CPU heatsink and fan: 1. A B A A B B A 4. Carefully remove the heatsink and fan assembly from the connector on the motherboard labeled CPU_FAN. 3. Chapter 2 DO NOT forget to the connector on the motherboard. 2. Rotate each fastener counterclockwise. B 3. Connect the CPU fan cable to connect the CPU fan connector! ASUS P6X58D Premium 2-9
... connector. 2.3.3 Uninstalling the CPU heatsink and fan To uninstall the CPU heatsink and fan: 1. A B A A B B A 4. Carefully remove the heatsink and fan assembly from the connector on the motherboard labeled CPU_FAN. 3. Chapter 2 DO NOT forget to the connector on the motherboard. 2. Rotate each fastener counterclockwise. B 3. Connect the CPU fan cable to connect the CPU fan connector! ASUS P6X58D Premium 2-9

User Manual
Page 30
... figure illustrates the location of the DDR3 DIMM sockets: Chapter 2 Recommended memory configurations One DIMM: You may install one DIMM is notched differently to Intel CPU spec deDfiIMniMtioCn1, the sysDteIMmM wC1ill not boot if only one memory module in DIMM slot A2, B2, or C2. Follow the illustrations above for better...
... figure illustrates the location of the DDR3 DIMM sockets: Chapter 2 Recommended memory configurations One DIMM: You may install one DIMM is notched differently to Intel CPU spec deDfiIMniMtioCn1, the sysDteIMmM wC1ill not boot if only one memory module in DIMM slot A2, B2, or C2. Follow the illustrations above for better...
User Manual
Page 31
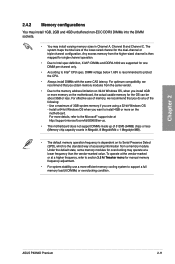
... For system stability, use of the lower-sized channel for one DIMM per channel only. • According to Intel® CPU spec, DIMM voltage below 1.65V is dependent on the motherboard. Use a maximum of 3GB system memory if you want to ... memory sizes in Channel A, Channel B and Channel C. Any excess memory from the same vendor. • Due to protect the CPU. • Always install DIMMs with the same CAS latency. DIMMs and DDR3-1600 are using a 32-bit Windows OS. - ... its Serial Presence Detect (SPD), which is the standard way of the following: - ASUS P6X58D Premium 2-11
... For system stability, use of the lower-sized channel for one DIMM per channel only. • According to Intel® CPU spec, DIMM voltage below 1.65V is dependent on the motherboard. Use a maximum of 3GB system memory if you want to ... memory sizes in Channel A, Channel B and Channel C. Any excess memory from the same vendor. • Due to protect the CPU. • Always install DIMMs with the same CAS latency. DIMMs and DDR3-1600 are using a 32-bit Windows OS. - ... its Serial Presence Detect (SPD), which is the standard way of the following: - ASUS P6X58D Premium 2-11
User Manual
Page 42
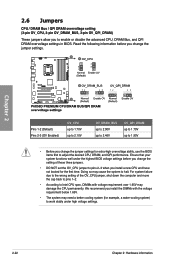
..., DIMMs with the voltage requirement below 1.65V. • The system may cause the system to enable or disable the advanced CPU, DRAM Bus, and QPI DRAM overvoltage settings in BIOS. Ensure that your system functions well under high voltage settings. 2-22 Chapter 2: Hardware information ...computer and move the cap back to pins 1-2. • According to pins 2-3 when you install a new CPU and have not booted for example, a water-cooling system) to adjust the desired CPU, DRAM, and QPI performance. We recommend you install the DIMMs with voltage requirement over 1.65V may damage the...
..., DIMMs with the voltage requirement below 1.65V. • The system may cause the system to enable or disable the advanced CPU, DRAM Bus, and QPI DRAM overvoltage settings in BIOS. Ensure that your system functions well under high voltage settings. 2-22 Chapter 2: Hardware information ...computer and move the cap back to pins 1-2. • According to pins 2-3 when you install a new CPU and have not booted for example, a water-cooling system) to adjust the desired CPU, DRAM, and QPI performance. We recommend you install the DIMMs with voltage requirement over 1.65V may damage the...
User Manual
Page 53
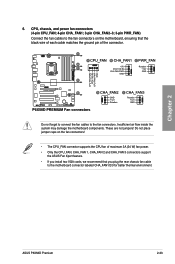
...not place jumper caps on the fan connectors! • The CPU_FAN connector supports the CPU fan of maximum 2A (24 W) fan power. • Only the CPU_FAN, CHA_FAN 1, CHA_FAN 2 and CHA_FAN 3 connectors support the ASUS Fan Xpert feature. • If you install two VGA cards, we recommend that you... connectors on the motherboard, ensuring that the black wire of each cable matches the ground pin of the connector. These are not jumpers! ASUS P6X58D Premium 2-33 Insufficient air flow inside the system may damage the motherboard components. Chapter 2 6. Do not forget to connect the fan cables to...
...not place jumper caps on the fan connectors! • The CPU_FAN connector supports the CPU fan of maximum 2A (24 W) fan power. • Only the CPU_FAN, CHA_FAN 1, CHA_FAN 2 and CHA_FAN 3 connectors support the ASUS Fan Xpert feature. • If you install two VGA cards, we recommend that you... connectors on the motherboard, ensuring that the black wire of each cable matches the ground pin of the connector. These are not jumpers! ASUS P6X58D Premium 2-33 Insufficient air flow inside the system may damage the motherboard components. Chapter 2 6. Do not forget to connect the fan cables to...

User Manual
Page 67
... or MO drive. This makes more efficient use of the PCI bus as fewer transactions are specifically configuring a CD-ROM drive. Chapter 3 ASUS P6X58D Premium 3-9 Block (Multi-Sector Transfer) M [Auto] [Auto] When set to [Auto], the data transfer from and to the device occurs in...] DMA (Direct Memory Access) allows your device is installed. Select this mode, and if the device was not previously formatted with much less CPU overhead. SMART Monitoring [Auto] [Auto] Allows automatic selection of the S.M.A.R.T (Smart Monitoring, Analysis, and Reporting Technology). [Enabled] Enables the ...
... or MO drive. This makes more efficient use of the PCI bus as fewer transactions are specifically configuring a CD-ROM drive. Chapter 3 ASUS P6X58D Premium 3-9 Block (Multi-Sector Transfer) M [Auto] [Auto] When set to [Auto], the data transfer from and to the device occurs in...] DMA (Direct Memory Access) allows your device is installed. Select this mode, and if the device was not previously formatted with much less CPU overhead. SMART Monitoring [Auto] [Auto] Allows automatic selection of the S.M.A.R.T (Smart Monitoring, Analysis, and Reporting Technology). [Enabled] Enables the ...


