User Manual
Page 6
...the support DVD 4-1 4.2.2 Obtaining the software manuals 4-2 4.3 Software information 4-3 4.3.1 ASUS PC Probe II 4-3 4.3.2 ASUS AI Suite 4-4 4.3.3 ASUS EPU 4-5 4.3.4 ASUS Fan Xpert 4-6 4.3.5 ASUS TurboV 4-7 4.3.6 ASUS Express Gate SSD 4-8 4.3.7 Audio configurations 4-9 4.4 RAID configurations 4-10 4.4.1 RAID definitions 4-10 4.4.2 Installing Serial ATA hard disks 4-11 4.4.3 Setting the RAID item in BIOS 4-11 4.4.4 Intel® Matrix Storage Manager option ROM utility 4-11 4.5 Creating a RAID driver disk 4-15 4.5.1 Creating a RAID driver disk without entering the...
...the support DVD 4-1 4.2.2 Obtaining the software manuals 4-2 4.3 Software information 4-3 4.3.1 ASUS PC Probe II 4-3 4.3.2 ASUS AI Suite 4-4 4.3.3 ASUS EPU 4-5 4.3.4 ASUS Fan Xpert 4-6 4.3.5 ASUS TurboV 4-7 4.3.6 ASUS Express Gate SSD 4-8 4.3.7 Audio configurations 4-9 4.4 RAID configurations 4-10 4.4.1 RAID definitions 4-10 4.4.2 Installing Serial ATA hard disks 4-11 4.4.3 Setting the RAID item in BIOS 4-11 4.4.4 Intel® Matrix Storage Manager option ROM utility 4-11 4.5 Creating a RAID driver disk 4-15 4.5.1 Creating a RAID driver disk without entering the...
User Manual
Page 17
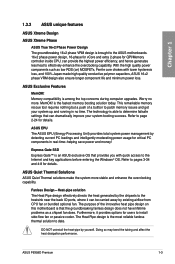
... chipsets to the heatsink near the back IO ports, where it provides options for users to the Internet and key applications before entering the Windows® OS. Worry no time. The purpose of a buttton to date. Refer to page 2-24 for critical PC components in no more stable and enhance the overclocking capability. ASUS P6X58D Premium 1-3 With the high quality power components such as a chipset fan...
... chipsets to the heatsink near the back IO ports, where it provides options for users to the Internet and key applications before entering the Windows® OS. Worry no time. The purpose of a buttton to date. Refer to page 2-24 for critical PC components in no more stable and enhance the overclocking capability. ASUS P6X58D Premium 1-3 With the high quality power components such as a chipset fan...
User Manual
Page 19
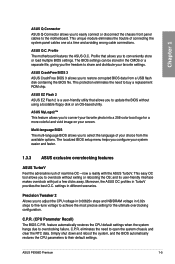
... load multiple BIOS settings. C.P.R. ASUS P6X58D Premium 1-5 ASUS EZ Flash 2 ASUS EZ Flash 2 is a user-friendly utility that allows you to update the BIOS without exiting or rebooting the OS; The localized BIOS setup menu helps you configure your system easier and faster. 1.3.3 ASUS exclusive overclocking features ASUS TurboV Feel the adrenaline rush of connecting the system panel cables one at a time and avoiding wrong cable connections. ASUS MyLogo2™ This feature allows you to the motherboard. Chapter 1 ASUS Q-Connector ASUS Q-Connector...
... load multiple BIOS settings. C.P.R. ASUS P6X58D Premium 1-5 ASUS EZ Flash 2 ASUS EZ Flash 2 is a user-friendly utility that allows you to update the BIOS without exiting or rebooting the OS; The localized BIOS setup menu helps you configure your system easier and faster. 1.3.3 ASUS exclusive overclocking features ASUS TurboV Feel the adrenaline rush of connecting the system panel cables one at a time and avoiding wrong cable connections. ASUS MyLogo2™ This feature allows you to the motherboard. Chapter 1 ASUS Q-Connector ASUS Q-Connector...
User Manual
Page 42
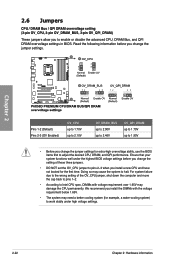
... system to enable or disable the advanced CPU, DRAM Bus, and QPI DRAM overvoltage settings in BIOS. For system failure due to the wrong setting of these three jumpers. • DO NOT set the OV_CPU jumper to pins 2-3 when you install a new CPU and have not booted for extra-high overvoltage ability, use the BIOS items first to 1.90V • Before you change the jumper settings. We recommend you install the DIMMs with voltage requirement...
... system to enable or disable the advanced CPU, DRAM Bus, and QPI DRAM overvoltage settings in BIOS. For system failure due to the wrong setting of these three jumpers. • DO NOT set the OV_CPU jumper to pins 2-3 when you install a new CPU and have not booted for extra-high overvoltage ability, use the BIOS items first to 1.90V • Before you change the jumper settings. We recommend you install the DIMMs with voltage requirement...
User Manual
Page 59
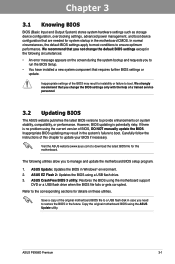
... current version of BIOS, DO NOT manually update the BIOS. Inappropriate settings of the original motherboard BIOS file to a USB flash disk in case you to restore the BIOS in the motherboard CMOS. However, BIOS updating is no problem using a USB flash drive. 3. Chapter 3 ASUS P6X58D Premium 3-1 We recommend that are needed for system startup in the future. If there is potentially risky. ASUS CrashFree BIOS 3 utility: Restores the BIOS using the ASUS Update utility. Save a copy of the BIOS may result in the system's failure...
... current version of BIOS, DO NOT manually update the BIOS. Inappropriate settings of the original motherboard BIOS file to a USB flash disk in case you to restore the BIOS in the motherboard CMOS. However, BIOS updating is no problem using a USB flash drive. 3. Chapter 3 ASUS P6X58D Premium 3-1 We recommend that are needed for system startup in the future. If there is potentially risky. ASUS CrashFree BIOS 3 utility: Restores the BIOS using the ASUS Update utility. Save a copy of the BIOS may result in the system's failure...
User Manual
Page 60
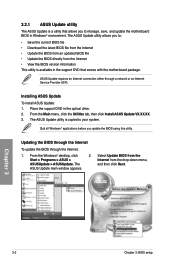
... Install ASUS Update VX.XX.XX. 3. Start > Programs > ASUS > ASUSUpdate > ASUSUpdate. Chapter 3 3-2 Chapter 3: BIOS setup ASUS Update requires an Internet connection either through the Internet: 1. Quit all Windows® applications before you to your system. 3.2.1 ASUS Update utility The ASUS Update is a utility that comes with the motherboard package. Updating the BIOS through the Internet To update the BIOS through a network or an Internet Service Provider (ISP). The ASUS Update main window appears. The ASUS Update utility is available in the support DVD...
... Install ASUS Update VX.XX.XX. 3. Start > Programs > ASUS > ASUSUpdate > ASUSUpdate. Chapter 3 3-2 Chapter 3: BIOS setup ASUS Update requires an Internet connection either through the Internet: 1. Quit all Windows® applications before you to your system. 3.2.1 ASUS Update utility The ASUS Update is a utility that comes with the motherboard package. Updating the BIOS through the Internet To update the BIOS through a network or an Internet Service Provider (ISP). The ASUS Update main window appears. The ASUS Update utility is available in the support DVD...

User Manual
Page 62
... NOT shut down or reset the system while updating the BIOS to enable it. 3.2.2 ASUS EZ Flash 2 utility The ASUS EZ Flash 2 feature allows you start using EZ Flash 2: 1. Press to use a bootable floppy disk or an OS‑based utility. Ensure to load the BIOS default settings to display the following. • Enter the BIOS setup program. ASUSTek EZ Flash 2 BIOS ROM Utility V3.44 FLASH TYPE: MXIC 25L1605A Current ROM BOARD: P6X58D PREMIUM VER: 0216 DATE: 10/16/2009 Update ROM BOARD: Unknown VER: Unknown...
... NOT shut down or reset the system while updating the BIOS to enable it. 3.2.2 ASUS EZ Flash 2 utility The ASUS EZ Flash 2 feature allows you start using EZ Flash 2: 1. Press to use a bootable floppy disk or an OS‑based utility. Ensure to load the BIOS default settings to display the following. • Enter the BIOS setup program. ASUSTek EZ Flash 2 BIOS ROM Utility V3.44 FLASH TYPE: MXIC 25L1605A Current ROM BOARD: P6X58D PREMIUM VER: 0216 DATE: 10/16/2009 Update ROM BOARD: Unknown VER: Unknown...
User Manual
Page 65
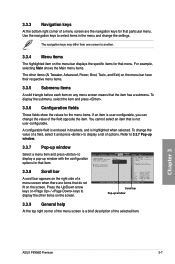
... field opposite the item. The navigation keys may differ from one screen to select a field. To display the submenu, select the item and press . 3.3.6 Configuration fields These fields show the values for that is highlighted when selected. Main BIOS SETUP UTILITY Ai Tweaker Advanced Power Boot Suspend Mode ACPI Version Features ACPI APIC support APM Configuration Hardware Monitor [Auto] [Disabled] [EDniasbalbelde]d Enabled Tools Exit Use [ENTER], [TAB] or [SHIFT-TAB] to another...
... field opposite the item. The navigation keys may differ from one screen to select a field. To display the submenu, select the item and press . 3.3.6 Configuration fields These fields show the values for that is highlighted when selected. Main BIOS SETUP UTILITY Ai Tweaker Advanced Power Boot Suspend Mode ACPI Version Features ACPI APIC support APM Configuration Hardware Monitor [Auto] [Disabled] [EDniasbalbelde]d Enabled Tools Exit Use [ENTER], [TAB] or [SHIFT-TAB] to another...
User Manual
Page 68
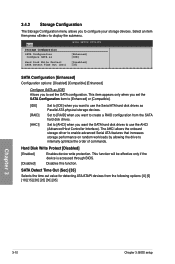
...you set the SATA configuration. This function will be effective only if the device is accessed through BIOS. [Disabled] Disables this function. Select an item then press to internally optimize the order of commands. Main BIOS SETUP UTILITY Storage Configuration SATA Configuration Configure SATA as [Enhanced] [IDE] Hard Disk Write Protect [Disabled] SATA Detect Time Out (Sec) [35] SATA Configuration [Enhanced] Configuration options: [Disabled] [Compatible] [Enhanced] Configure SATA as Parallel ATA physical storage devices. The AHCI allows the onboard storage driver to enable...
...you set the SATA configuration. This function will be effective only if the device is accessed through BIOS. [Disabled] Disables this function. Select an item then press to internally optimize the order of commands. Main BIOS SETUP UTILITY Storage Configuration SATA Configuration Configure SATA as [Enhanced] [IDE] Hard Disk Write Protect [Disabled] SATA Detect Time Out (Sec) [35] SATA Configuration [Enhanced] Configuration options: [Disabled] [Compatible] [Enhanced] Configure SATA as Parallel ATA physical storage devices. The AHCI allows the onboard storage driver to enable...
User Manual
Page 70
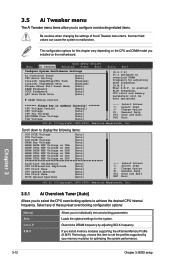
... set the profiles supported by your memory modules for the system. Main Ai Tweaker BIOS SETUP UTILITY Advanced Power Boot Tools Exit Configure System Performance Settings Ai Overclock Tuner CPU Ratio Setting Intel(R) SpeedStep(TM) Tech Intel(R) TurboMode Tech Xtreme Phase Full Power Mode DRAM Frequency UCLK Frequency QPI Link Data Rate [Auto] [Auto] [Enabled] [Enabled] [Auto] [Auto] [Auto] [Auto] DRAM Timing Control ******* Please key in numbers directly! ******* CPU Voltage Control [Manual] CPU Voltage [Auto] CPU PLL Voltage [Auto] QPI/DRAM Core Voltage [Auto...
... set the profiles supported by your memory modules for the system. Main Ai Tweaker BIOS SETUP UTILITY Advanced Power Boot Tools Exit Configure System Performance Settings Ai Overclock Tuner CPU Ratio Setting Intel(R) SpeedStep(TM) Tech Intel(R) TurboMode Tech Xtreme Phase Full Power Mode DRAM Frequency UCLK Frequency QPI Link Data Rate [Auto] [Auto] [Enabled] [Enabled] [Auto] [Auto] [Auto] [Auto] DRAM Timing Control ******* Please key in numbers directly! ******* CPU Voltage Control [Manual] CPU Voltage [Auto] CPU PLL Voltage [Auto] QPI/DRAM Core Voltage [Auto...
User Manual
Page 77
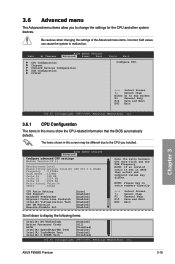
...-Disable Bit [Auto] [Enabled] [Enabled] [Enabled] [Enabled] [Enabled] [Enabled] Sets the ratio between CPU Core Clock and the FSB Frequency. ASUS P6X58D Premium 3-19 Main Ai Tweaker BIOS SETUP UTILITY Advanced Power Boot CPU Configuration Chipset Onboard Devices Configuration USB Configuration PCIPnP Tools Exit Configure CPU. The items shown in ratio numbers directly ←→ Select Screen ↑↓ Select Item F1 General Help F10 Save and Exit ESC Exit Scroll down to malfunction. NOTE: Please key in this menu show the CPU-related information that the BIOS...
...-Disable Bit [Auto] [Enabled] [Enabled] [Enabled] [Enabled] [Enabled] [Enabled] Sets the ratio between CPU Core Clock and the FSB Frequency. ASUS P6X58D Premium 3-19 Main Ai Tweaker BIOS SETUP UTILITY Advanced Power Boot CPU Configuration Chipset Onboard Devices Configuration USB Configuration PCIPnP Tools Exit Configure CPU. The items shown in ratio numbers directly ←→ Select Screen ↑↓ Select Item F1 General Help F10 Save and Exit ESC Exit Scroll down to malfunction. NOTE: Please key in this menu show the CPU-related information that the BIOS...
User Manual
Page 80
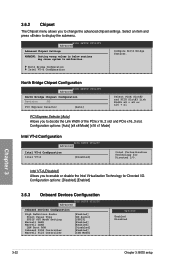
...PCI Express Selector [Auto] Allows you to enable or disable the Intel Virtualization Technology for Directed I /O. Intel VT-d [Disabled] Allows you to change the advanced chipset settings. Configuration options: [Disabled] [Enabled] 3.6.3 Onboard Devices Configuration BIOS SETUP UTILITY Advanced Onboard Devices Configuration High Definition Audio Front Panel Type SPDIF OUT Mode Setting Marvell LAN1 Marvell LAN2 LAN Boot ROM Onboard 1394 Controller Marvell 9123 Controller [Enabled] [HD Audio] [SPDIF] [Enabled] [Enabled] [Disabled] [Enabled] [IDE Mode] Options Enabled...
...PCI Express Selector [Auto] Allows you to enable or disable the Intel Virtualization Technology for Directed I /O. Intel VT-d [Disabled] Allows you to change the advanced chipset settings. Configuration options: [Disabled] [Enabled] 3.6.3 Onboard Devices Configuration BIOS SETUP UTILITY Advanced Onboard Devices Configuration High Definition Audio Front Panel Type SPDIF OUT Mode Setting Marvell LAN1 Marvell LAN2 LAN Boot ROM Onboard 1394 Controller Marvell 9123 Controller [Enabled] [HD Audio] [SPDIF] [Enabled] [Enabled] [Disabled] [Enabled] [IDE Mode] Options Enabled...

User Manual
Page 81
... HDMI audio output. Chapter 3 ASUS P6X58D Premium 3-23 SPDIF_OUT Mode Setting [SPDIF Output] If your graphics card has HDMI output and needs to use the AHCI (Advanced Host Controller Interface). The AHCI allows the onboard storage driver to enable advanced Serial ATA features that increases storage performance on the audio standard that the front panel audio module supports. [AC97] Sets the front panel audio connector (AAFP) mode to legacy AC'97 [HD Audio] Sets the front panel audio connector (AAFP) mode to internally optimize the order of commands.. LAN Boot ROM [Disabled...
... HDMI audio output. Chapter 3 ASUS P6X58D Premium 3-23 SPDIF_OUT Mode Setting [SPDIF Output] If your graphics card has HDMI output and needs to use the AHCI (Advanced Host Controller Interface). The AHCI allows the onboard storage driver to enable advanced Serial ATA features that increases storage performance on the audio standard that the front panel audio module supports. [AC97] Sets the front panel audio connector (AAFP) mode to legacy AC'97 [HD Audio] Sets the front panel audio connector (AAFP) mode to internally optimize the order of commands.. LAN Boot ROM [Disabled...

User Manual
Page 84
... 3: BIOS setup 3.7 Power menu The Power menu items allow you to select the Advanced Configuration and Power Interface (ACPI) state to be switched off some power at S5 state. Main Ai Tweaker BIOS SETUP UTILITY Advanced Power Boot Suspend Mode [Auto] Repost Video on S3/STR resume. 3.7.3 [Disabled] [Enabled] ACPI 2.0 Support [Disabled] The system will not invoke VGA BIOS POST on S3/STR resume. [Yes] The system invokes VGA BIOS POST on S3 Resume [Disabled] ACPI 2.0 Support [Disabled] ACPI APIC Support [Enabled] APM Configuration Hardware Monitor EuP Ready [Disabled] Tools...
... 3: BIOS setup 3.7 Power menu The Power menu items allow you to select the Advanced Configuration and Power Interface (ACPI) state to be switched off some power at S5 state. Main Ai Tweaker BIOS SETUP UTILITY Advanced Power Boot Suspend Mode [Auto] Repost Video on S3/STR resume. 3.7.3 [Disabled] [Enabled] ACPI 2.0 Support [Disabled] The system will not invoke VGA BIOS POST on S3/STR resume. [Yes] The system invokes VGA BIOS POST on S3 Resume [Disabled] ACPI 2.0 Support [Disabled] ACPI APIC Support [Enabled] APM Configuration Hardware Monitor EuP Ready [Disabled] Tools...
User Manual
Page 87
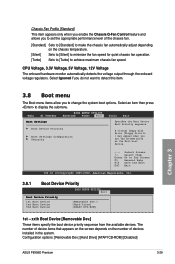
.... Configuration options: [Removable Dev.] [Hard Drive] [ATAPI CD-ROM] [Disabled] ASUS P6X58D Premium 3-29 A virtual floppy disk drive (Floppy Drive B: ) may appear when you to set the CD-ROM drive as the first boot device. ←→ Select Screen ↑↓ Select Item Enter Go to Sub Screen F1 General Help F10 Save and Exit ESC Exit v02.61 (C)Copyright 1985-2009, American Megatrends, Inc. 3.8.1 Boot Device Priority BIOS SETUP UTILITY Boot Boot Device Priority 1st Boot Device 2nd Boot Device 3rd Boot Device [Removable Dev.] [Hard Drive] [ATAPI DVD-ROM] 1st - Chassis...
.... Configuration options: [Removable Dev.] [Hard Drive] [ATAPI CD-ROM] [Disabled] ASUS P6X58D Premium 3-29 A virtual floppy disk drive (Floppy Drive B: ) may appear when you to set the CD-ROM drive as the first boot device. ←→ Select Screen ↑↓ Select Item Enter Go to Sub Screen F1 General Help F10 Save and Exit ESC Exit v02.61 (C)Copyright 1985-2009, American Megatrends, Inc. 3.8.1 Boot Device Priority BIOS SETUP UTILITY Boot Boot Device Priority 1st Boot Device 2nd Boot Device 3rd Boot Device [Removable Dev.] [Hard Drive] [ATAPI DVD-ROM] 1st - Chassis...
User Manual
Page 89
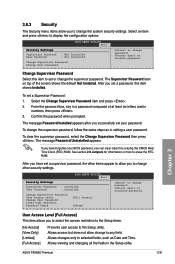
...appear to erase the RTC RAM. The message Password Installed appears after you to change the supervisor password. To change password. See section 2.6 Jumpers for information on top of at least six letters and/or numbers, then press . 3. BIOS SETUP UTILITY Boot Security Settings Supervisor Password User Password : Installed : Installed Change Supervisor Password User Access Level Change User Password Clear User Password Password Check [Full Access] [Setup] to disable password. ASUS P6X58D Premium 3-31 again to change the supervisor password, follow the same steps as...
...appear to erase the RTC RAM. The message Password Installed appears after you to change the supervisor password. To change password. See section 2.6 Jumpers for information on top of at least six letters and/or numbers, then press . 3. BIOS SETUP UTILITY Boot Security Settings Supervisor Password User Password : Installed : Installed Change Supervisor Password User Access Level Change User Password Clear User Password Password Check [Full Access] [Setup] to disable password. ASUS P6X58D Premium 3-31 again to change the supervisor password, follow the same steps as...
User Manual
Page 97
... updates to change at www.asus.com for reference only. Use the setup procedures presented in your hardware. • Motherboard settings and hardware options vary. The contents of the support DVD are subject to maximize the features of the user manual. The Make Disk menu contains items to open the folder of your computer. Click an item to create the RAID/AHCI driver disk. Click an icon to display DVD/ motherboard...
... updates to change at www.asus.com for reference only. Use the setup procedures presented in your hardware. • Motherboard settings and hardware options vary. The contents of the support DVD are subject to maximize the features of the user manual. The Make Disk menu contains items to open the folder of your computer. Click an item to create the RAID/AHCI driver disk. Click an icon to display DVD/ motherboard...
User Manual
Page 104
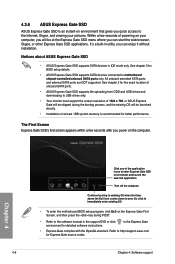
... the support DVD or click environment for Express Gate source codes. 4-8 Chapter 4: Software support Chapter 4 Click any of onboard SATA ports. • ASUS Express Gate SSD supports file uploading from ODD and USB drives and downloading to the software manual in utility, you power on the computer. See chapter 2 for the exact location of the application icons to enter Express Gate SSD environment and launch the selected application Turn off the computer Continue booting to...
... the support DVD or click environment for Express Gate source codes. 4-8 Chapter 4: Software support Chapter 4 Click any of onboard SATA ports. • ASUS Express Gate SSD supports file uploading from ODD and USB drives and downloading to the software manual in utility, you power on the computer. See chapter 2 for the exact location of the application icons to enter Express Gate SSD environment and launch the selected application Turn off the computer Continue booting to...
User Manual
Page 107
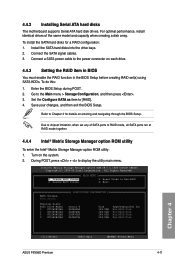
... the BIOS Setup before creating RAID set any of the same model and capacity when creating a disk array. Refer to Chapter 3 for a RAID configuration: 1. Intel(R) Matrix Storage Manager option ROM v8.0.0.1038 ICH10R wRAID5 Copyright(C) 2003-08 Intel Corporation. 4.4.2 Installing Serial ATA hard disks The motherboard supports Serial ATA hard disk drives. To install the SATA hard disks for details on the system. 2. Connect a SATA power cable to [RAID]. 4. Go to Non-RAID 4. Save your changes, and then exit the BIOS Setup. Reset Disks to the Main menu > Storage Configuration...
... the BIOS Setup before creating RAID set any of the same model and capacity when creating a disk array. Refer to Chapter 3 for a RAID configuration: 1. Intel(R) Matrix Storage Manager option ROM v8.0.0.1038 ICH10R wRAID5 Copyright(C) 2003-08 Intel Corporation. 4.4.2 Installing Serial ATA hard disks The motherboard supports Serial ATA hard disk drives. To install the SATA hard disks for details on the system. 2. Connect a SATA power cable to [RAID]. 4. Go to Non-RAID 4. Save your changes, and then exit the BIOS Setup. Reset Disks to the Main menu > Storage Configuration...
User Manual
Page 112
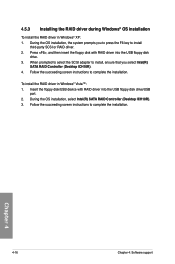
... the RAID driver in Windows® XP: 1. Insert the floppy disk/USB device with RAID driver into the USB floppy disk drive/USB port. 2. During the OS installation, the system prompts you select Intel(R) SATA RAID Controller (Desktop ICH10R). 4. Follow the succeeding screen instructions to complete the installation. 4.5.3 Installing the RAID driver during Windows® OS installation To install the RAID driver in Windows® Vista™: 1. Press , and then insert the floppy disk with RAID driver into the USB floppy disk drive. 3. Chapter 4 4-16 Chapter 4: Software support...
... the RAID driver in Windows® XP: 1. Insert the floppy disk/USB device with RAID driver into the USB floppy disk drive/USB port. 2. During the OS installation, the system prompts you select Intel(R) SATA RAID Controller (Desktop ICH10R). 4. Follow the succeeding screen instructions to complete the installation. 4.5.3 Installing the RAID driver during Windows® OS installation To install the RAID driver in Windows® Vista™: 1. Press , and then insert the floppy disk with RAID driver into the USB floppy disk drive. 3. Chapter 4 4-16 Chapter 4: Software support...


