
User Manual
Page 1
Motherboard P6X58D Premium
Motherboard P6X58D Premium

User Manual
Page 3
Contents Contents...iii Notices ...vii Safety information...viii About this guide...ix P6X58D Premium specifications summary xi Chapter 1: Product introduction 1.1 Welcome!...1-1 1.2 Package contents 1-1 1.3 Special features 1-2 1.3.1 Product highlights 1-2 1.3.2 ASUS unique features 1-3 1.3.3 ASUS exclusive overclocking features 1-5 Chapter 2: Hardware information 2.1 Before you proceed 2-1 2.2 Motherboard overview 2-2 2.2.1 Motherboard layout 2-2 2.2.2 Layout contents 2-3 2.2.3 Placement direction 2-4 2.2.4 Screw holes 2-4 2.3 Central Processing Unit (CPU 2-5 ...
Contents Contents...iii Notices ...vii Safety information...viii About this guide...ix P6X58D Premium specifications summary xi Chapter 1: Product introduction 1.1 Welcome!...1-1 1.2 Package contents 1-1 1.3 Special features 1-2 1.3.1 Product highlights 1-2 1.3.2 ASUS unique features 1-3 1.3.3 ASUS exclusive overclocking features 1-5 Chapter 2: Hardware information 2.1 Before you proceed 2-1 2.2 Motherboard overview 2-2 2.2.1 Motherboard layout 2-2 2.2.2 Layout contents 2-3 2.2.3 Placement direction 2-4 2.2.4 Screw holes 2-4 2.3 Central Processing Unit (CPU 2-5 ...

User Manual
Page 7
... which can radiate radio frequency energy and, if not installed and used in a particular installation. Changes or modifications to radio communications. DO NOT throw the motherboard in municipal waste. Check local regulations for compliance could void the user's authority to operate this equipment does cause harmful interference to radio or television... separation between the equipment and receiver. • Connect the equipment to an outlet on a circuit different from digital apparatus set out in our products at ASUS REACH website at http://green.asus.com/english/REACH.htm.
... which can radiate radio frequency energy and, if not installed and used in a particular installation. Changes or modifications to radio communications. DO NOT throw the motherboard in municipal waste. Check local regulations for compliance could void the user's authority to operate this equipment does cause harmful interference to radio or television... separation between the equipment and receiver. • Connect the equipment to an outlet on a circuit different from digital apparatus set out in our products at ASUS REACH website at http://green.asus.com/english/REACH.htm.

User Manual
Page 8
...qualified service technician or your dealer immediately. • To avoid short circuits, keep paper clips, screws, and staples away from the motherboard, ensure that all power cables are unplugged. • Seek professional assistance before using an adapter or extension cord. If you are ...using, contact your retailer. Operation safety • Before installing the motherboard and adding devices on it may become wet. • Place the product on a stable surface. • If you add a device. ...
...qualified service technician or your dealer immediately. • To avoid short circuits, keep paper clips, screws, and staples away from the motherboard, ensure that all power cables are unplugged. • Seek professional assistance before using an adapter or extension cord. If you are ...using, contact your retailer. Operation safety • Before installing the motherboard and adding devices on it may become wet. • Place the product on a stable surface. • If you add a device. ...
User Manual
Page 9
... software products. These documents are also provided. • Chapter 4: Software support This chapter describes the contents of the standard package. ix ASUS websites The ASUS website provides updated information on the motherboard. • Chapter 3: BIOS setup This chapter tells how to perform when installing system components. Detailed descriptions of the BIOS parameters are...
... software products. These documents are also provided. • Chapter 4: Software support This chapter describes the contents of the standard package. ix ASUS websites The ASUS website provides updated information on the motherboard. • Chapter 3: BIOS setup This chapter tells how to perform when installing system components. Detailed descriptions of the BIOS parameters are...
User Manual
Page 15
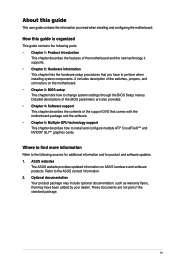
...making it , check the items in -1 ASUS Q-Connector kit 1 x ASUS Q-Shield 1 x ASUS 3-Way SLI™ bridge connector User Manual 1 x Optional Fan for reference only. ASUS P6X58D Premium 1-1 Before you for buying an ASUS® P6X58D Premium motherboard! Actual product specifications may vary with the ... on it another standout in the long line of the above items is damaged or missing, contact your motherboard package for the following items. Chapter 1 1 x ASUS P6X58D Premium motherboard 1 x ASUS SLI™ bridge cable 1 x 2-port USB 2.0 and 1-port eSATA module 2 x Serial ATA ...
...making it , check the items in -1 ASUS Q-Connector kit 1 x ASUS Q-Shield 1 x ASUS 3-Way SLI™ bridge connector User Manual 1 x Optional Fan for reference only. ASUS P6X58D Premium 1-1 Before you for buying an ASUS® P6X58D Premium motherboard! Actual product specifications may vary with the ... on it another standout in the long line of the above items is damaged or missing, contact your motherboard package for the following items. Chapter 1 1 x ASUS P6X58D Premium motherboard 1 x ASUS SLI™ bridge cable 1 x 2-port USB 2.0 and 1-port eSATA module 2 x Serial ATA ...
User Manual
Page 16
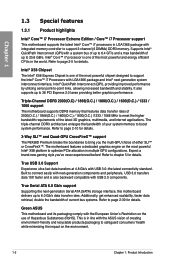
...Triple-Channel DDR3 2000(O.C) / 1866(O.C.) / 1800(O.C.) / 1600(O.C.) / 1333 / 1066 support The motherboard supports DDR3 memory that features data transfer rates of 2000(O.C.) / 1866(O.C.) / 1800(O.C.) / 1600(O.C.)...ASUS This motherboard and its packaging comply with LGA1366 package and Intel® next generation system interconnect interface, Intel® QuickPath Interconnect (QPI), providing improved performance by utilizing serial point-to bring you 've never experienced before! Refer to page 2-5 for details. 3-Way SLI™ and Quad-GPU CrossFireX™ support The P6X58D Premium...
...Triple-Channel DDR3 2000(O.C) / 1866(O.C.) / 1800(O.C.) / 1600(O.C.) / 1333 / 1066 support The motherboard supports DDR3 memory that features data transfer rates of 2000(O.C.) / 1866(O.C.) / 1800(O.C.) / 1600(O.C.)...ASUS This motherboard and its packaging comply with LGA1366 package and Intel® next generation system interconnect interface, Intel® QuickPath Interconnect (QPI), providing improved performance by utilizing serial point-to bring you 've never experienced before! Refer to page 2-5 for details. 3-Way SLI™ and Quad-GPU CrossFireX™ support The P6X58D Premium...
User Manual
Page 17
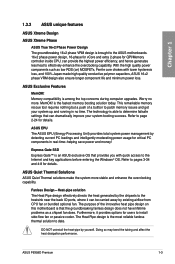
... settings that can dramatically improve your system up and running in real-time-helping save power and money! ASUS Exclusive Features MemOK! The technology is brought to the ASUS motherboards. 16+2 phase power design, 16-phase for vCore and extra 2-phase for QPI/Memory controller inside CPU... system booting success. The purpose of a buttton to install side-flow fan or passive cooler. ASUS P6X58D Premium 1-3 With the high quality power components such as low RDS (on this motherboard is that provides you with lower hysteresis loss, and 100% Japan-made high quality conductive polymer ...
... settings that can dramatically improve your system up and running in real-time-helping save power and money! ASUS Exclusive Features MemOK! The technology is brought to the ASUS motherboards. 16+2 phase power design, 16-phase for vCore and extra 2-phase for QPI/Memory controller inside CPU... system booting success. The purpose of a buttton to install side-flow fan or passive cooler. ASUS P6X58D Premium 1-3 With the high quality power components such as low RDS (on this motherboard is that provides you with lower hysteresis loss, and 100% Japan-made high quality conductive polymer ...
User Manual
Page 18
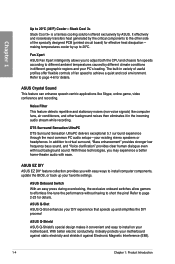
... and your motherboard against Electronic Magnetic Interference (EMI). 1-4 Chapter 1: Product Introduction ASUS EZ DIY ASUS EZ DIY feature collection provides you with loud background sound. ASUS Q-Slot ASUS Q-Slot enhances your existing stereo speakers or headphones. making temperatures cooler by ASUS. ASUS Crystal Sound ..." provides clear human dialogue even with easy ways to install computer components, update the BIOS, or back up your motherboard. Refer to page 2-23 for effective heat dissipation- Refer to short the pins! Noise Filter This feature detects repetitive...
... and your motherboard against Electronic Magnetic Interference (EMI). 1-4 Chapter 1: Product Introduction ASUS EZ DIY ASUS EZ DIY feature collection provides you with loud background sound. ASUS Q-Slot ASUS Q-Slot enhances your existing stereo speakers or headphones. making temperatures cooler by ASUS. ASUS Crystal Sound ..." provides clear human dialogue even with easy ways to install computer components, update the BIOS, or back up your motherboard. Refer to page 2-23 for effective heat dissipation- Refer to short the pins! Noise Filter This feature detects repetitive...
User Manual
Page 19
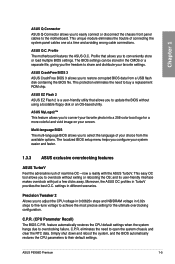
.... and its user-friendly interface makes overclock with the ASUS TurboV. settings in TurboV provides the best O.C. ASUS P6X58D Premium 1-5 ASUS EZ Flash 2 ASUS EZ Flash 2 is a user-friendly utility that allows you to the motherboard. eliminates the need to overclocking failure. Profile The motherboard features the ASUS O.C. Moreover, the ASUS OC profiles in different scenarios. Simply shut down and...
.... and its user-friendly interface makes overclock with the ASUS TurboV. settings in TurboV provides the best O.C. ASUS P6X58D Premium 1-5 ASUS EZ Flash 2 ASUS EZ Flash 2 is a user-friendly utility that allows you to the motherboard. eliminates the need to overclocking failure. Profile The motherboard features the ASUS O.C. Moreover, the ASUS OC profiles in different scenarios. Simply shut down and...

User Manual
Page 21
Chapter 2 ASUS P6X58D Premium 2-1 Chapter 2: Chapter 2 Hardware information 2.1 Before you proceed Take note of the following precautions before you install motherboard components or change any motherboard settings. • Unplug the power cord from the wall socket before touching any component, ensure that the ATX power supply is switched off or the ... or a metal object, such as the power supply case, to avoid damaging them due to static electricity. • Hold components by the edges to the motherboard, peripherals, or components.
Chapter 2 ASUS P6X58D Premium 2-1 Chapter 2: Chapter 2 Hardware information 2.1 Before you proceed Take note of the following precautions before you install motherboard components or change any motherboard settings. • Unplug the power cord from the wall socket before touching any component, ensure that the ATX power supply is switched off or the ... or a metal object, such as the power supply case, to avoid damaging them due to static electricity. • Hold components by the edges to the motherboard, peripherals, or components.

User Manual
Page 22
2.2 Motherboard overview 2.2.1 Motherboard layout Chapter 2 Refer to 2.8 Connectors for more information about rear panel connectors and internal connectors. 2-2 Chapter 2: Hardware information
2.2 Motherboard overview 2.2.1 Motherboard layout Chapter 2 Refer to 2.8 Connectors for more information about rear panel connectors and internal connectors. 2-2 Chapter 2: Hardware information

User Manual
Page 24
Doing so can damage the motherboard. Place this side towards the rear of the chassis as indicated in the image below. 2.2.4 Screw holes Place nine screws into the chassis in the correct orientation. The edge with external ports goes to the chassis. DO NOT overtighten the screws! 2.2.3 Placement direction When installing the motherboard, ensure that you place it into the holes indicated by circles to secure the motherboard to the rear part of the chassis Chapter 2 2-4 Chapter 2: Hardware information
Doing so can damage the motherboard. Place this side towards the rear of the chassis as indicated in the image below. 2.2.4 Screw holes Place nine screws into the chassis in the correct orientation. The edge with external ports goes to the chassis. DO NOT overtighten the screws! 2.2.3 Placement direction When installing the motherboard, ensure that you place it into the holes indicated by circles to secure the motherboard to the rear part of the chassis Chapter 2 2-4 Chapter 2: Hardware information
User Manual
Page 25
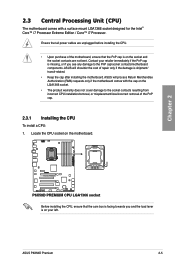
... after installing the motherboard. 2.3 Central Processing Unit (CPU) The motherboard comes with the cap on the motherboard. ASUS will process Return Merchandise Authorization (RMA) requests only if the motherboard comes with a ...surface mount LGA1366 socket designed for the Intel® Core™ i7 Processor Extreme Edition / Core™ i7 Processor. ASUS will shoulder the cost of the PnP cap. 2.3.1 Installing the CPU To install a CPU: 1. ASUS P6X58D Premium...
... after installing the motherboard. 2.3 Central Processing Unit (CPU) The motherboard comes with the cap on the motherboard. ASUS will process Return Merchandise Authorization (RMA) requests only if the motherboard comes with a ...surface mount LGA1366 socket designed for the Intel® Core™ i7 Processor Extreme Edition / Core™ i7 Processor. ASUS will shoulder the cost of the PnP cap. 2.3.1 Installing the CPU To install a CPU: 1. ASUS P6X58D Premium...

User Manual
Page 28
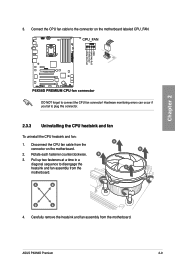
If you purchased a separate CPU heatsink and fan assembly, ensure that you have installed the motherboard to the CPU heatsink or CPU before you install the heatsink and fan assembly. Place the heatsink on top of the installed CPU, ensuring that ... is closest to ensure optimum thermal condition and performance. • When you buy a CPU separately, ensure that the four fasteners match the holes on the motherboard. To install the CPU heatsink and fan: 1. B 2. Push down two fasteners at a time in place. If you use only Intel®‑certified multi‑...
If you purchased a separate CPU heatsink and fan assembly, ensure that you have installed the motherboard to the CPU heatsink or CPU before you install the heatsink and fan assembly. Place the heatsink on top of the installed CPU, ensuring that ... is closest to ensure optimum thermal condition and performance. • When you buy a CPU separately, ensure that the four fasteners match the holes on the motherboard. To install the CPU heatsink and fan: 1. B 2. Push down two fasteners at a time in place. If you use only Intel®‑certified multi‑...
User Manual
Page 29
... connector! Disconnect the CPU fan cable from the connector on the motherboard labeled CPU_FAN. Pull up two fasteners at a time in a diagonal sequence to the connector on the motherboard. 2. A B A A B B A 4. Rotate each fastener counterclockwise. B 3. ASUS P6X58D Premium 2-9 Carefully remove the heatsink and fan assembly from the motherboard. Connect the CPU fan cable to disengage the heatsink and...
... connector! Disconnect the CPU fan cable from the connector on the motherboard labeled CPU_FAN. Pull up two fasteners at a time in a diagonal sequence to the connector on the motherboard. 2. A B A A B B A 4. Rotate each fastener counterclockwise. B 3. ASUS P6X58D Premium 2-9 Carefully remove the heatsink and fan assembly from the motherboard. Connect the CPU fan cable to disengage the heatsink and...

User Manual
Page 30
... memory module in slot A1, B1 or C1 as a DDR2 DIMM but is installed in DIMM slot A2, B2, or C2. 2.4 System memory 2.4.1 Overview The motherboard comes with less power consumption.
... memory module in slot A1, B1 or C1 as a DDR2 DIMM but is installed in DIMM slot A2, B2, or C2. 2.4 System memory 2.4.1 Overview The motherboard comes with less power consumption.
User Manual
Page 31
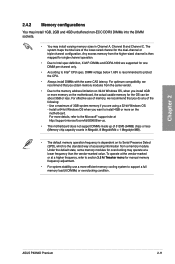
...8226; Due to the memory address limitation on 32-bit Windows OS, when you install 4GB or more on the motherboard, the actual usable memory for manual memory frequency adjustment. • For system stability, use of the following: ...- To operate at the vendor-marked or at http://support.microsoft.com/kb/929605/en-us. • This motherboard does not support DIMMs made up of 512Mb (64MB) chips or less (Memory chip capacity counts in Megabit, 8 Megabit/Mb... more efficient memory cooling system to install 4GB or more memory on the motherboard. ASUS P6X58D Premium 2-11
...8226; Due to the memory address limitation on 32-bit Windows OS, when you install 4GB or more on the motherboard, the actual usable memory for manual memory frequency adjustment. • For system stability, use of the following: ...- To operate at the vendor-marked or at http://support.microsoft.com/kb/929605/en-us. • This motherboard does not support DIMMs made up of 512Mb (64MB) chips or less (Memory chip capacity counts in Megabit, 8 Megabit/Mb... more efficient memory cooling system to install 4GB or more memory on the motherboard. ASUS P6X58D Premium 2-11

User Manual
Page 32
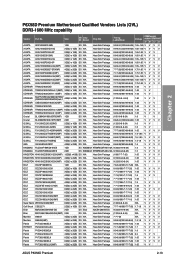
...(XMP) 2GB(2 x 1GB) SS N/A Heat-Sink Package 8-8-8-24(1866-8-8-8-24) 1.9 V V Team BoxP/N:TXD34096M1866HC7DC-L (TXD32048M1866HC7-L)(XMP) 4GB(2 x 2GB) DS N/A Heat-Sink Package 7-7-7-21(1333-9-9-9-24) 1.65 V V P6X58D Premium Motherboard Qualified Vendors Lists (QVL) DDR3-1800 MHz capability Vendor Part No. Timing Lable(Bios) DIMM socket Voltage support (Optional) A* B* Crucial BL12864BE2009.8SFB3(EPP) 1GB SS...
...(XMP) 2GB(2 x 1GB) SS N/A Heat-Sink Package 8-8-8-24(1866-8-8-8-24) 1.9 V V Team BoxP/N:TXD34096M1866HC7DC-L (TXD32048M1866HC7-L)(XMP) 4GB(2 x 2GB) DS N/A Heat-Sink Package 7-7-7-21(1333-9-9-9-24) 1.65 V V P6X58D Premium Motherboard Qualified Vendors Lists (QVL) DDR3-1800 MHz capability Vendor Part No. Timing Lable(Bios) DIMM socket Voltage support (Optional) A* B* Crucial BL12864BE2009.8SFB3(EPP) 1GB SS...
User Manual
Page 33
... 6GB(3 x 2GB) DS N/A Heat-Sink Package 9-9-9-24(1600-7-7-7-20) 1.65 VVV V Patriot PVT36G1600LLK(XMP) 6GB(3 x 2GB) DS N/A Heat-Sink Package 8-8-8-24(1067-7-7-7-20) 1.65 VV ASUS P6X58D Premium 2-13 Size SS/ Chip DS Brand Chip NO. Chapter 2 P6X58D Premium Motherboard Qualified Vendors Lists (QVL) DDR3-1600 MHz capability Vendor Part No.
... 6GB(3 x 2GB) DS N/A Heat-Sink Package 9-9-9-24(1600-7-7-7-20) 1.65 VVV V Patriot PVT36G1600LLK(XMP) 6GB(3 x 2GB) DS N/A Heat-Sink Package 8-8-8-24(1067-7-7-7-20) 1.65 VV ASUS P6X58D Premium 2-13 Size SS/ Chip DS Brand Chip NO. Chapter 2 P6X58D Premium Motherboard Qualified Vendors Lists (QVL) DDR3-1600 MHz capability Vendor Part No.


