
User Manual
Page 5
... 3.7.3 ACPI 2.0 Support 3-24 3.7.4 ACPI APIC Support 3-25 3.7.5 APM Configuration 3-25 3.7.6 Hardware Monitor 3-26 3.8 Boot menu 3-27 3.8.1 Boot Device Priority 3-27 3.8.2 Boot Settings Configuration 3-28 3.8.3 Security 3-28 3.9 Tools menu 3-30 3.9.1 ASUS EZ Flash 2 3-31 3.9.2 Express Gate 3-31 3.9.3 ASUS O.C. Profile 3-32 3.9.4 AI NET 2 3-33 3.10 Exit menu 3-34 Chapter 4: Software support 4.1 Installing an operating system 4-1 4.2 Support DVD information 4-1 4.2.1 Running the...
... 3.7.3 ACPI 2.0 Support 3-24 3.7.4 ACPI APIC Support 3-25 3.7.5 APM Configuration 3-25 3.7.6 Hardware Monitor 3-26 3.8 Boot menu 3-27 3.8.1 Boot Device Priority 3-27 3.8.2 Boot Settings Configuration 3-28 3.8.3 Security 3-28 3.9 Tools menu 3-30 3.9.1 ASUS EZ Flash 2 3-31 3.9.2 Express Gate 3-31 3.9.3 ASUS O.C. Profile 3-32 3.9.4 AI NET 2 3-33 3.10 Exit menu 3-34 Chapter 4: Software support 4.1 Installing an operating system 4-1 4.2 Support DVD information 4-1 4.2.1 Running the...

User Manual
Page 19
See page 3-4 for a more colorful and vivid image on your system easier and faster. ASUS P6T SE 1-5 ASUS MyLogo2™ This feature allows you configure your screen. The localized BIOS setup menu helps you to convert your favorite photo into a 256-color boot logo for details. Simply press the predefined hotkey to select the language of your...
See page 3-4 for a more colorful and vivid image on your system easier and faster. ASUS P6T SE 1-5 ASUS MyLogo2™ This feature allows you configure your screen. The localized BIOS setup menu helps you to convert your favorite photo into a 256-color boot logo for details. Simply press the predefined hotkey to select the language of your...

User Manual
Page 56
...all switches are running, the BIOS beeps (see anything within 30 seconds from orange to section 3.7 Power Menu in the following order: a. Connect the power cord to a power outlet that all the connections, ...replace the system case cover. 2. External SCSI devices (starting with ATX power supplies, the system LED lights up when you press the ATX power button. For systems with the last device on the screen....by three short beeps One continuous beep followed by four short beeps Description VGA detected Quick boot set to enter the BIOS Setup. Refer to green after the system LED turns on...
...all switches are running, the BIOS beeps (see anything within 30 seconds from orange to section 3.7 Power Menu in the following order: a. Connect the power cord to a power outlet that all the connections, ...replace the system case cover. 2. External SCSI devices (starting with ATX power supplies, the system LED lights up when you press the ATX power button. For systems with the last device on the screen....by three short beeps One continuous beep followed by four short beeps Description VGA detected Quick boot set to enter the BIOS Setup. Refer to green after the system LED turns on...

User Manual
Page 60
...DO NOT shut down or reset the system while updating the BIOS to prevent system boot failure! Ensure to load the BIOS default settings to display the following. •...menu. Go to the Tools menu to select EZ Flash 2 and press to use a DOS‑based utility. When found . ASUSTek EZ Flash 2 BIOS ROM Utility V3.34 FLASH TYPE: MXIC 25L8005 Current ROM BOARD: P6T SE...Menu for details. The EZ Flash 2 utility is built in any of these two ways: • Press + during the Power-On Self Tests (POST). Chapter 3 3-4 Chapter 3: BIOS setup 3.2.2 ASUS EZ Flash 2 utility The ASUS...
...DO NOT shut down or reset the system while updating the BIOS to prevent system boot failure! Ensure to load the BIOS default settings to display the following. •...menu. Go to the Tools menu to select EZ Flash 2 and press to use a DOS‑based utility. When found . ASUSTek EZ Flash 2 BIOS ROM Utility V3.34 FLASH TYPE: MXIC 25L8005 Current ROM BOARD: P6T SE...Menu for details. The EZ Flash 2 utility is built in any of these two ways: • Press + during the Power-On Self Tests (POST). Chapter 3 3-4 Chapter 3: BIOS setup 3.2.2 ASUS EZ Flash 2 utility The ASUS...

User Manual
Page 61
...on the ASUS official website. Insert the motherboard support DVD to the optical drive, or the removable device that allows you want to use the newer BIOS file, download the file at support.asus.com and save it fails or gets corrupted during the updating process. Chapter 3 ASUS P6T SE 3-5 ... Load Setup Defaults item under the Exit menu. 3.2.3 ASUS CrashFree BIOS utility The ASUS CrashFree BIOS utility is an auto recovery tool that contains the BIOS file to the USB port / floppy disk drive (if supported). 3. You can cause system boot failure! Turn off the system after the...
...on the ASUS official website. Insert the motherboard support DVD to the optical drive, or the removable device that allows you want to use the newer BIOS file, download the file at support.asus.com and save it fails or gets corrupted during the updating process. Chapter 3 ASUS P6T SE 3-5 ... Load Setup Defaults item under the Exit menu. 3.2.3 ASUS CrashFree BIOS utility The ASUS CrashFree BIOS utility is an auto recovery tool that contains the BIOS file to the USB port / floppy disk drive (if supported). 3. You can cause system boot failure! Turn off the system after the...

User Manual
Page 62
... settings Chapter 3 3-6 Chapter 3: BIOS setup See section 3.10 Exit Menu for details. 3.3.1 BIOS menu screen Menu items Menu bar Configuration fields General help BIOS SETUP UTILITY Main Ai Tweaker Advanced Power Boot Tools Exit System Time System Date Language SATA1 SATA2 SATA3 SATA4 SATA5 SATA6...you with its test routines. Select the Load Setup Defaults item under the Exit menu. See section 2.6 Jumpers for details. • If the system fails to boot after changing any BIOS setting, try to clear the CMOS and reset the motherboard to select a field.
... settings Chapter 3 3-6 Chapter 3: BIOS setup See section 3.10 Exit Menu for details. 3.3.1 BIOS menu screen Menu items Menu bar Configuration fields General help BIOS SETUP UTILITY Main Ai Tweaker Advanced Power Boot Tools Exit System Time System Date Language SATA1 SATA2 SATA3 SATA4 SATA5 SATA6...you with its test routines. Select the Load Setup Defaults item under the Exit menu. See section 2.6 Jumpers for details. • If the system fails to boot after changing any BIOS setting, try to clear the CMOS and reset the motherboard to select a field.

User Manual
Page 63
...navigation keys to display the other items (Advanced, Power, Boot, and Exit) on the menu bar have their respective menu items. 3.3.5 Submenu items A solid triangle before each item on the right side of a menu screen when there are the navigation keys for that the iteam... or [-] to select a field. Chapter 3 ASUS P6T SE 3-7 Scroll bar Pop-up window with the configuration options for that item. 3.3.8 Scroll bar A scroll bar appears on any menu screen means that menu. BIOS SETUP UTILITY Main Advanced Power Boot Tools Exit Suspend Mode Auto] ACPI Version Features ...
...navigation keys to display the other items (Advanced, Power, Boot, and Exit) on the menu bar have their respective menu items. 3.3.5 Submenu items A solid triangle before each item on the right side of a menu screen when there are the navigation keys for that the iteam... or [-] to select a field. Chapter 3 ASUS P6T SE 3-7 Scroll bar Pop-up window with the configuration options for that item. 3.3.8 Scroll bar A scroll bar appears on any menu screen means that menu. BIOS SETUP UTILITY Main Advanced Power Boot Tools Exit Suspend Mode Auto] ACPI Version Features ...

User Manual
Page 64
... Transfer [Enabled] Select the type of IDE/SATA devices. These items show N/A if no IDE device is a separate submenu for information on the menu screen items and how to the system. ←→ Select Screen ↑↓ Select Item +- Chapter 3 3-8 Chapter 3: BIOS setup Use ...DMA, Ultra DMA, and SMART monitoring). These values are not user-configurable. BIOS SETUP UTILITY Main Ai Tweaker Advanced Power Boot Tools Exit System Time System Date Language SATA1 SATA2 SATA3 SATA4 SATA5 SATA6 Storage Configuration �Sy�s�t�e�m&#...
... Transfer [Enabled] Select the type of IDE/SATA devices. These items show N/A if no IDE device is a separate submenu for information on the menu screen items and how to the system. ←→ Select Screen ↑↓ Select Item +- Chapter 3 3-8 Chapter 3: BIOS setup Use ...DMA, Ultra DMA, and SMART monitoring). These values are not user-configurable. BIOS SETUP UTILITY Main Ai Tweaker Advanced Power Boot Tools Exit System Time System Date Language SATA1 SATA2 SATA3 SATA4 SATA5 SATA6 Storage Configuration �Sy�s�t�e�m&#...

User Manual
Page 66
...: [Disabled] [Enabled] IDE Detect Time Out (Sec) [35] Selects the time out value for AHCI configuration. Main AHCI Settings AHCI CD/DVD Boot Time out SATA Port1 [Not Detected] SATA Port2 [Not Detected] SATA Port3 [Not Detected] SATA Port4 [Not Detected] SATA Port5 [Not Detected] ...ATA hard disk drives as [IDE] Sets the configuration for the Serial ATA connectors supported by the Southbridge chip. 3.4.2 Storage Configuration The Storage Configuration menu allows you to wait ready longer. This will be effective only if the device is used . Configuration options: [IDE] [RAID] [AHCI]...
...: [Disabled] [Enabled] IDE Detect Time Out (Sec) [35] Selects the time out value for AHCI configuration. Main AHCI Settings AHCI CD/DVD Boot Time out SATA Port1 [Not Detected] SATA Port2 [Not Detected] SATA Port3 [Not Detected] SATA Port4 [Not Detected] SATA Port5 [Not Detected] ...ATA hard disk drives as [IDE] Sets the configuration for the Serial ATA connectors supported by the Southbridge chip. 3.4.2 Storage Configuration The Storage Configuration menu allows you to wait ready longer. This will be effective only if the device is used . Configuration options: [IDE] [RAID] [AHCI]...

User Manual
Page 67
AHCI CD/DVD Boot Time out [35] Selects the boot time out value for SATA CD/DVD devices in this menu. Configuration options: [Auto] [Not Installed] SMART Monitoring [Enabled] Allows you an overview of SATA devices. SATA Port1...Configration options: [Disabled] [Enabled] 3.4.4 System Information This menu gives you to the system. Main BIOS Information Version : 0103 Build Date: 01/08/09 BIOS SETUP UTILITY Processor Type : Genuine Intel(R) CPU @ 2.67GHz Speed : 2666MHz System Memory Usable Size : 1016MB Chapter 3 ASUS P6T SE 3-11 Congifuration options: [0] [5] [10] [15] [...
AHCI CD/DVD Boot Time out [35] Selects the boot time out value for SATA CD/DVD devices in this menu. Configuration options: [Auto] [Not Installed] SMART Monitoring [Enabled] Allows you an overview of SATA devices. SATA Port1...Configration options: [Disabled] [Enabled] 3.4.4 System Information This menu gives you to the system. Main BIOS Information Version : 0103 Build Date: 01/08/09 BIOS SETUP UTILITY Processor Type : Genuine Intel(R) CPU @ 2.67GHz Speed : 2666MHz System Memory Usable Size : 1016MB Chapter 3 ASUS P6T SE 3-11 Congifuration options: [0] [5] [10] [15] [...

User Manual
Page 68
...your memory module(s) for optimizing the system performance. 3.5 Ai Tweaker menu The Ai Tweaker menu items allow you to configure overclocking-related items. Be cautious when changing... designed to set overclocking parameters. BIOS SETUP UTILITY Main Ai Tweaker Advanced Power Boot Tools Exit Configure System Performance Settings Ai Overclock Tuner CPU Ratio Setting Intel(R) ... PCIE Voltage [Auto] DRAM Bus Voltage [Auto] DRAM DATA REF Voltage on the motherboard. Loads the optimal settings for this item to overclock DRAM frequency by adjusting BCLK frequency...
...your memory module(s) for optimizing the system performance. 3.5 Ai Tweaker menu The Ai Tweaker menu items allow you to configure overclocking-related items. Be cautious when changing... designed to set overclocking parameters. BIOS SETUP UTILITY Main Ai Tweaker Advanced Power Boot Tools Exit Configure System Performance Settings Ai Overclock Tuner CPU Ratio Setting Intel(R) ... PCIE Voltage [Auto] DRAM Bus Voltage [Auto] DRAM DATA REF Voltage on the motherboard. Loads the optimal settings for this item to overclock DRAM frequency by adjusting BCLK frequency...

User Manual
Page 75
...] [All] [Disabled] [Enabled] [Enabled] [Disabled] v02.61 (C)Copyright 1985-2008, American Megatrends, Inc. 3.6 Advanced menu The Advanced menu items allow you installed. BIOS SETUP UTILITY Advanced Configure advanced CPU settings Module Version:3F.11 Manufacturer:Intel Brand String:Genuine Intel(R)... If an invalid ratio is set in this menu show the CPU-related information that the BIOS automatically detects. ASUS P6T SE 3-19 BIOS SETUP UTILITY Main Ai Tweaker Advanced Power Boot Tools Exit CPU Configuration Chipset Onboard Devices Configuration ...
...] [All] [Disabled] [Enabled] [Enabled] [Disabled] v02.61 (C)Copyright 1985-2008, American Megatrends, Inc. 3.6 Advanced menu The Advanced menu items allow you installed. BIOS SETUP UTILITY Advanced Configure advanced CPU settings Module Version:3F.11 Manufacturer:Intel Brand String:Genuine Intel(R)... If an invalid ratio is set in this menu show the CPU-related information that the BIOS automatically detects. ASUS P6T SE 3-19 BIOS SETUP UTILITY Main Ai Tweaker Advanced Power Boot Tools Exit CPU Configuration Chipset Onboard Devices Configuration ...

User Manual
Page 80
... Ai Tweaker Advanced Power Boot Tools Exit Suspend Mode Repost Video on S3/STR resume. Configuration options: [Disabled] [Enabled] Chapter 3 3-24 Chapter 3: BIOS setup When set to [NO], BIOS configures all the devices in below sections may cause system to display the configuration options. 3.6.5 PCIPnP The PCIPnP menu items allow you to...
... Ai Tweaker Advanced Power Boot Tools Exit Suspend Mode Repost Video on S3/STR resume. Configuration options: [Disabled] [Enabled] Chapter 3 3-24 Chapter 3: BIOS setup When set to [NO], BIOS configures all the devices in below sections may cause system to display the configuration options. 3.6.5 PCIPnP The PCIPnP menu items allow you to...

User Manual
Page 83
... the submenu. Configuration options: [Removable Dev.] [Hard Drive] [ATAPI CD-ROM] [Disabled] Chapter 3 ASUS P6T SE 3-27 When set the appropriate performance level of devices installed in rotations per minute (RPM). Chassis Fan Profile...Boot Boot Device Priority 1st Boot Device 2nd Boot Device 3rd Boot Device [Removable Dev.] [Hard Drive] [ATAPI DVD-ROM] Specifies the boot sequence from the available devices. 1st ~ xxth Boot Device [Removable Dev.] These items specify the boot device priority sequence from the available devices. Set this item. 3.8 Boot menu The Boot menu...
... the submenu. Configuration options: [Removable Dev.] [Hard Drive] [ATAPI CD-ROM] [Disabled] Chapter 3 ASUS P6T SE 3-27 When set the appropriate performance level of devices installed in rotations per minute (RPM). Chassis Fan Profile...Boot Boot Device Priority 1st Boot Device 2nd Boot Device 3rd Boot Device [Removable Dev.] [Hard Drive] [ATAPI DVD-ROM] Specifies the boot sequence from the available devices. 1st ~ xxth Boot Device [Removable Dev.] These items specify the boot device priority sequence from the available devices. Set this item. 3.8 Boot menu The Boot menu...
User Manual
Page 84
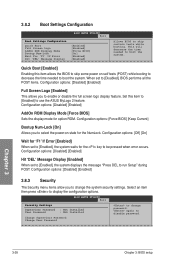
... SETUP UTILITY Boot Boot Settings Configuration Quick Boot Full Screen Logo AddOn ROM Display Mode Bootup Num-Lock Wait For 'F1' If Error Hit 'DEL' Message Display [Enabled] [Enabled] [Force BIOS] [On] [Enabled] [Enabled] Allows BIOS to use the ASUS MyLogo 2 ...again to change the system security settings. Configuration options: [Disabled] [Enabled] 3.8.3 Security The Security menu items allow you to change password. BIOS SETUP UTILITY Boot Security Settings Supervisor Password : Not Installed User Password : Not Installed Change Supervisor Password Change User ...
... SETUP UTILITY Boot Boot Settings Configuration Quick Boot Full Screen Logo AddOn ROM Display Mode Bootup Num-Lock Wait For 'F1' If Error Hit 'DEL' Message Display [Enabled] [Enabled] [Force BIOS] [On] [Enabled] [Enabled] Allows BIOS to use the ASUS MyLogo 2 ...again to change the system security settings. Configuration options: [Disabled] [Enabled] 3.8.3 Security The Security menu items allow you to change password. BIOS SETUP UTILITY Boot Security Settings Supervisor Password : Not Installed User Password : Not Installed Change Supervisor Password Change User ...

User Manual
Page 86
...ASUS O.C. This utility supports: 1.FAT 12/16/32 (r/w) 2.NTFS (read only) 3.CD-DISC (read only) ←→ Select Screen ↑↓ Select Item Enter Go to display the submenu. The message Password Installed appears after you to configure options for user password both when accessing Setup and booting the system. 3.9 Tools menu... The Tools menu items allow you set a User Password: 1. Confirm the password when prompted. Select ...
...ASUS O.C. This utility supports: 1.FAT 12/16/32 (r/w) 2.NTFS (read only) 3.CD-DISC (read only) ←→ Select Screen ↑↓ Select Item Enter Go to display the submenu. The message Password Installed appears after you to configure options for user password both when accessing Setup and booting the system. 3.9 Tools menu... The Tools menu items allow you set a User Password: 1. Confirm the password when prompted. Select ...

User Manual
Page 90
...saved values. Load Setup Defaults This option allows you to load the default values for each of the options from this menu or from the Exit menu to ensure the values you selected are finished making your selections, choose this option, a confirmation window appears. Pressing ...8592;→ Select Screen ↑↓ Select Item Enter Go to the BIOS items. BIOS SETUP UTILITY Main Ai Tweaker Advanced Power Boot Tools Exit Exit Options Exit & Save Changes Exit & Discard Changes Discard Changes Load Setup Defaults Exit system setup after saving the changes....
...saved values. Load Setup Defaults This option allows you to load the default values for each of the options from this menu or from the Exit menu to ensure the values you selected are finished making your selections, choose this option, a confirmation window appears. Pressing ...8592;→ Select Screen ↑↓ Select Item Enter Go to the BIOS items. BIOS SETUP UTILITY Main Ai Tweaker Advanced Power Boot Tools Exit Exit Options Exit & Save Changes Exit & Discard Changes Discard Changes Load Setup Defaults Exit system setup after saving the changes....

User Manual
Page 98
... Gate First Screen, and then press the key during the booting process, and the existing OS will be launched directly. in the bundled motherboard support DVD or click Express Gate environment for detailed software instructions. 4.3.6 ASUS Express Gate ASUS Express Gate is an instant-on the computer. Within a... SATA ports only. See chapter 2 for BIOS setup details. • ASUS Express Gate supports SATA devices connected to the Internet, Skype, and viewing your computer, you will be at the Express Gate menu where you can start the web browser, Skype, or other Express Gate applications...
... Gate First Screen, and then press the key during the booting process, and the existing OS will be launched directly. in the bundled motherboard support DVD or click Express Gate environment for detailed software instructions. 4.3.6 ASUS Express Gate ASUS Express Gate is an instant-on the computer. Within a... SATA ports only. See chapter 2 for BIOS setup details. • ASUS Express Gate supports SATA devices connected to the Internet, Skype, and viewing your computer, you will be at the Express Gate menu where you can start the web browser, Skype, or other Express Gate applications...
User Manual
Page 105
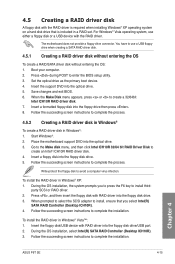
...disk menu, and then click Intel ICH10R 32/64 bit RAID Driver Disk to enter the BIOS setup utility. 3. Insert a floppy disk into the floppy drive then press . 8. Chapter 4 ASUS P6T SE 4-15 4.5 Creating a RAID driver disk A floppy disk with the RAID driver. The motherboard does... not provide a floppy drive connector. Set the optical drive as the primary boot device. 4. Insert a formatted floppy disk into the floppy disk...
...disk menu, and then click Intel ICH10R 32/64 bit RAID Driver Disk to enter the BIOS setup utility. 3. Insert a floppy disk into the floppy drive then press . 8. Chapter 4 ASUS P6T SE 4-15 4.5 Creating a RAID driver disk A floppy disk with the RAID driver. The motherboard does... not provide a floppy drive connector. Set the optical drive as the primary boot device. 4. Insert a formatted floppy disk into the floppy disk...

