P5VD1-X User's Manual for English Edition
Page 4
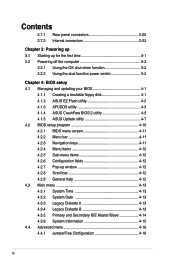
...BIOS setup 4.1 Managing and updating your BIOS 4-1 4.1.1 Creating a bootable floppy disk 4-1 4.1.2 ASUS EZ Flash utility 4-2 4.1.3 AFUDOS utility 4-3 4.1.4 ASUS CrashFree BIOS 2 utility 4-5 4.1.5 ASUS Update utility 4-7 4.2 BIOS setup program 4-10 4.2.1 BIOS menu screen 4-11 4.2.2 Menu bar 4-11... 4.2.3 Navigation keys 4-11 4.2.4 Menu items 4-12 4.2.5 Sub-menu items 4-12 4.2.6 Configuration fields 4-12 4.2.7 Pop-up window ...
...BIOS setup 4.1 Managing and updating your BIOS 4-1 4.1.1 Creating a bootable floppy disk 4-1 4.1.2 ASUS EZ Flash utility 4-2 4.1.3 AFUDOS utility 4-3 4.1.4 ASUS CrashFree BIOS 2 utility 4-5 4.1.5 ASUS Update utility 4-7 4.2 BIOS setup program 4-10 4.2.1 BIOS menu screen 4-11 4.2.2 Menu bar 4-11... 4.2.3 Navigation keys 4-11 4.2.4 Menu items 4-12 4.2.5 Sub-menu items 4-12 4.2.6 Configuration fields 4-12 4.2.7 Pop-up window ...
P5VD1-X User's Manual for English Edition
Page 25
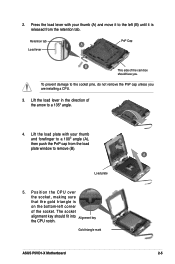
... prevent damage to remove (B). Retention tab A Load lever PnP Cap B This side of the arrow to the left corner of the socket. Gold triangle mark ASUS P5VD1-X Motherboard A 2-5 Lift the load lever in the direction of the cam box should fit into Alignment key the CPU notch. P o s i t i o n t h e C P ...U o v e r the socket, making sure that the gold triangle is released from the load B plate window to the socket pins, do not remove the PnP cap unless you . Lift the load plate with your thumb and forefinger to a 100º angle...
... prevent damage to remove (B). Retention tab A Load lever PnP Cap B This side of the arrow to the left corner of the socket. Gold triangle mark ASUS P5VD1-X Motherboard A 2-5 Lift the load lever in the direction of the cam box should fit into Alignment key the CPU notch. P o s i t i o n t h e C P ...U o v e r the socket, making sure that the gold triangle is released from the load B plate window to the socket pins, do not remove the PnP cap unless you . Lift the load plate with your thumb and forefinger to a 100º angle...
P5VD1-X User's Manual for English Edition
Page 26
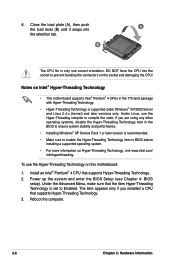
...you are using any other operating systems, disable the Hyper-Threading Technology item in the BIOS to ensure system stability and performance. • Installing Windows® XP Service Pack 1 or later version is recommended. • Make sure to compile the code. DO NOT force the CPU into ... Hyper-Threading Technology on the socket and damaging the CPU! Under the Advanced Menu, make sure that the item Hyper-Threading Technology is supported under Windows® XP/2003 Server and Linux 2.4.x (kernel) and later versions only. Install an Intel® Pentium® 4 CPU that supports Hyper-...
...you are using any other operating systems, disable the Hyper-Threading Technology item in the BIOS to ensure system stability and performance. • Installing Windows® XP Service Pack 1 or later version is recommended. • Make sure to compile the code. DO NOT force the CPU into ... Hyper-Threading Technology on the socket and damaging the CPU! Under the Advanced Menu, make sure that the item Hyper-Threading Technology is supported under Windows® XP/2003 Server and Linux 2.4.x (kernel) and later versions only. Install an Intel® Pentium® 4 CPU that supports Hyper-...
P5VD1-X User's Manual for English Edition
Page 43
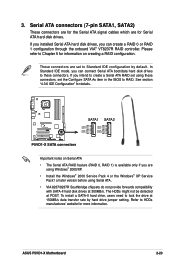
ASUS P5VD1-X Motherboard 2-23 If you can create a RAID 0 or RAID 1 configuration through the onboard VIA® VT8237R RAID controller. 3. These connectors are for Serial ... with SATA-II hard disk drives at POST. If you installed Serial ATA hard disk drives, you are using Windows® 2000/XP. • Install the Windows® 2000 Service Pack 4 or the Windows® XP Service Pack1 or later version before using these connectors. Please refer to HDDs manufacturesʼ website for...
ASUS P5VD1-X Motherboard 2-23 If you can create a RAID 0 or RAID 1 configuration through the onboard VIA® VT8237R RAID controller. 3. These connectors are for Serial ... with SATA-II hard disk drives at POST. If you installed Serial ATA hard disk drives, you are using Windows® 2000/XP. • Install the Windows® 2000 Service Pack 4 or the Windows® XP Service Pack1 or later version before using these connectors. Please refer to HDDs manufacturesʼ website for...

P5VD1-X User's Manual for English Edition
Page 52
... system enter the soft-off mode regardless of the BIOS setting. 3.2 Powering off the computer 3.2.1 Using the OS shut down function If you are using Windows® XP: 1. Pressing the power switch for details. 3-2 Chapter 3: Powering Up Refer to shut down . 3.2.2 Using the dual function power switch While ...more than four seconds puts the system to sleep mode or to shut down the computer. 3. Click the Turn Off button to soft-off after Windows® shuts down. Click the Start button then click Shut Down. 2. Click the Start button then select Turn Off Computer. 2. The power ...
... system enter the soft-off mode regardless of the BIOS setting. 3.2 Powering off the computer 3.2.1 Using the OS shut down function If you are using Windows® XP: 1. Pressing the power switch for details. 3-2 Chapter 3: Powering Up Refer to shut down . 3.2.2 Using the dual function power switch While ...more than four seconds puts the system to sleep mode or to shut down the computer. 3. Click the Turn Off button to soft-off after Windows® shuts down. Click the Start button then click Shut Down. 2. Click the Start button then select Turn Off Computer. 2. The power ...

P5VD1-X User's Manual for English Edition
Page 55
...Input/Output System (BIOS) setup. 1. Save a copy of boot disks for details on these utilities. c. ASUS P5VD1-X Motherboard 4-1 At the DOS prompt, type format A:/S then press . Windows® 2000 environment To create a set of the original motherboard BIOS file to a bootable floppy...when the BIOS file fails or gets corrupted.) 4. ASUS EZ Flash (Updates the BIOS using the ASUS Update or AFUDOS utilities. 4.1.1 Creating a bootable floppy disk 1. Click File from the menu, then select Format. Windows® XP environment a. Insert a 1.44 MB fl...
...Input/Output System (BIOS) setup. 1. Save a copy of boot disks for details on these utilities. c. ASUS P5VD1-X Motherboard 4-1 At the DOS prompt, type format A:/S then press . Windows® 2000 environment To create a set of the original motherboard BIOS file to a bootable floppy...when the BIOS file fails or gets corrupted.) 4. ASUS EZ Flash (Updates the BIOS using the ASUS Update or AFUDOS utilities. 4.1.1 Creating a bootable floppy disk 1. Click File from the menu, then select Format. Windows® XP environment a. Insert a 1.44 MB fl...
P5VD1-X User's Manual for English Edition
Page 61
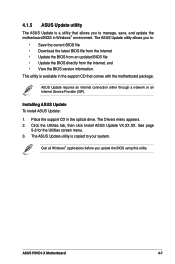
... the Utilities screen menu. 3. ASUS P5VD1-X Motherboard 4-7 ASUS Update requires an Internet connection either through a network or an Internet Service Provider (ISP). Click the Utilities tab, then click Install ASUS Update VX.XX.XX. Quit all Windows® applications before you to your system. The Drivers menu appears. 2. 4.1.5 ASUS Update utility The ASUS Update is available in...
... the Utilities screen menu. 3. ASUS P5VD1-X Motherboard 4-7 ASUS Update requires an Internet connection either through a network or an Internet Service Provider (ISP). Click the Utilities tab, then click Install ASUS Update VX.XX.XX. Quit all Windows® applications before you to your system. The Drivers menu appears. 2. 4.1.5 ASUS Update utility The ASUS Update is available in...
P5VD1-X User's Manual for English Edition
Page 62
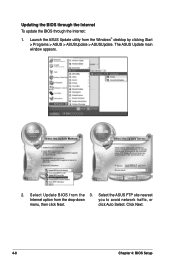
Click Next. 4-8 Chapter 4: BIOS Setup The ASUS Update main window appears. 2. Select Update BIOS from the drop-down you to avoid network traffic, or menu, then click Next. Select the ASUS FTP site nearest Internet option from the 3. click Auto Select. Launch the ASUS Update utility from the Windows® desktop by clicking Start > Programs > ASUS > ASUSUpdate > ASUSUpdate. Updating the BIOS through the Internet To update the BIOS through the Internet: 1.
Click Next. 4-8 Chapter 4: BIOS Setup The ASUS Update main window appears. 2. Select Update BIOS from the drop-down you to avoid network traffic, or menu, then click Next. Select the ASUS FTP site nearest Internet option from the 3. click Auto Select. Launch the ASUS Update utility from the Windows® desktop by clicking Start > Programs > ASUS > ASUSUpdate > ASUSUpdate. Updating the BIOS through the Internet To update the BIOS through the Internet: 1.
P5VD1-X User's Manual for English Edition
Page 63
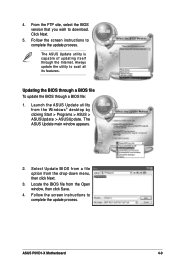
... file To update the BIOS through the Internet. Locate the BIOS file from the Windows® desktop by clicking Start > Programs > ASUS > ASUSUpdate > ASUSUpdate. Launch the ASUS Update utility from the Open window, then click Save. 4. ASUS P5VD1-X Motherboard 4-9 Select Update BIOS from a file option from the drop-down menu, then click Next. 3. 4. From...
... file To update the BIOS through the Internet. Locate the BIOS file from the Windows® desktop by clicking Start > Programs > ASUS > ASUSUpdate > ASUSUpdate. Launch the ASUS Update utility from the Open window, then click Save. 4. ASUS P5VD1-X Motherboard 4-9 Select Update BIOS from a file option from the drop-down menu, then click Next. 3. 4. From...
P5VD1-X User's Manual for English Edition
Page 66
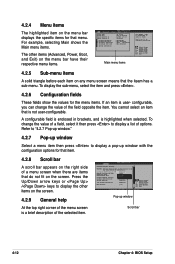
... Configuration fields These fields show the values for that the iteam has a sub-menu. Refer to "4.2.7 Pop-up window." 4.2.7 Pop-up window Select a menu item then press to display the other items (Advanced, Power, Boot, and Exit) on any menu screen means that menu. ...a field, select it then press to select a field. Advanced Chipset settings WARNING: Setting wrong values in ] [Disabled] :[ST340014A] :[Not Detected] :[ASUS DVD-E616P2] :[Not Detected] Use [ENTER], [TAB] or [SHIFT-TAB] to display a list of the field opposite the item. For example, ...
... Configuration fields These fields show the values for that the iteam has a sub-menu. Refer to "4.2.7 Pop-up window." 4.2.7 Pop-up window Select a menu item then press to display the other items (Advanced, Power, Boot, and Exit) on any menu screen means that menu. ...a field, select it then press to select a field. Advanced Chipset settings WARNING: Setting wrong values in ] [Disabled] :[ST340014A] :[Not Detected] :[ASUS DVD-E616P2] :[Not Detected] Use [ENTER], [TAB] or [SHIFT-TAB] to display a list of the field opposite the item. For example, ...

P5VD1-X User's Manual for English Edition
Page 87
...does not immediately exit this option, a confirmation appears. If you made changes to fields other changes before exiting. ASUS P5VD1-X Motherboard 4-33 If you attempt to exit the Setup program without saving your changes, the program prompts you with a message asking...changes before exiting. Exit & Discard Changes Select this option or if you made to discard the selections you press , a confirmation window appears. Select Yes to load default values. Select Yes to discard any changes and load the previously saved values. 4.7 Exit Menu The Exit...
...does not immediately exit this option, a confirmation appears. If you made changes to fields other changes before exiting. ASUS P5VD1-X Motherboard 4-33 If you attempt to exit the Setup program without saving your changes, the program prompts you with a message asking...changes before exiting. Exit & Discard Changes Select this option or if you made to discard the selections you press , a confirmation window appears. Select Yes to load default values. Select Yes to discard any changes and load the previously saved values. 4.7 Exit Menu The Exit...
P5VD1-X User's Manual for English Edition
Page 91
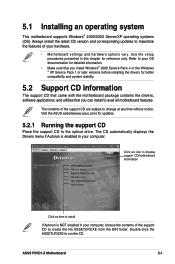
... time without notice. ASUS P5VD1-X Motherboard 5-1 Always install the latest OS version and corresponding updates to the optical drive. Visit the ASUS website(www.asus.com) for reference only. Refer to your computer. Use the setup procedures presented in your OS documentation for detailed information. • Make sure that you install Windows® 2000 Service...
... time without notice. ASUS P5VD1-X Motherboard 5-1 Always install the latest OS version and corresponding updates to the optical drive. Visit the ASUS website(www.asus.com) for reference only. Refer to your computer. Use the setup procedures presented in your OS documentation for detailed information. • Make sure that you install Windows® 2000 Service...
P5VD1-X User's Manual for English Edition
Page 97
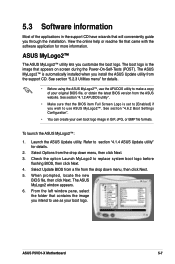
... click Next. 5. From the left window pane, select the folder that contains the image you wish to use as your boot logo. ASUS P5VD1-X Motherboard 5-7 See section "5.2.3 Utilities menu" for details. • Before using the ASUS MyLogo2™, use the AFUDOS utility to use ASUS MyLogo2™. To launch the ASUS MyLogo2™: 1. Check the option...
... click Next. 5. From the left window pane, select the folder that contains the image you wish to use as your boot logo. ASUS P5VD1-X Motherboard 5-7 See section "5.2.3 Utilities menu" for details. • Before using the ASUS MyLogo2™, use the AFUDOS utility to use ASUS MyLogo2™. To launch the ASUS MyLogo2™: 1. Check the option...
P5VD1-X User's Manual for English Edition
Page 98
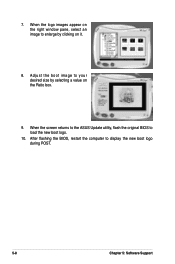
When the logo images appear on the right window pane, select an image to your desired size by clicking on the Ratio box. 9. When the screen returns to the ASUS Update utility, flash the original BIOS to display the new boot logo during POST. 5-8 Chapter 5: Software Support After flashing the BIOS, restart the computer to load the new boot logo. 10. Adjust the boot image to enlarge by selecting a value on it. 8. 7.
When the logo images appear on the right window pane, select an image to your desired size by clicking on the Ratio box. 9. When the screen returns to the ASUS Update utility, flash the original BIOS to display the new boot logo during POST. 5-8 Chapter 5: Software Support After flashing the BIOS, restart the computer to load the new boot logo. 10. Adjust the boot image to enlarge by selecting a value on it. 8. 7.
P5VD1-X User's Manual for English Edition
Page 99
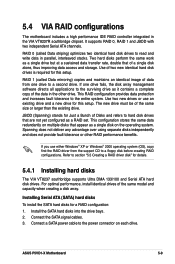
... a high performance IDE RAID controller integrated in the other RAID performance benefits. Use two new drives or use either Windows® XP or Windows® 2000 operating system (OS), copy first the RAID driver from one drive fails, the disk array management software ...signal cables. 3. Install the SATA hard disks into the drive bays. 2. If one drive to the power connector on the operating system. ASUS P5VD1-X Motherboard 5-9 Spanning does not deliver any advantage over using separate disks independently and does not provide fault tolerance or other drive. If you ...
... a high performance IDE RAID controller integrated in the other RAID performance benefits. Use two new drives or use either Windows® XP or Windows® 2000 operating system (OS), copy first the RAID driver from one drive fails, the disk array management software ...signal cables. 3. Install the SATA hard disks into the drive bays. 2. If one drive to the power connector on the operating system. ASUS P5VD1-X Motherboard 5-9 Spanning does not deliver any advantage over using separate disks independently and does not provide fault tolerance or other drive. If you ...
P5VD1-X User's Manual for English Edition
Page 103
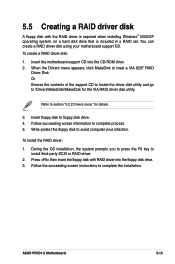
...utility and go to \Drivers\MakeDisk\MakeDisk for details. 3. To install the RAID driver: 1. Insert floppy disk to complete process. 5. ASUS P5VD1-X Motherboard 5-13 To create a RAID driver disk: 1. Refer to install third-party SCSI or RAID driver. 2. Follow succeeding screen information to... driver disk A floppy disk with RAID driver into the CD-ROM drive. 2. on a hard disk drive that is required when installing Windows® 2000/XP operating system. Insert the motherboard support CD into the floppy disk drive. 3. You can create a RAID driver disk ...
...utility and go to \Drivers\MakeDisk\MakeDisk for details. 3. To install the RAID driver: 1. Insert floppy disk to complete process. 5. ASUS P5VD1-X Motherboard 5-13 To create a RAID driver disk: 1. Refer to install third-party SCSI or RAID driver. 2. Follow succeeding screen information to... driver disk A floppy disk with RAID driver into the CD-ROM drive. 2. on a hard disk drive that is required when installing Windows® 2000/XP operating system. Insert the motherboard support CD into the floppy disk drive. 3. You can create a RAID driver disk ...


