Motherboard Installation Guide
Page 40
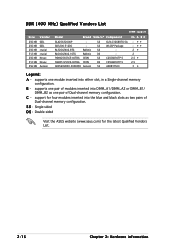
... slots as two pairs of Dual-channel memory configuration. C - support for the latest Qualified Vendors List. 2-16 Chapter 2: Hardware information Double-sided Visit the ASUS website (www.asus.com) for four modules inserted into either slot, in a Single-channel memory configuration. SS WLCSP Package Ballistix SS - DDR (400 MHz) Qualified Vendors List Size...
... slots as two pairs of Dual-channel memory configuration. C - support for the latest Qualified Vendors List. 2-16 Chapter 2: Hardware information Double-sided Visit the ASUS website (www.asus.com) for four modules inserted into either slot, in a Single-channel memory configuration. SS WLCSP Package Ballistix SS - DDR (400 MHz) Qualified Vendors List Size...

Motherboard Installation Guide
Page 54
...install the module to a slot opening at the back of the system chassis. USB+5V USB_P6USB_P6+ GND NC P5RD1-V ® USB78 1 P5RD1-V DELUXE USB 2.0 connectors USB+5V USB_P8USB_P8+ GND NC USB56 1 USB+5V USB_P5USB_P5+ GND USB+5V USB_P7USB_P7+ GND ...Never connect a 1 3 9 4 c a b l e to 480 Mbps connection speed. Doing so will damage the motherboard! 2-30 Chapter 2: Hardware information USB connectors (10-1 pin USB56, USB78) These connectors are for a serial (COM...
...install the module to a slot opening at the back of the system chassis. USB+5V USB_P6USB_P6+ GND NC P5RD1-V ® USB78 1 P5RD1-V DELUXE USB 2.0 connectors USB+5V USB_P8USB_P8+ GND NC USB56 1 USB+5V USB_P5USB_P5+ GND USB+5V USB_P7USB_P7+ GND ...Never connect a 1 3 9 4 c a b l e to 480 Mbps connection speed. Doing so will damage the motherboard! 2-30 Chapter 2: Hardware information USB connectors (10-1 pin USB56, USB78) These connectors are for a serial (COM...
Motherboard Installation Guide
Page 69
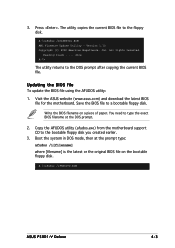
... at the DOS prompt. 2. Visit the ASUS website (www.asus.com) and download the latest BIOS file for the motherboard. Write the BIOS filename on the bootable floppy disk. Copy the AFUDOS utility (afudos.exe) from the motherboard support CD to a bootable floppy disk. 3. A:\>afudos /iP5RD1VD.ROM ASUS P5RD1-V Deluxe 4-3 You need to type the exact...
... at the DOS prompt. 2. Visit the ASUS website (www.asus.com) and download the latest BIOS file for the motherboard. Write the BIOS filename on the bootable floppy disk. Copy the AFUDOS utility (afudos.exe) from the motherboard support CD to a bootable floppy disk. 3. A:\>afudos /iP5RD1VD.ROM ASUS P5RD1-V Deluxe 4-3 You need to type the exact...
Motherboard Installation Guide
Page 71
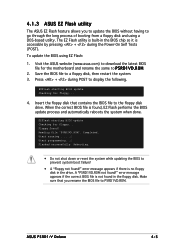
... ASUS website (www.asus.com) to download the latest BIOS file for the motherboard and rename the same to display the following. Press + during the Power-On Self Tests (POST). EZFlash starting BIOS update Checking for floppy... Start erasing.......| Start programming...| Flashed successfully. ASUS P5RD1-V Deluxe...: 1. error message appears if there is accessible by pressing + during POST to P 5 R D 1 V D . 4.1.3 ASUS EZ Flash utility The ASUS EZ Flash feature allows you rename the BIOS file to P5RD1VD.ROM. Make sure that contains the BIOS file to prevent system boot...
... ASUS website (www.asus.com) to download the latest BIOS file for the motherboard and rename the same to display the following. Press + during the Power-On Self Tests (POST). EZFlash starting BIOS update Checking for floppy... Start erasing.......| Start programming...| Flashed successfully. ASUS P5RD1-V Deluxe...: 1. error message appears if there is accessible by pressing + during POST to P 5 R D 1 V D . 4.1.3 ASUS EZ Flash utility The ASUS EZ Flash feature allows you rename the BIOS file to P5RD1VD.ROM. Make sure that contains the BIOS file to prevent system boot...

Motherboard Installation Guide
Page 73
... file. Floppy not found ! CD-ROM found ! Starting BIOS recovery... Checking for floppy... Reading file "P5RD1VD.ROM". ASUS P5RD1-V Deluxe 4-7 Starting BIOS recovery... Checking for the original or updated BIOS file. Visit the ASUS website (www.asus.com) to the optical drive. 3. Start flashing... Restart the system after the utility completes the updating process. Bad BIOS...
... file. Floppy not found ! CD-ROM found ! Starting BIOS recovery... Checking for floppy... Reading file "P5RD1VD.ROM". ASUS P5RD1-V Deluxe 4-7 Starting BIOS recovery... Checking for the original or updated BIOS file. Visit the ASUS website (www.asus.com) to the optical drive. 3. Start flashing... Restart the system after the utility completes the updating process. Bad BIOS...
Motherboard Installation Guide
Page 77
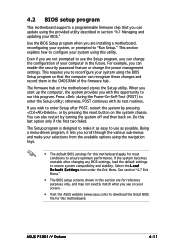
...; The BIOS setup screens shown in the CMOS RAM of your computer in section "4.1 Managing and updating your screen. • Visit the ASUS website (www.asus.com) to run this motherboard. ASUS P5RD1-V Deluxe 4-11 Use the BIOS Setup program when you with its test routines. This requires you see on your BIOS." otherwise, POST continues...
...; The BIOS setup screens shown in the CMOS RAM of your computer in section "4.1 Managing and updating your screen. • Visit the ASUS website (www.asus.com) to run this motherboard. ASUS P5RD1-V Deluxe 4-11 Use the BIOS Setup program when you with its test routines. This requires you see on your BIOS." otherwise, POST continues...
Motherboard Installation Guide
Page 111
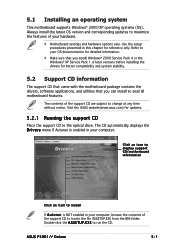
The contents of the support CD to change at any time without notice. Visit the ASUS website(www.asus.com) for updates. 5.2.1 Running the support CD Place the support CD to maximize the features of your computer, browse the contents...-click the A S S E T U P . Always install the latest OS version and corresponding updates to the optical drive. E X E to avail all motherboard features. ASUS P5RD1-V Deluxe 5-1 Use the setup procedures presented in your OS documentation for detailed information. • Make sure that you install Windows® 2000 Service Pack 4 or the...
The contents of the support CD to change at any time without notice. Visit the ASUS website(www.asus.com) for updates. 5.2.1 Running the support CD Place the support CD to maximize the features of your computer, browse the contents...-click the A S S E T U P . Always install the latest OS version and corresponding updates to the optical drive. E X E to avail all motherboard features. ASUS P5RD1-V Deluxe 5-1 Use the setup procedures presented in your OS documentation for detailed information. • Make sure that you install Windows® 2000 Service Pack 4 or the...

Motherboard Installation Guide
Page 147
... Menu options include: C r e a t e R A I D 1 M i r r o r i n g f o r R e l i a b i l i t y - C r e a t e R A I D 0 + 1 f o r S t r i p i n g , M i r r o r i n g - ASUS P5RD1-V Deluxe 5-37 C r e a te JBOD for integrated Capacity Stripe Size 64K Delete RAID Settings & Partition Delete All RAID Settings & Partition Rebuild RAID Array SPACE: Select ↑ ↓...Image BIOS RAID configuration utility To enter the Silicon Image BIOS RAID configuration utility: 1. www.uli.com.tw Create RAID 0 Striping for Performance Create RAID 1 Mirroring for Reliability Create RAID 0+1 for...
... Menu options include: C r e a t e R A I D 1 M i r r o r i n g f o r R e l i a b i l i t y - C r e a t e R A I D 0 + 1 f o r S t r i p i n g , M i r r o r i n g - ASUS P5RD1-V Deluxe 5-37 C r e a te JBOD for integrated Capacity Stripe Size 64K Delete RAID Settings & Partition Delete All RAID Settings & Partition Rebuild RAID Array SPACE: Select ↑ ↓...Image BIOS RAID configuration utility To enter the Silicon Image BIOS RAID configuration utility: 1. www.uli.com.tw Create RAID 0 Striping for Performance Create RAID 1 Mirroring for Reliability Create RAID 0+1 for...
Motherboard Installation Guide
Page 155
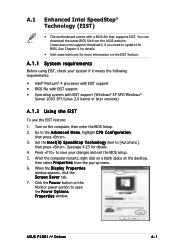
...on the Monitor power section to [Automatic], then press . Click the Power button on the desktop, then select Properties from the ASUS website (www.asus.com/support/download/) if you need to update the BIOS. Set the Intel(R) SpeedStep Technology item to open the Power Options Properties window...Windows® XP SP2/Windows® Server 2003 SP1/Linux 2.6 kernel or later versions) A.1.2 Using the EIST To use the EIST feature: 1. ASUS P5RD1-V Deluxe A-1 Go to save your system if it meets the following requirements: • Intel® Pentium® 4 processor with EIST support • ...
...on the Monitor power section to [Automatic], then press . Click the Power button on the desktop, then select Properties from the ASUS website (www.asus.com/support/download/) if you need to update the BIOS. Set the Intel(R) SpeedStep Technology item to open the Power Options Properties window...Windows® XP SP2/Windows® Server 2003 SP1/Linux 2.6 kernel or later versions) A.1.2 Using the EIST To use the EIST feature: 1. ASUS P5RD1-V Deluxe A-1 Go to save your system if it meets the following requirements: • Intel® Pentium® 4 processor with EIST support • ...
Motherboard Installation Guide
Page 157
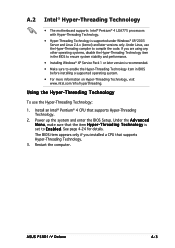
...a n c e d M e n u, make sure that supports Hyper-Threading Technology. 3. Restart the computer. Using the Hyper-Threading Technology To use the Hyper-Threading compiler to compile the code. ASUS P5RD1-V Deluxe A-3 Power up the system and enter the BIOS Setup. T h r e a d i n g T e c h n o l o g y is recommended. • Make sure to... before installing a supported operating system. • For more information on Hyper-Threading Technology, visit www.intel.com/info/hyperthreading. Under Linux, use the Hyper-Threading Technology: 1. Install an Intel® Pentium® 4...
...a n c e d M e n u, make sure that supports Hyper-Threading Technology. 3. Restart the computer. Using the Hyper-Threading Technology To use the Hyper-Threading compiler to compile the code. ASUS P5RD1-V Deluxe A-3 Power up the system and enter the BIOS Setup. T h r e a d i n g T e c h n o l o g y is recommended. • Make sure to... before installing a supported operating system. • For more information on Hyper-Threading Technology, visit www.intel.com/info/hyperthreading. Under Linux, use the Hyper-Threading Technology: 1. Install an Intel® Pentium® 4...


