User Manual
Page 7
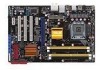
5. 從 CPU PnP 6. 請確認 CPU CPU CPU PnP 保護蓋 CPU CPU CPU CPU 7 A B A B
5. 從 CPU PnP 6. 請確認 CPU CPU CPU PnP 保護蓋 CPU CPU CPU CPU 7 A B A B

User Manual
Page 3
... viii About this guide ix P5Q SE Plus specifications summary xi Chapter 1: Product introduction 1.1 Welcome 1-2 1.2 Package contents 1-2 1.3 Special features 1-3 1.3.1 Product highlights 1-3 1.3.2 ASUS unique features 1-4 1.3.3 ASUS Stylish features 1-6 1.3.4 ASUS Intelligent Overclocking features 1-6 1.4 Before you proceed 1-7 1.5 Motherboard overview 1-8 1.5.1 Placement direction 1-8 1.5.2 Screw holes 1-8 1.5.3 Motherboard layout 1-9 1.6 Central Processing Unit (CPU 1-10 1.6.1 Installing the CPU 1-11 1.6.2 Installing the CPU heatsink and fan 1-14 1.6.3 Uninstalling...
... viii About this guide ix P5Q SE Plus specifications summary xi Chapter 1: Product introduction 1.1 Welcome 1-2 1.2 Package contents 1-2 1.3 Special features 1-3 1.3.1 Product highlights 1-3 1.3.2 ASUS unique features 1-4 1.3.3 ASUS Stylish features 1-6 1.3.4 ASUS Intelligent Overclocking features 1-6 1.4 Before you proceed 1-7 1.5 Motherboard overview 1-8 1.5.1 Placement direction 1-8 1.5.2 Screw holes 1-8 1.5.3 Motherboard layout 1-9 1.6 Central Processing Unit (CPU 1-10 1.6.1 Installing the CPU 1-11 1.6.2 Installing the CPU heatsink and fan 1-14 1.6.3 Uninstalling...

User Manual
Page 11
... DDR2 1200 / 1066 / 800 / 667 MHz memory modules - ASUS Fanless Design: Heatsink Solution ASUS EZ DIY: - ASUS EZ Flash 2 ASUS MyLogo2 Realtek Gigabit LAN controller featuring AI NET 2 VIA® AVT1708s, 8-channel High-Definition Audio CODEC - Profile - P5Q SE Plus specifications summary CPU Chipset System Bus Memory Expansion Slots Storage ASUS Unique Features Other Features LAN Audio LGA775 socket...
... DDR2 1200 / 1066 / 800 / 667 MHz memory modules - ASUS Fanless Design: Heatsink Solution ASUS EZ DIY: - ASUS EZ Flash 2 ASUS MyLogo2 Realtek Gigabit LAN controller featuring AI NET 2 VIA® AVT1708s, 8-channel High-Definition Audio CODEC - Profile - P5Q SE Plus specifications summary CPU Chipset System Bus Memory Expansion Slots Storage ASUS Unique Features Other Features LAN Audio LGA775 socket...

User Manual
Page 12
..., AMI BIOS, PnP, DMI 2.0, WfM 2.0, SM BIOS 2.3, ACPI 2.0a, ASUS EZ Flash 2, ASUS CrashFree BIOS 3 Support DVD Drivers ASUS PC Probe II ASUS Update ASUS AI Suite Anti-Virus software (OEM version) BIOS Features ATX form factor: 12 in x 7.8 in (30.5 cm x 19.8 cm)...to 180MHz at 1MHz increment - Memory tuning from 100MHz to 1333MHz for DDR2 - vCore: Adjustable CPU voltage at back panel) ASUS Exclusive Overclocking Features Intelligent overclocking tools: - P5Q SE Plus specifications summary USB 12 x USB 2.0 ports (6 ports at mid-board, 6 ports at 6.25mV ...
..., AMI BIOS, PnP, DMI 2.0, WfM 2.0, SM BIOS 2.3, ACPI 2.0a, ASUS EZ Flash 2, ASUS CrashFree BIOS 3 Support DVD Drivers ASUS PC Probe II ASUS Update ASUS AI Suite Anti-Virus software (OEM version) BIOS Features ATX form factor: 12 in x 7.8 in (30.5 cm x 19.8 cm)...to 180MHz at 1MHz increment - Memory tuning from 100MHz to 1333MHz for DDR2 - vCore: Adjustable CPU voltage at back panel) ASUS Exclusive Overclocking Features Intelligent overclocking tools: - P5Q SE Plus specifications summary USB 12 x USB 2.0 ports (6 ports at mid-board, 6 ports at 6.25mV ...

User Manual
Page 15
...65533;3�2��f�o�r�d��e�ta��il�s�. ASUS P5Q SE Plus 1-3 Serial ATA 3Gb/s technology This motherboard supports the hard drives based on the Serial ATA (SATA) 3Gb/s storage specification, delivering enhanced...;�/ Core™2 Duo CPU support� This motherboard supports the latest Intel® Core™2 processor in the world. 1.3 Special features 1.3.1 Product highlights Green ASUS This motherboard and its packaging comply with the ASUS vision of creating environment-friendly ...
...65533;3�2��f�o�r�d��e�ta��il�s�. ASUS P5Q SE Plus 1-3 Serial ATA 3Gb/s technology This motherboard supports the hard drives based on the Serial ATA (SATA) 3Gb/s storage specification, delivering enhanced...;�/ Core™2 Duo CPU support� This motherboard supports the latest Intel® Core™2 processor in the world. 1.3 Special features 1.3.1 Product highlights Green ASUS This motherboard and its packaging comply with the ASUS vision of creating environment-friendly ...

User Manual
Page 16
...progresses through USB devices only. helping save power and money. 1-4 Chapter 1: Product introduction ASUS 8-Phase Power Design ASUS 8-Phase Power Design keeps CPU and power module away from bootup, Express Gate is the onestop gateway to a new...CPU lifetime much longer and system more , the user-friendly picture manager lets you view your pictures without entering Windows at anytime! • The actual boot time depends on the weather and e-mails just before leaving your house. It's a unique motherboard built-in OS. ASUS EPU-4 Engine The new ASUS EPU - 1.3.2 ASUS unique features ASUS...
...progresses through USB devices only. helping save power and money. 1-4 Chapter 1: Product introduction ASUS 8-Phase Power Design ASUS 8-Phase Power Design keeps CPU and power module away from bootup, Express Gate is the onestop gateway to a new...CPU lifetime much longer and system more , the user-friendly picture manager lets you view your pictures without entering Windows at anytime! • The actual boot time depends on the weather and e-mails just before leaving your house. It's a unique motherboard built-in OS. ASUS EPU-4 Engine The new ASUS EPU - 1.3.2 ASUS unique features ASUS...

User Manual
Page 17
... the overclocking capability. ASUS EZ DIY ASUS EZ DIY feature collection provides you easy ways to the motherboard. ASUS Q-Connector ASUS Q-Connector allows you are temporarily away. Profile The motherboard features the ASUS O.C. ASUS CrashFree BIOS 3 The ASUS CrashFree BIOS 3 allows...can continue running at a time and avoiding wrong cable connections. Fan Xpert ASUS Fan Xpert intelligently allows users to adjust both the CPU and chassis fan speed according to restore corrupted BIOS data from a USB flash... fan speed to achieve a quiet and cool environment. ASUS P5Q SE Plus 1-5
... the overclocking capability. ASUS EZ DIY ASUS EZ DIY feature collection provides you easy ways to the motherboard. ASUS Q-Connector ASUS Q-Connector allows you are temporarily away. Profile The motherboard features the ASUS O.C. ASUS CrashFree BIOS 3 The ASUS CrashFree BIOS 3 allows...can continue running at a time and avoiding wrong cable connections. Fan Xpert ASUS Fan Xpert intelligently allows users to adjust both the CPU and chassis fan speed according to restore corrupted BIOS data from a USB flash... fan speed to achieve a quiet and cool environment. ASUS P5Q SE Plus 1-5

User Manual
Page 18
... reboot the system, and the BIOS automatically restores the CPU default setting for details. See page 2-34 for details. 1.3.4 ASUS Intelligent Overclocking features AI Booster The ASUS AI Booster allows you to overclock the CPU speed in Windows environment without the hassle of the motherboard BIOS allows automatic re-setting to the BIOS default settings...
... reboot the system, and the BIOS automatically restores the CPU default setting for details. See page 2-34 for details. 1.3.4 ASUS Intelligent Overclocking features AI Booster The ASUS AI Booster allows you to overclock the CPU speed in Windows environment without the hassle of the motherboard BIOS allows automatic re-setting to the BIOS default settings...

User Manual
Page 22
ASUS will shoulder the cost of the PnP cap. 1-10 Chapter 1: Product introduction 1.6 Central Processing Unit (CPU) The motherboard comes with the cap on the socket and the socket contacts are unplugged before installing the CPU. • Connect the chassis fan cable to the CHA_FAN ...LGA775 socket. • The product warranty does not cover damage to the PnP cap/socket contacts/motherboard components. ASUS will process Return Merchandise Authorization (RMA) requests only if the motherboard comes with a surface mount LGA775 socket designed for the Intel® Core™2 Extreme /...
ASUS will shoulder the cost of the PnP cap. 1-10 Chapter 1: Product introduction 1.6 Central Processing Unit (CPU) The motherboard comes with the cap on the socket and the socket contacts are unplugged before installing the CPU. • Connect the chassis fan cable to the CHA_FAN ...LGA775 socket. • The product warranty does not cover damage to the PnP cap/socket contacts/motherboard components. ASUS will process Return Merchandise Authorization (RMA) requests only if the motherboard comes with a surface mount LGA775 socket designed for the Intel® Core™2 Extreme /...

User Manual
Page 23
... that the socket box is facing towards you are installing a CPU. 3. 1.6.1 Installing the CPU To install a CPU: 1. To prevent damage to remove (4B). 3 ASUS P5Q SE Plus 1-11 Lift the load plate with your left (B) until it to a 135º angle. Press the load lever with your thumb 4B and forefinger to a ... retention tab. Retention tab A B Load lever PnP cap Load plate 4. Lift the load lever in the direction of the arrow to the left . 2. Locate the CPU socket on your thumb (A), then move it is on the motherboard.
... that the socket box is facing towards you are installing a CPU. 3. 1.6.1 Installing the CPU To install a CPU: 1. To prevent damage to remove (4B). 3 ASUS P5Q SE Plus 1-11 Lift the load plate with your left (B) until it to a 135º angle. Press the load lever with your thumb 4B and forefinger to a ... retention tab. Retention tab A B Load lever PnP cap Load plate 4. Lift the load lever in the direction of the arrow to the left . 2. Locate the CPU socket on your thumb (A), then move it is on the motherboard.

User Manual
Page 24
... that it is spread in only one correct orientation. DO NOT force the CPU into the socket to wash it gets into the CPU notch. If so, skip this step. 5. The CPU fits in an even thin layer. CPU notch Gold triangle mark Alignment key 6. The Thermal Interface Material is on the...seek professional medical help. Some heatsinks come with your skin, ensure to prevent bending the connectors on the bottom‑left corner of the CPU that the heatsink will be in contact with, ensuring that the gold triangle is toxic and inedible. Apply several drops of thermal paste to ...
... that it is spread in only one correct orientation. DO NOT force the CPU into the socket to wash it gets into the CPU notch. If so, skip this step. 5. The CPU fits in an even thin layer. CPU notch Gold triangle mark Alignment key 6. The Thermal Interface Material is on the...seek professional medical help. Some heatsinks come with your skin, ensure to prevent bending the connectors on the bottom‑left corner of the CPU that the heatsink will be in contact with, ensuring that the gold triangle is toxic and inedible. Apply several drops of thermal paste to ...

User Manual
Page 26
... LGA775 heatsink and fan assembly comes in place. A B A A B B A 1 1 The type of the installed CPU, making sure that you have installed the motherboard to the chassis before you install the heatsink and fan assembly. Ensure that Thermal Interface Material is for reference only. 1-14 ...properly applied Thermal Interface Material to install. • If you purchased a separate CPU heatsink and fan assembly, ensure that the B four fasteners match the holes on the motherboard. 2. To install the CPU heatsink and fan: 1. If you buy a boxed Intel® processor, the ...
... LGA775 heatsink and fan assembly comes in place. A B A A B B A 1 1 The type of the installed CPU, making sure that you have installed the motherboard to the chassis before you install the heatsink and fan assembly. Ensure that Thermal Interface Material is for reference only. 1-14 ...properly applied Thermal Interface Material to install. • If you purchased a separate CPU heatsink and fan assembly, ensure that the B four fasteners match the holes on the motherboard. 2. To install the CPU heatsink and fan: 1. If you buy a boxed Intel® processor, the ...

User Manual
Page 27
... two fasteners at a time in a diagonal sequence to the connector on the motherboard. 2. A B A A B B A 4. Disconnect the CPU fan cable from the motherboard. B 3. Carefully remove the heatsink and fan assembly from the motherboard. Hardware monitoring errors can occur if you fail to connect the CPU fan connector! ASUS P5Q SE Plus 1-15 Do not forget to plug this connector. 1.6.3 Uninstalling the...
... two fasteners at a time in a diagonal sequence to the connector on the motherboard. 2. A B A A B B A 4. Disconnect the CPU fan cable from the motherboard. B 3. Carefully remove the heatsink and fan assembly from the motherboard. Hardware monitoring errors can occur if you fail to connect the CPU fan connector! ASUS P5Q SE Plus 1-15 Do not forget to plug this connector. 1.6.3 Uninstalling the...

User Manual
Page 39
... the battery. • You do not help, remove the onboard battery and move the cap back to pins 2-3. For system failure due to overclocking. ASUS P5Q SE Plus 1-27 Hold down and reboot the system so the BIOS can clear the CMOS memory of date, time, and system setup parameters by erasing the...system boot failure! • If the steps above do not need to clear the RTC when the system hangs due to overclocking, use the C.P.R. (CPU Parameter Recall) feature. Shut down the key during the boot process and enter BIOS setup to clear the CMOS RTC RAM data. Clear RTC RAM...
... the battery. • You do not help, remove the onboard battery and move the cap back to pins 2-3. For system failure due to overclocking. ASUS P5Q SE Plus 1-27 Hold down and reboot the system so the BIOS can clear the CMOS memory of date, time, and system setup parameters by erasing the...system boot failure! • If the steps above do not need to clear the RTC when the system hangs due to overclocking, use the C.P.R. (CPU Parameter Recall) feature. Shut down the key during the boot process and enter BIOS setup to clear the CMOS RTC RAM data. Clear RTC RAM...

User Manual
Page 40
... requires an ATX power supply that can provide 500mA on the +5VSB lead for each USB port; Keyboard power (3-pin KBPWR) This jumper allows you can supply at least 1A on the keyboard (the default is the Space Bar)s. Set to +5VSB to wake up from S1 sleep mode (CPU stopped, DRAM... refreshed, system running in sleep mode. 1-28 Chapter 1: Product introduction When you set this jumper to pins 2-3 (+5VSB), you to CPU, DRAM in slow refresh, power supply in reduced power mode). • The USB device wake-up . • The total current consumed must NOT exceed the ...
... requires an ATX power supply that can provide 500mA on the +5VSB lead for each USB port; Keyboard power (3-pin KBPWR) This jumper allows you can supply at least 1A on the keyboard (the default is the Space Bar)s. Set to +5VSB to wake up from S1 sleep mode (CPU stopped, DRAM... refreshed, system running in sleep mode. 1-28 Chapter 1: Product introduction When you set this jumper to pins 2-3 (+5VSB), you to CPU, DRAM in slow refresh, power supply in reduced power mode). • The USB device wake-up . • The total current consumed must NOT exceed the ...

User Manual
Page 46
Insufficient air flow inside the system may damage the motherboard components. Only the CPU_FAN and CHA_FAN connector support the ASUS Q-FAN feature. 8. Serial port connector (10-1 pin COM1) This connector is purchased separately. 1-34 Chapter 1: Product introduction CPU, chassis, and power fan connectors (4-pin CPU_FAN, 3-pin CHA_FAN... fan cables to the fan connectors on the fan connectors! These are not jumpers! Do not place jumper caps on the motherboard, making sure that the black wire of each cable matches the ground pin of the system chassis. 7. Connect the serial ...
Insufficient air flow inside the system may damage the motherboard components. Only the CPU_FAN and CHA_FAN connector support the ASUS Q-FAN feature. 8. Serial port connector (10-1 pin COM1) This connector is purchased separately. 1-34 Chapter 1: Product introduction CPU, chassis, and power fan connectors (4-pin CPU_FAN, 3-pin CHA_FAN... fan cables to the fan connectors on the fan connectors! These are not jumpers! Do not place jumper caps on the motherboard, making sure that the black wire of each cable matches the ground pin of the system chassis. 7. Connect the serial ...

User Manual
Page 68
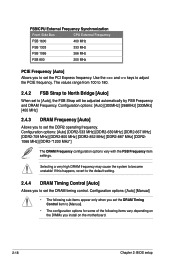
Main BIOS SETUP UTILITY Bios Information Version : 0103 Build Date : 09/02/08 Processor Type Speed Count : Intel(R) Core(TM)2 CPU 6300 @ 1.86GHz : 1866 MHz : 2 System Memory Installed Size: 512MB Usable Size : 512MB Select Screen Select Item F1 General Help F10 Save ...auto-detected system memory. 2-16 Chapter 2: BIOS setup The BIOS automatically detects the items in this menu. Processor Displays the auto-detected CPU specification. AMI BIOS Displays the auto-detected BIOS information. 2.3.6 System Information This menu gives you an overview of the general system specifications.
Main BIOS SETUP UTILITY Bios Information Version : 0103 Build Date : 09/02/08 Processor Type Speed Count : Intel(R) Core(TM)2 CPU 6300 @ 1.86GHz : 1866 MHz : 2 System Memory Installed Size: 512MB Usable Size : 512MB Select Screen Select Item F1 General Help F10 Save ...auto-detected system memory. 2-16 Chapter 2: BIOS setup The BIOS automatically detects the items in this menu. Processor Displays the auto-detected CPU specification. AMI BIOS Displays the auto-detected BIOS information. 2.3.6 System Information This menu gives you an overview of the general system specifications.

User Manual
Page 69
... Voltage [Auto] South Bridge Voltage [Auto] Load-Line Calibration [Auto] CPU GTL REference [Auto] CPU Spread Sepctrum [Auto] PCIE Spread Sprectrum [Auto] CPU Clock Skew [Auto] NB Clock Skew [Auto] CPU Margin Enhancement [Optimized] Tools Exit Options MANUAL Auto Select Screen Select Item .... The value of the preset overclocking configuration options: Manual Auto Allows you set overclocking parameters. ASUS P5Q SE Plus 2-17 You can also type the desired CPU frequency using the numeric keypad. 2.4 Ai Tweaker menu The Ai Tweaker menu items allow you to...
... Voltage [Auto] South Bridge Voltage [Auto] Load-Line Calibration [Auto] CPU GTL REference [Auto] CPU Spread Sepctrum [Auto] PCIE Spread Sprectrum [Auto] CPU Clock Skew [Auto] NB Clock Skew [Auto] CPU Margin Enhancement [Optimized] Tools Exit Options MANUAL Auto Select Screen Select Item .... The value of the preset overclocking configuration options: Manual Auto Allows you set overclocking parameters. ASUS P5Q SE Plus 2-17 You can also type the desired CPU frequency using the numeric keypad. 2.4 Ai Tweaker menu The Ai Tweaker menu items allow you to...
User Manual
Page 70
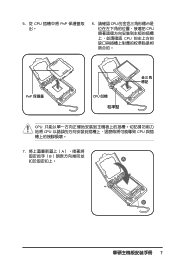
... items vary depending on the DIMMs you to North Bridge [Auto] When set the DDR2 operating frequency. FSB/CPU External Frequency Synchronization Front Side Bus CPU External Frequency FSB 1600 400 MHz FSB 1333 333 MHz FSB 1066 266 MHz FSB 800 200 MHz PCIE Frequency... [Auto] Allows you install on the motherboard. 2-18 Chapter 2: BIOS setup Configuration options: [Auto] [200MHz] [266MHz] [333MHz] [400 MHz] 2.4.3 DRAM Frequency...
... items vary depending on the DIMMs you to North Bridge [Auto] When set the DDR2 operating frequency. FSB/CPU External Frequency Synchronization Front Side Bus CPU External Frequency FSB 1600 400 MHz FSB 1333 333 MHz FSB 1066 266 MHz FSB 800 200 MHz PCIE Frequency... [Auto] Allows you install on the motherboard. 2-18 Chapter 2: BIOS setup Configuration options: [Auto] [200MHz] [266MHz] [333MHz] [400 MHz] 2.4.3 DRAM Frequency...

User Manual
Page 73
...ASUS P5Q SE Plus 2-21 The values range from 1.10V to set the North Bridge voltage. The values range from 1.20V* to 1.50V with a 0.10V interval. 2.4.13 North Bridge Voltage [Auto] Allows you to 1.40V* with a 0.00625V interval. Configuration options: [Auto] [Manual] The following ten (10) items on DRAM Channel A and B, Phase 1 to the CPU... documentation before setting the CPU Vcore voltage. Pull-In of CHA/B PH1/2/3/4 [Disabled] Set this item to [Enabled] to apply enhancement on the ...
...ASUS P5Q SE Plus 2-21 The values range from 1.10V to set the North Bridge voltage. The values range from 1.20V* to 1.50V with a 0.10V interval. 2.4.13 North Bridge Voltage [Auto] Allows you to 1.40V* with a 0.00625V interval. Configuration options: [Auto] [Manual] The following ten (10) items on DRAM Channel A and B, Phase 1 to the CPU... documentation before setting the CPU Vcore voltage. Pull-In of CHA/B PH1/2/3/4 [Disabled] Set this item to [Enabled] to apply enhancement on the ...


