User Manual
Page 14
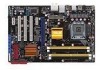
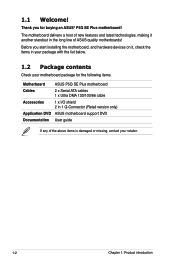
... cable Accessories 1 x I/O shield 2 in your package with the list below. 1.2 Package contents Check your motherboard package for buying an ASUS® P5Q SE Plus motherboard! The motherboard delivers a host of ASUS quality motherboards! 1.1 Welcome! Thank you start installing the motherboard, and hardware devices on it another standout in the long line of new features and latest technologies, making it , check the items in 1 Q-Connector (Retail version only) Application DVD ASUS motherboard support DVD Documentation User guide...
... cable Accessories 1 x I/O shield 2 in your package with the list below. 1.2 Package contents Check your motherboard package for buying an ASUS® P5Q SE Plus motherboard! The motherboard delivers a host of ASUS quality motherboards! 1.1 Welcome! Thank you start installing the motherboard, and hardware devices on it another standout in the long line of new features and latest technologies, making it , check the items in 1 Q-Connector (Retail version only) Application DVD ASUS motherboard support DVD Documentation User guide...

User Manual
Page 15
... while minimizing the impact on the environment. ASUS P5Q SE Plus 1-3 This is designed to enjoy the latest technology supported by one of the most powerful and energy efficient CPUs in line with the European Union's Restriction on the Serial ATA (SATA) 3Gb/s storage specification, delivering enhanced scalability and doubling the bus bandwidth for double speed and bandwidth which enhances system performance. With...
... while minimizing the impact on the environment. ASUS P5Q SE Plus 1-3 This is designed to enjoy the latest technology supported by one of the most powerful and energy efficient CPUs in line with the European Union's Restriction on the Serial ATA (SATA) 3Gb/s storage specification, delivering enhanced scalability and doubling the bus bandwidth for double speed and bandwidth which enhances system performance. With...

User Manual
Page 17
... the chassis front panel cables to install computer components, update the BIOS or back up your favorite settings. This unique module eliminates the trouble of fan speed to restore corrupted BIOS data from a USB flash disk containing the BIOS file. See page 2-9 for details. ASUS O.C. Profile The motherboard features the ASUS O.C. Built-in different geographic regions and system loading. ASUS P5Q SE Plus 1-5 ASUS Q-Connector ASUS Q-Connector allows you easy ways to the motherboard. ASUS CrashFree BIOS 3 The ASUS CrashFree BIOS 3 allows users to...
... the chassis front panel cables to install computer components, update the BIOS or back up your favorite settings. This unique module eliminates the trouble of fan speed to restore corrupted BIOS data from a USB flash disk containing the BIOS file. See page 2-9 for details. ASUS O.C. Profile The motherboard features the ASUS O.C. Built-in different geographic regions and system loading. ASUS P5Q SE Plus 1-5 ASUS Q-Connector ASUS Q-Connector allows you easy ways to the motherboard. ASUS CrashFree BIOS 3 The ASUS CrashFree BIOS 3 allows users to...

User Manual
Page 29
..., and 4 GB unbuffered non‑ECC DDR2 DIMMs into the DIMM sockets. • You may operate at a higher frequency, see section 2.4 Ai Tweaker menu for better overclocking capability. • Always install DIMMs with the same CAS latency. ASUS P5Q SE Plus 1-17 For optimum compatibility, it is recommended that you install 4GB or more memory installed on the motherboard, the actual usable memory for the dual-channel configuration.
..., and 4 GB unbuffered non‑ECC DDR2 DIMMs into the DIMM sockets. • You may operate at a higher frequency, see section 2.4 Ai Tweaker menu for better overclocking capability. • Always install DIMMs with the same CAS latency. ASUS P5Q SE Plus 1-17 For optimum compatibility, it is recommended that you install 4GB or more memory installed on the motherboard, the actual usable memory for the dual-channel configuration.
User Manual
Page 37
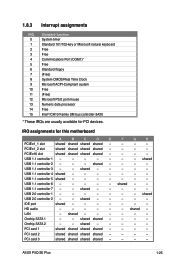
...- - - LAN - shared shared - - - - PCI card 2 shared shared shared shared - - - - ASUS P5Q SE Plus 1-25 IRQ assignments for PCI devices. shared - - - - - IDE port shared - - - - - - - PCI card 1 shared shared shared shared - - - - USB 1.1 controller 5 shared - - - - - - - shared - - - - - 1.8.3 Interrupt assignments IRQ Standard function 0 System timer 1 Standard 101/102-key or Microsoft natural keyboard 2 Free 3 Free 4 Commnications Port (COM1)* 5 Free 6 Standard floppy 7 (Free) 8 System CMOS/Real Time Clock 9 Microsoft ACPI...
...- - - LAN - shared shared - - - - PCI card 2 shared shared shared shared - - - - ASUS P5Q SE Plus 1-25 IRQ assignments for PCI devices. shared - - - - - IDE port shared - - - - - - - PCI card 1 shared shared shared shared - - - - USB 1.1 controller 5 shared - - - - - - - shared - - - - - 1.8.3 Interrupt assignments IRQ Standard function 0 System timer 1 Standard 101/102-key or Microsoft natural keyboard 2 Free 3 Free 4 Commnications Port (COM1)* 5 Free 6 Standard floppy 7 (Free) 8 System CMOS/Real Time Clock 9 Microsoft ACPI...

User Manual
Page 40
... each USB port; otherwise, the system would not power up feature. When you to wake up feature requires a power supply that can wake up from S1 sleep mode (CPU stopped, DRAM refreshed, system running in sleep mode. 1-28 Chapter 1: Product introduction Keyboard power (3-pin KBPWR) This jumper allows you set this jumper to CPU, DRAM in slow refresh, power supply in the BIOS. 3. USB device wake-up (3-pin USBPW1-5, 3-pin USBPW6-11) Set these jumpers to +5V to enable or disable the keyboard wake-up...
... each USB port; otherwise, the system would not power up feature. When you to wake up feature requires a power supply that can wake up from S1 sleep mode (CPU stopped, DRAM refreshed, system running in sleep mode. 1-28 Chapter 1: Product introduction Keyboard power (3-pin KBPWR) This jumper allows you set this jumper to CPU, DRAM in slow refresh, power supply in the BIOS. 3. USB device wake-up (3-pin USBPW1-5, 3-pin USBPW6-11) Set these jumpers to +5V to enable or disable the keyboard wake-up...

User Manual
Page 43
... removed to configure your device. This prevents incorrect insertion when you connect the IDE cable. • Use the 80-conductor IDE cable for the Ultra DMA 133/100/66 signal cable. IDE connector (40-1 pin PRI_EIDE) The onboard IDE connector is set as "Cable-Select," ensure that all other device jumpers have the same setting. There are three connectors on the Ultra DMA cable connector. ASUS P5Q SE Plus 1-31 Drive jumper setting Single device Two devices Cable-Select or Master Cable-Select Master Slave Mode...
... removed to configure your device. This prevents incorrect insertion when you connect the IDE cable. • Use the 80-conductor IDE cable for the Ultra DMA 133/100/66 signal cable. IDE connector (40-1 pin PRI_EIDE) The onboard IDE connector is set as "Cable-Select," ensure that all other device jumpers have the same setting. There are three connectors on the Ultra DMA cable connector. ASUS P5Q SE Plus 1-31 Drive jumper setting Single device Two devices Cable-Select or Master Cable-Select Master Slave Mode...

User Manual
Page 54
... original motherboard BIOS file to a bootable floppy disk or USB flash disk in case you need to your BIOS The following utilities allow you to manage, save, and update the motherboard BIOS in the support DVD that allows you to the corresponding sections for details on these utilities. ASUS Update requires an Internet connection either through a network or an Internet Service Provider (ISP). The Drivers menu appears. 2. ASUS AFUDOS: Updates the BIOS using the ASUS Update or AFUDOS utilities. 2.1.1 ASUS Update utility The ASUS Update is a utility...
... original motherboard BIOS file to a bootable floppy disk or USB flash disk in case you need to your BIOS The following utilities allow you to manage, save, and update the motherboard BIOS in the support DVD that allows you to the corresponding sections for details on these utilities. ASUS Update requires an Internet connection either through a network or an Internet Service Provider (ISP). The Drivers menu appears. 2. ASUS AFUDOS: Updates the BIOS using the ASUS Update or AFUDOS utilities. 2.1.1 ASUS Update utility The ASUS Update is a utility...
User Manual
Page 57
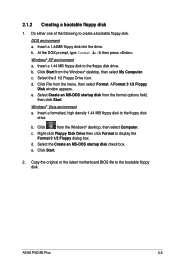
... the floppy disk drive. Click Start from the Windows® desktop, then select Computer. d. Insert a formatted, high density 1.44 MB floppy disk to create a bootable floppy disk. d. e. ASUS P5Q SE Plus 2-5 c. Select the 3 1/2 Floppy Drive icon. Click from the Windows® desktop, then select My Computer. Click Start. 2. DOS environment a. Click File from the format options field, then click Start. b. c. Select the Create an MS-DOS startup disk check box. Windows® XP environment a. A Format 3 1/2 Floppy Disk window...
... the floppy disk drive. Click Start from the Windows® desktop, then select Computer. d. Insert a formatted, high density 1.44 MB floppy disk to create a bootable floppy disk. d. e. ASUS P5Q SE Plus 2-5 c. Select the 3 1/2 Floppy Drive icon. Click from the Windows® desktop, then select My Computer. Click Start. 2. DOS environment a. Click File from the format options field, then click Start. b. c. Select the Create an MS-DOS startup disk check box. Windows® XP environment a. A Format 3 1/2 Floppy Disk window...
User Manual
Page 61
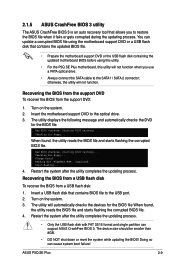
... recovery... Restart the system after the utility completes the updating process. Doing so can update a corrupted BIOS file using the motherboard support DVD or a USB flash disk that contains BIOS file to the optical drive. 3. Bad BIOS checksum. Floppy found , the utility reads the BIOS file and starts flashing the corrupted BIOS file. Completed. Reading file "P5QSEPLU.ROM". Turn on the system. 2. ASUS P5Q SE Plus 2-9 Turn on the system. 3. Checking for the BIOS file. Recovering the BIOS from the support DVD To recover the BIOS from a USB flash disk: 1. The device size...
... recovery... Restart the system after the utility completes the updating process. Doing so can update a corrupted BIOS file using the motherboard support DVD or a USB flash disk that contains BIOS file to the optical drive. 3. Bad BIOS checksum. Floppy found , the utility reads the BIOS file and starts flashing the corrupted BIOS file. Completed. Reading file "P5QSEPLU.ROM". Turn on the system. 2. ASUS P5Q SE Plus 2-9 Turn on the system. 3. Checking for the BIOS file. Recovering the BIOS from the support DVD To recover the BIOS from a USB flash disk: 1. The device size...

User Manual
Page 66
... (C)Copyright 1985-2008, American Megatrends, Inc. Select [ARMD] (ATAPI Removable Media Device) if your device is either a ZIP, LS-120, or MO drive. The BIOS automatically detects the values opposite the dimmed items (Device, Vendor, Size, LBA Mode, Block Mode, PIO Mode, Async DMA, Ultra DMA, and SMART monitoring). 2.3.4 SATA 1-6 While entering Setup, the BIOS automatically detects the presence of the appropriate IDE device type. These values are specifically configuring a CD-ROM drive.
... (C)Copyright 1985-2008, American Megatrends, Inc. Select [ARMD] (ATAPI Removable Media Device) if your device is either a ZIP, LS-120, or MO drive. The BIOS automatically detects the values opposite the dimmed items (Device, Vendor, Size, LBA Mode, Block Mode, PIO Mode, Async DMA, Ultra DMA, and SMART monitoring). 2.3.4 SATA 1-6 While entering Setup, the BIOS automatically detects the presence of the appropriate IDE device type. These values are specifically configuring a CD-ROM drive.
User Manual
Page 67
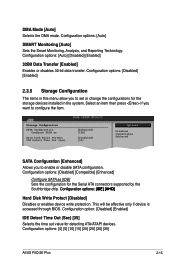
...] ASUS P5Q SE Plus 2-15 Configuration option: [Disabled] [Enabled] IDE Detect Time Out (Sec) [35] Selects the time out value for the storage devices installed in this menu allow you to set or change the configurations for detecting ATA/ATAPI devices. This will be effective only if device is accessed through BIOS. Configuration options: [Auto] SMART Monitoring [Auto] Sets the Smart Monitoring, Analysis, and Reporting Technology. Select an item then press if you to configure the item. Configuration options: [Disabled] [Compatible] [Enhanced] Configure SATA as Hard Disk Write...
...] ASUS P5Q SE Plus 2-15 Configuration option: [Disabled] [Enabled] IDE Detect Time Out (Sec) [35] Selects the time out value for the storage devices installed in this menu allow you to set or change the configurations for detecting ATA/ATAPI devices. This will be effective only if device is accessed through BIOS. Configuration options: [Auto] SMART Monitoring [Auto] Sets the Smart Monitoring, Analysis, and Reporting Technology. Select an item then press if you to configure the item. Configuration options: [Disabled] [Compatible] [Enhanced] Configure SATA as Hard Disk Write...

User Manual
Page 69
...3rd Information: 13-5-1-5-5 DRAM Static Read Control [Auto] DRAM Read Training [Auto] MEM. ASUS P5Q SE Plus 2-17 Main Ai Tweaker BIOS SETUP UTILITY Advanced Power Boot Configure System Performance Settings Ai Overclock Tuner [Auto] FSB Strap to 800. Select either one of the preset overclocking configuration options: Manual Auto Allows you to individually set the Ai Overclock Tuner item to achieve desired CPU internal frequency. The value of CPU overclocking options to [Manual]. OC Charger [Auto] Ai Clock Twister [Auto] Ai Transaction Booster [Auto] C/P: A1 A2...
...3rd Information: 13-5-1-5-5 DRAM Static Read Control [Auto] DRAM Read Training [Auto] MEM. ASUS P5Q SE Plus 2-17 Main Ai Tweaker BIOS SETUP UTILITY Advanced Power Boot Configure System Performance Settings Ai Overclock Tuner [Auto] FSB Strap to 800. Select either one of the preset overclocking configuration options: Manual Auto Allows you to individually set the Ai Overclock Tuner item to achieve desired CPU internal frequency. The value of CPU overclocking options to [Manual]. OC Charger [Auto] Ai Clock Twister [Auto] Ai Transaction Booster [Auto] C/P: A1 A2...

User Manual
Page 75
.... Configuration options: [Auto] [06.0] [07.0] [08.0] ASUS P5Q SE Plus 2-23 NOTE: If an invalid ratio is set in this menu show the CPU-related information that the BIOS automatically detects. CPU Ratio Setting [Auto] Allows you to Trusted Computing innovations. Use the and keys to malfunction. Main Ai Tweaker BIOS SETUP UTILITY Advanced Power Boot CPU Configuration Chipset Onboard Devices Configuration USB Configuration PCIPnP Tools Exit Configure settings related to change the settings for the CPU and other system devices. Select Screen Select Item +- BIOS SETUP...
.... Configuration options: [Auto] [06.0] [07.0] [08.0] ASUS P5Q SE Plus 2-23 NOTE: If an invalid ratio is set in this menu show the CPU-related information that the BIOS automatically detects. CPU Ratio Setting [Auto] Allows you to Trusted Computing innovations. Use the and keys to malfunction. Main Ai Tweaker BIOS SETUP UTILITY Advanced Power Boot CPU Configuration Chipset Onboard Devices Configuration USB Configuration PCIPnP Tools Exit Configure settings related to change the settings for the CPU and other system devices. Select Screen Select Item +- BIOS SETUP...

User Manual
Page 78
... set the front panel audio connector (AAFP) mode to enable or disable the onboard PCIE LAN. The following item appears only when you to legacy AC'97 or high-definition audio depending on the audio standard that the front panel audio module supports. Configuration options: [Disabled] [3F8/IRQ4] [2F8/IRQ3] [3E8/IRQ4] [2E8/IRQ3] 2-26 Chapter 2: BIOS setup 2.5.3 OnBoard Devices Configuration BIOS SETUP UTILITY Advanced Onboard Device Configuraiton High Definition Audio Front Panel Type J-Micron eSATA/PATA Controller Onboard PCIE LAN Onboard PCIE LAN Boot ROM [Enabled] [HD Audio] [Enabled...
... set the front panel audio connector (AAFP) mode to enable or disable the onboard PCIE LAN. The following item appears only when you to legacy AC'97 or high-definition audio depending on the audio standard that the front panel audio module supports. Configuration options: [Disabled] [3F8/IRQ4] [2F8/IRQ3] [3E8/IRQ4] [2E8/IRQ3] 2-26 Chapter 2: BIOS setup 2.5.3 OnBoard Devices Configuration BIOS SETUP UTILITY Advanced Onboard Device Configuraiton High Definition Audio Front Panel Type J-Micron eSATA/PATA Controller Onboard PCIE LAN Onboard PCIE LAN Boot ROM [Enabled] [HD Audio] [Enabled...
User Manual
Page 79
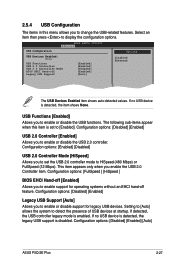
...the USB controller legacy mode is detected, the item shows None. If no USB device is detected, the legacy USB support is set the USB 2.0 controller mode to display the configuration options. USB Functions [Enabled] Allows you to change the USB-related features. Setting to [Auto] allows the system to [Enabled]. 2.5.4 USB Configuration The items in this item is disabled. The following sub-items appear when this menu allows you to enable or disable the USB functions. If no USB device is enabled. Configuration options: [Disabled] [Enabled] [Auto] ASUS P5Q SE Plus...
...the USB controller legacy mode is detected, the item shows None. If no USB device is detected, the legacy USB support is set the USB 2.0 controller mode to display the configuration options. USB Functions [Enabled] Allows you to change the USB-related features. Setting to [Auto] allows the system to [Enabled]. 2.5.4 USB Configuration The items in this item is disabled. The following sub-items appear when this menu allows you to enable or disable the USB functions. If no USB device is enabled. Configuration options: [Disabled] [Enabled] [Auto] ASUS P5Q SE Plus...
User Manual
Page 81
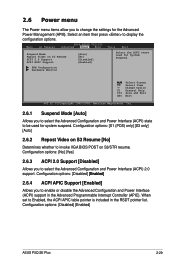
... Hardware Monitor Select Screen Select Item +- Change Option F1 General Help F10 Save and Exit ESC Exit v02.61 (C)Copyright 1985-2008, American Megatrends, Inc. 2.6.1 Suspend Mode [Auto] Allows you to enable or disable the Advanced Configuration and Power Interface (ACPI) support in the RSDT pointer list. When set to display the configuration options. Configuration options: [Disabled] [Enabled] ASUS P5Q SE Plus 2-29 Configuration options: [Disabled] �[E��n�a�b�l�e�d�] 2.6.4 ACPI APIC Support [Enabled] Allows...
... Hardware Monitor Select Screen Select Item +- Change Option F1 General Help F10 Save and Exit ESC Exit v02.61 (C)Copyright 1985-2008, American Megatrends, Inc. 2.6.1 Suspend Mode [Auto] Allows you to enable or disable the Advanced Configuration and Power Interface (ACPI) support in the RSDT pointer list. When set to display the configuration options. Configuration options: [Disabled] [Enabled] ASUS P5Q SE Plus 2-29 Configuration options: [Disabled] �[E��n�a�b�l�e�d�] 2.6.4 ACPI APIC Support [Enabled] Allows...

User Manual
Page 83
...Configuration options: [Disabled] [Enabled] 2.6.6 Hardware Monitor BIOS SETUP UTILITY Power Hardware Monitor CPU Temperature MB Temperature CPU Fan Speed CPU Q-Fan Control Chassis Fan Speed Chassis Q-Fan Control Power Fan Speed CPU Voltage 3.3V Voltage 5V Voltage 12V Voltage [25ºC/77ºF] [34ºC/93ºF] [4440RPM] [Disabled] [4440RPM] [Disabled] [N/A] [ 1.080V] [ 3.232V] [ 5.040V] [12.208V] CPU Temperature Select Screen Select Item +- CPU Q-Fan Control [Disabled] Allows you to display the detected temperatures. ASUS P5Q SE Plus 2-31 This feature requires an ATX power...
...Configuration options: [Disabled] [Enabled] 2.6.6 Hardware Monitor BIOS SETUP UTILITY Power Hardware Monitor CPU Temperature MB Temperature CPU Fan Speed CPU Q-Fan Control Chassis Fan Speed Chassis Q-Fan Control Power Fan Speed CPU Voltage 3.3V Voltage 5V Voltage 12V Voltage [25ºC/77ºF] [34ºC/93ºF] [4440RPM] [Disabled] [4440RPM] [Disabled] [N/A] [ 1.080V] [ 3.232V] [ 5.040V] [12.208V] CPU Temperature Select Screen Select Item +- CPU Q-Fan Control [Disabled] Allows you to display the detected temperatures. ASUS P5Q SE Plus 2-31 This feature requires an ATX power...
User Manual
Page 87
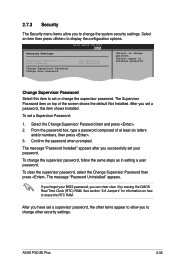
... Password item on how to disabled password. After you set a password, this item to set your BIOS password, you can clear clear it by erasing the CMOS Real Time Clock (RTC) RAM. The message "Password Uninstalled" appears. ASUS P5Q SE Plus 2-35 Change Supervisor Password Select this item shows Installed. Confirm the password when prompted. BIOS SETUP UTILITY Boot Security Settings Supervisor Password User Password Change Supervisor Password Change User Password :Not Installed :Not Installed to display the configuration options. From the password box, type a password...
... Password item on how to disabled password. After you set a password, this item to set your BIOS password, you can clear clear it by erasing the CMOS Real Time Clock (RTC) RAM. The message "Password Uninstalled" appears. ASUS P5Q SE Plus 2-35 Change Supervisor Password Select this item shows Installed. Confirm the password when prompted. BIOS SETUP UTILITY Boot Security Settings Supervisor Password User Password Change Supervisor Password Change User Password :Not Installed :Not Installed to display the configuration options. From the password box, type a password...
User Manual
Page 94
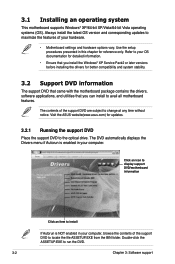
... the ASUS website(www.asus.com) for reference only. Use the setup procedures presented in your OS documentation for detailed information. • Ensure that you install the Windows® XP Service Pack2 or later versions before installing the drivers for better compatibility and system stability. 3.2 Support DVD information The support DVD that came with the motherboard package contains the drivers, software applications, and utilities that you can install to locate the file...
... the ASUS website(www.asus.com) for reference only. Use the setup procedures presented in your OS documentation for detailed information. • Ensure that you install the Windows® XP Service Pack2 or later versions before installing the drivers for better compatibility and system stability. 3.2 Support DVD information The support DVD that came with the motherboard package contains the drivers, software applications, and utilities that you can install to locate the file...


