
User Manual
Page 8
... radio/TV technician for a Class B digital device, pursuant to radio communications. This class B digital apparatus complies with the limits for help. This equipment has been tested and found to provide reasonable protection against harmful interference in the Radio Interference Regulations of the Canadian Department of Communications Statement This digital apparatus does...
... radio/TV technician for a Class B digital device, pursuant to radio communications. This class B digital apparatus complies with the limits for help. This equipment has been tested and found to provide reasonable protection against harmful interference in the Radio Interference Regulations of the Canadian Department of Communications Statement This digital apparatus does...
User Manual
Page 67
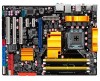
... VGA detected Quick boot set to the power connector at the back of the system chassis. 4. At power on the chain) c. ASUS P5Q-E Series 2-41 Turn on test. If you press the ATX power button. 2.9 Starting up for assistance. Connect the power cord to disabled No keyboard detected No memory... the jumper settings and connections or call your monitor complies with ATX power supplies, the system LED lights up or switch between orange and green after the system LED turns on the screen. If your retailer for the first time 1. Follow the instructions in the following order: a. While...
... VGA detected Quick boot set to the power connector at the back of the system chassis. 4. At power on the chain) c. ASUS P5Q-E Series 2-41 Turn on test. If you press the ATX power button. 2.9 Starting up for assistance. Connect the power cord to disabled No keyboard detected No memory... the jumper settings and connections or call your monitor complies with ATX power supplies, the system LED lights up or switch between orange and green after the system LED turns on the screen. If your retailer for the first time 1. Follow the instructions in the following order: a. While...
User Manual
Page 74
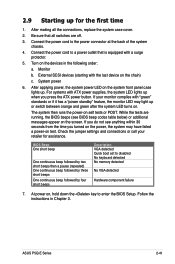
... the correct file is found . To update the BIOS using a DOS‑based utility. Press + during the Power-On Self Tests (POST). 3.1.2 ASUS EZ Flash 2 utility The ASUS EZ Flash 2 feature allows you to update the BIOS without having to go through the long process of booting from a floppy disk... and using EZ Flash 2 1. ASUSTek EZ Flash 2 BIOS ROM Utility V3.25 FLASH TYPE: WINBOND W25P/X16 Current ROM BOARD: P5Q-E VER: 0101 DATE...
... the correct file is found . To update the BIOS using a DOS‑based utility. Press + during the Power-On Self Tests (POST). 3.1.2 ASUS EZ Flash 2 utility The ASUS EZ Flash 2 feature allows you to update the BIOS without having to go through the long process of booting from a floppy disk... and using EZ Flash 2 1. ASUSTek EZ Flash 2 BIOS ROM Utility V3.25 FLASH TYPE: WINBOND W25P/X16 Current ROM BOARD: P5Q-E VER: 0101 DATE...
User Manual
Page 77
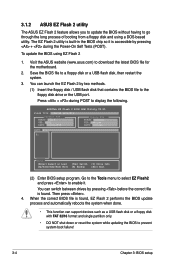
.... • The default BIOS settings for this motherboard apply for this program. Being a menu-driven program, it lets you with its test routines. ASUS P5Q-E Series 3-7 When you start up the computer, the system provides you scroll through the various sub-menus and make it as possible.... This requires you see on your screen. • Visit the ASUS website (www.asus.com) to configure your BIOS. otherwise, POST continues with the ...
.... • The default BIOS settings for this motherboard apply for this program. Being a menu-driven program, it lets you with its test routines. ASUS P5Q-E Series 3-7 When you start up the computer, the system provides you scroll through the various sub-menus and make it as possible.... This requires you see on your screen. • Visit the ASUS website (www.asus.com) to configure your BIOS. otherwise, POST continues with the ...
User Manual
Page 105
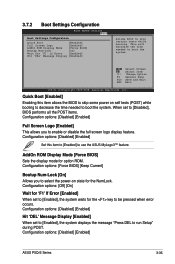
... [Enabled] When set to [Enabled], the system waits for the key to select the power-on self tests (POST) while booting to decrease the time needed to boot the system. Configuration options: [Disabled] [Enabled] ASUS P5Q-E Series 3-35 Change Option F1 General Help F10 Save and Exit ESC Exit v02.61 (C)Copyright 1985...
... [Enabled] When set to [Enabled], the system waits for the key to select the power-on self tests (POST) while booting to decrease the time needed to boot the system. Configuration options: [Disabled] [Enabled] ASUS P5Q-E Series 3-35 Change Option F1 General Help F10 Save and Exit ESC Exit v02.61 (C)Copyright 1985...

User Manual
Page 112
Configuration options: [Disabled] [Enabled] 3-42 Chapter 3: BIOS setup Check Marvell LAN Cable [Disabled] Enables or disables checking of the Marvell LAN cable during POST. Check Marvell LAN cable [Disabled] v02.61 (C)Copyright 1985-2008, American Megatrends, Inc. 3.8.6 AI Net 2 AI NET 2 Pair Status Length BIOS SETUP UTILITY Tools Marvell Check LAN cable during the Power-On Self‑Test (POST).
Configuration options: [Disabled] [Enabled] 3-42 Chapter 3: BIOS setup Check Marvell LAN Cable [Disabled] Enables or disables checking of the Marvell LAN cable during POST. Check Marvell LAN cable [Disabled] v02.61 (C)Copyright 1985-2008, American Megatrends, Inc. 3.8.6 AI Net 2 AI NET 2 Pair Status Length BIOS SETUP UTILITY Tools Marvell Check LAN cable during the Power-On Self‑Test (POST).

User Manual
Page 125
... ASUS P5Q-E Series 4-9 View the online help or readme file that came with the software application for details. 2. See section 4.2.3 Utilities menu for details. • Before using the ASUS MyLogo3™, use the AFUDOS utility to section 3.1.1 ASUS Update utility for more information. 4.3.1 ASUS MyLogo3™ The ASUS MyLogo3...support DVD. See section 3.1.3 AFUDOS utility. • Make sure that appears on screen during the Power‑On‑Self-Tests (POST). See section 3.7.2 Boot Settings Configuration. • You can create your own boot logo image in the support DVD have...
... ASUS P5Q-E Series 4-9 View the online help or readme file that came with the software application for details. 2. See section 4.2.3 Utilities menu for details. • Before using the ASUS MyLogo3™, use the AFUDOS utility to section 3.1.1 ASUS Update utility for more information. 4.3.1 ASUS MyLogo3™ The ASUS MyLogo3...support DVD. See section 3.1.3 AFUDOS utility. • Make sure that appears on screen during the Power‑On‑Self-Tests (POST). See section 3.7.2 Boot Settings Configuration. • You can create your own boot logo image in the support DVD have...

User Manual
Page 127
... a cable test. • The VCT utility only tests Ethernet cables connected to Gigabit LAN port(s). • The Run button on the Virtual Cable Tester™ main window is disabled if no problem is a cable diagnostic utility that reports LAN cable faults and shorts using the Time Domain Reflectometry (TDR) technology. ASUS P5Q-E Series 4-11...
... a cable test. • The VCT utility only tests Ethernet cables connected to Gigabit LAN port(s). • The Run button on the Virtual Cable Tester™ main window is disabled if no problem is a cable diagnostic utility that reports LAN cable faults and shorts using the Time Domain Reflectometry (TDR) technology. ASUS P5Q-E Series 4-11...

User Manual
Page 148
.... Preset settings Click and expand the drop-down menu to change the settings of the Speakers and SPDIF Interface or mute the audio. Press the Test Speakers button to customize the values of Voice Clarity, Dynamics, Brilliance, and Deep Bass of each preset. Move the sliders to perform speaker...
.... Preset settings Click and expand the drop-down menu to change the settings of the Speakers and SPDIF Interface or mute the audio. Press the Test Speakers button to customize the values of Voice Clarity, Dynamics, Brilliance, and Deep Bass of each preset. Move the sliders to perform speaker...

User Manual
Page 149
... settings Click the tab to select an enhanced microphone input features, including No Filtering, Speakerphone, Voice Recording, and Directional Beam. ASUS P5Q-E Series 4-33 Recording Settings To change the recording settings, click the Recording button on the control panel. Equalizer Allows you to...the rear panel ports for the further configurations. ANDREA settings Allows you to perform test recording and play the test sample through the speakers or the SPDIF interface. Record testing Click the tab to configure and customize all the DSP presets frequencies. More ...
... settings Click the tab to select an enhanced microphone input features, including No Filtering, Speakerphone, Voice Recording, and Directional Beam. ASUS P5Q-E Series 4-33 Recording Settings To change the recording settings, click the Recording button on the control panel. Equalizer Allows you to...the rear panel ports for the further configurations. ANDREA settings Allows you to perform test recording and play the test sample through the speakers or the SPDIF interface. Record testing Click the tab to configure and customize all the DSP presets frequencies. More ...
User Manual
Page 152
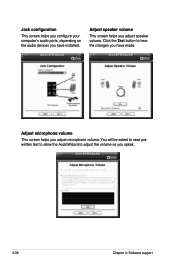
Adjust speaker volume This screen helps you adjust microphone volume. Adjust microphone volume This screen helps you adjust speaker volume. Jack configuration This screen helps you configure your computer's audio ports, depending on the audio devices you speak. 4-36 Chapter 4: Software support You will be asked to read prewritten text to allow the AudioWizard to hear the changes you have installed. Click the Test button to adjust the volume as you have made.
Adjust speaker volume This screen helps you adjust microphone volume. Adjust microphone volume This screen helps you adjust speaker volume. Jack configuration This screen helps you configure your computer's audio ports, depending on the audio devices you speak. 4-36 Chapter 4: Software support You will be asked to read prewritten text to allow the AudioWizard to hear the changes you have installed. Click the Test button to adjust the volume as you have made.

