

User Guide
Page 6
...; High Definition Audio utility)... 5-24 5.3.9 ASUS Express Gate 5-33 5.4 RAID configurations 5-40 5.4.1 RAID definitions 5-40 5.4.2 NVIDIA® RAID configurations 5-41 5.4.3 Marvell® eSATA RAID configurations 5-48 5.4.4 Marvell® SAS RAID configurations 5-54 5.5 Creating a RAID driver disk 5-63 5.5.1 Creating a RAID driver disk without entering the OS.... 5-63 5.5.2 Creating a SATA RAID driver disk in Windows 5-63 Chapter 6: NVIDIA® SLI™ technology support 6.1 Overview 6-1 Requirements 6-1 6.2 Graphics card setup 6-2 6.2.1 Installing three SLI-ready graphics...
...; High Definition Audio utility)... 5-24 5.3.9 ASUS Express Gate 5-33 5.4 RAID configurations 5-40 5.4.1 RAID definitions 5-40 5.4.2 NVIDIA® RAID configurations 5-41 5.4.3 Marvell® eSATA RAID configurations 5-48 5.4.4 Marvell® SAS RAID configurations 5-54 5.5 Creating a RAID driver disk 5-63 5.5.1 Creating a RAID driver disk without entering the OS.... 5-63 5.5.2 Creating a SATA RAID driver disk in Windows 5-63 Chapter 6: NVIDIA® SLI™ technology support 6.1 Overview 6-1 Requirements 6-1 6.2 Graphics card setup 6-2 6.2.1 Installing three SLI-ready graphics...
User Guide
Page 23
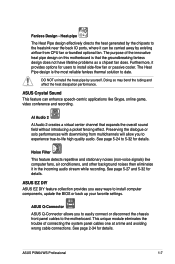
... you to easily connect or disconnect the chassis front panel cables to -life high quality audio. AI Audio 2 AI Audio 2 creates a virtual center channel that the groundbreaking fanless design does not have lifetime problems as a chipset fan does. ASUS P5N64 WS Professional 1-7 Fanless Design - ASUS Q-Connector ASUS Q-Connector allows you to experience true-to the motherboard. Preserving the dialogue or solo performances with downmixing from CPU fan or bundled optional fan. ASUS EZ DIY ASUS EZ DIY feature...
... you to easily connect or disconnect the chassis front panel cables to -life high quality audio. AI Audio 2 AI Audio 2 creates a virtual center channel that the groundbreaking fanless design does not have lifetime problems as a chipset fan does. ASUS P5N64 WS Professional 1-7 Fanless Design - ASUS Q-Connector ASUS Q-Connector allows you to experience true-to the motherboard. Preserving the dialogue or solo performances with downmixing from CPU fan or bundled optional fan. ASUS EZ DIY ASUS EZ DIY feature...
User Guide
Page 47
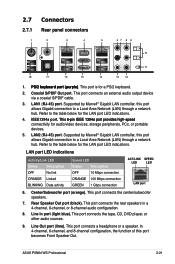
... portable devices�. 5. Supported by Marvell® Gigabit LAN controller, this port allows Gigabit connection to the table below for the LAN port LED indications. LAN port LED indications Activity/Link LED Status Description OFF No link ORANGE Linked BLINKING Data activity Speed LED Status Description OFF 10 Mbps connection ORANGE 100 Mbps connection GREEN 1 Gbps connection ACT/LINK SPEED LED LED LAN port 6. Line Out port (lime). LAN1 (RJ-45) port. Rear Speaker Out port (black). ASUS P5N64 WS Professional...
... portable devices�. 5. Supported by Marvell® Gigabit LAN controller, this port allows Gigabit connection to the table below for the LAN port LED indications. LAN port LED indications Activity/Link LED Status Description OFF No link ORANGE Linked BLINKING Data activity Speed LED Status Description OFF 10 Mbps connection ORANGE 100 Mbps connection GREEN 1 Gbps connection ACT/LINK SPEED LED LED LAN port 6. Line Out port (lime). LAN1 (RJ-45) port. Rear Speaker Out port (black). ASUS P5N64 WS Professional...
User Guide
Page 48
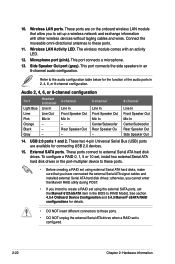
... SATA ports. USB 2.0 ports 1 and 2. These ports connect to these ports. 11. Microphone port (pink). See section 4.5.4 OnBoard Device Configuration and 5.4.3 Marvell® eSATA RAID configurations for the function of the audio ports in an 8-channel audio configuration. Connect the moveable omni-directional antennas to [RAID Mode]. This port connects the side speakers in 2, 4, 6, or 8-channel configuration. These two 4-pin Universal Serial Bus (USB) ports are on the onboard wireless LAN module that you intend to create a RAID set using external Serial ATA hard disks...
... SATA ports. USB 2.0 ports 1 and 2. These ports connect to these ports. 11. Microphone port (pink). See section 4.5.4 OnBoard Device Configuration and 5.4.3 Marvell® eSATA RAID configurations for the function of the audio ports in an 8-channel audio configuration. Connect the moveable omni-directional antennas to [RAID Mode]. This port connects the side speakers in 2, 4, 6, or 8-channel configuration. These two 4-pin Universal Serial Bus (USB) ports are on the onboard wireless LAN module that you intend to create a RAID set using external Serial ATA hard disks...

User Guide
Page 69
... support DVD in Windows® environment. The Drivers menu appears. 2. ASUS AFUDOS (Updates the BIOS using a bootable floppy disk, USB flash disk or the motherboard support DVD when the BIOS file fails or gets corrupted.) Refer to the corresponding sections for details on these utilities. Save a copy of the original motherboard BIOS file to a bootable floppy disk or USB flash disk in case you to restore the BIOS in Windows® environment.) 2. 4.1 Managing and updating your system. Click the Utilities tab, then click Install ASUS Update...
... support DVD in Windows® environment. The Drivers menu appears. 2. ASUS AFUDOS (Updates the BIOS using a bootable floppy disk, USB flash disk or the motherboard support DVD when the BIOS file fails or gets corrupted.) Refer to the corresponding sections for details on these utilities. Save a copy of the original motherboard BIOS file to a bootable floppy disk or USB flash disk in case you to restore the BIOS in Windows® environment.) 2. 4.1 Managing and updating your system. Click the Utilities tab, then click Install ASUS Update...
User Guide
Page 76
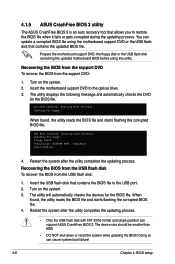
... motherboard support DVD to the USB port. 2. Starting BIOS recovery... Reading file "P5N64WP.ROM". The device size should be smaller than 8GB. • DO NOT shut down or reset the system while updating the BIOS! Bad BIOS checksum. The utility will automatically checks the devices for floppy... Recovering the BIOS from the USB flash disk To recover the BIOS from the support DVD: 1. 4.1.5 ASUS CrashFree BIOS 3 utility The ASUS CrashFree BIOS 3 is an auto recovery tool that contains the updated BIOS file. You can cause system boot failure...
... motherboard support DVD to the USB port. 2. Starting BIOS recovery... Reading file "P5N64WP.ROM". The device size should be smaller than 8GB. • DO NOT shut down or reset the system while updating the BIOS! Bad BIOS checksum. The utility will automatically checks the devices for floppy... Recovering the BIOS from the USB flash disk To recover the BIOS from the support DVD: 1. 4.1.5 ASUS CrashFree BIOS 3 utility The ASUS CrashFree BIOS 3 is an auto recovery tool that contains the updated BIOS file. You can cause system boot failure...
User Guide
Page 81
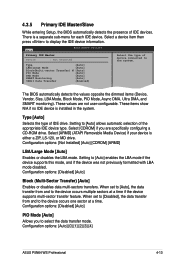
...to [Auto] enables the LBA mode if the device supports this mode, and if the device was not previously formatted with LBA mode disabled. Type [Auto] Selects the type of IDE devices. Configuration options: [Not Installed] [Auto] [CDROM] [ARMD] LBA/Large Mode [Auto] Enables or disables the LBA mode. When set to [Auto], the data transfer from and to select the data transfer mode. Configuration options: [Auto] [0] [1] [2] [3] [4] ASUS P5N64 WS Professional 4-13 4.3.5 Primary IDE Master/Slave While entering Setup, the BIOS automatically detects the presence of IDE drive. Select...
...to [Auto] enables the LBA mode if the device supports this mode, and if the device was not previously formatted with LBA mode disabled. Type [Auto] Selects the type of IDE devices. Configuration options: [Not Installed] [Auto] [CDROM] [ARMD] LBA/Large Mode [Auto] Enables or disables the LBA mode. When set to [Auto], the data transfer from and to select the data transfer mode. Configuration options: [Auto] [0] [1] [2] [3] [4] ASUS P5N64 WS Professional 4-13 4.3.5 Primary IDE Master/Slave While entering Setup, the BIOS automatically detects the presence of IDE drive. Select...

User Guide
Page 82
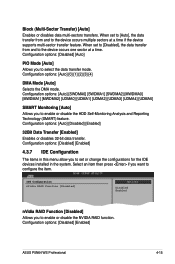
...of device connected to display the IDE device information. Main BIOS SETUP UTILITY Third IDE Master Device : Hard Disk Vendor : HDT722516DLA380 Size : 164.7GB LBA Mode : Supported Block Mode : 16Sectors PIO Mode : 4 Async DMA : MultiWord DMA-2 Ultra DMA : Ultra DMA-6 SMART Monitoring: Supported Select the type of SATA devices. The BIOS automatically detects the values opposite the dimmed items (Device, Vendor, Size, LBA Mode, Block Mode, PIO Mode, Async DMA, Ultra DMA, and SMART monitoring). LBA/Large Mode [Auto] Enables or disables the LBA mode. Configuration options...
...of device connected to display the IDE device information. Main BIOS SETUP UTILITY Third IDE Master Device : Hard Disk Vendor : HDT722516DLA380 Size : 164.7GB LBA Mode : Supported Block Mode : 16Sectors PIO Mode : 4 Async DMA : MultiWord DMA-2 Ultra DMA : Ultra DMA-6 SMART Monitoring: Supported Select the type of SATA devices. The BIOS automatically detects the values opposite the dimmed items (Device, Vendor, Size, LBA Mode, Block Mode, PIO Mode, Async DMA, Ultra DMA, and SMART monitoring). LBA/Large Mode [Auto] Enables or disables the LBA mode. Configuration options...
User Guide
Page 83
... change the configurations for the IDE devices installed in this menu allow you want to select the data transfer mode. Configuration options: [Disabled] [Enabled] 4.3.7 IDE Configuration The items in the system. Configuration options: [Disabled] [Enabled] ASUS P5N64 WS Professional 4-15 Block (Multi-Sector Transfer) [Auto] Enables or disables data multi-sectors transfers. Configuration options: [Auto] [SWDMA0] [SWDMA1] [SWDMA2] [MWDMA0] [MWDMA1] [MWDMA2] [UDMA0] [UDMA1] [UDMA2] [UDMA3] [UDMA4] [UDMA5] SMART Monitoring [Auto] Allows you to configure the item. Configuration options...
... change the configurations for the IDE devices installed in this menu allow you want to select the data transfer mode. Configuration options: [Disabled] [Enabled] 4.3.7 IDE Configuration The items in the system. Configuration options: [Disabled] [Enabled] ASUS P5N64 WS Professional 4-15 Block (Multi-Sector Transfer) [Auto] Enables or disables data multi-sectors transfers. Configuration options: [Auto] [SWDMA0] [SWDMA1] [SWDMA2] [MWDMA0] [MWDMA1] [MWDMA2] [UDMA0] [UDMA1] [UDMA2] [UDMA3] [UDMA4] [UDMA5] SMART Monitoring [Auto] Allows you to configure the item. Configuration options...
User Guide
Page 85
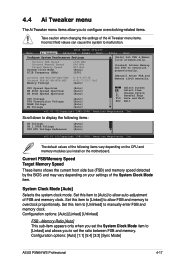
..., Inc. Configuration options: [Auto] [1:1] [5:4] [3:2] [Sync Mode] ASUS P5N64 WS Professional 4-17 System Clock Mode [Auto] Selects the system clock mode. Configuration options: [Auto] [Linked] [Unlinked] FSB - Current FSB/Memory Speed Target Memory Speed These items shows the current front side bus (FSB) and memory speed detected by the BIOS and may vary depending on the motherboard. The default values of the System Clock Mode item. Set this item to [Unlinked] to manually enter FSB and memory clock. 4.4 Ai Tweaker menu The Ai Tweaker menu items...
..., Inc. Configuration options: [Auto] [1:1] [5:4] [3:2] [Sync Mode] ASUS P5N64 WS Professional 4-17 System Clock Mode [Auto] Selects the system clock mode. Configuration options: [Auto] [Linked] [Unlinked] FSB - Current FSB/Memory Speed Target Memory Speed These items shows the current front side bus (FSB) and memory speed detected by the BIOS and may vary depending on the motherboard. The default values of the System Clock Mode item. Set this item to [Unlinked] to manually enter FSB and memory clock. 4.4 Ai Tweaker menu The Ai Tweaker menu items...
User Guide
Page 89
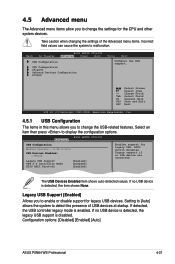
...Devices Enabled item shows auto-detected values. Configuration options: [Disabled] [Enabled] [Auto] ASUS P5N64 WS Professional 4-21 Select Screen Select Item +- Advanced BIOS SETUP UTILITY USB Configuration Module Version - 2.24.3-13.4 USB Devices Enabled: 1 Mouse Legacy USB Support [Enabled] USB 2.0 Controller Mode [HiSpeed] BIOS EHCI Hand-off [Enabled] Enables support for legacy USB devices. Legacy USB Support [Enabled] Allows you to display the configuration options. If detected, the USB controller legacy mode is disabled. If no USB device are connected. Setting...
...Devices Enabled item shows auto-detected values. Configuration options: [Disabled] [Enabled] [Auto] ASUS P5N64 WS Professional 4-21 Select Screen Select Item +- Advanced BIOS SETUP UTILITY USB Configuration Module Version - 2.24.3-13.4 USB Devices Enabled: 1 Mouse Legacy USB Support [Enabled] USB 2.0 Controller Mode [HiSpeed] BIOS EHCI Hand-off [Enabled] Enables support for legacy USB devices. Legacy USB Support [Enabled] Allows you to display the configuration options. If detected, the USB controller legacy mode is disabled. If no USB device are connected. Setting...

User Guide
Page 90
... Support [Enabled] CPU TM Function [Enabled] Vanderpool Technology [Enabled] Execute Disable Bit [Enabled] Max CPUID Value Limit [Disabled] Intel(R) SpeedStep(TM) Tech. [Enabled] Sets the ratio between CPU Core Clock and FSB Frequency. Configuration options: [Disabled] [Enabled] CPU TM function [Enabled] This function enables the overheated CPU to throttle the clock speed to adjust the value. You can also use the and keys to cool down. The value is set in this menu show the CPU-related information that the BIOS automatically detects. USB 2.0 Controller Mode...
... Support [Enabled] CPU TM Function [Enabled] Vanderpool Technology [Enabled] Execute Disable Bit [Enabled] Max CPUID Value Limit [Disabled] Intel(R) SpeedStep(TM) Tech. [Enabled] Sets the ratio between CPU Core Clock and FSB Frequency. Configuration options: [Disabled] [Enabled] CPU TM function [Enabled] This function enables the overheated CPU to throttle the clock speed to adjust the value. You can also use the and keys to cool down. The value is set in this menu show the CPU-related information that the BIOS automatically detects. USB 2.0 Controller Mode...
User Guide
Page 91
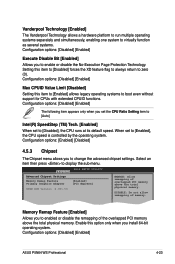
... Technology. Configuration options: [Disabled] [Enabled] Max CPUID Value Limit [Disabled] Setting this item to [Enabled] allows legacy operating systems to display the sub-menu. Configuration options: [Disabled] [Enabled] ASUS P5N64 WS Professional 4-23 Configuration options: [Enabled] [Disabled] 4.5.3 Chipset The Chipset menu allows you to zero (0). Enable this item to [Disabled] forces the XD feature flag to always return to enabled or disable the remapping of the overlapped PCI memory above the total physical memory. Setting this option only when you install 64-bit...
... Technology. Configuration options: [Disabled] [Enabled] Max CPUID Value Limit [Disabled] Setting this item to [Enabled] allows legacy operating systems to display the sub-menu. Configuration options: [Disabled] [Enabled] ASUS P5N64 WS Professional 4-23 Configuration options: [Enabled] [Disabled] 4.5.3 Chipset The Chipset menu allows you to zero (0). Enable this item to [Disabled] forces the XD feature flag to always return to enabled or disable the remapping of the overlapped PCI memory above the total physical memory. Setting this option only when you install 64-bit...
User Guide
Page 92
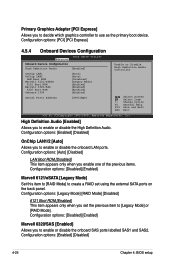
... [PCI Express] Allows you to enable or disable the onboard LAN ports. Configuration options: [Enabled] [Disabled] OnChip LAN1/2 [Auto] Allows you to decide which graphics controller to enable or disable the High Definition Audio. Configuration options: [Disabled] [Enabled] Marvell 6320/SAS [Enabled] Allows you to use as the primary boot device. Change Option F1 General Help F10 Save and Exit ESC Exit v02.61 (C)Copyright 1985-2008, American Megatrends, Inc. Configuration options: [Enabled] [Disabled] 4-24 Chapter 4: BIOS setup Configuration options: [Legacy Mode] [RAID Mode...
... [PCI Express] Allows you to enable or disable the onboard LAN ports. Configuration options: [Enabled] [Disabled] OnChip LAN1/2 [Auto] Allows you to decide which graphics controller to enable or disable the High Definition Audio. Configuration options: [Disabled] [Enabled] Marvell 6320/SAS [Enabled] Allows you to use as the primary boot device. Change Option F1 General Help F10 Save and Exit ESC Exit v02.61 (C)Copyright 1985-2008, American Megatrends, Inc. Configuration options: [Enabled] [Disabled] 4-24 Chapter 4: BIOS setup Configuration options: [Legacy Mode] [RAID Mode...

User Guide
Page 94
... [Auto] [No] [Disabled] [Enabled] Select the ACPI state used for the Advanced Power Management (APM). Configuration options: [Disabled] [Enabled] 4-26 Chapter 4: BIOS setup Configuration options: [Disabled] [Enabled] 4.6.4 ACPI APIC Support [Enabled] Allows you to change the settings for system suspend. APM Configuration Hardware Monitor Select Screen Select Item +- 4.6 Power menu The Power menu items allow you to enable or disable the Advanced Configuration and Power Interface (ACPI) support in the RSDT pointer list. Main Ai Tweaker BIOS SETUP UTILITY Advanced Power Boot...
... [Auto] [No] [Disabled] [Enabled] Select the ACPI state used for the Advanced Power Management (APM). Configuration options: [Disabled] [Enabled] 4-26 Chapter 4: BIOS setup Configuration options: [Disabled] [Enabled] 4.6.4 ACPI APIC Support [Enabled] Allows you to change the settings for system suspend. APM Configuration Hardware Monitor Select Screen Select Item +- 4.6 Power menu The Power menu items allow you to enable or disable the Advanced Configuration and Power Interface (ACPI) support in the RSDT pointer list. Main Ai Tweaker BIOS SETUP UTILITY Advanced Power Boot...

User Guide
Page 100
... disabled password. After you forget your password. The message "Password Uninstalled" appears. To set or change other items appear to allow you to erase the RTC RAM. To change password. If you set a password, this item to change the supervisor password, follow the same steps as in setting a user password. Change Supervisor Password Select this item shows Installed. From the password box, type a password composed of the screen shows the default Not Installed. BIOS SETUP UTILITY Boot Security Settings Supervisor Password User Password...
... disabled password. After you forget your password. The message "Password Uninstalled" appears. To set or change other items appear to allow you to erase the RTC RAM. To change password. If you set a password, this item to change the supervisor password, follow the same steps as in setting a user password. Change Supervisor Password Select this item shows Installed. From the password box, type a password composed of the screen shows the default Not Installed. BIOS SETUP UTILITY Boot Security Settings Supervisor Password User Password...

User Guide
Page 109
... DVD. Use the setup procedures presented in your OS documentation for detailed information. • Make sure that you install Windows® XP Service Pack 2 or later versions before installing the drivers for updates. 5.2.1 Running the support DVD Place the support DVD to your computer. Refer to the optical drive. The DVD automatically displays the Drivers menu if Autorun is NOT enabled in your hardware. • Motherboard settings and hardware options vary. ASUS P5N64 WS Professional 5-1 Visit the ASUS...
... DVD. Use the setup procedures presented in your OS documentation for detailed information. • Make sure that you install Windows® XP Service Pack 2 or later versions before installing the drivers for updates. 5.2.1 Running the support DVD Place the support DVD to your computer. Refer to the optical drive. The DVD automatically displays the Drivers menu if Autorun is NOT enabled in your hardware. • Motherboard settings and hardware options vary. ASUS P5N64 WS Professional 5-1 Visit the ASUS...

User Guide
Page 149
... want to enter the BIOS Setup Utility. 2. otherwise, the system will not recognize your NVRAID settings after the CMOS is cleared; Refer to Main > IDE Configuration and enable the nVidia RAID Function item in the NVIDIA® nForce® 790i Ultra SLI™ chipset. Go to the RAID controllers user manual in the motherboard support DVD for details. 3. ASUS P5N64 WS Professional 5-41 Installing Serial ATA (SATA) hard disks The motherboard supports Ultra DMA 133/100/66 and Serial ATA hard disk drives. Connect the SATA signal cables. 3. Boot the...
... want to enter the BIOS Setup Utility. 2. otherwise, the system will not recognize your NVRAID settings after the CMOS is cleared; Refer to Main > IDE Configuration and enable the nVidia RAID Function item in the NVIDIA® nForce® 790i Ultra SLI™ chipset. Go to the RAID controllers user manual in the motherboard support DVD for details. 3. ASUS P5N64 WS Professional 5-41 Installing Serial ATA (SATA) hard disks The motherboard supports Ultra DMA 133/100/66 and Serial ATA hard disk drives. Connect the SATA signal cables. 3. Boot the...

User Guide
Page 172
... nForce Serial ATA Controller. 3. To install the RAID driver in Windows® Vista: 1. Insert the floppy disk with RAID driver into the floppy disk drive. 2. Follow the succeeding screen instructions to install third-party SCSI or RAID driver. 2. During the OS installation, the system prompts you to press the F6 key to complete the installation. Press then insert the floppy disk with the RAID driver into the floppy disk drive. 3. Follow the succeeding screen instructions to complete the installation. 5-64 Chapter 5: Software support
... nForce Serial ATA Controller. 3. To install the RAID driver in Windows® Vista: 1. Insert the floppy disk with RAID driver into the floppy disk drive. 2. Follow the succeeding screen instructions to install third-party SCSI or RAID driver. 2. During the OS installation, the system prompts you to press the F6 key to complete the installation. Press then insert the floppy disk with the RAID driver into the floppy disk drive. 3. Follow the succeeding screen instructions to complete the installation. 5-64 Chapter 5: Software support

User Guide
Page 180
... using s 3-way SLI system, make sure to install the device drivers. • Make sure that your PCI Express graphics card driver supports the NVIDIA® SLI™ technology. Launching the NVIDIA Control Panel You can launch the NVIDIA Control Panel by Windows® Vista™ only. 6.2.4 Enabling the NVIDIA® SLI™ technology in Windows® After installing your graphics cards and the device drivers, enable the SLI feature in step (a), select Personalize. 6-6 Chapter 6: NVIDIA® SLI™ technology support Download the latest driver...
... using s 3-way SLI system, make sure to install the device drivers. • Make sure that your PCI Express graphics card driver supports the NVIDIA® SLI™ technology. Launching the NVIDIA Control Panel You can launch the NVIDIA Control Panel by Windows® Vista™ only. 6.2.4 Enabling the NVIDIA® SLI™ technology in Windows® After installing your graphics cards and the device drivers, enable the SLI feature in step (a), select Personalize. 6-6 Chapter 6: NVIDIA® SLI™ technology support Download the latest driver...


