
User Manual
Page 1
Motherboard
Motherboard

User Manual
Page 1
P5KPL SE Motherboard
P5KPL SE Motherboard
User Manual
Page 3
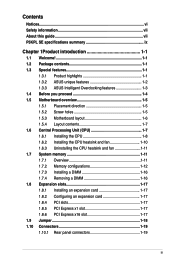
Contents Notices...vi Safety information vii About this guide vii P5KPL SE specifications summary ix Chapter 1Product introduction 1-1 1.1 Welcome 1-1 1.2 Package contents 1-1 1.3 Special features 1-1 1.3.1 Product highlights 1-1 1.3.2 ASUS unique features 1-2 1.3.3 ASUS Intelligent Overclocking features 1-3 1.4 Before you proceed 1-4 1.5 Motherboard overview 1-5 1.5.1 Placement direction 1-5 1.5.2 Screw holes 1-5 1.5.3 Motherboard layout 1-6 1.5.4 Layout contents 1-7 1.6 Central Processing Unit (CPU 1-7 1.6.1 Installing the CPU 1-8 1.6.2 Installing the CPU heatsink and...
Contents Notices...vi Safety information vii About this guide vii P5KPL SE specifications summary ix Chapter 1Product introduction 1-1 1.1 Welcome 1-1 1.2 Package contents 1-1 1.3 Special features 1-1 1.3.1 Product highlights 1-1 1.3.2 ASUS unique features 1-2 1.3.3 ASUS Intelligent Overclocking features 1-3 1.4 Before you proceed 1-4 1.5 Motherboard overview 1-5 1.5.1 Placement direction 1-5 1.5.2 Screw holes 1-5 1.5.3 Motherboard layout 1-6 1.5.4 Layout contents 1-7 1.6 Central Processing Unit (CPU 1-7 1.6.1 Installing the CPU 1-8 1.6.2 Installing the CPU heatsink and...

User Manual
Page 6
... of Communications Statement This digital apparatus does not exceed the Class B limits for radio noise emissions from that to radio communications. DO NOT throw the motherboard in municipal waste. Check local regulations for compliance could void the user's authority to provide reasonable protection against harmful interference in a particular installation. Operation is...
... of Communications Statement This digital apparatus does not exceed the Class B limits for radio noise emissions from that to radio communications. DO NOT throw the motherboard in municipal waste. Check local regulations for compliance could void the user's authority to provide reasonable protection against harmful interference in a particular installation. Operation is...
User Manual
Page 7
...Before using an adpater or extension cord. Do not place the product in your area. If you need when installing and configuring the motherboard. Detailed descriptions of the BIOS parameters are not damaged. These devices could interrupt the grounding circuit. • Make sure that the ...power cables for the devices are connected. Operation safety • Before installing the motherboard and adding devices on it may become wet. • Place the product on a stable surface. • If you add a device. &#...
...Before using an adpater or extension cord. Do not place the product in your area. If you need when installing and configuring the motherboard. Detailed descriptions of the BIOS parameters are not damaged. These devices could interrupt the grounding circuit. • Make sure that the ...power cables for the devices are connected. Operation safety • Before installing the motherboard and adding devices on it may become wet. • Place the product on a stable surface. • If you add a device. &#...
User Manual
Page 9
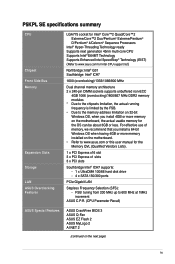
...ASUS MyLogo 2 AI NET 2 (continued on the motherboard, the actual usable memory for the Memory QVL (Qualified Vendors Lists). 1 x PCI Express x16 slot 3 x PCI Express x1 slots 3 x PCI slots Southbridge Intel® ICH7 supports: - 1 x UltraDMA 100/66 hard disk drive - 4 x SATA 150/300 ports PCIe Gigabit LAN Stepless Frequency Selection (SFS): - P5KPL SE... specifications summary CPU. Chipset Front Side Bus Memory Expansion Slots Storage LAN ASUS Overclocking Features LGA775 socket for Intel® Core™2 Quad/...
...ASUS MyLogo 2 AI NET 2 (continued on the motherboard, the actual usable memory for the Memory QVL (Qualified Vendors Lists). 1 x PCI Express x16 slot 3 x PCI Express x1 slots 3 x PCI slots Southbridge Intel® ICH7 supports: - 1 x UltraDMA 100/66 hard disk drive - 4 x SATA 150/300 ports PCIe Gigabit LAN Stepless Frequency Selection (SFS): - P5KPL SE... specifications summary CPU. Chipset Front Side Bus Memory Expansion Slots Storage LAN ASUS Overclocking Features LGA775 socket for Intel® Core™2 Quad/...
User Manual
Page 11
... the long line of gaming experience and multi-tasking performance. Before you for the following items. Motherboard Cables Accessories Application DVD Documentation ASUS P5KPL SE motherboard 1 x Serial ATA cable 1 x Ultra DMA 100/66 cable 1 x SATA power cable 1 x I/O shield ASUS motherboard support DVD User Manual If any of the above items is damaged or missing, contact your retailer...
... the long line of gaming experience and multi-tasking performance. Before you for the following items. Motherboard Cables Accessories Application DVD Documentation ASUS P5KPL SE motherboard 1 x Serial ATA cable 1 x Ultra DMA 100/66 cable 1 x SATA power cable 1 x I/O shield ASUS motherboard support DVD User Manual If any of the above items is damaged or missing, contact your retailer...
User Manual
Page 12
...image on the Serial ATA (SATA) 3Gb/s storage specifications, delivering enhanced scalability and doubling the bus bandwidth for details. 1.3.2 ASUS unique features ASUS MyLogo2™ This feature allows you to provide powerful and energy efficient performance. See page 1-11 for details. The onboard... networking standard for handling large amounts of the latest 3D graphics, multimedia, and Internet applications. DDR2 memory support The motherboard supports DDR2 memory that features data transfer rates of 1066 (overclocking)/800/667MHz to ten times faster than conventional 10/...
...image on the Serial ATA (SATA) 3Gb/s storage specifications, delivering enhanced scalability and doubling the bus bandwidth for details. 1.3.2 ASUS unique features ASUS MyLogo2™ This feature allows you to provide powerful and energy efficient performance. See page 1-11 for details. The onboard... networking standard for handling large amounts of the latest 3D graphics, multimedia, and Internet applications. DDR2 memory support The motherboard supports DDR2 memory that features data transfer rates of 1066 (overclocking)/800/667MHz to ten times faster than conventional 10/...
User Manual
Page 13
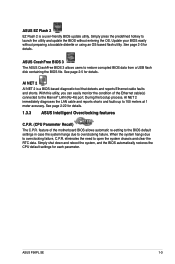
...AI NET 2 AI NET 2 is a user-friendly BIOS update utility. With this utility, you can easily monitor the condition of the motherboard BIOS allows automatic re-setting to the BIOS default settings in case the system hangs due to overclocking failure, C.P.R. eliminates the need to... data. Simply press the predefined hotkey to restore corrupted BIOS data from a USB flash disk containing the BIOS file. ASUS P5KPL SE 1-3 ASUS CrashFree BIOS 3 The ASUS CrashFree BIOS 3 allows users to launch the utility and update the BIOS without preparing a bootable diskette or using an ...
...AI NET 2 AI NET 2 is a user-friendly BIOS update utility. With this utility, you can easily monitor the condition of the motherboard BIOS allows automatic re-setting to the BIOS default settings in case the system hangs due to overclocking failure, C.P.R. eliminates the need to... data. Simply press the predefined hotkey to restore corrupted BIOS data from a USB flash disk containing the BIOS file. ASUS P5KPL SE 1-3 ASUS CrashFree BIOS 3 The ASUS CrashFree BIOS 3 allows users to launch the utility and update the BIOS without preparing a bootable diskette or using an ...
User Manual
Page 14
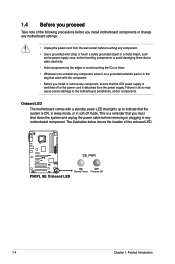
...-off or the power cord is detached from the power supply. P5KPL SE SB_PWR P5KPL SE Onboard LED ON OFF Standy Power Powered Off 1-4 Chapter 1: Product introduction The illustration below shows the location of the following precautions before you install motherboard components or change any motherboard settings. • Unplug the power cord from the wall socket...
...-off or the power cord is detached from the power supply. P5KPL SE SB_PWR P5KPL SE Onboard LED ON OFF Standy Power Powered Off 1-4 Chapter 1: Product introduction The illustration below shows the location of the following precautions before you install motherboard components or change any motherboard settings. • Unplug the power cord from the wall socket...
User Manual
Page 15
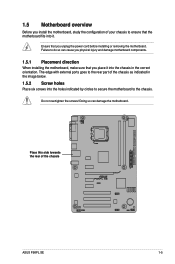
the rear of the chassis P5KPL SE ASUS P5KPL SE 1-5 Do not overtighten the screws! Failure to do so can damage the motherboard. The edge with external ports goes to the rear part of the chassis as indicated in the image below. 1.5.2 Screw ...Doing so can cause you physical injury and damage motherboard components. 1.5.1 Placement direction When installing the motherboard, make sure that you place it . 1.5 Motherboard overview Before you install the motherboard, study the configuration of your chassis to ensure that the motherboard fits into it into the holes indicated by circles ...
the rear of the chassis P5KPL SE ASUS P5KPL SE 1-5 Do not overtighten the screws! Failure to do so can damage the motherboard. The edge with external ports goes to the rear part of the chassis as indicated in the image below. 1.5.2 Screw ...Doing so can cause you physical injury and damage motherboard components. 1.5.1 Placement direction When installing the motherboard, make sure that you place it . 1.5 Motherboard overview Before you install the motherboard, study the configuration of your chassis to ensure that the motherboard fits into it into the holes indicated by circles ...
User Manual
Page 16
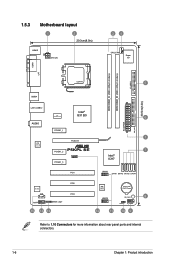
1.5.3 Motherboard layout 1 2 20.3cm(8.0in) KBMS ATX12V 34 CPU_FAN Super I/O COM1 LPT DDR2 DIMM_B1 (64bit, 240-pin module) DDR2 DIMM_A1 (64bit, 240-pin module) FLOPPY LGA775 5 USB34 30.5cm(12in) LAN1_USB12 Intel® ICS G31 B0 9LPRS954A3GLF 6 AUDIO EATXPWR PRI_IDE PCIEX1_1 1 PCIEX16 RTL 8111C P5KPL SE PCIEX1_2 7 PCIEX1_3 SPEAKER Intel® ICH7 PCI1 USB56...
1.5.3 Motherboard layout 1 2 20.3cm(8.0in) KBMS ATX12V 34 CPU_FAN Super I/O COM1 LPT DDR2 DIMM_B1 (64bit, 240-pin module) DDR2 DIMM_A1 (64bit, 240-pin module) FLOPPY LGA775 5 USB34 30.5cm(12in) LAN1_USB12 Intel® ICS G31 B0 9LPRS954A3GLF 6 AUDIO EATXPWR PRI_IDE PCIEX1_1 1 PCIEX16 RTL 8111C P5KPL SE PCIEX1_2 7 PCIEX1_3 SPEAKER Intel® ICH7 PCI1 USB56...
User Manual
Page 17
... panel connector (10-1 pin PANEL) 10. Front panel audio connector (10-1 pin AAFP) 15. ASUS will process Return Merchandise Authorization (RMA) requests only if the motherboard comes with a surface mount LGA775 socket designed for the Intel® Core™2 Extreme / Core&#... PnP cap is shipment/ transit-related. • Keep the cap after installing the motherboard. Speaker connector (4-pin speaker) 13. 1.5.4 Layout contents Connectors/Jumpers/Slots 1. DDR2 DIMM slots 4. IDE connector (40-1 pin PRI_EIDE) 7. Clear RTC RAM (3-pin CLRTC) 11. ASUS P5KPL SE 1-7
... panel connector (10-1 pin PANEL) 10. Front panel audio connector (10-1 pin AAFP) 15. ASUS will process Return Merchandise Authorization (RMA) requests only if the motherboard comes with a surface mount LGA775 socket designed for the Intel® Core™2 Extreme / Core&#... PnP cap is shipment/ transit-related. • Keep the cap after installing the motherboard. Speaker connector (4-pin speaker) 13. 1.5.4 Layout contents Connectors/Jumpers/Slots 1. DDR2 DIMM slots 4. IDE connector (40-1 pin PRI_EIDE) 7. Clear RTC RAM (3-pin CLRTC) 11. ASUS P5KPL SE 1-7
User Manual
Page 18
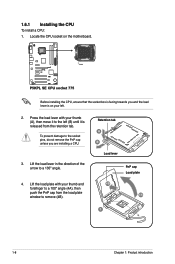
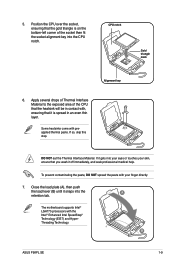
To prevent damage to the socket pins, do not remove the PnP cap unless you and the load lever is on the motherboard. Lift the load plate with your thumb and forefinger to remove (4B). Press the load lever with your thumb (A), then move it is released from ...º angle (4A), then push the PnP cap from the retention tab. Lift the load lever in the direction of the arrow to the left . 2. P5KPL SE P5KPL SE CPU socket 775 Before installing the CPU, ensure that the socket box is facing towards you are installing a CPU. 3. 1.6.1 Installing the CPU To install a CPU...
To prevent damage to the socket pins, do not remove the PnP cap unless you and the load lever is on the motherboard. Lift the load plate with your thumb and forefinger to remove (4B). Press the load lever with your thumb (A), then move it is released from ...º angle (4A), then push the PnP cap from the retention tab. Lift the load lever in the direction of the arrow to the left . 2. P5KPL SE P5KPL SE CPU socket 775 Before installing the CPU, ensure that the socket box is facing towards you are installing a CPU. 3. 1.6.1 Installing the CPU To install a CPU...
User Manual
Page 19
... Interface Material to the exposed area of the socket then fit the socket alignment key into the CPU notch. If so, skip this step. The motherboard supports Intel® LGA775 processors with , ensuring that the heatsink will be in an even thin layer. To prevent contaminating the paste, DO NOT spread...‑left corner of the CPU that it is spread in contact with the Intel® Enhanced Intel SpeedStep® Technology (EIST) and HyperThreading Technology. 5. B ASUS P5KPL SE 1-9
... Interface Material to the exposed area of the socket then fit the socket alignment key into the CPU notch. If so, skip this step. The motherboard supports Intel® LGA775 processors with , ensuring that the heatsink will be in an even thin layer. To prevent contaminating the paste, DO NOT spread...‑left corner of the CPU that it is spread in contact with the Intel® Enhanced Intel SpeedStep® Technology (EIST) and HyperThreading Technology. 5. B ASUS P5KPL SE 1-9
User Manual
Page 20
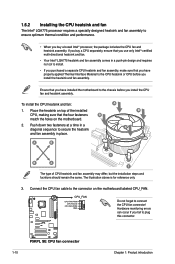
CPU_FAN CPU FAN PWM CPU FAN IN CPU FAN PWR GND Do not forget to the connector on the motherboard labeled CPU_FAN. Connect the CPU fan cable to connect the CPU fan connector! Hardware monitoring errors can occur if you fail to secure the heatsink... the heatsink and fan assembly. P5KPL SE P5KPL SE CPU fan connector 1-10 Chapter 1: Product introduction Push down two fasteners at a time in a push-pin design and requires no tool to install. • If you purchased a separate CPU heatsink and fan assembly, make sure that you have installed the motherboard to the chassis before you...
CPU_FAN CPU FAN PWM CPU FAN IN CPU FAN PWR GND Do not forget to the connector on the motherboard labeled CPU_FAN. Connect the CPU fan cable to connect the CPU fan connector! Hardware monitoring errors can occur if you fail to secure the heatsink... the heatsink and fan assembly. P5KPL SE P5KPL SE CPU fan connector 1-10 Chapter 1: Product introduction Push down two fasteners at a time in a push-pin design and requires no tool to install. • If you purchased a separate CPU heatsink and fan assembly, make sure that you have installed the motherboard to the chassis before you...

User Manual
Page 21
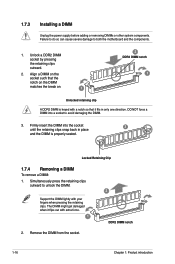
... motherboard. 1.7 System memory 1.7.1 Overview The motherboard comes with two Double Data Rate 2 (DDR2) Dual Inline Memory Modules (DIMM) sockets. Disconnect the CPU fan cable from A the connector on the motherboard. The figure illustrates the location of the DDR2 DIMM sockets: DIMM_A1 DIMM_B1 P5KPL SE P5KPL SE 240-pin DDR2 DIMM sockets Channel Channel A Channel B Sockets DIMM_A1 DIMM_B1 ASUS P5KPL SE...
... motherboard. 1.7 System memory 1.7.1 Overview The motherboard comes with two Double Data Rate 2 (DDR2) Dual Inline Memory Modules (DIMM) sockets. Disconnect the CPU fan cable from A the connector on the motherboard. The figure illustrates the location of the DDR2 DIMM sockets: DIMM_A1 DIMM_B1 P5KPL SE P5KPL SE 240-pin DDR2 DIMM sockets Channel Channel A Channel B Sockets DIMM_A1 DIMM_B1 ASUS P5KPL SE...

User Manual
Page 22
...of 256 megabit (Mb) chips or less. Some old-version DDR2-800 DIMMs may install varying memory sizes in Channel A and Channel B. P5KPL SE Motherboard Qualified Vendors Lists (QVL) DDR2-667MHz capability Size 256MB 256MB 256MB 512MB 512MB 1G 1G 1G 512MB 512MB 512MB 1G 1G 256MB 512MB 512MB ... or less. Any excess memory from the higher-sized channel is recommended that you install 4GB or more memory installed on the motherboard. • This motherboard does not support DIMMs made up of the lower-sized channel for single-channel operation. • Always install DIMMs with the ...
...of 256 megabit (Mb) chips or less. Some old-version DDR2-800 DIMMs may install varying memory sizes in Channel A and Channel B. P5KPL SE Motherboard Qualified Vendors Lists (QVL) DDR2-667MHz capability Size 256MB 256MB 256MB 512MB 512MB 1G 1G 1G 512MB 512MB 512MB 1G 1G 256MB 512MB 512MB ... or less. Any excess memory from the higher-sized channel is recommended that you install 4GB or more memory installed on the motherboard. • This motherboard does not support DIMMs made up of the lower-sized channel for single-channel operation. • Always install DIMMs with the ...
User Manual
Page 26
... A DDR2 DIMM is properly seated. Firmly insert the DIMM into a socket to avoid damaging the DIMM. 3. Simultaneously press the retaining clips outward to both the motherboard and the components. 1. The DIMM might get damaged when it fits in place and the DIMM is keyed with a notch so that the notch on...
... A DDR2 DIMM is properly seated. Firmly insert the DIMM into a socket to avoid damaging the DIMM. 3. Simultaneously press the retaining clips outward to both the motherboard and the components. 1. The DIMM might get damaged when it fits in place and the DIMM is keyed with a notch so that the notch on...

User Manual
Page 27
...(if your motherboard is completely seated on the system and change the necessary BIOS settings, if any. Before installing the expansion card, read the documentation that came with it by adjusting the software settings. 1. Install the software drivers for the card. 2. ASUS P5KPL SE 1-17 Replace... that comply with the PCI Express specifications. 1.8 Expansion slots In the future, you may cause you physical injury and damage motherboard components. 1.8.1 Installing an expansion card To install an expansion card: 1. The following sub‑sections describe the slots and the...
...(if your motherboard is completely seated on the system and change the necessary BIOS settings, if any. Before installing the expansion card, read the documentation that came with it by adjusting the software settings. 1. Install the software drivers for the card. 2. ASUS P5KPL SE 1-17 Replace... that comply with the PCI Express specifications. 1.8 Expansion slots In the future, you may cause you physical injury and damage motherboard components. 1.8.1 Installing an expansion card To install an expansion card: 1. The following sub‑sections describe the slots and the...


