
User Manual
Page 11
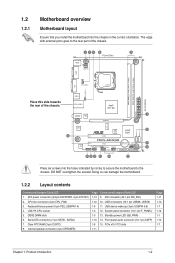
.../Jumpers/Slots/LED 1-13 9. The edge with external ports goes to the chassis. DO NOT overtighten the screws! CPU fan connector (4-pin CPU_FAN) 3. Clear RTC RAM (3-pin CLRTC) 8. USB connectors (10-1 pin USB56, USB78) 1-9 11. Front panel audio connector (10-1 pin AAFP) 1-8 15. 1.2 1.2.1 Motherboard overview Motherboard layout Ensure that you install...
.../Jumpers/Slots/LED 1-13 9. The edge with external ports goes to the chassis. DO NOT overtighten the screws! CPU fan connector (4-pin CPU_FAN) 3. Clear RTC RAM (3-pin CLRTC) 8. USB connectors (10-1 pin USB56, USB78) 1-9 11. Front panel audio connector (10-1 pin AAFP) 1-8 15. 1.2 1.2.1 Motherboard overview Motherboard layout Ensure that you install...
User Manual
Page 17
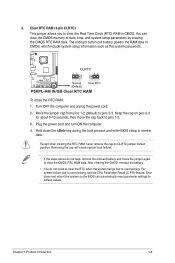
...5-10 seconds, then move the jumper again to pins 1-2. 3. The onboard button cell battery powers the RAM data in CMOS. Hold down and reboot the system so the BIOS can clear the CMOS memory of... date, time, and system setup parameters by erasing the CMOS RTC RAM data. After clearing the CMOS, reinstall the battery. • You do not help, remove the ...onboard battery and move the cap back to clear the CMOS RTC RAM data. Shut down the key during the boot process and enter BIOS setup to overclocking. Keep the cap...
...5-10 seconds, then move the jumper again to pins 1-2. 3. The onboard button cell battery powers the RAM data in CMOS. Hold down and reboot the system so the BIOS can clear the CMOS memory of... date, time, and system setup parameters by erasing the CMOS RTC RAM data. After clearing the CMOS, reinstall the battery. • You do not help, remove the ...onboard battery and move the cap back to clear the CMOS RTC RAM data. Shut down the key during the boot process and enter BIOS setup to overclocking. Keep the cap...

User Manual
Page 35
...(POS) Only] - Enables the system to enter the ACPI S3 (Suspend to enter the ACPI S1 (Power on Suspend) sleep state. Enables the system to RAM) sleep state (default). When this item is set to display the configuration options. In S1 sleep state, the system appears suspended and stays in the...
...(POS) Only] - Enables the system to enter the ACPI S3 (Suspend to enter the ACPI S1 (Power on Suspend) sleep state. Enables the system to RAM) sleep state (default). When this item is set to display the configuration options. In S1 sleep state, the system appears suspended and stays in the...
User Manual
Page 38
... - To change other items appear to allow you to change to change the supervisor password, follow the same steps in the Setup utility. 2-14 ASUS P5KPL-AM IN/GB The Supervisor Password item on how to six letters and/or numbers, then press . 3. The message Password Installed appears after you successfully set to... For 'F1' If Error [Enabled] When set your BIOS password, you can clear it by erasing the CMOS Real Time Clock (RTC) RAM. If you to select the access restriction to selected fields, such as Date and Time. [Full Access] - allows changes only to the Setup items. ...
... - To change other items appear to allow you to change to change the supervisor password, follow the same steps in the Setup utility. 2-14 ASUS P5KPL-AM IN/GB The Supervisor Password item on how to six letters and/or numbers, then press . 3. The message Password Installed appears after you successfully set to... For 'F1' If Error [Enabled] When set your BIOS password, you can clear it by erasing the CMOS Real Time Clock (RTC) RAM. If you to select the access restriction to selected fields, such as Date and Time. [Full Access] - allows changes only to the Setup items. ...
User Manual
Page 40
...a confirmation window appears. When you select this option only if you do not want to save the changes that you are saved to the CMOS RAM. Select Item Enter Go to Sub-screen F1 General Help F10 Save and Exit Exit & Save Changes ESC Exit Once you made to the Setup... you to load the optimal or failsafe default values for the BIOS items, and save changes and exit. Select OK to the non-volatile RAM. 2-16 ASUS P5KPL-AM IN/GB Select OK to save or discard your selections, choose this option, a confirmation appears. Select OK to exit. After selecting this option from...
...a confirmation window appears. When you select this option only if you do not want to save the changes that you are saved to the CMOS RAM. Select Item Enter Go to Sub-screen F1 General Help F10 Save and Exit Exit & Save Changes ESC Exit Once you made to the Setup... you to load the optimal or failsafe default values for the BIOS items, and save changes and exit. Select OK to the non-volatile RAM. 2-16 ASUS P5KPL-AM IN/GB Select OK to save or discard your selections, choose this option, a confirmation appears. Select OK to exit. After selecting this option from...


