

Motherboard DIY Troubleshooting Guide
Page 3
... this guide viii Typography ix P5GV-MX specifications summary x Chapter 1: Product introduction 1.1 Welcome 1-2 1.2 Package contents 1-2 1.3 Special features 1-3 1.3.1 Product highlights 1-3 1.3.2 Innovative ASUS features 1-5 1.4 Before you proceed 1-6 1.5 Motherboard overview 1-7 1.5.1 Placement direction 1-7 1.5.2 Screw holes 1-7 1.5.3 Motherboard layout 1-8 1.6 Central Processing Unit (CPU 1-9 1.6.1 Installing the CPU 1-9 1.6.2 Installing the CPU heatsink and fan 1-12 1.6.3 Uninstalling the CPU heatsink and fan 1-14 1.7 System...
... this guide viii Typography ix P5GV-MX specifications summary x Chapter 1: Product introduction 1.1 Welcome 1-2 1.2 Package contents 1-2 1.3 Special features 1-3 1.3.1 Product highlights 1-3 1.3.2 Innovative ASUS features 1-5 1.4 Before you proceed 1-6 1.5 Motherboard overview 1-7 1.5.1 Placement direction 1-7 1.5.2 Screw holes 1-7 1.5.3 Motherboard layout 1-8 1.6 Central Processing Unit (CPU 1-9 1.6.1 Installing the CPU 1-9 1.6.2 Installing the CPU heatsink and fan 1-12 1.6.3 Uninstalling the CPU heatsink and fan 1-14 1.7 System...
Motherboard DIY Troubleshooting Guide
Page 4
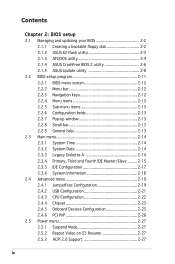
... BIOS setup 2.1 Managing and updating your BIOS 2-2 2.1.1 Creating a bootable floppy disk 2-2 2.1.2 ASUS EZ Flash utility 2-3 2.1.3 AFUDOS utility 2-4 2.1.4 ASUS CrashFree BIOS 2 utility 2-6 2.1.5 ASUS Update utility 2-8 2.2 BIOS setup program 2-11 2.2.1 BIOS menu screen 2-12 2.2.2 Menu bar 2-12 ... 2-17 2.3.6 System Information 2-18 2.4 Advanced menu 2-19 2.4.1 JumperFree Configuration 2-19 2.4.2 USB Configuration 2-21 2.4.3 CPU Configuration 2-22 2.4.4 Chipset 2-23 2.4.5 Onboard Devices Configuration 2-25 2.4.6 PCI PnP 2-26 2.5 Power menu 2-27 ...
... BIOS setup 2.1 Managing and updating your BIOS 2-2 2.1.1 Creating a bootable floppy disk 2-2 2.1.2 ASUS EZ Flash utility 2-3 2.1.3 AFUDOS utility 2-4 2.1.4 ASUS CrashFree BIOS 2 utility 2-6 2.1.5 ASUS Update utility 2-8 2.2 BIOS setup program 2-11 2.2.1 BIOS menu screen 2-12 2.2.2 Menu bar 2-12 ... 2-17 2.3.6 System Information 2-18 2.4 Advanced menu 2-19 2.4.1 JumperFree Configuration 2-19 2.4.2 USB Configuration 2-21 2.4.3 CPU Configuration 2-22 2.4.4 Chipset 2-23 2.4.5 Onboard Devices Configuration 2-25 2.4.6 PCI PnP 2-26 2.5 Power menu 2-27 ...

Motherboard DIY Troubleshooting Guide
Page 5
... 2.6.4 Security 2-34 2.7 Exit menu 2-36 Chapter 3: Software support 3.1 Installing an operating system 3-2 3.2 Support CD information 3-2 3.2.1 Running the support CD 3-2 3.2.2 Drivers menu 3-3 3.2.3 Utilities menu 3-4 3.2.4 ASUS Contact information 3-5 Appendix: CPU features A.1 Intel® EM64T A-2 Using the Intel® EM64T feature A-2 A.2 Enhanced Intel SpeedStep® Technology (EIST A-2 A.2.1 System requirements A-2 A.2.2 Using the EIST A-3 A.3 Intel® Hyper...
... 2.6.4 Security 2-34 2.7 Exit menu 2-36 Chapter 3: Software support 3.1 Installing an operating system 3-2 3.2 Support CD information 3-2 3.2.1 Running the support CD 3-2 3.2.2 Drivers menu 3-3 3.2.3 Utilities menu 3-4 3.2.4 ASUS Contact information 3-5 Appendix: CPU features A.1 Intel® EM64T A-2 Using the Intel® EM64T feature A-2 A.2 Enhanced Intel SpeedStep® Technology (EIST A-2 A.2.1 System requirements A-2 A.2.2 Using the EIST A-3 A.3 Intel® Hyper...

Motherboard DIY Troubleshooting Guide
Page 8
... describes the features of the support CD that comes with the motherboard package. • Appendix: CPU features The appendix describes the CPU features and technologies that you need when installing and configuring the motherboard. ASUS websites The ASUS website provides updated information on the motherboard. • Chapter 2: BIOS setup This chapter tells...
... describes the features of the support CD that comes with the motherboard package. • Appendix: CPU features The appendix describes the CPU features and technologies that you need when installing and configuring the motherboard. ASUS websites The ASUS website provides updated information on the motherboard. • Chapter 2: BIOS setup This chapter tells...

Motherboard DIY Troubleshooting Guide
Page 10
...MHz Dual-channel memory architecture 4 x 184-pin DIMM sockets support up to use only qualified graphics cards. P5GV-MX specifications summary CPU Chipset Front Side Bus Memory Expansion slots VGA Storage Audio LAN USB Special features BIOS features Rear Panel LGA775 socket for ...ECC 400/333 MHz DDR DIMMs 1 x PCI Express x16 slot (max 2GB/s, x4 mode) 3 x PCI slots (Note: Make sure to 8 USB 2.0 ports ASUS CPU Lock Free ASUS Q-FAN ASUS MyLogo ASUS EZ Flash ASUS CrashFree BIOS 2 4 MB Flash ROM, AMI BIOS, PnP, DMI2.0, WfM2.0, SM BIOS 2.3, PXE, RPL 1 x Parallel port 1 x LAN (RJ-45)...
...MHz Dual-channel memory architecture 4 x 184-pin DIMM sockets support up to use only qualified graphics cards. P5GV-MX specifications summary CPU Chipset Front Side Bus Memory Expansion slots VGA Storage Audio LAN USB Special features BIOS features Rear Panel LGA775 socket for ...ECC 400/333 MHz DDR DIMMs 1 x PCI Express x16 slot (max 2GB/s, x4 mode) 3 x PCI slots (Note: Make sure to 8 USB 2.0 ports ASUS CPU Lock Free ASUS Q-FAN ASUS MyLogo ASUS EZ Flash ASUS CrashFree BIOS 2 4 MB Flash ROM, AMI BIOS, PnP, DMI2.0, WfM2.0, SM BIOS 2.3, PXE, RPL 1 x Parallel port 1 x LAN (RJ-45)...
Motherboard DIY Troubleshooting Guide
Page 11
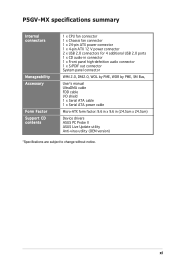
xi P5GV-MX specifications summary Internal connectors Manageability Accessary Form Factor Support CD contents 1 x CPU fan connector 1 x Chassis fan connector 1 x 24-pin ATX power connector 1 x 4-pin ATX 12 V power connector 2 x USB 2.0 connectors for 4 additional USB 2.0 ports 1 x CD audio-in connector ... cable FDD cable I/O shield 1 x Serial ATA cable 1 x Serial ATA power cable Micro-ATX form factor: 9.6 in x 9.6 in (24.5cm x 24.5cm) Device drivers ASUS PC Probe II ASUS Live Update utility Anti-virus utility (OEM version) *Specifications are subject to change without notice.
xi P5GV-MX specifications summary Internal connectors Manageability Accessary Form Factor Support CD contents 1 x CPU fan connector 1 x Chassis fan connector 1 x 24-pin ATX power connector 1 x 4-pin ATX 12 V power connector 2 x USB 2.0 connectors for 4 additional USB 2.0 ports 1 x CD audio-in connector ... cable FDD cable I/O shield 1 x Serial ATA cable 1 x Serial ATA power cable Micro-ATX form factor: 9.6 in x 9.6 in (24.5cm x 24.5cm) Device drivers ASUS PC Probe II ASUS Live Update utility Anti-virus utility (OEM version) *Specifications are subject to change without notice.
Motherboard DIY Troubleshooting Guide
Page 15
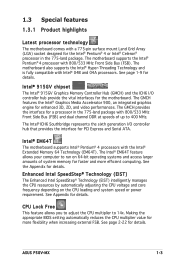
... allows your computer to run on the CPU loading and system speed or power requirement. CPU Lock Free This feature allows you to adjust the CPU multiplier to 400 MHz. Making the appropriate BIOS setting automatically reduces the CPU multiplier value for faster and more fl... Intel SpeedStep® Technology (EIST) intelligently manages the CPU resources by automatically adjusting the CPU voltage and core frequency depending on 64-bit operating systems and access larger amounts of up to 14x. See Appendix for details. ASUS P5GV-MX 1-3 See the Appendix for details. See page 2-22...
... allows your computer to run on the CPU loading and system speed or power requirement. CPU Lock Free This feature allows you to adjust the CPU multiplier to 400 MHz. Making the appropriate BIOS setting automatically reduces the CPU multiplier value for faster and more fl... Intel SpeedStep® Technology (EIST) intelligently manages the CPU resources by automatically adjusting the CPU voltage and core frequency depending on 64-bit operating systems and access larger amounts of up to 14x. See Appendix for details. ASUS P5GV-MX 1-3 See the Appendix for details. See page 2-22...
Motherboard DIY Troubleshooting Guide
Page 17
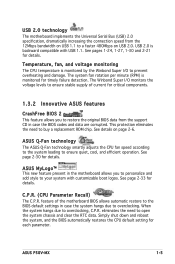
...system hangs due to your system with USB 1.1. This protection eliminates the need to prevent overheating and damage. C.P.R. (CPU Parameter Recall) The C.P.R. ASUS MyLogo™ This new feature present in the motherboard allows you to restore the original BIOS data from the 12Mbps ...failure detection. Simply shut down and reboot the system, and the BIOS automatically restores the CPU default setting for details. See pages 1-24, 1-27, 1-30 and 2-21 for each parameter. ASUS P5GV-MX 1-5 eliminates the need to a faster 480Mbps on page 2-6. USB 2.0 technology The motherboard ...
...system hangs due to your system with USB 1.1. This protection eliminates the need to prevent overheating and damage. C.P.R. (CPU Parameter Recall) The C.P.R. ASUS MyLogo™ This new feature present in the motherboard allows you to restore the original BIOS data from the 12Mbps ...failure detection. Simply shut down and reboot the system, and the BIOS automatically restores the CPU default setting for details. See pages 1-24, 1-27, 1-30 and 2-21 for each parameter. ASUS P5GV-MX 1-5 eliminates the need to a faster 480Mbps on page 2-6. USB 2.0 technology The motherboard ...

Motherboard DIY Troubleshooting Guide
Page 21
... Return Merchandise Authorization (RMA) requests only if the motherboard comes with the cap on the socket and the socket pins are not bent. ASUS P5GV-MX 1-9 If the instructions in the 775-land package. • Your boxed Intel® Pentium® 4 LGA775 processor package should come with... PnP cap is shipment/transit-related. • Keep the cap after installing the motherboard. Locate the CPU socket on the motherboard. ® P5GV-MX P5GV-MX CPU Socket 775 Before installing the CPU, make sure that the socket box is facing towards you see any damage to the socket pins resulting...
... Return Merchandise Authorization (RMA) requests only if the motherboard comes with the cap on the socket and the socket pins are not bent. ASUS P5GV-MX 1-9 If the instructions in the 775-land package. • Your boxed Intel® Pentium® 4 LGA775 processor package should come with... PnP cap is shipment/transit-related. • Keep the cap after installing the motherboard. Locate the CPU socket on the motherboard. ® P5GV-MX P5GV-MX CPU Socket 775 Before installing the CPU, make sure that the socket box is facing towards you see any damage to the socket pins resulting...

Motherboard DIY Troubleshooting Guide
Page 22
... to the socket pins, do not remove the PnP cap unless you . B A Load plate 5. The socket alignment keys should face you are installing a CPU. 3. Lift the load lever in the direction of the arrow to the left corner of the cam box should fit Alignment key into the... forefinger to a 100º angle (A), then push the PnP cap from the retention tab. Gold triangle mark 1-10 Chapter 1: Product introduction Position the CPU on the socket, making sure that the gold triangle fixes on the bottom-left (B) until it to a 135º angle. 4. 2. Retention tab A...
... to the socket pins, do not remove the PnP cap unless you . B A Load plate 5. The socket alignment keys should face you are installing a CPU. 3. Lift the load lever in the direction of the arrow to the left corner of the cam box should fit Alignment key into the... forefinger to a 100º angle (A), then push the PnP cap from the retention tab. Gold triangle mark 1-10 Chapter 1: Product introduction Position the CPU on the socket, making sure that the gold triangle fixes on the bottom-left (B) until it to a 135º angle. 4. 2. Retention tab A...
Motherboard DIY Troubleshooting Guide
Page 23
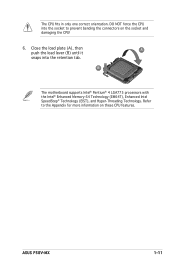
The CPU fits in only one correct orientation. B The motherboard supports Intel® Pentium® 4 LGA775 processors with the Intel® Enhanced Memory 64 Technology (EM64T), Enhanced Intel SpeedStep® Technology (EIST), and Hyper-Threading Technology. Refer to prevent bending the connectors on these CPU features. Close the load plate (A), then push the load lever (B) until it A snaps into the socket to the Appendix for more information on the socket and damaging the CPU! 6. DO NOT force the CPU into the retention tab. ASUS P5GV-MX 1-11
The CPU fits in only one correct orientation. B The motherboard supports Intel® Pentium® 4 LGA775 processors with the Intel® Enhanced Memory 64 Technology (EM64T), Enhanced Intel SpeedStep® Technology (EIST), and Hyper-Threading Technology. Refer to prevent bending the connectors on these CPU features. Close the load plate (A), then push the load lever (B) until it A snaps into the socket to the Appendix for more information on the socket and damaging the CPU! 6. DO NOT force the CPU into the retention tab. ASUS P5GV-MX 1-11

Motherboard DIY Troubleshooting Guide
Page 24
...sure that the four fasteners match the holes on top of the groove Make sure each fastener is properly applied to the CPU heatsink or CPU before you install the CPU fan and heatsink assembly. • Your Intel® Pentium® 4 LGA775 heatsink and fan assembly comes in a ... tool to install. • When you buy a boxed Intel® Pentium® 4 processor, the package includes the CPU fan and heatsink assembly. • If you purchase a separate CPU heatsink and fan assembly, make sure that a Thermal Interface Material is oriented as shown, with the narrow groove directed outward....
...sure that the four fasteners match the holes on top of the groove Make sure each fastener is properly applied to the CPU heatsink or CPU before you install the CPU fan and heatsink assembly. • Your Intel® Pentium® 4 LGA775 heatsink and fan assembly comes in a ... tool to install. • When you buy a boxed Intel® Pentium® 4 processor, the package includes the CPU fan and heatsink assembly. • If you purchase a separate CPU heatsink and fan assembly, make sure that a Thermal Interface Material is oriented as shown, with the narrow groove directed outward....

Motherboard DIY Troubleshooting Guide
Page 25
CPU_FAN ® GND CPU FAN PWR CPU FAN IN CPU FAN PWM 1 P5GV-MX P5GV-MX CPU Fan Connector Do not forget to the connector on the motherboard labeled CPU_FAN. B A A A B B B A 3. ASUS P5GV-MX 1-13 2. When the fan and heatsink assembly is in place, connect the CPU fan cable to connect the CPU fan connector! Hardware monitoring errors can occur if you fail to secure the heatsink and fan assembly in a diagonal sequence to plug this connector. Push down two fasteners at a time in place.
CPU_FAN ® GND CPU FAN PWR CPU FAN IN CPU FAN PWM 1 P5GV-MX P5GV-MX CPU Fan Connector Do not forget to the connector on the motherboard labeled CPU_FAN. B A A A B B B A 3. ASUS P5GV-MX 1-13 2. When the fan and heatsink assembly is in place, connect the CPU fan cable to connect the CPU fan connector! Hardware monitoring errors can occur if you fail to secure the heatsink and fan assembly in a diagonal sequence to plug this connector. Push down two fasteners at a time in place.

Motherboard DIY Troubleshooting Guide
Page 26
1.6.3 Uninstalling the CPU heatsink and fan To uninstall the CPU heatsink and fan: 1. Pull up two fasteners at a time in a diagonal sequence to disengage the heatsink B and fan assembly from the connector on the motherboard. 2. B A B B A 1-14 Chapter 1: Product introduction Rotate each fastener counterclockwise. 3. Disconnect the CPU fan cable from the A A motherboard.
1.6.3 Uninstalling the CPU heatsink and fan To uninstall the CPU heatsink and fan: 1. Pull up two fasteners at a time in a diagonal sequence to disengage the heatsink B and fan assembly from the connector on the motherboard. 2. B A B B A 1-14 Chapter 1: Product introduction Rotate each fastener counterclockwise. 3. Disconnect the CPU fan cable from the A A motherboard.

Motherboard DIY Troubleshooting Guide
Page 35
... in CMOS. ASUS P5GV-MX 1-23 To erase the RTC RAM: 1. Re-install the battery. 5. Removing the cap will cause system boot failure! ® P5GV-MX P5GV-MX Clear RTC RAM CLRTC 12 23 Normal (Default) Clear CMOS You do not need to clear the RTC when the system hangs due to overclocking, use the C.P.R. (CPU Parameter Recall...
... in CMOS. ASUS P5GV-MX 1-23 To erase the RTC RAM: 1. Re-install the battery. 5. Removing the cap will cause system boot failure! ® P5GV-MX P5GV-MX Clear RTC RAM CLRTC 12 23 Normal (Default) Clear CMOS You do not need to clear the RTC when the system hangs due to overclocking, use the C.P.R. (CPU Parameter Recall...

Motherboard DIY Troubleshooting Guide
Page 36
... USB connectors that can connect to additional USB ports. The USBPWR12 and USBPWR34 jumpers are for the rear USB ports. P5GV-MX ® USBPW34 USBPW12 2 1 +5V (Default) 3 2 +5VSB USBPW78 USBPW56 12 23 P5GV-MX USB Device Wake-Up +5V (Default) +5VSB • The USB device wake-up . • The total current consumed... computer from S3 or S4 sleep mode (no power to wake up (3-pin USBPW12, USBPW34, USBPW56, USBPW78) Set these jumpers to +5V to CPU, DRAM in slow refresh, power supply in low power mode) using the connected USB devices. Set to +5VSB to wake up from S1 sleep ...
... USB connectors that can connect to additional USB ports. The USBPWR12 and USBPWR34 jumpers are for the rear USB ports. P5GV-MX ® USBPW34 USBPW12 2 1 +5V (Default) 3 2 +5VSB USBPW78 USBPW56 12 23 P5GV-MX USB Device Wake-Up +5V (Default) +5VSB • The USB device wake-up . • The total current consumed... computer from S3 or S4 sleep mode (no power to wake up (3-pin USBPW12, USBPW34, USBPW56, USBPW78) Set these jumpers to +5V to CPU, DRAM in slow refresh, power supply in low power mode) using the connected USB devices. Set to +5VSB to wake up from S1 sleep ...

Motherboard DIY Troubleshooting Guide
Page 40
... on the connector is for the provided Floppy Disk Drive (FDD) signal cable. CHA_FAN GND +12V Rotation P5GV-MX P5GV-MX Fan Connectors 1-28 GND CPU FAN PWR CPU FAN IN CPU FAN PWM 1 CPU_FAN 1 Chapter 1: Product introduction Connect the fan cables to the fan connectors. Floppy disk... drive connector (34-1 pin FLOPPY) This connector is removed to PIN 1. ® ® P5GV-MX PIN 1 P5GV-MX Floppy Disk Drive Connector 3. CPU and chassis fan connectors (4-pin CPU_FAN, 3-pin CHA_FAN) The fan connectors support cooling fans of 350mA~2000mA (24W max.)...
... on the connector is for the provided Floppy Disk Drive (FDD) signal cable. CHA_FAN GND +12V Rotation P5GV-MX P5GV-MX Fan Connectors 1-28 GND CPU FAN PWR CPU FAN IN CPU FAN PWM 1 CPU_FAN 1 Chapter 1: Product introduction Connect the fan cables to the fan connectors. Floppy disk... drive connector (34-1 pin FLOPPY) This connector is removed to PIN 1. ® ® P5GV-MX PIN 1 P5GV-MX Floppy Disk Drive Connector 3. CPU and chassis fan connectors (4-pin CPU_FAN, 3-pin CHA_FAN) The fan connectors support cooling fans of 350mA~2000mA (24W max.)...

Motherboard DIY Troubleshooting Guide
Page 43
... power is inadequate. • The ATX 12V Specification 2.0-compliant PSU passed the motherboard power requirement test with the following configuration: CPU : Memory : Graphics card : Parallel ATA devices : Serial ATA device : Optical drive : Intel® Pentium® 4 3.6 GHz 512 MB... least 15A on +12V and that you intend to connect the 4-pin ATX +12V power plug; 7. ATX12V EATXPWR ® +12V DC GND P5GV-MX P5GV-MX ATX Power Connectors +3 Volts +12V DC +12 Volts GND +12 Volts +5V Standby Power OK Ground +5 Volts Ground +5 Volts Ground +3 Volts...
... power is inadequate. • The ATX 12V Specification 2.0-compliant PSU passed the motherboard power requirement test with the following configuration: CPU : Memory : Graphics card : Parallel ATA devices : Serial ATA device : Optical drive : Intel® Pentium® 4 3.6 GHz 512 MB... least 15A on +12V and that you intend to connect the 4-pin ATX +12V power plug; 7. ATX12V EATXPWR ® +12V DC GND P5GV-MX P5GV-MX ATX Power Connectors +3 Volts +12V DC +12 Volts GND +12 Volts +5V Standby Power OK Ground +5 Volts Ground +5 Volts Ground +3 Volts...

Motherboard DIY Troubleshooting Guide
Page 64
The BIOS automatically detects the items in this menu. Processor Displays the auto-detected CPU specification. System Memory Displays the auto-detected system memory. 2-18 Chapter 2: BIOS setup 2.3.6 System Information This menu gives you an overview of the general system specifications. AMIBIOS Version : 0203 Build Date : 09/14/05 Processor Type Speed Count : Genuine Intel(R) CPU 3.80GHz : 3800MHz : 1 System Memory Size : 248MB AMI BIOS Displays the auto-detected BIOS information.
The BIOS automatically detects the items in this menu. Processor Displays the auto-detected CPU specification. System Memory Displays the auto-detected system memory. 2-18 Chapter 2: BIOS setup 2.3.6 System Information This menu gives you an overview of the general system specifications. AMIBIOS Version : 0203 Build Date : 09/14/05 Processor Type Speed Count : Genuine Intel(R) CPU 3.80GHz : 3800MHz : 1 System Memory Size : 248MB AMI BIOS Displays the auto-detected BIOS information.

Motherboard DIY Troubleshooting Guide
Page 65
... Exit ESC Exit AI Overclocking [Standard] Allows selection of the preset overclocking configuration options: Manual - loads the standard settings for the CPU and other system devices. ASUS P5GV-MX 2-19 2.4 Advanced menu The Advanced menu items allow you to change the settings for the system. Use the and keys to the table...
... Exit ESC Exit AI Overclocking [Standard] Allows selection of the preset overclocking configuration options: Manual - loads the standard settings for the CPU and other system devices. ASUS P5GV-MX 2-19 2.4 Advanced menu The Advanced menu items allow you to change the settings for the system. Use the and keys to the table...


