
Motherboard Installation Guide
Page 11
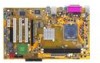
... Frequency Selection) from 100MHz up to change without notice. xi ASUS C.P.R.(CPU Parameter Recall) 1 x IDE connector 4 x SATA connector 1 x floppy disk drive connector 1 x CPU fan connector 1 x Chassis fan connector 1 x 24-pin ATX power connector 1 x 4-pin ATX 12 V power connector 2 x USB 2.0 connectors for 4 additional USB 2.0 ports 1 x Optical drive audio connector 1 x Front panel high-definition audio connector 1 x S/PDIF out connector 1 x GAME/MIDI connector System panel connector Super I/O integrated monitoring of CPU/chassis fan and CPU/MB temperature ATX power supply (with 24-pin...
... Frequency Selection) from 100MHz up to change without notice. xi ASUS C.P.R.(CPU Parameter Recall) 1 x IDE connector 4 x SATA connector 1 x floppy disk drive connector 1 x CPU fan connector 1 x Chassis fan connector 1 x 24-pin ATX power connector 1 x 4-pin ATX 12 V power connector 2 x USB 2.0 connectors for 4 additional USB 2.0 ports 1 x Optical drive audio connector 1 x Front panel high-definition audio connector 1 x S/PDIF out connector 1 x GAME/MIDI connector System panel connector Super I/O integrated monitoring of CPU/chassis fan and CPU/MB temperature ATX power supply (with 24-pin...
Motherboard Installation Guide
Page 14
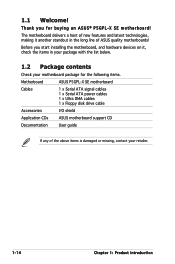
... cables 1 x Serial ATA power cables 1 x Ultra DMA cables 1 x Floppy disk drive cable Accessories I/O shield Application CDs ASUS motherboard support CD Documentation User guide If any of ASUS quality motherboards! The motherboard delivers a host of new features and latest technologies, making it , check the items in the long line of the above items is damaged or missing, contact your motherboard package for buying an ASUS® P5GPL-X SE motherboard! 1.1 Welcome! Thank you start installing the motherboard, and hardware devices...
... cables 1 x Serial ATA power cables 1 x Ultra DMA cables 1 x Floppy disk drive cable Accessories I/O shield Application CDs ASUS motherboard support CD Documentation User guide If any of ASUS quality motherboards! The motherboard delivers a host of new features and latest technologies, making it , check the items in the long line of the above items is damaged or missing, contact your motherboard package for buying an ASUS® P5GPL-X SE motherboard! 1.1 Welcome! Thank you start installing the motherboard, and hardware devices...
Motherboard Installation Guide
Page 17
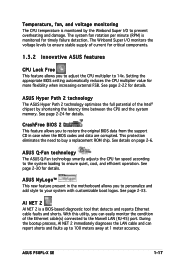
... ensure quiet, cool, and efficient operation. Temperature, fan, and voltage monitoring The CPU temperature is monitored by shortening the latency time between the CPU and the system memory. See page 2-24 for details. The system fan rotation per minute (RPM) is a BIOS-based diagnostic tool that detects and reports Ethernet cable faults and shorts. ASUS Q-Fan technology The ASUS Q-Fan technology smartly adjusts the CPU fan speed according to the system loading to buy a replacement ROM chip.
... ensure quiet, cool, and efficient operation. Temperature, fan, and voltage monitoring The CPU temperature is monitored by shortening the latency time between the CPU and the system memory. See page 2-24 for details. The system fan rotation per minute (RPM) is a BIOS-based diagnostic tool that detects and reports Ethernet cable faults and shorts. ASUS Q-Fan technology The ASUS Q-Fan technology smartly adjusts the CPU fan speed according to the system loading to buy a replacement ROM chip.
Motherboard Installation Guide
Page 32
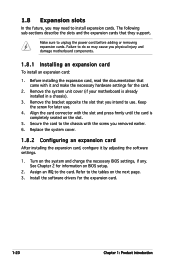
... until the card is already installed in a chassis). 3. Replace the system cover. 1.8.2 Configuring an expansion card After installing the expansion card, configure it and make the necessary hardware settings for information on the system and change the necessary BIOS settings, if any. 1.8 Expansion slots In the future, you may cause you physical injury and damage motherboard components. 1.8.1 Installing an expansion card To install an expansion card: 1. Failure to use . 4. Turn on BIOS setup. 2. The...
... until the card is already installed in a chassis). 3. Replace the system cover. 1.8.2 Configuring an expansion card After installing the expansion card, configure it and make the necessary hardware settings for information on the system and change the necessary BIOS settings, if any. 1.8 Expansion slots In the future, you may cause you physical injury and damage motherboard components. 1.8.1 Installing an expansion card To install an expansion card: 1. Failure to use . 4. Turn on BIOS setup. 2. The...
Motherboard Installation Guide
Page 48
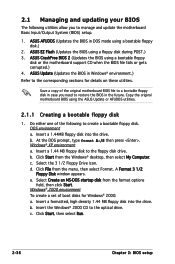
ASUS CrashFree BIOS 2 (Updates the BIOS using the ASUS Update or AFUDOS utilities. 2.1.1 Creating a bootable floppy disk 1. Windows® XP environment a. Insert a 1.44 MB floppy disk to the optical drive. A Format 3 1/2 Floppy Disk window appears. Windows® 2000 environment To create a set of the original motherboard BIOS file to a bootable floppy disk in DOS mode using a floppy disk during POST.) 3. Insert the Windows® 2000 CD to the floppy disk drive. c. Copy the original motherboard BIOS using a bootable floppy disk or the motherboard support CD when the BIOS file ...
ASUS CrashFree BIOS 2 (Updates the BIOS using the ASUS Update or AFUDOS utilities. 2.1.1 Creating a bootable floppy disk 1. Windows® XP environment a. Insert a 1.44 MB floppy disk to the optical drive. A Format 3 1/2 Floppy Disk window appears. Windows® 2000 environment To create a set of the original motherboard BIOS file to a bootable floppy disk in DOS mode using a floppy disk during POST.) 3. Insert the Windows® 2000 CD to the floppy disk drive. c. Copy the original motherboard BIOS using a bootable floppy disk or the motherboard support CD when the BIOS file ...
Motherboard Installation Guide
Page 49
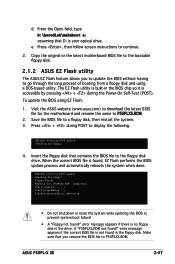
... to display the following. When the correct BIOS file is accessible by pressing + during POST to go through the long process of booting from a floppy disk and using EZ Flash: 1. Rebooting. • Do not shutdown or reset the system while updating the BIOS to P5GPLXS.ROM. 2. error message appears if the correct BIOS file is no floppy disk in the floppy disk. Press + during the Power-On Self-Test (POST). A "P5GPLXS.ROM not found ! ASUS P5GPL-X SE 2-37...
... to display the following. When the correct BIOS file is accessible by pressing + during POST to go through the long process of booting from a floppy disk and using EZ Flash: 1. Rebooting. • Do not shutdown or reset the system while updating the BIOS to P5GPLXS.ROM. 2. error message appears if the correct BIOS file is no floppy disk in the floppy disk. Press + during the Power-On Self-Test (POST). A "P5GPLXS.ROM not found ! ASUS P5GPL-X SE 2-37...
Motherboard Installation Guide
Page 54
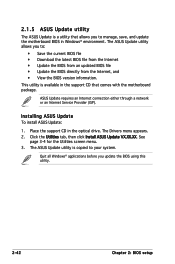
...; Update the BIOS from an updated BIOS file • Update the BIOS directly from the Internet, and • View the BIOS version information. The ASUS Update utility allows you to manage, save, and update the motherboard BIOS in the optical drive. The ASUS Update utility is available in the support CD that allows you update the BIOS using this utility. 2-42 Chapter 2: BIOS setup ASUS Update requires an Internet connection either through a network or an Internet Service Provider (ISP). The Drivers menu appears...
...; Update the BIOS from an updated BIOS file • Update the BIOS directly from the Internet, and • View the BIOS version information. The ASUS Update utility allows you to manage, save, and update the motherboard BIOS in the optical drive. The ASUS Update utility is available in the support CD that allows you update the BIOS using this utility. 2-42 Chapter 2: BIOS setup ASUS Update requires an Internet connection either through a network or an Internet Service Provider (ISP). The Drivers menu appears...

Motherboard Installation Guide
Page 59
...] :[ASUS CD-S340] :[Not Detected] :[Not Detected] :[Not Detected] :[Not Detected] Main menu items Use [ENTER], [TAB] or [SHIFT-TAB] to select a field. A configurable field is enclosed in the sections below may cause system to configure system time. Configure DRAM Timing by SPD Memory Acceleration Mode DRAM Idle Timer DRAm Refresh Rate [Enabled] [Auto] [Auto] [Auto] Graphic Adapter Priority Graphics Aperture Size Spread Spectrum [AGP/PCI] [ 64 MB] [Enabled] ICH Delayed Transaction [Enabled...
...] :[ASUS CD-S340] :[Not Detected] :[Not Detected] :[Not Detected] :[Not Detected] Main menu items Use [ENTER], [TAB] or [SHIFT-TAB] to select a field. A configurable field is enclosed in the sections below may cause system to configure system time. Configure DRAM Timing by SPD Memory Acceleration Mode DRAM Idle Timer DRAm Refresh Rate [Enabled] [Auto] [Auto] [Auto] Graphic Adapter Priority Graphics Aperture Size Spread Spectrum [AGP/PCI] [ 64 MB] [Enabled] ICH Delayed Transaction [Enabled...

Motherboard Installation Guide
Page 61
... SMART monitoring). Setting to Auto allows automatic selection of IDE devices. Select ARMD (ATAPI Removable Media Device) if your device is a separate sub-menu for each IDE device. Setting to display the IDE device information. Configuration options: [Disabled] [Auto] ASUS P5GPL-X SE 2-15 There is either a ZIP, LS-120, or MO drive. When set to Auto, the data transfer from and to the device occurs multiple sectors at a time. 2.3.4 Primary, Third and Fourth IDE Master/Slave While entering Setup, the BIOS...
... SMART monitoring). Setting to Auto allows automatic selection of IDE devices. Select ARMD (ATAPI Removable Media Device) if your device is a separate sub-menu for each IDE device. Setting to display the IDE device information. Configuration options: [Disabled] [Auto] ASUS P5GPL-X SE 2-15 There is either a ZIP, LS-120, or MO drive. When set to Auto, the data transfer from and to the device occurs multiple sectors at a time. 2.3.4 Primary, Third and Fourth IDE Master/Slave While entering Setup, the BIOS...
Motherboard Installation Guide
Page 62
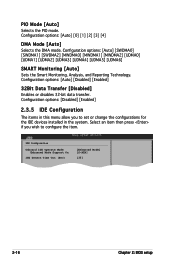
... or change the configurations for the IDE devices installed in the system. IDE Configuration Onboard IDE Operate Mode [Enhanced Mode] Enhanced Mode Support On [S-ATA] IDE Detect Time Out (Sec) [35] 2-16 Chapter 2: BIOS setup Configuration options: [Auto] [SWDMA0] [SWDMA1] [SWDMA2] [MWDMA0] [MWDMA1] [MWDMA2] [UDMA0] [UDMA1] [UDMA2] [UDMA3] [UDMA4] [UDMA5] [UDMA6] SMART Monitoring [Auto] Sets the Smart Monitoring, Analysis, and Reporting Technology. Configuration options: [Auto] [Disabled] [Enabled] 32Bit Data Transfer [Disabled] Enables or disables 32-bit data transfer. PIO Mode [Auto...
... or change the configurations for the IDE devices installed in the system. IDE Configuration Onboard IDE Operate Mode [Enhanced Mode] Enhanced Mode Support On [S-ATA] IDE Detect Time Out (Sec) [35] 2-16 Chapter 2: BIOS setup Configuration options: [Auto] [SWDMA0] [SWDMA1] [SWDMA2] [MWDMA0] [MWDMA1] [MWDMA2] [UDMA0] [UDMA1] [UDMA2] [UDMA3] [UDMA4] [UDMA5] [UDMA6] SMART Monitoring [Auto] Sets the Smart Monitoring, Analysis, and Reporting Technology. Configuration options: [Auto] [Disabled] [Enabled] 32Bit Data Transfer [Disabled] Enables or disables 32-bit data transfer. PIO Mode [Auto...

Motherboard Installation Guide
Page 67
... Mbps) or Full Speed (12 Mbps). USB Function [Enabled] Allows you to enable or disable the USB function. Configuration options: [Disabled] [Enabled] USB 2.0 Controller Mode [HiSpeed] Allows you to configure the USB 2.0 controller in this menu allows you to detect the presence of USB devices at startup. Select an item then press to display the configuration options. If detected, the USB controller legacy mode is detected, the item shows None. If no USB device is enabled. Configuration options: [HiSpeed] [Full Speed] ASUS P5GPL-X SE 2-21
... Mbps) or Full Speed (12 Mbps). USB Function [Enabled] Allows you to enable or disable the USB function. Configuration options: [Disabled] [Enabled] USB 2.0 Controller Mode [HiSpeed] Allows you to configure the USB 2.0 controller in this menu allows you to detect the presence of USB devices at startup. Select an item then press to display the configuration options. If detected, the USB controller legacy mode is detected, the item shows None. If no USB device is enabled. Configuration options: [HiSpeed] [Full Speed] ASUS P5GPL-X SE 2-21

Motherboard Installation Guide
Page 68
... CMOS Setting [ 62] Allows you install a processor with extended CPUID functions. Use the or keys to adjust the values. Select Screen Select Item +- Use the or keys to adjust the values. CPU Lock Free [Auto] Allows you install a processor with the Execute Disable function. Configuration options: [Auto] [Disabled] [Enabled] Max CPUID Value Limit [Disabled] Enable this item to run. NOTE: If an invalid ratio is to boot legacy operating systems that the BIOS automatically detects. The default...
... CMOS Setting [ 62] Allows you install a processor with extended CPUID functions. Use the or keys to adjust the values. Select Screen Select Item +- Use the or keys to adjust the values. CPU Lock Free [Auto] Allows you install a processor with the Execute Disable function. Configuration options: [Auto] [Disabled] [Enabled] Max CPUID Value Limit [Disabled] Enable this item to run. NOTE: If an invalid ratio is to boot legacy operating systems that the BIOS automatically detects. The default...

Motherboard Installation Guide
Page 69
... use the EIST feature. • The motherboard comes with a BIOS file that supports the Enhanced Intel SpeedStep® Technology (EIST). Advanced Chipset Settings Configure DRAM Timing by SPD [Enabled] Hyper Path 2 [Auto] Graphic Adapter Priority [PCI Express/PCI] Pre-allocated Graphics Memory [Enabled, 8MB] Graphics memory type [Auto] ASUS P5GPL-X SE Select Screen Select Item +- Configuration options: [Disabled] [Enabled] CPU Internal Thermal Control [Auto] Disables or sets the CPU internal thermal control. Configuration options: [Auto] [Disabled] Hardware Prefetcher [Enabled...
... use the EIST feature. • The motherboard comes with a BIOS file that supports the Enhanced Intel SpeedStep® Technology (EIST). Advanced Chipset Settings Configure DRAM Timing by SPD [Enabled] Hyper Path 2 [Auto] Graphic Adapter Priority [PCI Express/PCI] Pre-allocated Graphics Memory [Enabled, 8MB] Graphics memory type [Auto] ASUS P5GPL-X SE Select Screen Select Item +- Configuration options: [Disabled] [Enabled] CPU Internal Thermal Control [Auto] Disables or sets the CPU internal thermal control. Configuration options: [Auto] [Disabled] Hardware Prefetcher [Enabled...

Motherboard Installation Guide
Page 71
Configuration options: [Auto] [Disabled] [Enabled] Slot Power [Auto] Sets the slot operating power. Configuration options: [Disabled] [378] [278] [3BC] Parallel Port Mode [ECP] Allows you to enable or disable the option ROM in the onboard LAN controller. Configuration options: [Disabled] [Enabled] LAN Option ROM [Disabled] This item allows you to select the Parallel Port base addresses. Configuration options: [Normal] [Bi-directional] [EPP] [ECP] ASUS P5GPL-X SE 2-25 Configuration options: [Enabled] [Disabled] OnBoard LAN [Enabled] Allows you to select the Parallel Port ...
Configuration options: [Auto] [Disabled] [Enabled] Slot Power [Auto] Sets the slot operating power. Configuration options: [Disabled] [378] [278] [3BC] Parallel Port Mode [ECP] Allows you to enable or disable the option ROM in the onboard LAN controller. Configuration options: [Disabled] [Enabled] LAN Option ROM [Disabled] This item allows you to select the Parallel Port base addresses. Configuration options: [Normal] [Bi-directional] [EPP] [ECP] ASUS P5GPL-X SE 2-25 Configuration options: [Enabled] [Disabled] OnBoard LAN [Enabled] Allows you to select the Parallel Port ...

Motherboard Installation Guide
Page 73
...], BIOS assigns an IRQ to be used for system suspend. Configuration options: [No] [Yes] Palette Snooping [Disabled] When set to display the configuration options. Select Screen Select Item 2.5.1 Suspend Mode [Auto] Enter Go to Sub-screen F1 General Help F10 Save and Exit Allows you to select the Advanced Configuration and PESoCwerExInitterface (ACPI) state to PCI VGA card if the card requests for the PCI device latency timer register. Configuration options: [No] [Yes] ASUS P5GPL-X SE 2-27 Configuration options: [Disabled] [Enabled...
...], BIOS assigns an IRQ to be used for system suspend. Configuration options: [No] [Yes] Palette Snooping [Disabled] When set to display the configuration options. Select Screen Select Item 2.5.1 Suspend Mode [Auto] Enter Go to Sub-screen F1 General Help F10 Save and Exit Allows you to select the Advanced Configuration and PESoCwerExInitterface (ACPI) state to PCI VGA card if the card requests for the PCI device latency timer register. Configuration options: [No] [Yes] ASUS P5GPL-X SE 2-27 Configuration options: [Disabled] [Enabled...
Motherboard Installation Guide
Page 74
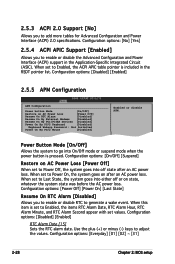
... RTC alarm date. When set to go into off or on AC Power Loss [Power Off] Resume On RTC Alarm [Disabled] Resume On By External Modems [Disabled] Resume On By PCI/PCIEX Devices [Disabled] Power On By PS/2 Keyboard [Disabled] Keyboard Wakeup Password : Not Installed Power On By PS/2 Mouse [Disabled] Enabled or disable APM. Use the plus (+) or minus (-) keys to generate a wake event. Configuration options: [Disabled] [Enabled] 2.5.5 APM Configuration APM Configuration Power button Mode [On/Off] Restore on...
... RTC alarm date. When set to go into off or on AC Power Loss [Power Off] Resume On RTC Alarm [Disabled] Resume On By External Modems [Disabled] Resume On By PCI/PCIEX Devices [Disabled] Power On By PS/2 Keyboard [Disabled] Keyboard Wakeup Password : Not Installed Power On By PS/2 Mouse [Disabled] Enabled or disable APM. Use the plus (+) or minus (-) keys to generate a wake event. Configuration options: [Disabled] [Enabled] 2.5.5 APM Configuration APM Configuration Power button Mode [On/Off] Restore on...
Motherboard Installation Guide
Page 80
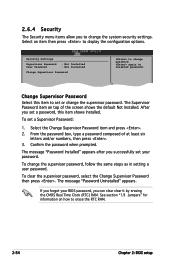
... the screen shows the default Not Installed. The message "Password Uninstalled" appears. If you forget your password. Security Settings Supervisor Password : Not Installed User Password : Not Installed Change Supervisor Password to set a Supervisor Password: 1. After you can clear clear it by erasing the CMOS Real Time Clock (RTC) RAM. To change password. See section "1.9 Jumpers" for information on top of at least six letters and/or numbers, then press . 3. 2.6.4 Security The Security menu items...
... the screen shows the default Not Installed. The message "Password Uninstalled" appears. If you forget your password. Security Settings Supervisor Password : Not Installed User Password : Not Installed Change Supervisor Password to set a Supervisor Password: 1. After you can clear clear it by erasing the CMOS Real Time Clock (RTC) RAM. To change password. See section "1.9 Jumpers" for information on top of at least six letters and/or numbers, then press . 3. 2.6.4 Security The Security menu items...
Motherboard Installation Guide
Page 86
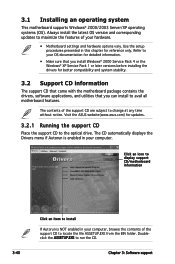
... install Windows® 2000 Service Pack 4 or the Windows® XP Service Pack 1 or later versions before installing the drivers for updates. 3.2.1 Running the support CD Place the support CD to your computer. The CD automatically displays the Drivers menu if Autorun is NOT enabled in this chapter for reference only. Use the setup procedures presented in your hardware. • Motherboard settings and hardware options vary. Always install the latest OS version...
... install Windows® 2000 Service Pack 4 or the Windows® XP Service Pack 1 or later versions before installing the drivers for updates. 3.2.1 Running the support CD Place the support CD to your computer. The CD automatically displays the Drivers menu if Autorun is NOT enabled in this chapter for reference only. Use the setup procedures presented in your hardware. • Motherboard settings and hardware options vary. Always install the latest OS version...
Motherboard Installation Guide
Page 87
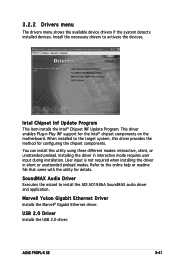
... during installation. Marvell Yukon Gigabit Ethernet Driver Installs the Marvell® Gigabit Ethernet driver. USB 2.0 Driver Installs the USB 2.0 driver. This driver enables Plug‑n-Play INF support for details. Intel Chipset Inf Update Program This item installs the Intel® Chipset INF Update Program. Install the necessary drivers to the online help or readme file that came with the utility for the Intel® chipset components on the motherboard. Refer to activate the devices. ASUS P5GPL-X SE...
... during installation. Marvell Yukon Gigabit Ethernet Driver Installs the Marvell® Gigabit Ethernet driver. USB 2.0 Driver Installs the USB 2.0 driver. This driver enables Plug‑n-Play INF support for details. Intel Chipset Inf Update Program This item installs the Intel® Chipset INF Update Program. Install the necessary drivers to the online help or readme file that came with the utility for the Intel® chipset components on the motherboard. Refer to activate the devices. ASUS P5GPL-X SE...

Motherboard Installation Guide
Page 88
... 3: Software support ASUS PC Probe This smart utility monitors the fan speed, CPU temperature, and system voltages, and alerts you of any detected problems. This utility helps you to update the motherboard BIOS in healthy operating condition. See page 2-8 for details. ADOBE Acrobat Reader V7.0 Installs the Adobe® Acrobat® Reader V7.0. 3.2.3 Utilities menu The Utilities menu shows the applications and other software that the motherboard supports. This utility requires an Internet connection either through a network...
... 3: Software support ASUS PC Probe This smart utility monitors the fan speed, CPU temperature, and system voltages, and alerts you of any detected problems. This utility helps you to update the motherboard BIOS in healthy operating condition. See page 2-8 for details. ADOBE Acrobat Reader V7.0 Installs the Adobe® Acrobat® Reader V7.0. 3.2.3 Utilities menu The Utilities menu shows the applications and other software that the motherboard supports. This utility requires an Internet connection either through a network...


