
User Manual
Page 10
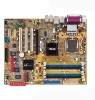
P5GDC Deluxe specifications summary Overclocking features Special features Rear panel Internal connectors Support CD contents Form factor ASUS AI NOS™ (Non-delay Overclocking System) ASUS AI Overclocking ASUS C.P.R. (CPU Parameter Recall) ASUS...MHz at 1 MHz increment Adjustable FSB/DDR frequencies Fixed PCI/PCI Express frequencies ASUS Q-Fan2 ASUS CrashFree BIOS 2 ASUS MyLogo™ 1 x PS/2 mouse port 1 x Parallel port 1 x...High Definition Audio connector 1 x System panel connector Drivers ASUS PC Probe ASUS Live Update Anti-virus software (OEM version) ATX form factor: 12 in x 9.6 in...
P5GDC Deluxe specifications summary Overclocking features Special features Rear panel Internal connectors Support CD contents Form factor ASUS AI NOS™ (Non-delay Overclocking System) ASUS AI Overclocking ASUS C.P.R. (CPU Parameter Recall) ASUS...MHz at 1 MHz increment Adjustable FSB/DDR frequencies Fixed PCI/PCI Express frequencies ASUS Q-Fan2 ASUS CrashFree BIOS 2 ASUS MyLogo™ 1 x PS/2 mouse port 1 x Parallel port 1 x...High Definition Audio connector 1 x System panel connector Drivers ASUS PC Probe ASUS Live Update Anti-virus software (OEM version) ATX form factor: 12 in x 9.6 in...
User Manual
Page 64
Chapter summary 4 4.1 Managing and updating your BIOS 4-1 4.2 BIOS setup program 4-10 4.3 Main menu 4-13 4.4 Advanced menu 4-18 4.5 Power menu 4-31 4.6 Boot menu 4-36 4.7 Exit menu 4-40 ASUS P5GDC Deluxe
Chapter summary 4 4.1 Managing and updating your BIOS 4-1 4.2 BIOS setup program 4-10 4.3 Main menu 4-13 4.4 Advanced menu 4-18 4.5 Power menu 4-31 4.6 Boot menu 4-36 4.7 Exit menu 4-40 ASUS P5GDC Deluxe

User Manual
Page 65
... the DOS prompt, type format A:/S then press . Select the 3 1/2 Floppy Drive icon. ASUS P5GDC Deluxe 4-1 Insert a 1.44MB floppy disk into the drive. DOS environment a. d. D O S s t a r t u p d i s k from the format options field, then click S t a r t. 4.1 Managing and updating your BIOS The following to the optical drive. A S U S A F U D O S (Updates the BIOS in case you to the floppy disk drive. Insert a 1.44 MB floppy...
... the DOS prompt, type format A:/S then press . Select the 3 1/2 Floppy Drive icon. ASUS P5GDC Deluxe 4-1 Insert a 1.44MB floppy disk into the drive. DOS environment a. d. D O S s t a r t u p d i s k from the format options field, then click S t a r t. 4.1 Managing and updating your BIOS The following to the optical drive. A S U S A F U D O S (Updates the BIOS in case you to the floppy disk drive. Insert a 1.44 MB floppy...

User Manual
Page 67
... may not be exactly the same as backup when the BIOS fails or gets corrupted during the updating process. done A:\> The utility returns to the floppy disk. Press . 4.1.3 AFUDOS utility The AFUDOS utility allows you created earlier. 2. A:\>afudos /oOLDBIOS1.ROM AMI Firmware Update Utility - ASUS P5GDC Deluxe 4-3 All rights reserved. A:\>afudos /oOLDBIOS1.ROM Main filename Extension...
... may not be exactly the same as backup when the BIOS fails or gets corrupted during the updating process. done A:\> The utility returns to the floppy disk. Press . 4.1.3 AFUDOS utility The AFUDOS utility allows you created earlier. 2. A:\>afudos /oOLDBIOS1.ROM AMI Firmware Update Utility - ASUS P5GDC Deluxe 4-3 All rights reserved. A:\>afudos /oOLDBIOS1.ROM Main filename Extension...

User Manual
Page 69
...)) Copyright (C) 2003 American Megatrends, Inc. Do not turn off power during the updating process. done Reading flash .... ASUS P5GDC Deluxe 4-5 A:\>afudos /iP5GDCD.ROM AMI Firmware Update Utility - 5. You can update a corrupted BIOS file using the motherboard support CD or the floppy disk that contains the updated BIOS file. • Prepare the motherboard support CD or the floppy disk containing...
...)) Copyright (C) 2003 American Megatrends, Inc. Do not turn off power during the updating process. done Reading flash .... ASUS P5GDC Deluxe 4-5 A:\>afudos /iP5GDCD.ROM AMI Firmware Update Utility - 5. You can update a corrupted BIOS file using the motherboard support CD or the floppy disk that contains the updated BIOS file. • Prepare the motherboard support CD or the floppy disk containing...

User Manual
Page 71
.... Quit all Windows® applications before you to manage, save, and update the motherboard BIOS in Windows® environment. ASUS P5GDC Deluxe 4-7 Click the U t i l i t i e s tab, then click I n s t a l l A S U S U p d a t e V X . ASUS Update requires an Internet connection either through a network or an Internet Service Provider (ISP). The D r i v e r s menu appears. 2. X X. See page 5-3 for this utility. DO NOT shut down ...
.... Quit all Windows® applications before you to manage, save, and update the motherboard BIOS in Windows® environment. ASUS P5GDC Deluxe 4-7 Click the U t i l i t i e s tab, then click I n s t a l l A S U S U p d a t e V X . ASUS Update requires an Internet connection either through a network or an Internet Service Provider (ISP). The D r i v e r s menu appears. 2. X X. See page 5-3 for this utility. DO NOT shut down ...

User Manual
Page 73
... Windows® desktop by clicking S t a r t > P r o g r a m s > A S U S > A S U S U p d a t e > A S U S U p d a t e. From the FTP site, select the BIOS version that you wish to complete the update process. The ASUS Update utility is capable of updating itself through a BIOS file: 1. ASUS P5GDC Deluxe 4-9 4. Click Next. 5. Always update the utility to complete the update process. Launch the ASUS Update utility from the drop-down menu, then click N e x t. 3. Follow the screen instructions...
... Windows® desktop by clicking S t a r t > P r o g r a m s > A S U S > A S U S U p d a t e > A S U S U p d a t e. From the FTP site, select the BIOS version that you wish to complete the update process. The ASUS Update utility is capable of updating itself through a BIOS file: 1. ASUS P5GDC Deluxe 4-9 4. Click Next. 5. Always update the utility to complete the update process. Launch the ASUS Update utility from the drop-down menu, then click N e x t. 3. Follow the screen instructions...

User Manual
Page 87
... Ratio CMOS Setting [ 8] Sets the ratio between CPU Core Clock and the FSB Frequency. ASUS P5GDC Deluxe 4-23 Configuration options: [Disabled] [Enabled] [Auto] USB 2.0 Controller [Disabled] Allows you...) or FullSpeed (12 Mbps). NOTE: If an invalid ratio is auto-detected by BIOS. If detected, the USB controller legacy mode is disabled. Use the or keys to... 0 KB Ratio Status: Unlocked Ratio Actual Value : 16 Ratio CMOS Setting: VID CMOS Setting: Microcode Updating: Max CPUID Value Limit: Enhanced C1 Control CPU Internal Thermal Control Hyper Threading Technology [ 8] [ 62...
... Ratio CMOS Setting [ 8] Sets the ratio between CPU Core Clock and the FSB Frequency. ASUS P5GDC Deluxe 4-23 Configuration options: [Disabled] [Enabled] [Auto] USB 2.0 Controller [Disabled] Allows you...) or FullSpeed (12 Mbps). NOTE: If an invalid ratio is auto-detected by BIOS. If detected, the USB controller legacy mode is disabled. Use the or keys to... 0 KB Ratio Status: Unlocked Ratio Actual Value : 16 Ratio CMOS Setting: VID CMOS Setting: Microcode Updating: Max CPUID Value Limit: Enhanced C1 Control CPU Internal Thermal Control Hyper Threading Technology [ 8] [ 62...

User Manual
Page 117
When the screen returns to the ASUS Update utility, flash the original BIOS to display the new boot logo during POST. 7. After flashing the BIOS, restart the computer to load the new boot logo. 10. ASUS P5GDC-V Deluxe 5-9 When the logo images appear on the right window pane, select an image to your desired size by clicking on the R a t i o box. 9. Adjust the boot image to enlarge by selecting a value on it. 8.
When the screen returns to the ASUS Update utility, flash the original BIOS to display the new boot logo during POST. 7. After flashing the BIOS, restart the computer to load the new boot logo. 10. ASUS P5GDC-V Deluxe 5-9 When the logo images appear on the right window pane, select an image to your desired size by clicking on the R a t i o box. 9. Adjust the boot image to enlarge by selecting a value on it. 8.


