User Manual
Page 36
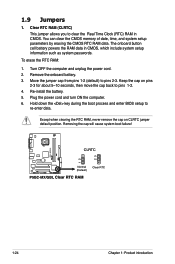
... 2-3. Move the jumper cap from pins 1-2 (default) to re-enter data. P5GC-MX/GBL R 12 23 CLRTC Normal (Default) P5GC-MX/GBL Clear RTC RAM Clear RTC 1-24 Chapter 1: Product introduction Clear RTC RAM (CLRTC) This jumper allows you to pins 1-2. 4. Except when clearing the RTC RAM, never remove the cap on pins 2-3 for about 5~10 seconds, then move...
... 2-3. Move the jumper cap from pins 1-2 (default) to re-enter data. P5GC-MX/GBL R 12 23 CLRTC Normal (Default) P5GC-MX/GBL Clear RTC RAM Clear RTC 1-24 Chapter 1: Product introduction Clear RTC RAM (CLRTC) This jumper allows you to pins 1-2. 4. Except when clearing the RTC RAM, never remove the cap on pins 2-3 for about 5~10 seconds, then move...
User Manual
Page 58
...configuration of your computer in the future. You can also restart by pressing the reset button on your screen. • Visit the ASUS website (www.asus.com) to reconfigure your system using the BIOS Setup program so that you scroll through the various sub-menus and make it lets ... failed. 2.2 BIOS setup program This motherboard supports a programmable firmware chip that the computer can recognize these changes and record them in the CMOS RAM of the firmware hub. This requires you see on the system chassis. Refer to your Printed Circuit Board (PCB) for most conditions to enter...
...configuration of your computer in the future. You can also restart by pressing the reset button on your screen. • Visit the ASUS website (www.asus.com) to reconfigure your system using the BIOS Setup program so that you scroll through the various sub-menus and make it lets ... failed. 2.2 BIOS setup program This motherboard supports a programmable firmware chip that the computer can recognize these changes and record them in the CMOS RAM of the firmware hub. This requires you see on the system chassis. Refer to your Printed Circuit Board (PCB) for most conditions to enter...
User Manual
Page 81
...to trap Interrupt 19. If you to change password. After you can clear clear it by erasing the CMOS Real Time Clock (RTC) RAM. Confirm the password when prompted. Change Option F1 General Help F10 Save and Exit ESC Exit Select this item to set a password, ...this function allows the option ROMs to erase the RTC RAM. The message "Password Installed" appears after you successfully set your BIOS password, you set or change the supervisor password, follow the same steps as in setting a user password. ASUS P5GC-MX/GBL 2-35
...to trap Interrupt 19. If you to change password. After you can clear clear it by erasing the CMOS Real Time Clock (RTC) RAM. Confirm the password when prompted. Change Option F1 General Help F10 Save and Exit ESC Exit Select this item to set a password, ...this function allows the option ROMs to erase the RTC RAM. The message "Password Installed" appears after you successfully set your BIOS password, you set or change the supervisor password, follow the same steps as in setting a user password. ASUS P5GC-MX/GBL 2-35
User Manual
Page 84
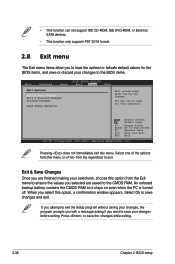
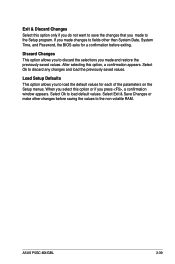
... this option from this operation. Select Screen Select Item +- When you are finished making your changes to exit. An onboard backup battery sustains the CMOS RAM so it stays on even when the PC is turned off. Pressing does not immediately exit this option, a confirmation window appears. Exit & Save Changes Once...
... this option from this operation. Select Screen Select Item +- When you are finished making your changes to exit. An onboard backup battery sustains the CMOS RAM so it stays on even when the PC is turned off. Pressing does not immediately exit this option, a confirmation window appears. Exit & Save Changes Once...
User Manual
Page 85
After selecting this option or if you press , a confirmation window appears. Load Setup Defaults This option allows you to load default values. ASUS P5GC-MX/GBL 2-39 Select Exit & Save Changes or make other than System Date, System Time, and Password, the BIOS asks for each of the ...a confirmation appears. Select Ok to load the default values for a confirmation before saving the values to discard the selections you to the non-volatile RAM. Select Ok to the Setup program. Exit & Discard Changes Select this option only if you do not want to save the changes that you...
After selecting this option or if you press , a confirmation window appears. Load Setup Defaults This option allows you to load default values. ASUS P5GC-MX/GBL 2-39 Select Exit & Save Changes or make other than System Date, System Time, and Password, the BIOS asks for each of the ...a confirmation appears. Select Ok to load the default values for a confirmation before saving the values to discard the selections you to the non-volatile RAM. Select Ok to the Setup program. Exit & Discard Changes Select this option only if you do not want to save the changes that you...


