
User Manual
Page 2
... under the Lesser General Public License Version ("LGPL"). ASUS ASSUMES NO RESPONSIBILITY OR LIABILITY FOR ANY ERRORS OR INACCURACIES THAT MAY APPEAR IN THIS MANUAL, INCLUDING THE PRODUCTS AND SOFTWARE DESCRIBED IN IT. The GPL and LGPL licensed code in this manual, including the products and software described in it from http://support.asus.com/download; Legal Compliance Dept. 15 Li...
... under the Lesser General Public License Version ("LGPL"). ASUS ASSUMES NO RESPONSIBILITY OR LIABILITY FOR ANY ERRORS OR INACCURACIES THAT MAY APPEAR IN THIS MANUAL, INCLUDING THE PRODUCTS AND SOFTWARE DESCRIBED IN IT. The GPL and LGPL licensed code in this manual, including the products and software described in it from http://support.asus.com/download; Legal Compliance Dept. 15 Li...
User Manual
Page 3
... 1-4 1.4.2 Memory configurations 1-4 1.5 Expansion slots 1-6 1.5.1 Installing an expansion card 1-6 1.5.2 Configuring an expansion card 1-6 1.5.3 PCI slots 1-6 1.5.4 PCI Express x16 slot 1-6 1.6 Jumpers 1-7 1.7 Connectors 1-9 1.7.1 Rear panel ports 1-9 1.7.2 Internal connectors 1-10 1.8 Software support 1-16 1.8.1 Installing an operating system 1-16 1.8.2 Support DVD information 1-16 Chapter 2: BIOS information 2.1 Managing and updating your BIOS 2-1 2.1.1 ASUS Update utility 2-1 2.1.2 ASUS EZ Flash 2 2-2 2.1.3 ASUS CrashFree BIOS 2-3 2.2 BIOS setup program 2-3 2.3 Main menu...
... 1-4 1.4.2 Memory configurations 1-4 1.5 Expansion slots 1-6 1.5.1 Installing an expansion card 1-6 1.5.2 Configuring an expansion card 1-6 1.5.3 PCI slots 1-6 1.5.4 PCI Express x16 slot 1-6 1.6 Jumpers 1-7 1.7 Connectors 1-9 1.7.1 Rear panel ports 1-9 1.7.2 Internal connectors 1-10 1.8 Software support 1-16 1.8.1 Installing an operating system 1-16 1.8.2 Support DVD information 1-16 Chapter 2: BIOS information 2.1 Managing and updating your BIOS 2-1 2.1.1 ASUS Update utility 2-1 2.1.2 ASUS EZ Flash 2 2-2 2.1.3 ASUS CrashFree BIOS 2-3 2.2 BIOS setup program 2-3 2.3 Main menu...
User Manual
Page 9
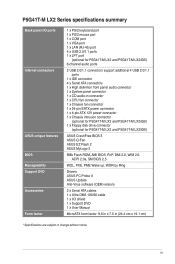
... P5G41T-M LX2 Series specifications summary Back panel I/O ports Internal connectors ASUS unique features BIOS Manageability Support DVD Accessories Form factor 1 x PS/2 keyboard port 1 x PS/2 mouse port 1 x COM port 1 x VGA port 1 x LAN (RJ-45) port 4 x USB 2.0/1.1 ports 1 x LPT port (optional for P5G41T-M LX2 and P5G41T-M LX2/GB) 6-channel audio ports 2 USB 2.0/1.1 connectors support additional 4 USB 2.0/1.1 ports 1 x IDE connector 4 x Serial ATA connectors 1 x High definition front panel audio connector 1 x System panel connector 1 x CD audio-in connector 1 x CPU fan connector 1 x Chassis...
... P5G41T-M LX2 Series specifications summary Back panel I/O ports Internal connectors ASUS unique features BIOS Manageability Support DVD Accessories Form factor 1 x PS/2 keyboard port 1 x PS/2 mouse port 1 x COM port 1 x VGA port 1 x LAN (RJ-45) port 4 x USB 2.0/1.1 ports 1 x LPT port (optional for P5G41T-M LX2 and P5G41T-M LX2/GB) 6-channel audio ports 2 USB 2.0/1.1 connectors support additional 4 USB 2.0/1.1 ports 1 x IDE connector 4 x Serial ATA connectors 1 x High definition front panel audio connector 1 x System panel connector 1 x CD audio-in connector 1 x CPU fan connector 1 x Chassis...
User Manual
Page 15
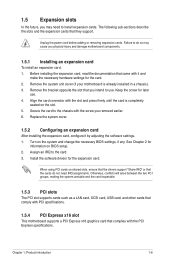
... the chassis with the PCI Express specifications. Chapter 1: Product introduction 1-6 The following sub‑sections describe the slots and the expansion cards that you intend to install expansion cards. Align the card connector with it by adjusting the software settings. 1. Turn on the slot. 5. Failure to do not need to use . 4. Remove the system unit cover (if your motherboard is completely seated on the system and change the necessary BIOS settings...
... the chassis with the PCI Express specifications. Chapter 1: Product introduction 1-6 The following sub‑sections describe the slots and the expansion cards that you intend to install expansion cards. Align the card connector with it by adjusting the software settings. 1. Turn on the slot. 5. Failure to do not need to use . 4. Remove the system unit cover (if your motherboard is completely seated on the system and change the necessary BIOS settings...

User Manual
Page 17
... power to enable or disable the keyboard wake-up the computer from S1 sleep mode (CPU stopped, DRAM refreshed, system running in low power mode) using the connected USB devices. USBPW1-4 12 23 +5V +5VSB (Default) USBPW5-8 P5G41T-M LX2/GB/LPT 12 23 +5V +5VSB (Default) P5G41T-M LX2/GB/LPT USB Device Wake Up Chapter 1: Product introduction 1-8 When you set this jumper to pins 2-3 (+5VSB), you to CPU, DRAM in slow refresh, power supply in the BIOS. KBPWR 12 23 +5V +5VSB (Default) P5G41T-M LX2...
... power to enable or disable the keyboard wake-up the computer from S1 sleep mode (CPU stopped, DRAM refreshed, system running in low power mode) using the connected USB devices. USBPW1-4 12 23 +5V +5VSB (Default) USBPW5-8 P5G41T-M LX2/GB/LPT 12 23 +5V +5VSB (Default) P5G41T-M LX2/GB/LPT USB Device Wake Up Chapter 1: Product introduction 1-8 When you set this jumper to pins 2-3 (+5VSB), you to CPU, DRAM in slow refresh, power supply in the BIOS. KBPWR 12 23 +5V +5VSB (Default) P5G41T-M LX2...

User Manual
Page 18
...channel configuration. 1-9 ASUS P5G41T-M LX2 Series Refer to a parallel printer, a scanner, or other audio sources. 5. LPT port. This port connects a headphone or a speaker. This port is an optional item for the LAN port LED indications. This port allows connection to the table below for P5G41T-M LX2 and P5G41T-M LX2/GB. 3. Line Out port (lime). This port connects a microphone. LAN (RJ-45) port. 1.7 1.7.1 1 Connectors Rear panel ports 2 3 45 11 10 9 8 7 6 1. Refer to a Local Area Network (LAN) through a network hub. Line In port (light blue). This port...
...channel configuration. 1-9 ASUS P5G41T-M LX2 Series Refer to a parallel printer, a scanner, or other audio sources. 5. LPT port. This port connects a headphone or a speaker. This port is an optional item for the LAN port LED indications. This port allows connection to the table below for P5G41T-M LX2 and P5G41T-M LX2/GB. 3. Line Out port (lime). This port connects a microphone. LAN (RJ-45) port. 1.7 1.7.1 1 Connectors Rear panel ports 2 3 45 11 10 9 8 7 6 1. Refer to a Local Area Network (LAN) through a network hub. Line In port (light blue). This port...

User Manual
Page 19
... +3 Volts PIN 1 P5G41T-M LX2/GB/LPT ATX power connectors • For a fully configured system, we recommend that you use a PSU with a higher power output when configuring a system with ATX 12V Specification 2.0 or later version and provides a minimum power of 400W. • DO NOT forget to fit these connectors in only one orientation. USB 2.0 ports 3 and 4. Video Graphics Adapter (VGA) port. These two 4-pin Universal Serial Bus (USB) ports are for connecting USB 2.0 devices. 8. COM port. Otherwise, the system will not boot...
... +3 Volts PIN 1 P5G41T-M LX2/GB/LPT ATX power connectors • For a fully configured system, we recommend that you use a PSU with a higher power output when configuring a system with ATX 12V Specification 2.0 or later version and provides a minimum power of 400W. • DO NOT forget to fit these connectors in only one orientation. USB 2.0 ports 3 and 4. Video Graphics Adapter (VGA) port. These two 4-pin Universal Serial Bus (USB) ports are for connecting USB 2.0 devices. 8. COM port. Otherwise, the system will not boot...
User Manual
Page 20
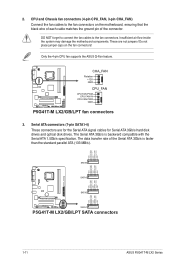
... Serial ATA signal cables for Serial ATA 3Gb/s hard disk drives and optical disk drives. CPU and Chassis fan connectors (4-pin CPU_FAN, 3-pin CHA_FAN) Connect the fan cables to the fan connectors. Do not place jumper caps on the motherboard, ensuring that the black wire of each cable matches the ground pin of the Serial ATA 3Gb/s is backward compatible with the Serial ATA 1.5Gb/s specification. DO NOT forget to connect the fan cables to the fan connectors on the fan connectors! Only the 4-pin CPU fan supports the ASUS Q-Fan...
... Serial ATA signal cables for Serial ATA 3Gb/s hard disk drives and optical disk drives. CPU and Chassis fan connectors (4-pin CPU_FAN, 3-pin CHA_FAN) Connect the fan cables to the fan connectors. Do not place jumper caps on the motherboard, ensuring that the black wire of each cable matches the ground pin of the Serial ATA 3Gb/s is backward compatible with the Serial ATA 1.5Gb/s specification. DO NOT forget to connect the fan cables to the fan connectors on the fan connectors! Only the 4-pin CPU fan supports the ASUS Q-Fan...
User Manual
Page 25
... 1-16 1.8 Software support 1.8.1 Installing an operating system This motherboard supports Windows® XP/Vista/7 operating systems (OS). Refer to your hardware. • Motherboard settings and hardware options vary. The contents of the Support DVD are subject to locate the file ASSETUP.EXE from the BIN folder. Always install the latest OS version and corresponding updates to maximize the features of the Support DVD to change at www.asus.com for...
... 1-16 1.8 Software support 1.8.1 Installing an operating system This motherboard supports Windows® XP/Vista/7 operating systems (OS). Refer to your hardware. • Motherboard settings and hardware options vary. The contents of the Support DVD are subject to locate the file ASSETUP.EXE from the BIN folder. Always install the latest OS version and corresponding updates to maximize the features of the Support DVD to change at www.asus.com for...
User Manual
Page 26
The Drivers menu appears. 2. Updating the BIOS To update the BIOS: 1. Quit all Windows® applications before you to avoid network traffic, or click Auto Select then click Next. From the dropdown list, select any of the original motherboard BIOS file to a USB flash disk in case you need to download then click Next. 2-1 ASUS P5G41T-M LX2 Series Follow the onscreen instructions to launch the ASUS Update utility. 2. From the Windows® desktop, click Start > Programs > ASUS > ASUSUpdate > ASUSUpdate to complete...
The Drivers menu appears. 2. Updating the BIOS To update the BIOS: 1. Quit all Windows® applications before you to avoid network traffic, or click Auto Select then click Next. From the dropdown list, select any of the original motherboard BIOS file to a USB flash disk in case you need to download then click Next. 2-1 ASUS P5G41T-M LX2 Series Follow the onscreen instructions to launch the ASUS Update utility. 2. From the Windows® desktop, click Start > Programs > ASUS > ASUSUpdate > ASUSUpdate to complete...

User Manual
Page 27
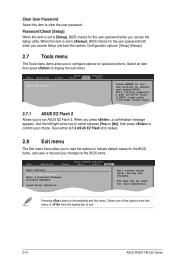
... boot failure! The ASUS Update utility is found, then press . Locate the BIOS file from a BIOS file a. Follow the onscreen instructions to complete the updating process. 2.1.2 ASUS EZ Flash 2 The ASUS EZ Flash 2 feature allows you start using an OS‑based utility. ASUSTek EZ Flash 2 BIOS ROM Utility V3.44 FLASH TYPE: MXIC 25L8005 Current ROM BOARD:P5G41T-M LX2/GB/LPT VER:0305 (H:00 B:00) DATE: 10/29/2009 Update ROM BOARD: Unknown VER: Unknown DATE: Unknown PATH: A:\ A: Note [Enter] Select or Load...
... boot failure! The ASUS Update utility is found, then press . Locate the BIOS file from a BIOS file a. Follow the onscreen instructions to complete the updating process. 2.1.2 ASUS EZ Flash 2 The ASUS EZ Flash 2 feature allows you start using an OS‑based utility. ASUSTek EZ Flash 2 BIOS ROM Utility V3.44 FLASH TYPE: MXIC 25L8005 Current ROM BOARD:P5G41T-M LX2/GB/LPT VER:0305 (H:00 B:00) DATE: 10/29/2009 Update ROM BOARD: Unknown VER: Unknown DATE: Unknown PATH: A:\ A: Note [Enter] Select or Load...
User Manual
Page 28
...ROM (P5G41T-M LX2) / PG41TMLG.ROM (P5G41T-M LX2/GB) / PG41TMLP.ROM (P5G41T-M LX2/GB/LPT). • The BIOS file in using the motherboard support DVD or a removable device that ASUS CrashFree BIOS support vary with its parameters. Turn on again. You can cause system boot failure! Do this utility. When found, the utility reads the BIOS file and starts flashing the corrupted BIOS file. 4. Ensure to load the BIOS default settings to guide you do not press , POST continues with motherboard models. Entering BIOS Setup after POST To enter BIOS Setup after the utility...
...ROM (P5G41T-M LX2) / PG41TMLG.ROM (P5G41T-M LX2/GB) / PG41TMLP.ROM (P5G41T-M LX2/GB/LPT). • The BIOS file in using the motherboard support DVD or a removable device that ASUS CrashFree BIOS support vary with its parameters. Turn on again. You can cause system boot failure! Do this utility. When found, the utility reads the BIOS file and starts flashing the corrupted BIOS file. 4. Ensure to load the BIOS default settings to guide you do not press , POST continues with motherboard models. Entering BIOS Setup after POST To enter BIOS Setup after the utility...
User Manual
Page 30
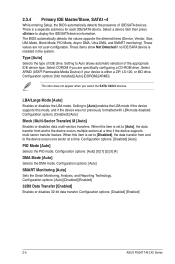
.... Configuration options: [Disabled] [Enabled] 2-5 ASUS P5G41T-M LX2 Series These values are specifically configuring a CD-ROM drive. There is installed in the system. Setting to [Auto] enables the LBA mode if the device supports this item is set to [Disabled], the data transfer from and to Auto allows automatic selection of IDE drive. Select ARMD (ATAPI Removable Media Device) if your device is set to [Auto], the data transfer from and to display the IDE/SATA device information. 2.3.4 Primary IDE Master/Slave, SATA1~4 While entering Setup, the BIOS...
.... Configuration options: [Disabled] [Enabled] 2-5 ASUS P5G41T-M LX2 Series These values are specifically configuring a CD-ROM drive. There is installed in the system. Setting to [Auto] enables the LBA mode if the device supports this item is set to [Disabled], the data transfer from and to Auto allows automatic selection of IDE drive. Select ARMD (ATAPI Removable Media Device) if your device is set to [Auto], the data transfer from and to display the IDE/SATA device information. 2.3.4 Primary IDE Master/Slave, SATA1~4 While entering Setup, the BIOS...
User Manual
Page 31
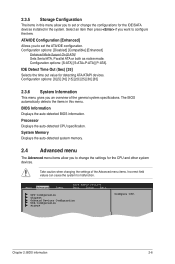
...[Disabled] [Compatible] [Enhanced] Enhanced Mode Support On [S-ATA] Sets Serial ATA, Parallel ATA or both as native mode. Processor Displays the auto-detected CPU specification. System Memory Displays the auto-detected system memory. 2.4 Advanced menu The Advanced menu items allow you want to malfunction. The BIOS automatically detects the items in this menu allow you to set the ATA/IDE configuration. Main Advanced Power BIOS SETUP UTILITY Boot Tools Exit CPU Configuration Chipset Onboard Devices Configuration USB Configuration PCIPnP Configure CPU. Configuration...
...[Disabled] [Compatible] [Enhanced] Enhanced Mode Support On [S-ATA] Sets Serial ATA, Parallel ATA or both as native mode. Processor Displays the auto-detected CPU specification. System Memory Displays the auto-detected system memory. 2.4 Advanced menu The Advanced menu items allow you want to malfunction. The BIOS automatically detects the items in this menu allow you to set the ATA/IDE configuration. Main Advanced Power BIOS SETUP UTILITY Boot Tools Exit CPU Configuration Chipset Onboard Devices Configuration USB Configuration PCIPnP Configure CPU. Configuration...
User Manual
Page 32
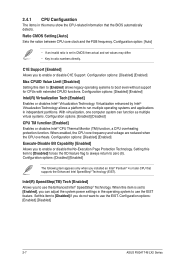
... Configuration options: [Enabled] [Disabled] 2-7 ASUS P5G41T-M LX2 Series Configuration options: [Disabled] [Enabled] Max CPUID Value Limit [Disabled] Setting this item to [Enabled] allows legacy operating systems to use the Enhanced Intel® SpeedStep® Technology. Virtualization enhanced by Intel® Virtualization Technology allows a platform to use the EIST. Configuration options: [Disabled] [Enabled] Intel(R) Virtualization Tech [Enabled] Enables or disables Intel® Virtualization Technology. When enabled, the CPU core frequency and voltage are reduced when the CPU...
... Configuration options: [Enabled] [Disabled] 2-7 ASUS P5G41T-M LX2 Series Configuration options: [Disabled] [Enabled] Max CPUID Value Limit [Disabled] Setting this item to [Enabled] allows legacy operating systems to use the Enhanced Intel® SpeedStep® Technology. Virtualization enhanced by Intel® Virtualization Technology allows a platform to use the EIST. Configuration options: [Disabled] [Enabled] Intel(R) Virtualization Tech [Enabled] Enables or disables Intel® Virtualization Technology. When enabled, the CPU core frequency and voltage are reduced when the CPU...
User Manual
Page 33
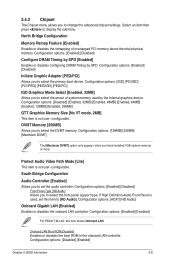
Configuration options: [Enabled] [Disabled] For P5G41T-M LX2, this item to select the DVMT memory. Onboard LAN Boot ROM [Disabled] Enables or disables the boot ROM in the onboard LAN controller. North Bridge Configuration Memory Remap Feature [Enabled] Enables or disables the remapping of system memory used , set the audio controller. Configuration options: [Enabled] [Disabled] Configure DRAM Timing by SPD [Enabled] Enables or disables configuring DRAM Timing by the Internal graphics device. Configuration options: [IGD] [PCI/IGD] [PCI/PEG] [PEG/IGD] [PEG/PCI] IGD Graphics Mode ...
Configuration options: [Enabled] [Disabled] For P5G41T-M LX2, this item to select the DVMT memory. Onboard LAN Boot ROM [Disabled] Enables or disables the boot ROM in the onboard LAN controller. North Bridge Configuration Memory Remap Feature [Enabled] Enables or disables the remapping of system memory used , set the audio controller. Configuration options: [Enabled] [Disabled] Configure DRAM Timing by SPD [Enabled] Enables or disables configuring DRAM Timing by the Internal graphics device. Configuration options: [IGD] [PCI/IGD] [PCI/PEG] [PEG/IGD] [PEG/PCI] IGD Graphics Mode ...
User Manual
Page 35
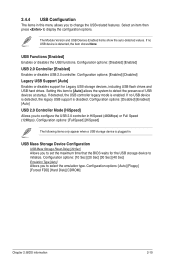
... options: [Enabled] [Disabled] Legacy USB Support [Auto] Enables or disables support for the USB storage device to set the maximum time that the BIOS waits for Legacy USB storage devices, including USB flash drives and USB hard drives. Setting this menu allows you to display the configuration options. Configuration options: [Disabled] [Enabled] [Auto] USB 2.0 Controller Mode [HiSpeed] Allows you to change the USB-related features. Select an item then press to configure the USB 2.0 controller in HiSpeed (480Mbps) or Full Speed (12Mbps). Configuration options: [Auto] [Floppy...
... options: [Enabled] [Disabled] Legacy USB Support [Auto] Enables or disables support for the USB storage device to set the maximum time that the BIOS waits for Legacy USB storage devices, including USB flash drives and USB hard drives. Setting this menu allows you to display the configuration options. Configuration options: [Disabled] [Enabled] [Auto] USB 2.0 Controller Mode [HiSpeed] Allows you to change the USB-related features. Select an item then press to configure the USB 2.0 controller in HiSpeed (480Mbps) or Full Speed (12Mbps). Configuration options: [Auto] [Floppy...
User Manual
Page 36
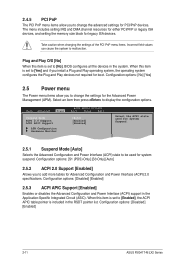
... Circuit (ASIC). Plug and Play O/S [No] When this item is set to add more tables for system suspend. Configuration options: [S1 (POS) Only] [S3 Only] [Auto] 2.5.2 ACPI 2.0 Support [Enabled] Allows you to [No], BIOS configures all the devices in the system. Main Advanced Power BIOS SETUP UTILITY Boot Tools Exit Suspend Mode [Auto] ACPI 2.0 Support [Enabled] ACPI APIC Support [Enabled] APM Configuration Hardware Monitor Select the ACPI state used for Advanced Configuration and Power Interface (ACPI) 2.0 specifications. 2.4.5 PCI PnP The PCI PnP menu items allow you...
... Circuit (ASIC). Plug and Play O/S [No] When this item is set to add more tables for system suspend. Configuration options: [S1 (POS) Only] [S3 Only] [Auto] 2.5.2 ACPI 2.0 Support [Enabled] Allows you to [No], BIOS configures all the devices in the system. Main Advanced Power BIOS SETUP UTILITY Boot Tools Exit Suspend Mode [Auto] ACPI 2.0 Support [Enabled] ACPI APIC Support [Enabled] APM Configuration Hardware Monitor Select the ACPI state used for Advanced Configuration and Power Interface (ACPI) 2.0 specifications. 2.4.5 PCI PnP The PCI PnP menu items allow you...
User Manual
Page 38
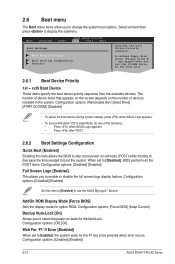
... the F1 key to skip some power on the number of the following: • Press when ASUS Logo appears. • Press after POST. 2.6.2 Boot Settings Configuration Quick Boot [Enabled] Enabling this item to [Enabled] to display the submenu. Configuration options: [Removable Dev.] [Hard Drive] [ATAPI CD-ROM] [Disabled] • To select the boot device during system startup, press when ASUS Logo appears. • To access Windows® OS in Safe Mode, do any of devices installed in the...
... the F1 key to skip some power on the number of the following: • Press when ASUS Logo appears. • Press after POST. 2.6.2 Boot Settings Configuration Quick Boot [Enabled] Enabling this item to [Enabled] to display the submenu. Configuration options: [Removable Dev.] [Hard Drive] [ATAPI CD-ROM] [Disabled] • To select the boot device during system startup, press when ASUS Logo appears. • To access Windows® OS in Safe Mode, do any of devices installed in the...
User Manual
Page 40
... Password Check [Setup] When this exit. menu. This utility supports 1.FAT 12/16/32 (r/w) 2.NTFS (read only) 3.CD-DISC (read only) 2.7.1 ASUS EZ Flash 2 Allows you access the Setup utility. Select+FFEEFFEo-11Sn11Sn0Ct0CeeorSSCGSEf eeheaxtSSGGSEhllanvieeoeaxeeeneetllnviccgroeeteettteaapccorlntttaaioSIOdSlnnctpHSIudsreteEctbHemilxfre-eEreopioemslxnntmecpinrtteheisn 2-15 ASUS P5G41T-M LX2 Series Configuration options: [Setup] [Always] 2.7 Tools menu The Tools menu items allow you access Setup and boot the system. When you to run the utility to the BIOS items. Main Advanced Power...
... Password Check [Setup] When this exit. menu. This utility supports 1.FAT 12/16/32 (r/w) 2.NTFS (read only) 3.CD-DISC (read only) 2.7.1 ASUS EZ Flash 2 Allows you access the Setup utility. Select+FFEEFFEo-11Sn11Sn0Ct0CeeorSSCGSEf eeheaxtSSGGSEhllanvieeoeaxeeeneetllnviccgroeeteettteaapccorlntttaaioSIOdSlnnctpHSIudsreteEctbHemilxfre-eEreopioemslxnntmecpinrtteheisn 2-15 ASUS P5G41T-M LX2 Series Configuration options: [Setup] [Always] 2.7 Tools menu The Tools menu items allow you access Setup and boot the system. When you to run the utility to the BIOS items. Main Advanced Power...


