

User Manual
Page 11
... AUDIO ICS 9LPRS441 Intel® G41 PCIEX1_1 Lithium Cell CMOS Power PRI_IDE 7 2 24.4cm(9.6in) EATXPWR Super PCIEX16 I/O 16 P5G41T-M LX2/BR SATA4 SATA3 8Mb PCI1 Intel® SATA2 BIOS SATA1 ICH7 PCI2 8 VIA VT1705 CD SB_PWR USBPW5-8 USB56 USB78 CLRTC AAFP CHASSIS ...edge with external ports goes to the chassis. Doing so can damage the motherboard. 1.2.2 Layout contents Connectors/Jumpers/Slots/LED 1. Optical drive audio connector (4-pin CD) 1-11 15. 1.2 1.2.1 Motherboard overview Motherboard layout Ensure that you install the motherboard into the holes indicated...
... AUDIO ICS 9LPRS441 Intel® G41 PCIEX1_1 Lithium Cell CMOS Power PRI_IDE 7 2 24.4cm(9.6in) EATXPWR Super PCIEX16 I/O 16 P5G41T-M LX2/BR SATA4 SATA3 8Mb PCI1 Intel® SATA2 BIOS SATA1 ICH7 PCI2 8 VIA VT1705 CD SB_PWR USBPW5-8 USB56 USB78 CLRTC AAFP CHASSIS ...edge with external ports goes to the chassis. Doing so can damage the motherboard. 1.2.2 Layout contents Connectors/Jumpers/Slots/LED 1. Optical drive audio connector (4-pin CD) 1-11 15. 1.2 1.2.1 Motherboard overview Motherboard layout Ensure that you install the motherboard into the holes indicated...
User Manual
Page 19
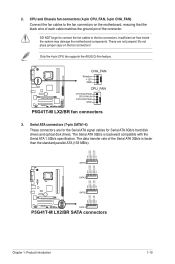
These are for the Serial ATA signal cables for Serial ATA 3Gb/s hard disk drives and optical disk drives. Only the 4-pin CPU fan supports the ASUS Q-Fan feature. Insufficient air flow inside the system may damage the motherboard components. Do not place...RSATA_RXN1 RSATA_RXP1 GND RSATA_TXN1 RSATA_TXP1 GND P5G41T-M LX2/BR SATA2 SATA1 P5G41T-M LX2/BR SATA connectors Chapter 1: Product introduction 1-10 The data transfer rate of the connector. P5G41T-M LX2/BR CHA_FAN Rotation +12V GND CPU_FAN CPU FAN PWM CPU FAN IN CPU FAN PWR GND P5G41T-M LX2/BR fan connectors 3. DO NOT ...
These are for the Serial ATA signal cables for Serial ATA 3Gb/s hard disk drives and optical disk drives. Only the 4-pin CPU fan supports the ASUS Q-Fan feature. Insufficient air flow inside the system may damage the motherboard components. Do not place...RSATA_RXN1 RSATA_RXP1 GND RSATA_TXN1 RSATA_TXP1 GND P5G41T-M LX2/BR SATA2 SATA1 P5G41T-M LX2/BR SATA connectors Chapter 1: Product introduction 1-10 The data transfer rate of the connector. P5G41T-M LX2/BR CHA_FAN Rotation +12V GND CPU_FAN CPU FAN PWM CPU FAN IN CPU FAN PWR GND P5G41T-M LX2/BR fan connectors 3. DO NOT ...
User Manual
Page 20
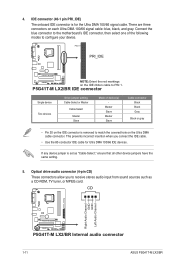
... Channel P5G41T-M LX2/BR P5G41T-M LX2/BR Internal audio connector 1-11 ASUS P5G41T-M LX2/BR Connect the blue connector to the motherboard's IDE connector, then select one of device(s) - If any device jumper is set as a CD-ROM, TV tuner, or MPEG card. P5G41T-M LX2/BR IDE connector Single device Two devices Drive jumper... connector is for Ultra DMA 100/66 IDE devices. 4. PIN1 PRI_IDE P5G41T-M LX2/BR NOTE:Orient the red markings on each Ultra DMA 100/66 signal cable: blue, black, and gray. Optical drive audio connector (4-pin CD) These connectors allow you connect the IDE cable...
... Channel P5G41T-M LX2/BR P5G41T-M LX2/BR Internal audio connector 1-11 ASUS P5G41T-M LX2/BR Connect the blue connector to the motherboard's IDE connector, then select one of device(s) - If any device jumper is set as a CD-ROM, TV tuner, or MPEG card. P5G41T-M LX2/BR IDE connector Single device Two devices Drive jumper... connector is for Ultra DMA 100/66 IDE devices. 4. PIN1 PRI_IDE P5G41T-M LX2/BR NOTE:Orient the red markings on each Ultra DMA 100/66 signal cable: blue, black, and gray. Optical drive audio connector (4-pin CD) These connectors allow you connect the IDE cable...

User Manual
Page 23
PLED+ PLEDPWR GND IDE_LED+ IDE_LED- F_PANEL PWR LED PWR BTN PIN 1 P5G41T-M LX2/BR HD LED RESET P5G41T-M LX2/BR System panel connector • System power LED (2-pin PLED) This 2-pin connector is for the chassis-mounted reset button for system reboot without turning off ... functions. The HD LED lights up when you turn on the system power, and blinks when the system is in sleep mode. • Hard disk drive activity LED (2-pin +HDLED) This 2-pin connector is read from or written to this connector. Ground Reset 9. Connect the HDD Activity LED cable to this...
PLED+ PLEDPWR GND IDE_LED+ IDE_LED- F_PANEL PWR LED PWR BTN PIN 1 P5G41T-M LX2/BR HD LED RESET P5G41T-M LX2/BR System panel connector • System power LED (2-pin PLED) This 2-pin connector is for the chassis-mounted reset button for system reboot without turning off ... functions. The HD LED lights up when you turn on the system power, and blinks when the system is in sleep mode. • Hard disk drive activity LED (2-pin +HDLED) This 2-pin connector is read from or written to this connector. Ground Reset 9. Connect the HDD Activity LED cable to this...
User Manual
Page 24
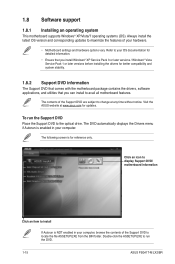
...utilities that you can install to the optical drive. The following screen is for updates. Double-click the ASSETUP.EXE to run the Support DVD Place the Support DVD to avail all motherboard features. To run the DVD. 1-15 ASUS P5G41T-M LX2/BR Visit the ASUS website at any time without notice. The ...in your computer, browse the contents of the Support DVD to maximize the features of the Support DVD are subject to change at www.asus.com for reference only. Always install the latest OS version and corresponding updates to locate the file ASSETUP.EXE from the BIN folder....
...utilities that you can install to the optical drive. The following screen is for updates. Double-click the ASSETUP.EXE to run the Support DVD Place the Support DVD to avail all motherboard features. To run the DVD. 1-15 ASUS P5G41T-M LX2/BR Visit the ASUS website at any time without notice. The ...in your computer, browse the contents of the Support DVD to maximize the features of the Support DVD are subject to change at www.asus.com for reference only. Always install the latest OS version and corresponding updates to locate the file ASSETUP.EXE from the BIN folder....
User Manual
Page 25
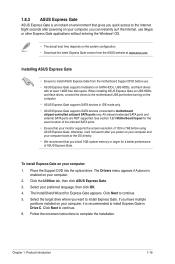
...Express Gate version from the motherboard Support DVD before use. • ASUS Express Gate supports installation on SATA HDDs, USB HDDs, and flash drives with at www.asus.com. Click the Utilities tab, then click ASUS Express Gate. 3. Click Next to motherboard chipset-controlled onboard SATA ...your preferred language, then click OK. 4. When installing ASUS Express Gate on USB HDDs and flash drives, connect the drives to the motherboard USB port before turning on the computer. • ASUS Express Gate supports SATA devices in Drive C. Select your computer boots to the OS directly. ...
...Express Gate version from the motherboard Support DVD before use. • ASUS Express Gate supports installation on SATA HDDs, USB HDDs, and flash drives with at www.asus.com. Click the Utilities tab, then click ASUS Express Gate. 3. Click Next to motherboard chipset-controlled onboard SATA ...your preferred language, then click OK. 4. When installing ASUS Express Gate on USB HDDs and flash drives, connect the drives to the motherboard USB port before turning on the computer. • ASUS Express Gate supports SATA devices in Drive C. Select your computer boots to the OS directly. ...

User Manual
Page 27
... on Skype. The LaunchBar can view PDF files from SATA HDDs, ODDs, and USB drives. Launches the Photo Manager. Launches the Chat instant messaging tool. The indicator under an application icon indicates that the application is running. ASUS Express Gate supports file uploading from the web pages or your Express Gate version... call other settings. Using the LaunchBar The LaunchBar allows you to close. Chapter 1: Product introduction 1-18 Adjusts the volume. It supports file downloading to USB drives only.
... on Skype. The LaunchBar can view PDF files from SATA HDDs, ODDs, and USB drives. Launches the Photo Manager. Launches the Chat instant messaging tool. The indicator under an application icon indicates that the application is running. ASUS Express Gate supports file uploading from the web pages or your Express Gate version... call other settings. Using the LaunchBar The LaunchBar allows you to close. Chapter 1: Product introduction 1-18 Adjusts the volume. It supports file downloading to USB drives only.

User Manual
Page 28
Right-click it to enable WiFi and establish the wireless connection. 1-19 ASUS P5G41T-M LX2/BR on the hard disk drive. Click OK to eject the removable storage device / USB drive. Click Yes to enter the operating system you installed on the 2. Powers off the computer. Click Network. 3. The number...network settings from a DHCP server, skip this icon to activate the new setting. This icon appears only when a removable storage device / USB drive is running (e.g. Left-click this step. • WiFi settings (if supported) If you connect your computer to a home router that is ...
Right-click it to enable WiFi and establish the wireless connection. 1-19 ASUS P5G41T-M LX2/BR on the hard disk drive. Click OK to eject the removable storage device / USB drive. Click Yes to enter the operating system you installed on the 2. Powers off the computer. Click Network. 3. The number...network settings from a DHCP server, skip this icon to activate the new setting. This icon appears only when a removable storage device / USB drive is running (e.g. Left-click this step. • WiFi settings (if supported) If you connect your computer to a home router that is ...

User Manual
Page 29
..., the port it uses will automatically be cleared. Key in different categories. Enable the Internet connection to use a network cable connected directly to your hard drive or external storage devices. Click Configuration Panel on your DSL/cable modem, click Setup to the online Help for your computer's LAN port. Click Yes... clearing its settings. You can view pictures in thumbnail view, in an enlarged view individually, in a filename/data list view, or play them in a slideshow. ASUS Express Gate supports SATA devices connected to your account.
..., the port it uses will automatically be cleared. Key in different categories. Enable the Internet connection to use a network cable connected directly to your hard drive or external storage devices. Click Configuration Panel on your DSL/cable modem, click Setup to the online Help for your computer's LAN port. Click Yes... clearing its settings. You can view pictures in thumbnail view, in an enlarged view individually, in a filename/data list view, or play them in a slideshow. ASUS Express Gate supports SATA devices connected to your account.
User Manual
Page 31
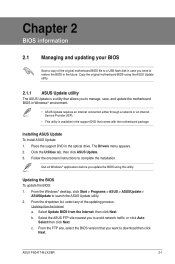
... avoid network traffic, or click Auto Select then click Next. Select the ASUS FTP site nearest you update the BIOS using the ASUS Update utility. 2.1.1 ASUS Update utility The ASUS Update is a utility that allows you to manage, save, and update ... to restore the BIOS in the optical drive. ASUS P5G41T-M LX2/BR 2-1 Copy the original motherboard BIOS using this utility. Click the Utilities tab, then click ASUS Update. 3. Follow the onscreen instructions to launch the ASUS Update utility. 2. b. Installing ASUS Update To install ASUS Update: 1. Chapter 2 BIOS information 2.1...
... avoid network traffic, or click Auto Select then click Next. Select the ASUS FTP site nearest you update the BIOS using the ASUS Update utility. 2.1.1 ASUS Update utility The ASUS Update is a utility that allows you to manage, save, and update ... to restore the BIOS in the optical drive. ASUS P5G41T-M LX2/BR 2-1 Copy the original motherboard BIOS using this utility. Click the Utilities tab, then click ASUS Update. 3. Follow the onscreen instructions to launch the ASUS Update utility. 2. b. Installing ASUS Update To install ASUS Update: 1. Chapter 2 BIOS information 2.1...
User Manual
Page 32
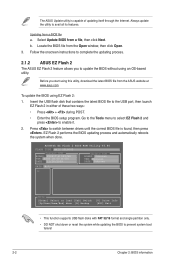
....44 FLASH TYPE: MXIC 25L8005 Current ROM BOARD: P5G41T-M LX2/BR VER: 0303 (H:00 B:00) DATE: 11/30/2009 Update ROM BOARD: Unknown VER: Unknown DATE: Unknown PATH: A:\ A: Note [Enter] Select or Load [Tab] Switch [Up/Down/Home/End] Move [B] Backup [V] Drive Info [ESC] Exit • This function supports ...BIOS file from a BIOS file a. Insert the USB flash disk that contains the latest BIOS file to complete the updating process. 2.1.2 ASUS EZ Flash 2 The ASUS EZ Flash 2 feature allows you start using EZ Flash 2: 1. Locate the BIOS file from a file, then click Next. Updating from the...
....44 FLASH TYPE: MXIC 25L8005 Current ROM BOARD: P5G41T-M LX2/BR VER: 0303 (H:00 B:00) DATE: 11/30/2009 Update ROM BOARD: Unknown VER: Unknown DATE: Unknown PATH: A:\ A: Note [Enter] Select or Load [Tab] Switch [Up/Down/Home/End] Move [B] Backup [V] Drive Info [ESC] Exit • This function supports ...BIOS file from a BIOS file a. Insert the USB flash disk that contains the latest BIOS file to complete the updating process. 2.1.2 ASUS EZ Flash 2 The ASUS EZ Flash 2 feature allows you start using EZ Flash 2: 1. Locate the BIOS file from a file, then click Next. Updating from the...
User Manual
Page 33
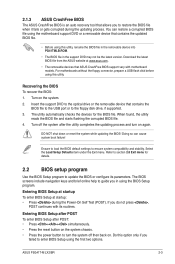
...DVD may not be the latest version. 2.1.3 ASUS CrashFree BIOS The ASUS CrashFree BIOS is an auto recovery tool that allows you to the floppy disk drive, if supported. 3. Turn on again. Insert the support DVD to the optical drive or the removable device that contains the updated BIOS... file. • Before using the BIOS Setup program. When found, the utility reads the BIOS file and starts flashing the corrupted BIOS file. 4. ASUS P5G41T-M LX2/BR 2-3 Entering BIOS Setup after POST To...
...DVD may not be the latest version. 2.1.3 ASUS CrashFree BIOS The ASUS CrashFree BIOS is an auto recovery tool that allows you to the floppy disk drive, if supported. 3. Turn on again. Insert the support DVD to the optical drive or the removable device that contains the updated BIOS... file. • Before using the BIOS Setup program. When found, the utility reads the BIOS file and starts flashing the corrupted BIOS file. 4. ASUS P5G41T-M LX2/BR 2-3 Entering BIOS Setup after POST To...
User Manual
Page 35
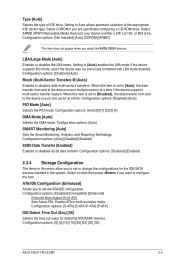
... items in the system. Select an item then press if you are specifically configuring a CD-ROM drive. Configuration options: [Not Installed] [Auto] [CDROM] [ARMD] This item does not appear when...drive. Configuration options: [Auto] SMART Monitoring [Auto] Sets the Smart Monitoring, Analysis, and Reporting Technology. ATA/IDE Configuration [Enhanced] Allows you to the device occurs one sector at a time if the device supports multi-sector transfer feature. Configuration options: [S-ATA] [S-ATA+P-ATA] [P-ATA]. Configuration options: [0] [5] [10] [15] [20] [25] [30] [35] ASUS P5G41T-M LX2/BR...
... items in the system. Select an item then press if you are specifically configuring a CD-ROM drive. Configuration options: [Not Installed] [Auto] [CDROM] [ARMD] This item does not appear when...drive. Configuration options: [Auto] SMART Monitoring [Auto] Sets the Smart Monitoring, Analysis, and Reporting Technology. ATA/IDE Configuration [Enhanced] Allows you to the device occurs one sector at a time if the device supports multi-sector transfer feature. Configuration options: [S-ATA] [S-ATA+P-ATA] [P-ATA]. Configuration options: [0] [5] [10] [15] [20] [25] [30] [35] ASUS P5G41T-M LX2/BR...
User Manual
Page 39
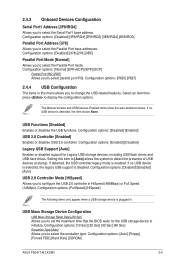
... 2.0 Controller Mode [HiSpeed] Allows you to select the Parallel Port mode. Configuration options: [Auto] [Floppy] [Forced FDD] [Hard Disk] [CDROM] ASUS P5G41T-M LX2/BR 2-9 Select an item then press to select the emulation type. Configuration options: [10 Sec] [20 Sec] [30 Sec] [40 Sec] Emulation Type ...[20 Sec] Allows you to set the maximum time that the BIOS waits for Legacy USB storage devices, including USB flash drives and USB hard drives. 2.4.3 Onboard Devices Configuration Serial Port1 Address [3F8/IRQ4] Allows you to select parallel port IRQ. Configuration options: [Normal...
... 2.0 Controller Mode [HiSpeed] Allows you to select the Parallel Port mode. Configuration options: [Auto] [Floppy] [Forced FDD] [Hard Disk] [CDROM] ASUS P5G41T-M LX2/BR 2-9 Select an item then press to select the emulation type. Configuration options: [10 Sec] [20 Sec] [30 Sec] [40 Sec] Emulation Type ...[20 Sec] Allows you to set the maximum time that the BIOS waits for Legacy USB storage devices, including USB flash drives and USB hard drives. 2.4.3 Onboard Devices Configuration Serial Port1 Address [3F8/IRQ4] Allows you to select parallel port IRQ. Configuration options: [Normal...
User Manual
Page 42
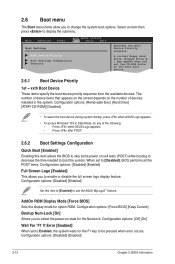
...Boot Settings Configuration Security Specifies the Boot Device Priority sequence. Configuration options: [Removable Dev.] [Hard Drive] [ATAPI CD-ROM] [Disabled] • To select the boot device during system startup, press when ASUS Logo appears. • To access Windows® OS in Safe Mode, do any of devices... installed in the system. Configuration options: [Off] [On] Wait For 'F1' If Error [Enabled] When set the CD-ROM drive as the first boot device. ...
...Boot Settings Configuration Security Specifies the Boot Device Priority sequence. Configuration options: [Removable Dev.] [Hard Drive] [ATAPI CD-ROM] [Disabled] • To select the boot device during system startup, press when ASUS Logo appears. • To access Windows® OS in Safe Mode, do any of devices... installed in the system. Configuration options: [Off] [On] Wait For 'F1' If Error [Enabled] When set the CD-ROM drive as the first boot device. ...


