
User Manual
Page 1
P5G41C-M Motherboard
P5G41C-M Motherboard
User Manual
Page 3
Contents Notices...vi Safety information vii About this guide vii P5G41C-M specifications summary ix Chapter 1: Product introduction 1.1 Welcome 1-1 1.2 Package contents 1-1 1.3 Special features 1-1 1.3.1 Product highlights 1-1 1.3.2 Innovative ASUS features 1-2 1.4 Before you proceed 1-4 1.5 Motherboard overview 1-5 1.5.1 Placement direction 1-5 1.5.2 Screw holes 1-5 1.5.3 Motherboard layout 1-6 1.5.4 Layout contents 1-6 1.6 Central Processing Unit (CPU 1-7 1.6.1 Installing the CPU 1-7 1.6.2 Installing the CPU heatsink and fan 1-10 1.6.3 Uninstalling...
Contents Notices...vi Safety information vii About this guide vii P5G41C-M specifications summary ix Chapter 1: Product introduction 1.1 Welcome 1-1 1.2 Package contents 1-1 1.3 Special features 1-1 1.3.1 Product highlights 1-1 1.3.2 Innovative ASUS features 1-2 1.4 Before you proceed 1-4 1.5 Motherboard overview 1-5 1.5.1 Placement direction 1-5 1.5.2 Screw holes 1-5 1.5.3 Motherboard layout 1-6 1.5.4 Layout contents 1-6 1.6 Central Processing Unit (CPU 1-7 1.6.1 Installing the CPU 1-7 1.6.2 Installing the CPU heatsink and fan 1-10 1.6.3 Uninstalling...
User Manual
Page 6
...we published the chemical substances in the Radio Interference Regulations of the Canadian Department of parts and recycling. DO NOT throw the motherboard in municipal waste. Notices Federal Communications Commission Statement This device complies with Part 15 of electronic products. These limits are designed to...determined by turning the equipment off and on a circuit different from digital apparatus set out in our products at ASUS REACH website at http://green.asus.com/english/REACH.htm. However, there is required to which can radiate radio frequency energy and, if not installed...
...we published the chemical substances in the Radio Interference Regulations of the Canadian Department of parts and recycling. DO NOT throw the motherboard in municipal waste. Notices Federal Communications Commission Statement This device complies with Part 15 of electronic products. These limits are designed to...determined by turning the equipment off and on a circuit different from digital apparatus set out in our products at ASUS REACH website at http://green.asus.com/english/REACH.htm. However, there is required to which can radiate radio frequency energy and, if not installed...
User Manual
Page 7
...• Avoid dust, humidity, and temperature extremes. If you add a device. • Before connecting or removing signal cables from the motherboard, ensure that all power cables from the system, ensure that your retailer. About this guide is set to or from the existing system ... an adapter or extension cord. Do not place the product in your area. vii If you need when installing and configuring the motherboard. If possible, disconnect all cables are correctly connected and the power cables are unplugged. • Seek professional assistance before using the...
...• Avoid dust, humidity, and temperature extremes. If you add a device. • Before connecting or removing signal cables from the motherboard, ensure that all power cables from the system, ensure that your retailer. About this guide is set to or from the existing system ... an adapter or extension cord. Do not place the product in your area. vii If you need when installing and configuring the motherboard. If possible, disconnect all cables are correctly connected and the power cables are unplugged. • Seek professional assistance before using the...
User Manual
Page 11
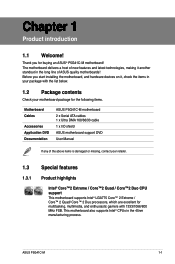
... the above items is damaged or missing, contact your motherboard package for the following items. Motherboard Cables Accessories Application DVD Documentation ASUS P5G41C-M motherboard 2 x Serial ATA cables 1 x Ultra DMA 100/66/33 cable 1 x I/O shield ASUS motherboard support DVD User Manual If any of ASUS quality motherboards! Thank you start installing the motherboard, and hardware devices on it another standout in...
... the above items is damaged or missing, contact your motherboard package for the following items. Motherboard Cables Accessories Application DVD Documentation ASUS P5G41C-M motherboard 2 x Serial ATA cables 1 x Ultra DMA 100/66/33 cable 1 x I/O shield ASUS motherboard support DVD User Manual If any of ASUS quality motherboards! Thank you start installing the motherboard, and hardware devices on it another standout in...
User Manual
Page 12
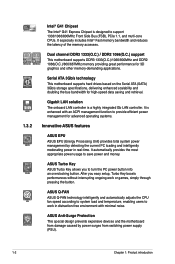
...in real-time. After you to turn the PC power button into an overclocking button. ASUS Anti-Surge Protection This special design prevents expensive devices and the motherboard from switching power supply (PSU). 1-2 Chapter 1: Product introduction Gigabit LAN solution The ...core CPUs. Serial ATA 3Gb/s technology This motherboard supports hard drives based on the Serial ATA (SATA) 3Gb/s storage specifications, delivering enhanced scalability and doubling the bus bandwidth for advanced operating systems. Innovative ASUS features ASUS EPU ASUS EPU (Energy Processing Unit) provides total ...
...in real-time. After you to turn the PC power button into an overclocking button. ASUS Anti-Surge Protection This special design prevents expensive devices and the motherboard from switching power supply (PSU). 1-2 Chapter 1: Product introduction Gigabit LAN solution The ...core CPUs. Serial ATA 3Gb/s technology This motherboard supports hard drives based on the Serial ATA (SATA) 3Gb/s storage specifications, delivering enhanced scalability and doubling the bus bandwidth for advanced operating systems. Innovative ASUS features ASUS EPU ASUS EPU (Energy Processing Unit) provides total ...
User Manual
Page 13
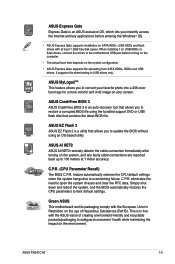
.... Green ASUS This motherboard and its packaging comply with the European Union's Restriction on the environment. C.P.R. (CPU Parameter Recall) The BIOS C.P.R. Simply shut down and reboot the system, and the BIOS automatically restores the CPU parameters to overclocking failure. ASUS P5G41C-M 1-3 ...feature automatically restores the CPU default settings when the system hangs due to their default settings. This is in line with at 1 meter accuracy. C.P.R. ASUS EZ Flash 2 ASUS EZ Flash 2 is an auto-recovery...
.... Green ASUS This motherboard and its packaging comply with the European Union's Restriction on the environment. C.P.R. (CPU Parameter Recall) The BIOS C.P.R. Simply shut down and reboot the system, and the BIOS automatically restores the CPU parameters to overclocking failure. ASUS P5G41C-M 1-3 ...feature automatically restores the CPU default settings when the system hangs due to their default settings. This is in line with at 1 meter accuracy. C.P.R. ASUS EZ Flash 2 ASUS EZ Flash 2 is an auto-recovery...
User Manual
Page 14
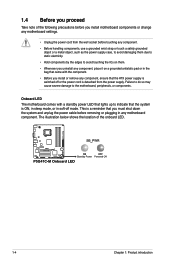
... location of the following precautions before you install motherboard components or change any motherboard component. This is ON, in sleep mode, or in any motherboard settings. • Unplug the power cord from the power supply. Onboard LED The motherboard comes with the component. • Before you... install or remove any component, place it on them due to static electricity. • Hold components by the edges to the motherboard, peripherals, or components. 1.4 Before you proceed Take note of the onboard LED. 1-4 Chapter 1: Product introduction Failure to do so may...
... location of the following precautions before you install motherboard components or change any motherboard component. This is ON, in sleep mode, or in any motherboard settings. • Unplug the power cord from the power supply. Onboard LED The motherboard comes with the component. • Before you... install or remove any component, place it on them due to static electricity. • Hold components by the edges to the motherboard, peripherals, or components. 1.4 Before you proceed Take note of the onboard LED. 1-4 Chapter 1: Product introduction Failure to do so may...
User Manual
Page 15
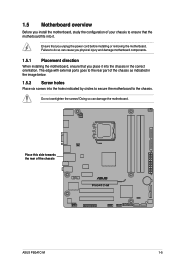
.... Ensure that you unplug the power cord before installing or removing the motherboard. 1.5 Motherboard overview Before you install the motherboard, study the configuration of your chassis to ensure that the motherboard fits into it into the chassis in the image below. 1.5.2 Screw ...holes Place six screws into the holes indicated by circles to secure the motherboard to the chassis. Place this side towards the rear of the chassis ASUS P5G41C...
.... Ensure that you unplug the power cord before installing or removing the motherboard. 1.5 Motherboard overview Before you install the motherboard, study the configuration of your chassis to ensure that the motherboard fits into it into the chassis in the image below. 1.5.2 Screw ...holes Place six screws into the holes indicated by circles to secure the motherboard to the chassis. Place this side towards the rear of the chassis ASUS P5G41C...
User Manual
Page 16
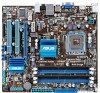
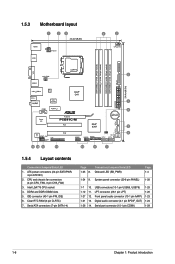
... 13. DDR2 and DDR3 DIMM slots 5. Onboard LED (SB_PWR) Page 1-4 1-24 9. CPU and chassis fan connectors (4-pin CPU_FAN, 3-pin CHA_FAN) 3. IDE connector (40-1 pin PRI_IDE) 6. 1.5.3 Motherboard layout 1.5.4 Layout contents Connectors/Jumpers/Slots/LED 1.
... 13. DDR2 and DDR3 DIMM slots 5. Onboard LED (SB_PWR) Page 1-4 1-24 9. CPU and chassis fan connectors (4-pin CPU_FAN, 3-pin CHA_FAN) 3. IDE connector (40-1 pin PRI_IDE) 6. 1.5.3 Motherboard layout 1.5.4 Layout contents Connectors/Jumpers/Slots/LED 1.
User Manual
Page 17
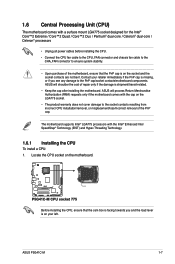
... shoulder the cost of repair only if the damage is shipment/transit-related. • Keep the cap after installing the motherboard. ASUS P5G41C-M 1-7 1.6 Central Processing Unit (CPU) The motherboard comes with a surface mount LGA775 socket designed for the Intel® Core™2 Extreme / Core™2 Quad / Core™2 Duo / Pentium® dual-core / Celeron...
... shoulder the cost of repair only if the damage is shipment/transit-related. • Keep the cap after installing the motherboard. ASUS P5G41C-M 1-7 1.6 Central Processing Unit (CPU) The motherboard comes with a surface mount LGA775 socket designed for the Intel® Core™2 Extreme / Core™2 Quad / Core™2 Duo / Pentium® dual-core / Celeron...
User Manual
Page 20
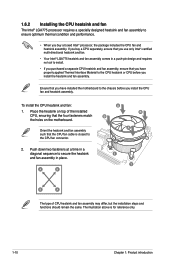
... applied Thermal Interface Material to the CPU heatsink or CPU before you buy a CPU separately, ensure that the four fasteners match the holes on the motherboard. If you install the heatsink and fan assembly. A B A B B A 1 1 B A The type of the installed CPU, ensuring that you purchased a separate... • When you install the CPU fan and heatsink assembly. Orient the heatsink and fan assembly such that you have installed the motherboard to the chassis before you buy a boxed Intel® processor, the package includes the CPU fan and heatsink assembly. The illustration ...
... applied Thermal Interface Material to the CPU heatsink or CPU before you buy a CPU separately, ensure that the four fasteners match the holes on the motherboard. If you install the heatsink and fan assembly. A B A B B A 1 1 B A The type of the installed CPU, ensuring that you purchased a separate... • When you install the CPU fan and heatsink assembly. Orient the heatsink and fan assembly such that you have installed the motherboard to the chassis before you buy a boxed Intel® processor, the package includes the CPU fan and heatsink assembly. The illustration ...
User Manual
Page 21
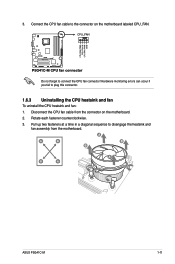
Disconnect the CPU fan cable from the motherboard. 3. Hardware monitoring errors can occur if you fail to disengage the heatsink and fan assembly from the connector on the motherboard labeled CPU_FAN. Pull up two fasteners at a time in a diagonal sequence to plug this connector. 1.6.3 Uninstalling the CPU heatsink and fan To uninstall the CPU heatsink and fan: 1. A A B B B A B A ASUS P5G41C-M 1-11 Connect the CPU fan cable to connect the CPU fan connector! Do not forget to the connector on the motherboard. 2. Rotate each fastener counterclockwise. 3.
Disconnect the CPU fan cable from the motherboard. 3. Hardware monitoring errors can occur if you fail to disengage the heatsink and fan assembly from the connector on the motherboard labeled CPU_FAN. Pull up two fasteners at a time in a diagonal sequence to plug this connector. 1.6.3 Uninstalling the CPU heatsink and fan To uninstall the CPU heatsink and fan: 1. A A B B B A B A ASUS P5G41C-M 1-11 Connect the CPU fan cable to connect the CPU fan connector! Do not forget to the connector on the motherboard. 2. Rotate each fastener counterclockwise. 3.

User Manual
Page 22
4. The figure illustrates the location of the DIMM sockets: Channel Channel A Channel B Sockets DDR3_A1 and DDR2_A1 DDR3_B1 and DDR2_B1 1-12 Chapter 1: Product introduction Rotate each fastener clockwise to ensure correct orientation when reinstalling. 1.7 System memory 1.7.1 Overview The motherboard comes with two Double Data Rate 2 (DDR2) and two Double Data Rate 3 (DDR3) Dual Inline Memory Modules (DIMM) sockets. Carefully remove the heatsink and fan assembly from the motherboard. 5.
4. The figure illustrates the location of the DIMM sockets: Channel Channel A Channel B Sockets DDR3_A1 and DDR2_A1 DDR3_B1 and DDR2_B1 1-12 Chapter 1: Product introduction Rotate each fastener clockwise to ensure correct orientation when reinstalling. 1.7 System memory 1.7.1 Overview The motherboard comes with two Double Data Rate 2 (DDR2) and two Double Data Rate 3 (DDR3) Dual Inline Memory Modules (DIMM) sockets. Carefully remove the heatsink and fan assembly from the motherboard. 5.
User Manual
Page 23
... the standard way of accessing information from the same vendor. • Due to install 4GB or more memory on the motherboard, the actual usable memory for the dual-channel configuration. Under the default state, some memory modules for single-channel operation....Elixir M2Y2G64CBHC9N-BE 2048MB DS Elixir - - - • • Kingtiger 2GB DIMM PC3-8500 2048MB DS Hynix H5TQ1G83AFP G7C - - • • ASUS P5G41C-M 1-13 For optimum compatibility, it is recommended that you obtain memory modules from a memory module. Install a 64-bit Windows® OS when you are using...
... the standard way of accessing information from the same vendor. • Due to install 4GB or more memory on the motherboard, the actual usable memory for the dual-channel configuration. Under the default state, some memory modules for single-channel operation....Elixir M2Y2G64CBHC9N-BE 2048MB DS Elixir - - - • • Kingtiger 2GB DIMM PC3-8500 2048MB DS Hynix H5TQ1G83AFP G7C - - • • ASUS P5G41C-M 1-13 For optimum compatibility, it is recommended that you obtain memory modules from a memory module. Install a 64-bit Windows® OS when you are using...
User Manual
Page 29
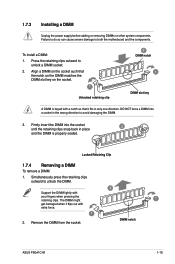
... from the socket. The DIMM might 1 get damaged when it fits in only one direction. Press the retaining clips outward to both the motherboard and the components. DIMM notch ASUS P5G41C-M 1-19 To install a DIMM: 1. Firmly insert the DIMM into a socket in place 3 and the DIMM is keyed with a notch so that the...
... from the socket. The DIMM might 1 get damaged when it fits in only one direction. Press the retaining clips outward to both the motherboard and the components. DIMM notch ASUS P5G41C-M 1-19 To install a DIMM: 1. Firmly insert the DIMM into a socket in place 3 and the DIMM is keyed with a notch so that the...

User Manual
Page 30
...a LAN card, SCSI card, USB card, and other cards that comply with PCI specifications. 1.8.4 PCI Express x1 slot This motherboard supports PCI Express x1 network cards, SCSI cards, and other cards that comply with the PCI Express specifications. 1.8.5 PCI Express x16 slot This... cards that came with the screw you removed earlier. 6. 1.8 Expansion slots In the future, you may cause you physical injury and damage motherboard components. 1.8.1 Installing an expansion card To install an expansion card: 1. Before installing the expansion card, read the documentation that they support. ...
...a LAN card, SCSI card, USB card, and other cards that comply with PCI specifications. 1.8.4 PCI Express x1 slot This motherboard supports PCI Express x1 network cards, SCSI cards, and other cards that comply with the PCI Express specifications. 1.8.5 PCI Express x16 slot This... cards that came with the screw you removed earlier. 6. 1.8 Expansion slots In the future, you may cause you physical injury and damage motherboard components. 1.8.1 Installing an expansion card To install an expansion card: 1. Before installing the expansion card, read the documentation that they support. ...
User Manual
Page 33
...) This connector is HDCP compliant allowing playback of the motherboard's high-definition audio capability. • If you want to connect a high-definition front panel audio module to this connector to avail of HD DVD, Blu-ray, and other VGA-compatible devices. 10. ASUS P5G41C-M 1-23 These two 4-pin Universal Serial Bus (USB) ports...
...) This connector is HDCP compliant allowing playback of the motherboard's high-definition audio capability. • If you want to connect a high-definition front panel audio module to this connector to avail of HD DVD, Blu-ray, and other VGA-compatible devices. 10. ASUS P5G41C-M 1-23 These two 4-pin Universal Serial Bus (USB) ports...
User Manual
Page 34
... opening at the back of the connector. Insufficient air flow inside the system may damage the motherboard components. Only the 4-pin CPU fan supports the ASUS Q-FAN feature. 3. 2. Do not place jumper caps on the motherboard, ensuring that the black wire of each cable matches the ground pin of the system chassis. CPU...
... opening at the back of the connector. Insufficient air flow inside the system may damage the motherboard components. Only the 4-pin CPU fan supports the ASUS Q-FAN feature. 3. 2. Do not place jumper caps on the motherboard, ensuring that the black wire of each cable matches the ground pin of the system chassis. CPU...
User Manual
Page 37
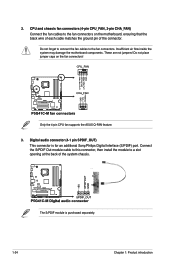
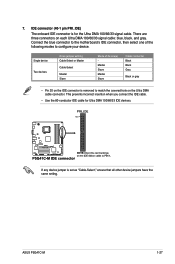
... the IDE cable. • Use the 80-conductor IDE cable for the Ultra DMA 100/66/33 signal cable. Connect the blue connector to the motherboard's IDE connector, then select one of device(s) Master Slave Master Slave Cable connector Black Black Gray Black or gray • Pin 20 on the IDE... each Ultra DMA 100/66/33 signal cable: blue, black, and gray. If any device jumper is for Ultra DMA 100/66/33 IDE devices. 7. ASUS P5G41C-M 1-27 There are three connectors on the Ultra DMA cable connector. IDE connector (40-1 pin PRI_IDE) The onboard IDE connector is set as "Cable-Select...
... the IDE cable. • Use the 80-conductor IDE cable for the Ultra DMA 100/66/33 signal cable. Connect the blue connector to the motherboard's IDE connector, then select one of device(s) Master Slave Master Slave Cable connector Black Black Gray Black or gray • Pin 20 on the IDE... each Ultra DMA 100/66/33 signal cable: blue, black, and gray. If any device jumper is for Ultra DMA 100/66/33 IDE devices. 7. ASUS P5G41C-M 1-27 There are three connectors on the Ultra DMA cable connector. IDE connector (40-1 pin PRI_IDE) The onboard IDE connector is set as "Cable-Select...


