
User Manual
Page 4
... 3-2 Chapter 4: BIOS setup 4.1 Managing and updating your BIOS 4-1 4.1.1 ASUS Update utility 4-1 4.1.2 ASUS EZ Flash 2 utility 4-4 4.1.3 AFUDOS utility 4-5 4.1.4 ASUS CrashFree BIOS 3 utility 4-7 4.2 BIOS setup program 4-8 4.2.1 BIOS menu screen 4-9 4.2.2 Menu bar 4-9 4.2.3 Navigation keys 4-9 4.2.4 Menu items 4-10 4.2.5 Sub-menu items 4-10 4.2.6 Configuration fields 4-10 4.2.7 Pop-up window 4-10 4.2.8 Scroll bar 4-10 4.2.9 General help 4-10 4.3 Main menu 4-11 4.3.1 System Time 4-11 4.3.2 System Date 4-11...
... 3-2 Chapter 4: BIOS setup 4.1 Managing and updating your BIOS 4-1 4.1.1 ASUS Update utility 4-1 4.1.2 ASUS EZ Flash 2 utility 4-4 4.1.3 AFUDOS utility 4-5 4.1.4 ASUS CrashFree BIOS 3 utility 4-7 4.2 BIOS setup program 4-8 4.2.1 BIOS menu screen 4-9 4.2.2 Menu bar 4-9 4.2.3 Navigation keys 4-9 4.2.4 Menu items 4-10 4.2.5 Sub-menu items 4-10 4.2.6 Configuration fields 4-10 4.2.7 Pop-up window 4-10 4.2.8 Scroll bar 4-10 4.2.9 General help 4-10 4.3 Main menu 4-11 4.3.1 System Time 4-11 4.3.2 System Date 4-11...
User Manual
Page 6
... 5.3.6 ASUS EPU Utility-AI Gear 3 5-29 5.3.7 ASUS AI Nap 5-31 5.3.8 ASUS Q-Fan 2 5-32 5.3.9 ASUS AI Booster 5-33 5.3.10 ASUS AI Direct Link 5-34 5.4 RAID configurations 5-36 5.4.1 RAID definitions 5-36 5.4.2 Installing Serial ATA hard disks 5-37 5.4.3 Intel® RAID configurations 5-37 5.5 Creating a RAID driver disk 5-45 5.5.1 Creating a RAID driver disk without entering the OS.... 5-45 5.5.2 Creating a RAID/SATA driver disk in Windows...
... 5.3.6 ASUS EPU Utility-AI Gear 3 5-29 5.3.7 ASUS AI Nap 5-31 5.3.8 ASUS Q-Fan 2 5-32 5.3.9 ASUS AI Booster 5-33 5.3.10 ASUS AI Direct Link 5-34 5.4 RAID configurations 5-36 5.4.1 RAID definitions 5-36 5.4.2 Installing Serial ATA hard disks 5-37 5.4.3 Intel® RAID configurations 5-37 5.5 Creating a RAID driver disk 5-45 5.5.1 Creating a RAID driver disk without entering the OS.... 5-45 5.5.2 Creating a RAID/SATA driver disk in Windows...
User Manual
Page 54
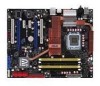
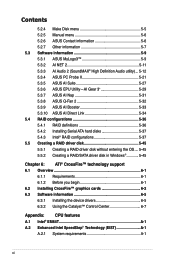
... create a RAID 0, RAID 1, RAID 5, RAID 10 configuration with huge graphics cards. Use two to avoid mechanical conflict with the Intel® Matrix Storage Technology through the onboard Intel® ICH9R RAID controller. • You must install the Windows® XP Service Pack 1 before using Serial ATA... 4.3.6 SATA Configuration for each RAID 0 or RAID 1 set. • Before creating a RAID set the Configure SATA as item in the motherboard support DVD. If you may connect the right-angle side of SATA signal cable to Standard IDE mode by default. ICH9R Serial ATA connectors (7-...
... create a RAID 0, RAID 1, RAID 5, RAID 10 configuration with huge graphics cards. Use two to avoid mechanical conflict with the Intel® Matrix Storage Technology through the onboard Intel® ICH9R RAID controller. • You must install the Windows® XP Service Pack 1 before using Serial ATA... 4.3.6 SATA Configuration for each RAID 0 or RAID 1 set. • Before creating a RAID set the Configure SATA as item in the motherboard support DVD. If you may connect the right-angle side of SATA signal cable to Standard IDE mode by default. ICH9R Serial ATA connectors (7-...
User Manual
Page 76
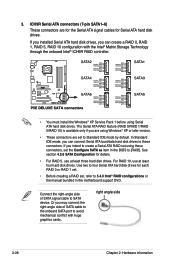
... a menu screen when there are items that the iteam has a sub-menu. Use [+] or [-] to display a pop-up window Scroll bar 4-10 Chapter 4: BIOS setup You cannot select an item that menu. Pop-up window with the configuration options for that item. 4.2.8 Scroll bar A scroll bar appears on the right side of the... not fit on the screen. 4.2.9 General help At the top right corner of the menu screen is a brief description of options. Refer to 4.2.7 Pop-up window. 4.2.7 Pop-up window Select a menu item then press to configure system.
... a menu screen when there are items that the iteam has a sub-menu. Use [+] or [-] to display a pop-up window Scroll bar 4-10 Chapter 4: BIOS setup You cannot select an item that menu. Pop-up window with the configuration options for that item. 4.2.8 Scroll bar A scroll bar appears on the right side of the... not fit on the screen. 4.2.9 General help At the top right corner of the menu screen is a brief description of options. Refer to 4.2.7 Pop-up window. 4.2.7 Pop-up window Select a menu item then press to configure system.

User Manual
Page 118
After flashing the BIOS, restart the computer to enlarge by selecting a value on the Ratio box. 9. When the logo images appear on it. 8. When the screen returns to the ASUS Update utility, flash the original BIOS to your desired size by clicking on the right window pane, select an image to display the new boot logo during POST. 5-10 Chapter 5: Software support 7. Adjust the boot image to load the new boot logo. 10.
After flashing the BIOS, restart the computer to enlarge by selecting a value on the Ratio box. 9. When the logo images appear on it. 8. When the screen returns to the ASUS Update utility, flash the original BIOS to your desired size by clicking on the right window pane, select an image to display the new boot logo during POST. 5-10 Chapter 5: Software support 7. Adjust the boot image to load the new boot logo. 10.

User Manual
Page 142
... a network cable, and then install the utility to both computers to avail the AI Direct Link feature. • Turn off your username and password. 5.3.10 ASUS AI Direct Link ASUS AI Direct Link allows you set your firewall software other than Windows Firewall before launching AI Direct Link. • The transfer rate is recommended that you to form...
... a network cable, and then install the utility to both computers to avail the AI Direct Link feature. • Turn off your username and password. 5.3.10 ASUS AI Direct Link ASUS AI Direct Link allows you set your firewall software other than Windows Firewall before launching AI Direct Link. • The transfer rate is recommended that you to form...

User Manual
Page 172
... 5. On the Power schemes section, click , then select any option except Home/Office Desktop or Always On. 9. item to open the Power Options Properties window. 8. Set the Intel(R) SpeedStep (TM) Tech. See page 4-23 for details. 4. Click the Power button on the computer, then enter the BIOS ... screen displays and procedures may vary depending on the desktop, then select Properties from the pop-up menu. 6. Click Apply, then click OK. 10. A.2.2 Using the EIST To use the EIST feature: 1. After the computer restarts, right click on a blank space on the operating system. Turn...
... 5. On the Power schemes section, click , then select any option except Home/Office Desktop or Always On. 9. item to open the Power Options Properties window. 8. Set the Intel(R) SpeedStep (TM) Tech. See page 4-23 for details. 4. Click the Power button on the computer, then enter the BIOS ... screen displays and procedures may vary depending on the desktop, then select Properties from the pop-up menu. 6. Click Apply, then click OK. 10. A.2.2 Using the EIST To use the EIST feature: 1. After the computer restarts, right click on a blank space on the operating system. Turn...

