
Motherboard DIY Troubleshooting Guide
Page 27
FLOPPY1 R P4SP-MX SE PIN 1 P4SP-MX SE Floppy disk drive connector ATXPWR1 +5.0VDC +5.0VDC -5.0VDC COM COM COM PS_ON# COM -12.0VDC +3.3VDC +12.0VDC +5VSB PWR_OK COM +5.0VDC COM +5.0VDC COM +3.3VDC +3.3VDC ® P4SP-MX SE ATX12V1 +12V DC P4SP-MX SE ATX power connectors COM +12V DC COM 1-19
FLOPPY1 R P4SP-MX SE PIN 1 P4SP-MX SE Floppy disk drive connector ATXPWR1 +5.0VDC +5.0VDC -5.0VDC COM COM COM PS_ON# COM -12.0VDC +3.3VDC +12.0VDC +5VSB PWR_OK COM +5.0VDC COM +5.0VDC COM +3.3VDC +3.3VDC ® P4SP-MX SE ATX12V1 +12V DC P4SP-MX SE ATX power connectors COM +12V DC COM 1-19
P4SP-MX SE English User Manual E1676a
Page 10
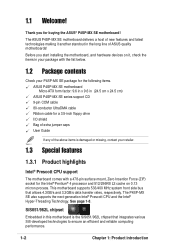
...on 0.13 micron process. SiS651/962L chipset Embedded in (24.5 cm x 24.5 cm) ASUS P4SP-MX SE series support CD 9-pin COM cable 80-conductor UltraDMA cable Ribbon cable for a 3.5-inch floppy drive I/O shield Bag of extra jumper caps User Guide If any of the above items is the... SiS651/962L chipset that allows 4.3GB/s and 3.2GB/s data transfer rates, respectively. See page 1-8. Before you for the following items. ASUS P4SP-MX SE motherboard Micro-ATX form factor: 9.6...
...on 0.13 micron process. SiS651/962L chipset Embedded in (24.5 cm x 24.5 cm) ASUS P4SP-MX SE series support CD 9-pin COM cable 80-conductor UltraDMA cable Ribbon cable for a 3.5-inch floppy drive I/O shield Bag of extra jumper caps User Guide If any of the above items is the... SiS651/962L chipset that allows 4.3GB/s and 3.2GB/s data transfer rates, respectively. See page 1-8. Before you for the following items. ASUS P4SP-MX SE motherboard Micro-ATX form factor: 9.6...
P4SP-MX SE English User Manual E1676a
Page 26
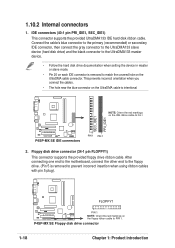
...P4SP-MX SE PIN 1 NOTE: Orient the red markings on the IDE ribbon cable to PIN 1. P4SP-MX SE Floppy disk drive connector 1-18 Chapter 1: Product introduction NOTE: Orient the red markings on the floppy ribbon cable to PIN 1 SEC_IDE1 PRI_IDE1 ® P4SP-MX SE P4SP-MX SE IDE connectors PIN 1 PIN 1 2. Floppy disk drive... connector (34-1 pin FLOPPY1) This connector supports the provided floppy drive ribbon cable. After connecting one end to the motherboard...
...P4SP-MX SE PIN 1 NOTE: Orient the red markings on the IDE ribbon cable to PIN 1. P4SP-MX SE Floppy disk drive connector 1-18 Chapter 1: Product introduction NOTE: Orient the red markings on the floppy ribbon cable to PIN 1 SEC_IDE1 PRI_IDE1 ® P4SP-MX SE P4SP-MX SE IDE connectors PIN 1 PIN 1 2. Floppy disk drive... connector (34-1 pin FLOPPY1) This connector supports the provided floppy drive ribbon cable. After connecting one end to the motherboard...

P4SP-MX SE English User Manual E1676a
Page 34
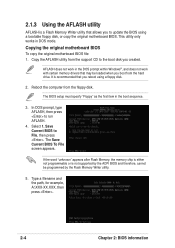
... section for this motherboard using a floppy disk during POST.) 2. DOS environment Insert a 1.44 MB floppy disk into the floppy disk drive. c. d. ASUS AFlash (Updates the BIOS using a bootable floppy disk.) 4. Windows® 98SE/ME environment a. Follow the succeeding screen instructions to the...Programs icon from the Control Panel window. Double-click on these utilities. Select the 3 1/2 Floppy Drive icon. ASUS EZ Flash (Updates the BIOS using the ASUS Update utility. 2.1.1 Creating a bootable floppy disk 1. Do either one of the original motherboard BIOS file...
... section for this motherboard using a floppy disk during POST.) 2. DOS environment Insert a 1.44 MB floppy disk into the floppy disk drive. c. d. ASUS AFlash (Updates the BIOS using a bootable floppy disk.) 4. Windows® 98SE/ME environment a. Follow the succeeding screen instructions to the...Programs icon from the Control Panel window. Double-click on these utilities. Select the 3 1/2 Floppy Drive icon. ASUS EZ Flash (Updates the BIOS using the ASUS Update utility. 2.1.1 Creating a bootable floppy disk 1. Do either one of the original motherboard BIOS file...
P4SP-MX SE English User Manual E1676a
Page 35
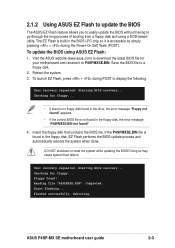
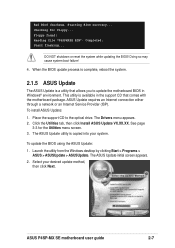
... done. appears. • If the correct BIOS file is not found in the BIOS LPC chip so it to P4SPMXSE.BIN. Completed. ASUS P4SP-MX SE motherboard user guide 2-3 To update the BIOS using a DOS-based utility. User recovery requested. DO NOT shutdown or reset the system while...... Start flashing... Rebooting. Save the BIOS file to a floppy disk. 2. Checking for floppy... • If there is found in the drive, the error message "Floppy not found ! Insert the floppy disk that contains the BIOS file. Reading file "P4SPMXSE.BIN". Starting BIOS recovery... 2.1.2 Using...
... done. appears. • If the correct BIOS file is not found in the BIOS LPC chip so it to P4SPMXSE.BIN. Completed. ASUS P4SP-MX SE motherboard user guide 2-3 To update the BIOS using a DOS-based utility. User recovery requested. DO NOT shutdown or reset the system while...... Start flashing... Rebooting. Save the BIOS file to a floppy disk. 2. Checking for floppy... • If there is found in the drive, the error message "Floppy not found ! Insert the floppy disk that contains the BIOS file. Reading file "P4SPMXSE.BIN". Starting BIOS recovery... 2.1.2 Using...
P4SP-MX SE English User Manual E1676a
Page 36
... BIOS. If the word "unknown" appears after Flash Memory, the memory chip is either not programmable or is recommended that you boot from the hard drive. Select 1. The BIOS setup must specify "Floppy" as the first item in DOS mode. Type a filename and the path, for example, A:\XXX-XX.XXX, then...
... BIOS. If the word "unknown" appears after Flash Memory, the memory chip is either not programmable or is recommended that you boot from the hard drive. Select 1. The BIOS setup must specify "Floppy" as the first item in DOS mode. Type a filename and the path, for example, A:\XXX-XX.XXX, then...
P4SP-MX SE English User Manual E1676a
Page 39
... available in the support CD that allows you to the optical drive. ASUS P4SP-MX SE motherboard user guide 2-7 Completed. Launch the utility from the Windows desktop by clicking Start > Programs > ASUS > ASUSUpdate > ASUSUpdate. The ASUS Update initial screen appears. 2. The Drivers menu appears. 2. Starting BIOS recovery... ASUS Update requires an Internet connection either through a network or an...
... available in the support CD that allows you to the optical drive. ASUS P4SP-MX SE motherboard user guide 2-7 Completed. Launch the utility from the Windows desktop by clicking Start > Programs > ASUS > ASUSUpdate > ASUSUpdate. The ASUS Update initial screen appears. 2. The Drivers menu appears. 2. Starting BIOS recovery... ASUS Update requires an Internet connection either through a network or an...

P4SP-MX SE English User Manual E1676a
Page 44
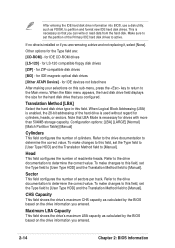
... Floppy 3 Mode Support [Disabled] This is required to enter the BIOS Setup program and to gain full access to support older Japanese floppy drives. The Floppy 3 Mode feature allows reading and writing of conventional memory detected by erasing the CMOS Real Time Clock (RTC) RAM. You ... RAM. The BIOS Setup program allows you to [Enabled]. Forgot the password? Halt On [All Errors] This field specifies the types of floppy drive installed. The password is set a password, highlight the appropriate field and press . Legacy Diskette A [1.44M, 3.5 in.] Sets the type of...
... Floppy 3 Mode Support [Disabled] This is required to enter the BIOS Setup program and to gain full access to support older Japanese floppy drives. The Floppy 3 Mode feature allows reading and writing of conventional memory detected by erasing the CMOS Real Time Clock (RTC) RAM. You ... RAM. The BIOS Setup program allows you to [Enabled]. Forgot the password? Halt On [All Errors] This field specifies the types of floppy drive installed. The password is set a password, highlight the appropriate field and press . Legacy Diskette A [1.44M, 3.5 in.] Sets the type of...
P4SP-MX SE English User Manual E1676a
Page 45
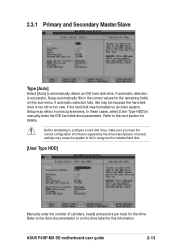
...to automatically detect an IDE hard disk drive. If the hard disk was formatted on the drive label for the remaining fields on this may be because the hard disk drive is too old or too new. Refer to the drive documentation or on an older system, ... Select [Auto] to manually enter the IDE hard disk drive parameters. Refer to configure a hard disk drive, make sure you have the correct configuration information supplied by the drive manufacturer. Incorrect settings may detect incorrect parameters. ASUS P4SP-MX SE motherboard user guide 2-13 Before attempting to the next section ...
...to automatically detect an IDE hard disk drive. If the hard disk was formatted on the drive label for the remaining fields on this may be because the hard disk drive is too old or too new. Refer to the drive documentation or on an older system, ... Select [Auto] to manually enter the IDE hard disk drive parameters. Refer to configure a hard disk drive, make sure you have the correct configuration information supplied by the drive manufacturer. Incorrect settings may detect incorrect parameters. ASUS P4SP-MX SE motherboard user guide 2-13 Before attempting to the next section ...
P4SP-MX SE English User Manual E1676a
Page 46
...sectors per track. Head This field configures the number of the Primary IDE hard disk drives to determine the correct value. To make changes to partition and format new IDE hard disk drives. Refer to the drive documentation to active. Sector This field configures the number of cylinders. Maximum LBA Capacity This...field to the Main menu. This is necessary so that LBA Mode is installed or if you are : [CD-ROM] - for IDE CD-ROM drives [LS-120] - To make changes to this field, set the partition of read data from the hard disk. After entering the IDE hard disk...
...sectors per track. Head This field configures the number of the Primary IDE hard disk drives to determine the correct value. To make changes to partition and format new IDE hard disk drives. Refer to the drive documentation to active. Sector This field configures the number of cylinders. Maximum LBA Capacity This...field to the Main menu. This is necessary so that LBA Mode is installed or if you are : [CD-ROM] - for IDE CD-ROM drives [LS-120] - To make changes to this field, set the partition of read data from the hard disk. After entering the IDE hard disk...
P4SP-MX SE English User Manual E1676a
Page 47
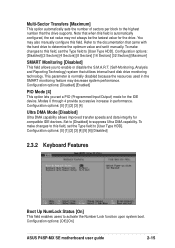
...options: [0] [1] [2] [3] [4] Ultra DMA Mode [Disabled] Ultra DMA capability allows improved transfer speeds and data integrity for the drive. You may decrease system performance. To make changes to this field, set value may not always be the fastest value for ...[6] [Disabled] 2.3.2 Keyboard Features Boot Up NumLock Status [On] This field enables users to [User Type HDD]. Configuration options: [Off] [On] ASUS P4SP-MX SE motherboard user guide 2-15 Multi-Sector Transfers [Maximum] This option automatically sets the number of sectors per block to the highest number that when this...
...options: [0] [1] [2] [3] [4] Ultra DMA Mode [Disabled] Ultra DMA capability allows improved transfer speeds and data integrity for the drive. You may decrease system performance. To make changes to this field, set value may not always be the fastest value for ...[6] [Disabled] 2.3.2 Keyboard Features Boot Up NumLock Status [On] This field enables users to [User Type HDD]. Configuration options: [Off] [On] ASUS P4SP-MX SE motherboard user guide 2-15 Multi-Sector Transfers [Maximum] This option automatically sets the number of sectors per block to the highest number that when this...

P4SP-MX SE English User Manual E1676a
Page 52
... port. Configuration options: [Normal] [EPP] [ECP] [ECP+EPP] ECP DMA Select [3] This field allows you disable this item to [Read Only] allows the floppy disk drive to a floppy disk.
... port. Configuration options: [Normal] [EPP] [ECP] [ECP+EPP] ECP DMA Select [3] This field allows you disable this item to [Read Only] allows the floppy disk drive to a floppy disk.
P4SP-MX SE English User Manual E1676a
Page 56
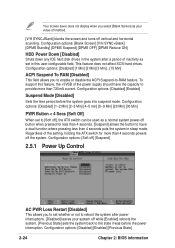
.... [Previous State] sets the system back to the state it was before the system goes into suspend mode. This feature does not affect SCSI hard drives. Configuration options: [Disabled] [Enabled] [Previous State] 2-24 Chapter 2: BIOS information To support this user-configurable field. Configuration options: [Disabled] ...+Blank] [DPMS Standby] [DPMS Suspend] [DPMS OFF] [DPMS Reduce ON] HDD Power Down [Disabled] Shuts down any IDE hard disk drives in the system after power interruptions. [Disabled] leaves your video-off method. [V/H SYNC+Blank] blanks the screen and turns off ], the...
.... [Previous State] sets the system back to the state it was before the system goes into suspend mode. This feature does not affect SCSI hard drives. Configuration options: [Disabled] [Enabled] [Previous State] 2-24 Chapter 2: BIOS information To support this user-configurable field. Configuration options: [Disabled] ...+Blank] [DPMS Standby] [DPMS Suspend] [DPMS OFF] [DPMS Reduce ON] HDD Power Down [Disabled] Shuts down any IDE hard disk drives in the system after power interruptions. [Disabled] leaves your video-off method. [V/H SYNC+Blank] blanks the screen and turns off ], the...

P4SP-MX SE English User Manual E1676a
Page 58
... using the key, you to select which the system uses to search for details". If any of all connected IDE hard disk drives. 2-26 Chapter 2: BIOS information You will show the product IDs of the fans is out of devices alters the priority which IDE ...specific field shows N/A. Removable Device [Legacy Floppy] Configuration options: [Disabled] [Legacy Floppy] [LS-120] [ZIP] [ATAPIMO] [USB FDD] [USB ZIP] IDE Hard Drive This field allows you can promote devices and by using the up . VCORE Voltage, +3.3V Voltage, +5V Voltage, +12V Voltage The onboard hardware monitor automatically...
... using the key, you to select which the system uses to search for details". If any of all connected IDE hard disk drives. 2-26 Chapter 2: BIOS information You will show the product IDs of the fans is out of devices alters the priority which IDE ...specific field shows N/A. Removable Device [Legacy Floppy] Configuration options: [Disabled] [Legacy Floppy] [LS-120] [ZIP] [ATAPIMO] [USB FDD] [USB ZIP] IDE Hard Drive This field allows you can promote devices and by using the up . VCORE Voltage, +3.3V Voltage, +5V Voltage, +12V Voltage The onboard hardware monitor automatically...
P4SP-MX SE English User Manual E1676a
Page 59
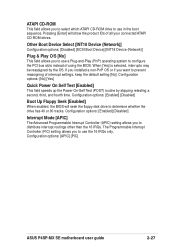
...-On-Self Test (POST) routine by the OS. Configuration options: [APIC] [PIC] ASUS P4SP-MX SE motherboard user guide 2-27 Pressing [Enter] will seek the floppy disk drive to determine whether the drive has 40 or 80 tracks. Other Boot Device Select [INT18 Device (Network)] Configuration options:...[Enabled] [Disabled] Interrupt Mode [APIC] The Advanced Programmable Interrupt Controller (APIC) setting allows you to select which ATAPI CD-ROM drive to use in the boot sequence. The Programmable Interrupt Controller (PIC) setting allows you want to prevent reassigning of using the BIOS....
...-On-Self Test (POST) routine by the OS. Configuration options: [APIC] [PIC] ASUS P4SP-MX SE motherboard user guide 2-27 Pressing [Enter] will seek the floppy disk drive to determine whether the drive has 40 or 80 tracks. Other Boot Device Select [INT18 Device (Network)] Configuration options:...[Enabled] [Disabled] Interrupt Mode [APIC] The Advanced Programmable Interrupt Controller (APIC) setting allows you to select which ATAPI CD-ROM drive to use in the boot sequence. The Programmable Interrupt Controller (PIC) setting allows you want to prevent reassigning of using the BIOS....
P4SP-MX SE English User Manual E1676a
Page 62
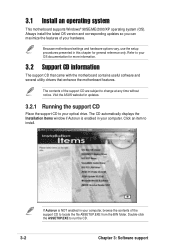
If Autorun is enabled in your computer, browse the contents of the support CD to your hardware. Visit the ASUS website for general reference only. Because motherboard settings and hardware options vary, use the setup procedures presented in this chapter for updates. 3.2.1 Running... the support CD Place the support CD to locate the file ASSETUP.EXE from the BIN folder. The contents of your optical drive. Double-click the ASSETUP.EXE to change at any time without notice. 3.1 Install an operating system This motherboard supports Windows® 98SE/ME/2000...
If Autorun is enabled in your computer, browse the contents of the support CD to your hardware. Visit the ASUS website for general reference only. Because motherboard settings and hardware options vary, use the setup procedures presented in this chapter for updates. 3.2.1 Running... the support CD Place the support CD to locate the file ASSETUP.EXE from the BIN folder. The contents of your optical drive. Double-click the ASSETUP.EXE to change at any time without notice. 3.1 Install an operating system This motherboard supports Windows® 98SE/ME/2000...


