
Motherboard DIY Troubleshooting Guide
Page 1
Motherboard P4S800 User Guide
Motherboard P4S800 User Guide
Motherboard DIY Troubleshooting Guide
Page 3
Features Contents Notices v Safety information vi About this guide vii ASUS contact information viii P4S800 specifications summary ix Chapter 1: Product introduction 1.1 Welcome 1-2 1.2 Package contents 1-2 1.3 Motherboard components 1-3 1.4 Special Features 1-6 1.5 Motherboard layout 1-8 1.6 Before you proceed 1-9 1.7 Motherboard installation 1-9 1.7.1 Placement direction 1-9 1.7.2 Screw holes 1-10 1.8 Central Processing Unit (CPU 1-10 1.8.1 Overview 1-10 1.8.2 Installing the CPU 1-11 1.9 System memory 1-12 1.9.1 Overview 1-12...
Features Contents Notices v Safety information vi About this guide vii ASUS contact information viii P4S800 specifications summary ix Chapter 1: Product introduction 1.1 Welcome 1-2 1.2 Package contents 1-2 1.3 Motherboard components 1-3 1.4 Special Features 1-6 1.5 Motherboard layout 1-8 1.6 Before you proceed 1-9 1.7 Motherboard installation 1-9 1.7.1 Placement direction 1-9 1.7.2 Screw holes 1-10 1.8 Central Processing Unit (CPU 1-10 1.8.1 Overview 1-10 1.8.2 Installing the CPU 1-11 1.9 System memory 1-12 1.9.1 Overview 1-12...
Motherboard DIY Troubleshooting Guide
Page 6
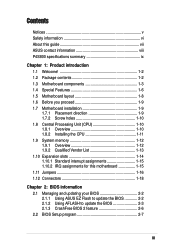
...any area where it may become wet. • Place the product on it by yourself. Operation safety • Before installing the motherboard and adding devices on a stable surface. • If you encounter technical problems with the package. • Before using the product... • Avoid dust, humidity, and temperature extremes. If you add a device. • Before connecting or removing signal cables from the motherboard, ensure that came with the product, contact a qualified service technician or your area. Safety information Electrical safety • To prevent electrical shock ...
...any area where it may become wet. • Place the product on it by yourself. Operation safety • Before installing the motherboard and adding devices on a stable surface. • If you encounter technical problems with the package. • Before using the product... • Avoid dust, humidity, and temperature extremes. If you add a device. • Before connecting or removing signal cables from the motherboard, ensure that came with the product, contact a qualified service technician or your area. Safety information Electrical safety • To prevent electrical shock ...

Motherboard DIY Troubleshooting Guide
Page 11
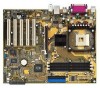
Chapter 1 This chapter describes the features of the layout, jumper settings, and connectors. Product introduction It includes brief descriptions of the motherboard components, and illustrations of the P4S800 motherboard.
Chapter 1 This chapter describes the features of the layout, jumper settings, and connectors. Product introduction It includes brief descriptions of the motherboard components, and illustrations of the P4S800 motherboard.

Motherboard DIY Troubleshooting Guide
Page 12
Supporting up to 3GB of computing! Before you for buying the ASUS® P4S800 motherboard! The ASUS P4S800 motherboard delivers a host of new features and latest technologies making it , check the items in your package with Front Side Bus 800 (FSB800) ...support coupled with the SiS® 648FX chipset with the list below. 1.2 Package contents Check your P4S800 package for the following items. ASUS P4S800 motherboard ATX form factor: 12 in x 9.6 in (30.5 cm x 24.5 cm) ASUS P4S800 series support CD 80-conductor UltraDMA/66/100/133 IDE cable Ribbon cable for a cost-effective desktop...
Supporting up to 3GB of computing! Before you for buying the ASUS® P4S800 motherboard! The ASUS P4S800 motherboard delivers a host of new features and latest technologies making it , check the items in your package with Front Side Bus 800 (FSB800) ...support coupled with the SiS® 648FX chipset with the list below. 1.2 Package contents Check your P4S800 package for the following items. ASUS P4S800 motherboard ATX form factor: 12 in x 9.6 in (30.5 cm x 24.5 cm) ASUS P4S800 series support CD 80-conductor UltraDMA/66/100/133 IDE cable Ribbon cable for a cost-effective desktop...
Motherboard DIY Troubleshooting Guide
Page 13
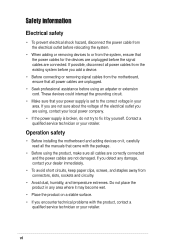
1.3 Motherboard components Before you install the motherboard, learn about its major components and available features to the succeeding pages for the component descriptions. 1 23 4 5 6 16 7 8 15 14 17 13 12 11 10 18 19 27 26 25 24 23 ASUS P4S800 motherboard user guide 9 20 21 22 1-3 Refer to facilitate the installation and future upgrades.
1.3 Motherboard components Before you install the motherboard, learn about its major components and available features to the succeeding pages for the component descriptions. 1 23 4 5 6 16 7 8 15 14 17 13 12 11 10 18 19 27 26 25 24 23 ASUS P4S800 motherboard user guide 9 20 21 22 1-3 Refer to facilitate the installation and future upgrades.
Motherboard DIY Troubleshooting Guide
Page 14
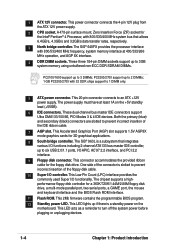
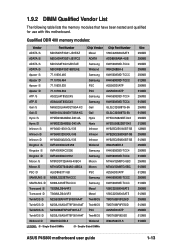
... SDRAM DIMMs. PC2100/1600 support up to 2 DIMMs; 1 GB PC3200/2700 with 800/533/400 MHz frequency, system memory interface at least 1A on the motherboard. The SiS® 648FX provides the processor interface with 32 DDR chips support to 1 DIMM only. 5 ATX power connector. PC3200/2700 support up to prevent...
... SDRAM DIMMs. PC2100/1600 support up to 2 DIMMs; 1 GB PC3200/2700 with 800/533/400 MHz frequency, system memory interface at least 1A on the motherboard. The SiS® 648FX provides the processor interface with 32 DDR chips support to 1 DIMM only. 5 ATX power connector. PC3200/2700 support up to prevent...
Motherboard DIY Troubleshooting Guide
Page 15
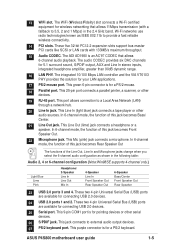
... jack. This Mic (pink) jack connects a microphone. These two 4-pin Universal Serial Bus (USB) ports are available for wireless networking that allows 6-channel audio playback. ASUS P4S800 motherboard user guide 1-5 In 6-channel mode, the function of this jack becomes Bass/ Center. 21 Line Out jack. This purple connector is for pointing devices or...
... jack. This Mic (pink) jack connects a microphone. These two 4-pin Universal Serial Bus (USB) ports are available for wireless networking that allows 6-channel audio playback. ASUS P4S800 motherboard user guide 1-5 In 6-channel mode, the function of this jack becomes Bass/ Center. 21 Line Out jack. This purple connector is for pointing devices or...
Motherboard DIY Troubleshooting Guide
Page 16
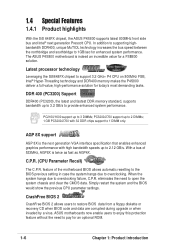
...1 DIMM only. With a bus of the motherboard BIOS allows automatic resetting to the BIOS previous setting in case the system hangs due to 3 DIMMs; 1.4 Special Features 1.4.1 Product highlights With the SiS 648FX chipset, the ASUS P4S800 supports latest 800MHz front side bus and Intel&#...174; next generation Prescott CPU. The ASUS P4S800 motherboard is twice as fast as AGP4X. PC3200/2700 support up to overclocking. feature of ...
...1 DIMM only. With a bus of the motherboard BIOS allows automatic resetting to the BIOS previous setting in case the system hangs due to 3 DIMMs; 1.4 Special Features 1.4.1 Product highlights With the SiS 648FX chipset, the ASUS P4S800 supports latest 800MHz front side bus and Intel&#...174; next generation Prescott CPU. The ASUS P4S800 motherboard is twice as fast as AGP4X. PC3200/2700 support up to overclocking. feature of ...
Motherboard DIY Troubleshooting Guide
Page 17
...major game audio technologies including Microsoft DirectX™8.0, Microsoft DirectSound 3D™, A3D, MacroFX, ZoomFX, MultiDrive 5.1 and EAX. ASUS P4S800 motherboard user guide 1-7 No more DOS-based flash utility and bootable diskette required. Experience 5.1-channel surround sound and enhanced 3D ...need to enter Windows. (The stickers on PS/2 keyboards. S/PDIF out The P4S800 provides convenient connectivity to 1GB/s. ASUS Instant Music Lite Through this unique feature, P4S800 is the industry's high-performance and most reliable audio solution for business professionals,...
...major game audio technologies including Microsoft DirectX™8.0, Microsoft DirectSound 3D™, A3D, MacroFX, ZoomFX, MultiDrive 5.1 and EAX. ASUS P4S800 motherboard user guide 1-7 No more DOS-based flash utility and bootable diskette required. Experience 5.1-channel surround sound and enhanced 3D ...need to enter Windows. (The stickers on PS/2 keyboards. S/PDIF out The P4S800 provides convenient connectivity to 1GB/s. ASUS Instant Music Lite Through this unique feature, P4S800 is the industry's high-performance and most reliable audio solution for business professionals,...

Motherboard DIY Troubleshooting Guide
Page 18
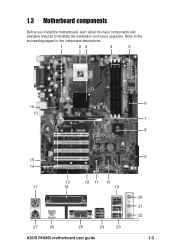
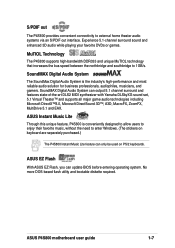
ATX Power Connector SEC_IDE PRI_IDE 30.5cm (12.0in) 1.5 Motherboard layout PS/2KBMS T: Mouse B: Keyboard SPDIF1 24.5cm (9.6in) Socket 478 DDR DIMM1 (64/72 bit,184-pin module) DDR DIMM2 (64/72 bit,184-... USBPW34 Bottom: USB3 USB4 Top: RJ-45 CPU_FAN ATX12V SiS 648FX Chip Top:Line In Center:Line Out Below:Mic In Accelerated Graphics Port (AGP) P4S800 ® PCI1 SiS 963LUA Chipset SPDIF_OUT FP_AUDIO CD AUX Audio Codec PCI2 PCI3 PCI4 CR2032 3V Lithium Cell CMOS Power CLRTC CHASSIS PCI5 WIFI USBPW56...
ATX Power Connector SEC_IDE PRI_IDE 30.5cm (12.0in) 1.5 Motherboard layout PS/2KBMS T: Mouse B: Keyboard SPDIF1 24.5cm (9.6in) Socket 478 DDR DIMM1 (64/72 bit,184-pin module) DDR DIMM2 (64/72 bit,184-... USBPW34 Bottom: USB3 USB4 Top: RJ-45 CPU_FAN ATX12V SiS 648FX Chip Top:Line In Center:Line Out Below:Mic In Accelerated Graphics Port (AGP) P4S800 ® PCI1 SiS 963LUA Chipset SPDIF_OUT FP_AUDIO CD AUX Audio Codec PCI2 PCI3 PCI4 CR2032 3V Lithium Cell CMOS Power CLRTC CHASSIS PCI5 WIFI USBPW56...
Motherboard DIY Troubleshooting Guide
Page 19
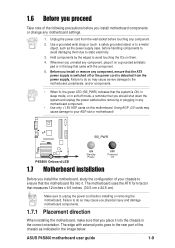
... chassis in the bag that the motherboard fits into it on a grounded antistatic pad or in the correct orientation. P4S800 ® SB_PWR P4S800 Onboard LED ON Standby Power OFF Powered Off 1.7 Motherboard installation Before you install the motherboard, study the configuration of the following...ports goes to static electricity. 3. The edge with the component. 5. ASUS P4S800 motherboard user guide 1-9 Make sure to unplug the power cord before handling components to avoid damaging them . 4. The motherboard uses the ATX form factor that you should shut down the system ...
... chassis in the bag that the motherboard fits into it on a grounded antistatic pad or in the correct orientation. P4S800 ® SB_PWR P4S800 Onboard LED ON Standby Power OFF Powered Off 1.7 Motherboard installation Before you install the motherboard, study the configuration of the following...ports goes to static electricity. 3. The edge with the component. 5. ASUS P4S800 motherboard user guide 1-9 Make sure to unplug the power cord before handling components to avoid damaging them . 4. The motherboard uses the ATX form factor that you should shut down the system ...

Motherboard DIY Troubleshooting Guide
Page 20
... this side towards the rear of the CPU into the holes indicated by circles to secure the motherboard to the chassis. Gold Mark 1-10 Incorrect installation of the chassis 1.8 Central Processing Unit (CPU) 1.8.1 Overview The motherboard comes with 512/256KB L2 cache on one corner. Note in the 478-pin package with... in the illustration that should match a specific corner of 6.4GB/s, 4.2GB/s and 3.2GB/s respectively. 1.7.2 Screw holes Place nine (9) screws into the socket may damage the motherboard.
... this side towards the rear of the CPU into the holes indicated by circles to secure the motherboard to the chassis. Gold Mark 1-10 Incorrect installation of the chassis 1.8 Central Processing Unit (CPU) 1.8.1 Overview The motherboard comes with 512/256KB L2 cache on one corner. Note in the 478-pin package with... in the illustration that should match a specific corner of 6.4GB/s, 4.2GB/s and 3.2GB/s respectively. 1.7.2 Screw holes Place nine (9) screws into the socket may damage the motherboard.
Motherboard DIY Troubleshooting Guide
Page 21
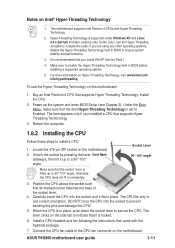
... that its marked corner matches the base of the socket lever. 4. Notes on Hyper-Threading Technology, visit www.intel.com/ info/hyperthreading. This motherboard supports Intel Pentium 4 CPUs with the heatsink package. 7. For more information on Intel® Hyper-Threading Technology 1. Buy an Intel Pentium 4... secure the CPU. The CPU fits only in BIOS before installing a supported operating system. 5. The lever clicks on this motherboard: 1. ASUS P4S800 motherboard user guide 1-11 If you installed a CPU that the socket lever is locked. 6. Locate the 478-pin ZIF socket on the...
... that its marked corner matches the base of the socket lever. 4. Notes on Hyper-Threading Technology, visit www.intel.com/ info/hyperthreading. This motherboard supports Intel Pentium 4 CPUs with the heatsink package. 7. For more information on Intel® Hyper-Threading Technology 1. Buy an Intel Pentium 4... secure the CPU. The CPU fits only in BIOS before installing a supported operating system. 5. The lever clicks on this motherboard: 1. ASUS P4S800 motherboard user guide 1-11 If you installed a CPU that the socket lever is locked. 6. Locate the 478-pin ZIF socket on the...
Motherboard DIY Troubleshooting Guide
Page 22
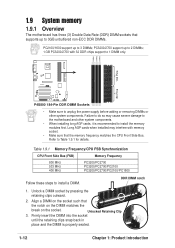
...into the socket until the retaining clips snap back in place and the DIMM is recommended to the motherboard and other system components. DIMM1 DIMM2 DIMM3 80 Pins 104 Pins P4S800 ® P4S800 184-Pin DDR DIMM Sockets • Make sure to 1 DIMM only. Unlocked Retaining Clip 3. .../PC2700/PC2100 PC3200/PC2700/PC2100/ PC1600 Follow these steps to Table 1.9.1 for details. Refer to install a DIMM. 1.9 System memory 1.9.1 Overview The motherboard has three (3) Double Data Rate (DDR) DIMM sockets that the notch on the DIMM matches the break on the socket. Align a DIMM on...
...into the socket until the retaining clips snap back in place and the DIMM is recommended to the motherboard and other system components. DIMM1 DIMM2 DIMM3 80 Pins 104 Pins P4S800 ® P4S800 184-Pin DDR DIMM Sockets • Make sure to 1 DIMM only. Unlocked Retaining Clip 3. .../PC2700/PC2100 PC3200/PC2700/PC2100/ PC1600 Follow these steps to Table 1.9.1 for details. Refer to install a DIMM. 1.9 System memory 1.9.1 Overview The motherboard has three (3) Double Data Rate (DDR) DIMM sockets that the notch on the DIMM matches the break on the socket. Align a DIMM on...
Motherboard DIY Troubleshooting Guide
Page 23
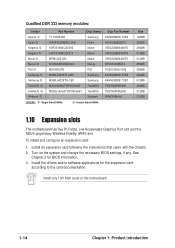
... 512MB 256MB 512MB 256MB 512MB 256MB 512MB 128MB 256MB 512MB 256MB 256MB 512MB 256MB 512MB 512MB 256MB 512MB 256MB 512MB 256MB 512MB 256MB 512MB 512MB ASUS P4S800 motherboard user guide 1-13 1.9.2 DIMM Qualified Vendor List The following table lists the memory modules that have been tested and qualified for use with this...
... 512MB 256MB 512MB 256MB 512MB 256MB 512MB 128MB 256MB 512MB 256MB 256MB 512MB 256MB 512MB 512MB 256MB 512MB 256MB 512MB 256MB 512MB 256MB 512MB 512MB ASUS P4S800 motherboard user guide 1-13 1.9.2 DIMM Qualified Vendor List The following table lists the memory modules that have been tested and qualified for use with this...
Motherboard DIY Troubleshooting Guide
Page 24
..., if any. Single Sided DIMMs /D - To install and configure an expansion card: 1. Install the drivers and/or software applications for BIOS information. 3. Turn on this motherboard! 1-14 Chapter 1: Product introduction Double Sided DIMMs Size 128MB 256MB 256MB 512MB 512MB 256MB 256MB 256MB 512MB 256MB 512MB 512MB 1.10 Expansion slots The...
..., if any. Single Sided DIMMs /D - To install and configure an expansion card: 1. Install the drivers and/or software applications for BIOS information. 3. Turn on this motherboard! 1-14 Chapter 1: Product introduction Double Sided DIMMs Size 128MB 256MB 256MB 512MB 512MB 256MB 256MB 256MB 512MB 256MB 512MB 512MB 1.10 Expansion slots The...
Motherboard DIY Troubleshooting Guide
Page 25
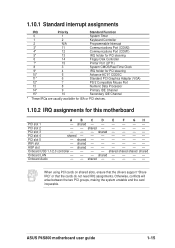
WiFi slot - shared shared shared shared Onboard LAN - - - ASUS P4S800 motherboard user guide 1-15 PCI slot 3 - - - shared - - - - shared - - - - - shared - - - - - shared - - - - - - shared - - - - - - When using PCI cards on shared slots, ensure that the drivers support "Share IRQ...* 9 Primary IDE Channel 15* 10 Secondary IDE Channel * These IRQs are usually available for ISA or PCI devices. 1.10.2 IRQ assignments for this motherboard A B C D E F GH PCI slot 1 - Onboard Audio - - Onboard USB 1.1/2.0 controller - - - - PCI slot 2 - - shared...
WiFi slot - shared shared shared shared Onboard LAN - - - ASUS P4S800 motherboard user guide 1-15 PCI slot 3 - - - shared - - - - shared - - - - - shared - - - - - shared - - - - - - shared - - - - - - When using PCI cards on shared slots, ensure that the drivers support "Share IRQ...* 9 Primary IDE Channel 15* 10 Secondary IDE Channel * These IRQs are usually available for ISA or PCI devices. 1.10.2 IRQ assignments for this motherboard A B C D E F GH PCI slot 1 - Onboard Audio - - Onboard USB 1.1/2.0 controller - - - - PCI slot 2 - - shared...
Motherboard DIY Troubleshooting Guide
Page 27
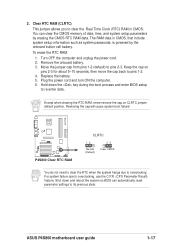
...the system so BIOS can clear the CMOS memory of date, time, and system setup parameters by the onboard button cell battery. P4S800 ® P4S800 Clear RTC RAM CLRTC 12 Normal (Default) 23 Clear CMOS You do not need to clear the RTC when the system hangs due...Clock (RTC) RAM in CMOS, that include system setup information such as system passwords, is powered by erasing the CMOS RTC RAM data. 2. ASUS P4S800 motherboard user guide 1-17 You can automatically reset parameter settings to overclocking. Turn OFF the computer and unplug the power cord. 2. Remove the onboard battery....
...the system so BIOS can clear the CMOS memory of date, time, and system setup parameters by the onboard button cell battery. P4S800 ® P4S800 Clear RTC RAM CLRTC 12 Normal (Default) 23 Clear CMOS You do not need to clear the RTC when the system hangs due...Clock (RTC) RAM in CMOS, that include system setup information such as system passwords, is powered by erasing the CMOS RTC RAM data. 2. ASUS P4S800 motherboard user guide 1-17 You can automatically reset parameter settings to overclocking. Turn OFF the computer and unplug the power cord. 2. Remove the onboard battery....
Motherboard DIY Troubleshooting Guide
Page 28
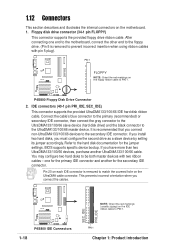
... 1-18 PIN 1 Chapter 1: Product introduction It is removed to prevent incorrect insertion when using ribbon cables with two ribbon cables - P4S800 ® NOTE: Orient the red markings (usually zigzag) on the motherboard. 1. If you connect non-UltraDMA133/100/66 devices to be both master devices with pin 5 plug). After connecting one for...
... 1-18 PIN 1 Chapter 1: Product introduction It is removed to prevent incorrect insertion when using ribbon cables with two ribbon cables - P4S800 ® NOTE: Orient the red markings (usually zigzag) on the motherboard. 1. If you connect non-UltraDMA133/100/66 devices to be both master devices with pin 5 plug). After connecting one for...


