Motherboard DIY Troubleshooting Guide
Page 1
P4P8X SE Motherboard
P4P8X SE Motherboard

P4P8X SE user's manual English version E1479
Page 1
Motherboard P4P8X SE User Guide
Motherboard P4P8X SE User Guide
P4P8X SE user's manual English version E1479
Page 3
... v Safety information vi About this guide vii ASUS contact information viii P4P8X SE specifications summary ix Chapter 1: Product introduction 1.1 Welcome 1-2 1.2 Package contents 1-2 1.3 Special features 1-3 1.4 Motherboard components 1-5 1.5 Motherboard layout 1-9 1.6 Before you proceed 1-10 1.7 Motherboard installation 1-11 1.7.1 Placement direction 1-11 1.7.2... a bootable floppy disk 2-2 2.1.2 Using AFUDOS to update the BIOS 2-2 2.1.3 Using ASUS EZ Flash to update the BIOS 2-4 2.1.4 Recovering the BIOS with CrashFree BIOS 2 ....... 2-5 2.2 BIOS Setup program 2-7 2.2.1 ...
... v Safety information vi About this guide vii ASUS contact information viii P4P8X SE specifications summary ix Chapter 1: Product introduction 1.1 Welcome 1-2 1.2 Package contents 1-2 1.3 Special features 1-3 1.4 Motherboard components 1-5 1.5 Motherboard layout 1-9 1.6 Before you proceed 1-10 1.7 Motherboard installation 1-11 1.7.1 Placement direction 1-11 1.7.2... a bootable floppy disk 2-2 2.1.2 Using AFUDOS to update the BIOS 2-2 2.1.3 Using ASUS EZ Flash to update the BIOS 2-4 2.1.4 Recovering the BIOS with CrashFree BIOS 2 ....... 2-5 2.2 BIOS Setup program 2-7 2.2.1 ...

P4P8X SE user's manual English version E1479
Page 6
... the product in your dealer immediately. • To avoid short circuits, keep paper clips, screws, and staples away from the motherboard, ensure that all the manuals that the power cables for the devices are unplugged before you add a device. • Before ...signal cables from connectors, slots, sockets and circuitry. • Avoid dust, humidity, and temperature extremes. Operation safety • Before installing the motherboard and adding devices on a stable surface. • If you encounter technical problems with the package. • Before using an adpater or extension...
... the product in your dealer immediately. • To avoid short circuits, keep paper clips, screws, and staples away from the motherboard, ensure that all the manuals that the power cables for the devices are unplugged before you add a device. • Before ...signal cables from connectors, slots, sockets and circuitry. • Avoid dust, humidity, and temperature extremes. Operation safety • Before installing the motherboard and adding devices on a stable surface. • If you encounter technical problems with the package. • Before using an adpater or extension...
P4P8X SE user's manual English version E1479
Page 11
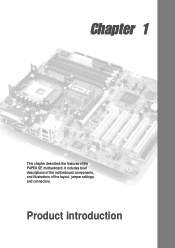
It includes brief descriptions of the motherboard components, and illustrations of the P4P8X SE motherboard. Chapter 1 This chapter describes the features of the layout, jumper settings, and connectors. Product introduction
It includes brief descriptions of the motherboard components, and illustrations of the P4P8X SE motherboard. Chapter 1 This chapter describes the features of the layout, jumper settings, and connectors. Product introduction
P4P8X SE user's manual English version E1479
Page 12
... affordable vehicle to set a new benchmark for an effective desktop platform solution. Before you for the following items. ASUS P4P8X SE motherboard ASUS motherboard support CD 2 x Serial ATA cable UltraDMA 100/66 cable Floppy disk cable I/O shield Bag of extra jumper caps... ATA support, USB 2.0, and 6-channel audio features, the P4P8X SE is damaged or missing, contact your P4P8X SE package for buying the ASUS® P4P8X SE motherboard! Supporting up to 4GB of ASUS quality motherboards! 1.1 Welcome! The motherboard delivers a host of new features and latest technologies making it...
... affordable vehicle to set a new benchmark for an effective desktop platform solution. Before you for the following items. ASUS P4P8X SE motherboard ASUS motherboard support CD 2 x Serial ATA cable UltraDMA 100/66 cable Floppy disk cable I/O shield Bag of extra jumper caps... ATA support, USB 2.0, and 6-channel audio features, the P4P8X SE is damaged or missing, contact your P4P8X SE package for buying the ASUS® P4P8X SE motherboard! Supporting up to 4GB of ASUS quality motherboards! 1.1 Welcome! The motherboard delivers a host of new features and latest technologies making it...
P4P8X SE user's manual English version E1479
Page 13
...-diagnosing utility - The motherboard will also support the next generation Intel Prescott CPU. The CPU features the Intel HyperThreading Technology and a new power design that allows up to 100 meters and helps users improve network quality. ASUS EZ Flash BIOS With the ASUS EZ Flash, you to... BIOS data from the support CD, or from a remote location up to buy a replacement ROM chip. AGP 3.0), offering 2.1GB/s bandwidth. ASUS P4P8X SE motherboard user guide 1-3 No need to 150 MB/s data transfer rate, and software compatibility with 512KB L2 cache and an 533/400 MHz system bus...
...-diagnosing utility - The motherboard will also support the next generation Intel Prescott CPU. The CPU features the Intel HyperThreading Technology and a new power design that allows up to 100 meters and helps users improve network quality. ASUS EZ Flash BIOS With the ASUS EZ Flash, you to... BIOS data from the support CD, or from a remote location up to buy a replacement ROM chip. AGP 3.0), offering 2.1GB/s bandwidth. ASUS P4P8X SE motherboard user guide 1-3 No need to 150 MB/s data transfer rate, and software compatibility with 512KB L2 cache and an 533/400 MHz system bus...

P4P8X SE user's manual English version E1479
Page 14
USB 2.0 technology The motherboard implements the new Universal Serial Bus (USB) 2.0 specification, extending the connection speed from 12 Mbps on USB 1.1 to a fast 480 Mbps on USB 2.0. 6-channel digital audio The ADI AD1888 SoundMAX AC'97 audio CODEC is onboard to provide 6-channel audio playback for 5.1 surround sound and over 90dB dynamic range. Windows 98SE/ME/2000/XP support 6/4/2-channel audio modes. 1-4 Chapter 1: Product introduction
USB 2.0 technology The motherboard implements the new Universal Serial Bus (USB) 2.0 specification, extending the connection speed from 12 Mbps on USB 1.1 to a fast 480 Mbps on USB 2.0. 6-channel digital audio The ADI AD1888 SoundMAX AC'97 audio CODEC is onboard to provide 6-channel audio playback for 5.1 surround sound and over 90dB dynamic range. Windows 98SE/ME/2000/XP support 6/4/2-channel audio modes. 1-4 Chapter 1: Product introduction
P4P8X SE user's manual English version E1479
Page 15
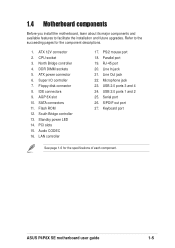
... 5. PS/2 mouse port 18. 1.4 Motherboard components Before you install the motherboard, learn about its major components and available features to the succeeding pages for the specifications of each component. RJ-45 port 20. Floppy disk connector 8. South Bridge controller 13. North Bridge controller 4. Audio CODEC 16. Line Out jack 22. ASUS P4P8X SE motherboard user guide 1-5
... 5. PS/2 mouse port 18. 1.4 Motherboard components Before you install the motherboard, learn about its major components and available features to the succeeding pages for the specifications of each component. RJ-45 port 20. Floppy disk connector 8. South Bridge controller 13. North Bridge controller 4. Audio CODEC 16. Line Out jack 22. ASUS P4P8X SE motherboard user guide 1-5
P4P8X SE user's manual English version E1479
Page 17
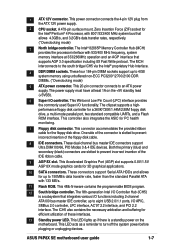
...Memory Controller Hub (MCH) provides the processor interface with 533/400 MHz frequency, system memory interface at least 1A on the motherboard. The power supply must have at 333/266MHz operation and an AGP interface that integrates various I/O functions including 2-channel ATA100 ... This Accelerated Graphics Port (AGP) slot supports 0.8V/1.5V AGP 8X mode graphics cards for PC health monitoring. 7 Floppy disk connector. ASUS P4P8X SE motherboard user guide 1-7 A 478-pin surface mount, Zero Insertion Force (ZIF) socket for efficient utilization of these interfaces. 13 Standby power LED...
...Memory Controller Hub (MCH) provides the processor interface with 533/400 MHz frequency, system memory interface at least 1A on the motherboard. The power supply must have at 333/266MHz operation and an AGP interface that integrates various I/O functions including 2-channel ATA100 ... This Accelerated Graphics Port (AGP) slot supports 0.8V/1.5V AGP 8X mode graphics cards for PC health monitoring. 7 Floppy disk connector. ASUS P4P8X SE motherboard user guide 1-7 A 478-pin surface mount, Zero Insertion Force (ZIF) socket for efficient utilization of these interfaces. 13 Standby power LED...

P4P8X SE user's manual English version E1479
Page 19
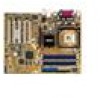
ATX Power Connector FLOPPY1 1.5 Motherboard layout PS/2KBMS KBPWR T: Mouse B: Keyboard SPDIF_O 24.5cm (9.6in) Socket 478 CPU_FAN1 Super I/O DDR DIMM_A1 (64 bit,184-pin module) DDR DIMM_A2 (64 bit,... Controller Hub Accelerated Graphics Port (AGP1) Marrell 88E8001 ® CHA_FAN1 CD1 AUX1 Audio Codec FP_AUDIO PCI1 PCI2 PCI3 P4P8X SE PCI4 SATA2 Intel ICH5 SATA1 USBPW56 USBPW78 CLRTC1 USB_56 USB_78 4Mbit Firmware Hub CR2032 3V Lithium Cell CMOS Power PCI5 SB_PWR1 GAME1 CHASSIS1 PANEL1 PRI_IDE1 SEC_IDE1 30.5cm (12.0in) ASUS P4P8X SE motherboard user guide 1-9
ATX Power Connector FLOPPY1 1.5 Motherboard layout PS/2KBMS KBPWR T: Mouse B: Keyboard SPDIF_O 24.5cm (9.6in) Socket 478 CPU_FAN1 Super I/O DDR DIMM_A1 (64 bit,184-pin module) DDR DIMM_A2 (64 bit,... Controller Hub Accelerated Graphics Port (AGP1) Marrell 88E8001 ® CHA_FAN1 CD1 AUX1 Audio Codec FP_AUDIO PCI1 PCI2 PCI3 P4P8X SE PCI4 SATA2 Intel ICH5 SATA1 USBPW56 USBPW78 CLRTC1 USB_56 USB_78 4Mbit Firmware Hub CR2032 3V Lithium Cell CMOS Power PCI5 SB_PWR1 GAME1 CHASSIS1 PANEL1 PRI_IDE1 SEC_IDE1 30.5cm (12.0in) ASUS P4P8X SE motherboard user guide 1-9
P4P8X SE user's manual English version E1479
Page 20
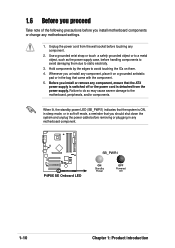
...grounded wrist strap or touch a safely grounded object or to a metal object, such as the power supply case, before you install motherboard components or change any motherboard settings. 1. Whenever you uninstall any component, place it on them due to static electricity. 3. 1.6 Before you proceed Take note ...removing or plugging in the bag that you should shut down the system and unplug the power cable before touching any motherboard component. ® P4P8X SE P4P8X SE Onboard LED SB_PWR1 ON Standby Power OFF Powered Off 1-10 Chapter 1: Product introduction Failure to do so may cause...
...grounded wrist strap or touch a safely grounded object or to a metal object, such as the power supply case, before you install motherboard components or change any motherboard settings. 1. Whenever you uninstall any component, place it on them due to static electricity. 3. 1.6 Before you proceed Take note ...removing or plugging in the bag that you should shut down the system and unplug the power cable before touching any motherboard component. ® P4P8X SE P4P8X SE Onboard LED SB_PWR1 ON Standby Power OFF Powered Off 1-10 Chapter 1: Product introduction Failure to do so may cause...
P4P8X SE user's manual English version E1479
Page 21
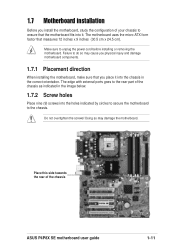
... . Make sure to the rear part of the chassis ASUS P4P8X SE motherboard user guide 1-11 1.7 Motherboard installation Before you install the motherboard, study the configuration of your chassis to ensure that you physical injury and damage motherboard components. 1.7.1 Placement direction When installing the motherboard, make sure that the motherboard fits into it into the holes indicated by circles...
... . Make sure to the rear part of the chassis ASUS P4P8X SE motherboard user guide 1-11 1.7 Motherboard installation Before you install the motherboard, study the configuration of your chassis to ensure that you physical injury and damage motherboard components. 1.7.1 Placement direction When installing the motherboard, make sure that the motherboard fits into it into the holes indicated by circles...
P4P8X SE user's manual English version E1479
Page 22
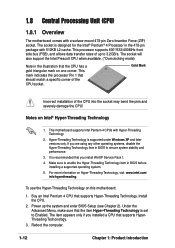
... illustration that should match a specific corner of the CPU socket. Notes on Hyper-Threading Technology, visit www.intel.com/ info/hyperthreading. This motherboard supports Intel Pentium 4 CPUs with a surface mount 478-pin Zero Insertion Force (ZIF) socket. For more information on Intel® Hyper-...478-pin package with 512KB L2 cache. This mark indicates the processor Pin 1 that the CPU has a gold triangular mark on this motherboard: 1. Under the Advanced Menu, make sure that the item Hyper-Threading Technology is recommended that you installed a CPU that supports Hyper...
... illustration that should match a specific corner of the CPU socket. Notes on Hyper-Threading Technology, visit www.intel.com/ info/hyperthreading. This motherboard supports Intel Pentium 4 CPUs with a surface mount 478-pin Zero Insertion Force (ZIF) socket. For more information on Intel® Hyper-...478-pin package with 512KB L2 cache. This mark indicates the processor Pin 1 that the CPU has a gold triangular mark on this motherboard: 1. Under the Advanced Menu, make sure that the item Hyper-Threading Technology is recommended that you installed a CPU that supports Hyper...
P4P8X SE user's manual English version E1479
Page 23
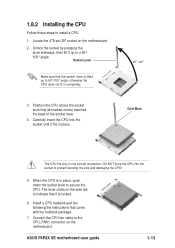
... pins and damaging the CPU! 5. When the CPU is in place, push down the socket lever to a 90°- 100° angle. ASUS P4P8X SE motherboard user guide 1-13 Install a CPU heatsink and fan following the instructions that its marked corner matches the base of the socket lever. 4. Socket Lever... the CPU. Connect the CPU fan cable to install a CPU. 1. 1.8.2 Installing the CPU Follow these steps to the CPU_FAN1 connector on the motherboard. Carefully insert the CPU into the socket to 90°-100° angle, otherwise the CPU does not fit in one correct orientation. The...
... pins and damaging the CPU! 5. When the CPU is in place, push down the socket lever to a 90°- 100° angle. ASUS P4P8X SE motherboard user guide 1-13 Install a CPU heatsink and fan following the instructions that its marked corner matches the base of the socket lever. 4. Socket Lever... the CPU. Connect the CPU fan cable to install a CPU. 1. 1.8.2 Installing the CPU Follow these steps to the CPU_FAN1 connector on the motherboard. Carefully insert the CPU into the socket to 90°-100° angle, otherwise the CPU does not fit in one correct orientation. The...

P4P8X SE user's manual English version E1479
Page 24
...4GB system memory using the memory configurations in Table 1. 2. Use any of the DDR DIMM sockets. (*Overclocking mode) SB_PWR1 ® P4P8X SE P4P8X SE Onboard LED ON Standby Power OFF Powered Off 1.9.1 Memory configurations You may install 64MB, 128MB, 256MB, 512MB, and 1GB DDR DIMMs into...chips are populated with 1GB DIMMs (total 4GB), the system may cause memory sizing error or system boot failure. 1.9 System memory The motherboard comes with the same CAS latency. Refer to chipset limitation. 8. It is recommended that the memory frequency matches the CPU FSB (Front...
...4GB system memory using the memory configurations in Table 1. 2. Use any of the DDR DIMM sockets. (*Overclocking mode) SB_PWR1 ® P4P8X SE P4P8X SE Onboard LED ON Standby Power OFF Powered Off 1.9.1 Memory configurations You may install 64MB, 128MB, 256MB, 512MB, and 1GB DDR DIMMs into...chips are populated with 1GB DIMMs (total 4GB), the system may cause memory sizing error or system boot failure. 1.9 System memory The motherboard comes with the same CAS latency. Refer to chipset limitation. 8. It is recommended that the memory frequency matches the CPU FSB (Front...

P4P8X SE user's manual English version E1479
Page 25
...channel Sockets DIMM_A1 DIMM_A2 DIMM_B1 DIMM_B2 (blue) (black) (blue) (black) (1) Populated - - - (2) - Populated - Populated (1) Populated - ASUS P4P8X SE motherboard user guide 1-15 CPU FSB DDR DIMM Type *800 MHz *PC3200 533 MHz PC2700/PC2100 400 MHz PC2100 * Overclocked mode Memory Frequency 400 MHz 333...) and identical DIMMs in DIMM_A2 and DIMM_B2 (black sockets) Table 2 Memory frequency/CPU FSB synchronization This motherboard supports different memory frequencies depending on the CPU FSB (Front Side Bus) and the type of DDR DIMM. Populated - (4) - - -
...channel Sockets DIMM_A1 DIMM_A2 DIMM_B1 DIMM_B2 (blue) (black) (blue) (black) (1) Populated - - - (2) - Populated - Populated (1) Populated - ASUS P4P8X SE motherboard user guide 1-15 CPU FSB DDR DIMM Type *800 MHz *PC3200 533 MHz PC2700/PC2100 400 MHz PC2100 * Overclocked mode Memory Frequency 400 MHz 333...) and identical DIMMs in DIMM_A2 and DIMM_B2 (black sockets) Table 2 Memory frequency/CPU FSB synchronization This motherboard supports different memory frequencies depending on the CPU FSB (Front Side Bus) and the type of DDR DIMM. Populated - (4) - - -

P4P8X SE user's manual English version E1479
Page 26
... adding or removing DIMMs or other system components. DDR DIMM notch 1. DIMMs 2 2 1 2 2 2 2 2 2 2 2 2 2 2 2 2 2 2 2 2 2 2 2 • Obtain DDR DIMMs only from ASUS qualified vendors for the latest QVL. • FSB800 and DDR400 is properly Unlocked Retaining Clip seated. 1-16 Chapter 1: Product introduction Table 3 DDR400 Qualified Vendor List...K4H560838E-TCCC K4H560838E-TCCC HY5DU56822BT-D43 HY5DU56822BT-D43 MT46V32M8TG-5BC MT46V32M8TG-5BC Max. Follow these steps to both the motherboard and the components. Unlock a DIMM socket by pressing the retaining clips outward. 2.
... adding or removing DIMMs or other system components. DDR DIMM notch 1. DIMMs 2 2 1 2 2 2 2 2 2 2 2 2 2 2 2 2 2 2 2 2 2 2 2 • Obtain DDR DIMMs only from ASUS qualified vendors for the latest QVL. • FSB800 and DDR400 is properly Unlocked Retaining Clip seated. 1-16 Chapter 1: Product introduction Table 3 DDR400 Qualified Vendor List...K4H560838E-TCCC K4H560838E-TCCC HY5DU56822BT-D43 HY5DU56822BT-D43 MT46V32M8TG-5BC MT46V32M8TG-5BC Max. Follow these steps to both the motherboard and the components. Unlock a DIMM socket by pressing the retaining clips outward. 2.
P4P8X SE user's manual English version E1479
Page 27
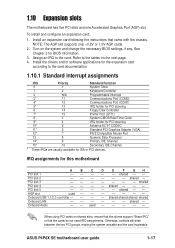
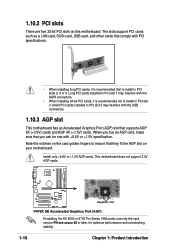
... inoperable. IRQ assignments for BIOS information. 3. shared shared shared shared - - - See Chapter 2 for this motherboard AB PCI slot 1 -- PCI slot 5 -- Onboard LAN -- 1.10 Expansion slots The motherboard has five PCI slots and one Accelerated Graphics Port (AGP) slot. Install an expansion card following the instructions that...- - - shared - - - - - shared - - - - - -- - shared - - - - -- When using PCI cards on shared slots, ensure that the drivers support "Share IRQ" or that came with the chassis. ASUS P4P8X SE motherboard user guide 1-17
... inoperable. IRQ assignments for BIOS information. 3. shared shared shared shared - - - See Chapter 2 for this motherboard AB PCI slot 1 -- PCI slot 5 -- Onboard LAN -- 1.10 Expansion slots The motherboard has five PCI slots and one Accelerated Graphics Port (AGP) slot. Install an expansion card following the instructions that...- - - shared - - - - - shared - - - - - -- - shared - - - - -- When using PCI cards on shared slots, ensure that the drivers support "Share IRQ" or that came with the chassis. ASUS P4P8X SE motherboard user guide 1-17
P4P8X SE user's manual English version E1479
Page 28
This motherboard does not support 3.3V AGP cards. ® P4P8X SE Keyed for 1.5v P4P8X SE Accelerated Graphics Port (AGP) If installing the ATi 9500 ..., SCSI card, USB card, and other cards that comply with the USB connectors. 1.10.3 AGP slot This motherboard has an Accelerated Graphics Port (AGP) slot that you ask for optimum performance and overclocking stability. 1-18 Chapter ...make sure that supports AGP 8X (+0.8V) cards and AGP 4X (+1.5V) cards. Note the notches on this motherboard. Install only +0.8V or +1.5V AGP cards. Long PCI cards installed in PCI slot 1 may interfere with ...
This motherboard does not support 3.3V AGP cards. ® P4P8X SE Keyed for 1.5v P4P8X SE Accelerated Graphics Port (AGP) If installing the ATi 9500 ..., SCSI card, USB card, and other cards that comply with the USB connectors. 1.10.3 AGP slot This motherboard has an Accelerated Graphics Port (AGP) slot that you ask for optimum performance and overclocking stability. 1-18 Chapter ...make sure that supports AGP 8X (+0.8V) cards and AGP 4X (+1.5V) cards. Note the notches on this motherboard. Install only +0.8V or +1.5V AGP cards. Long PCI cards installed in PCI slot 1 may interfere with ...


