
P4C800-E Deluxe User's manual english version E1347
Page 5
...4.5.4 ACPI APIC Support [Enabled 4-27 4.5.5 BIOS -> AML ACPI Table [Enabled 4-27 4.5.6 APM Configuration 4-28 4.5.7 Hardware Monitor 4-30 4.6 Boot menu 4-32 4.6.1 Boot Device Priority 4-32 4.6.2 Boot Settings Configuration 4-33 4.6.3 Security 4-35 4.7 Exit...menu 5-2 5.2.3 Utilities menu 5-3 5.2.4 ASUS Contact Information 5-4 5.2.5 Other information 5-5 5.3 Software information 5-7 5.3.1 ASUS Update 5-7 5.3.2 ASUS MyLogo2 5-8 5.3.3 ASUS PC Probe 5-10 5.3.4 Winbond Voice Editor 5-15 5.3.5 SoundMAX® 4 XL software 5-19 5.3.6 ASUS Instant Music 5-22 5.4 Promise RAID ...
...4.5.4 ACPI APIC Support [Enabled 4-27 4.5.5 BIOS -> AML ACPI Table [Enabled 4-27 4.5.6 APM Configuration 4-28 4.5.7 Hardware Monitor 4-30 4.6 Boot menu 4-32 4.6.1 Boot Device Priority 4-32 4.6.2 Boot Settings Configuration 4-33 4.6.3 Security 4-35 4.7 Exit...menu 5-2 5.2.3 Utilities menu 5-3 5.2.4 ASUS Contact Information 5-4 5.2.5 Other information 5-5 5.3 Software information 5-7 5.3.1 ASUS Update 5-7 5.3.2 ASUS MyLogo2 5-8 5.3.3 ASUS PC Probe 5-10 5.3.4 Winbond Voice Editor 5-15 5.3.5 SoundMAX® 4 XL software 5-19 5.3.6 ASUS Instant Music 5-22 5.4 Promise RAID ...
P4C800-E Deluxe User's manual english version E1347
Page 8
...the motherboard. • Chapter 3: Powering up This chapter describes the power up sequence and gives information on the BIOS beep codes. • Chapter 4: BIOS setup This chapter tells how to perform when installing system components. How this guide This user guide contains the ...information you have to change system settings through the BIOS Setup menus. About this guide is organized This manual contains the following parts: • Chapter 1: Product introduction This chapter describes the features of the P4C800-E Deluxe motherboard.
...the motherboard. • Chapter 3: Powering up This chapter describes the power up sequence and gives information on the BIOS beep codes. • Chapter 4: BIOS setup This chapter tells how to perform when installing system components. How this guide This user guide contains the ...information you have to change system settings through the BIOS Setup menus. About this guide is organized This manual contains the following parts: • Chapter 1: Product introduction This chapter describes the features of the P4C800-E Deluxe motherboard.
P4C800-E Deluxe User's manual english version E1347
Page 17
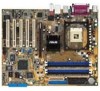
...-dB out put with 94-dB SNR, and analog enumeration capability. ASUS P4C800-E Deluxe motherboard user guide 1-3 AGP 3.0), offering 2.1GB/s bandwidth which is a combination of connecting to the PCI bus, the controller connects to set the BIOS items for other I/O operations. The SoundMAX 4 XL software features the...% (depending on the installed CPU and DRAM) to restore the original BIOS data from the support CD, or from a bootable floppy disk, when the BIOS codes and data are corrupted. Instead of three ASUS intelligent solutions: CrashFree BIOS2, Q-Fan, and POST Reporter. See section ...
...-dB out put with 94-dB SNR, and analog enumeration capability. ASUS P4C800-E Deluxe motherboard user guide 1-3 AGP 3.0), offering 2.1GB/s bandwidth which is a combination of connecting to the PCI bus, the controller connects to set the BIOS items for other I/O operations. The SoundMAX 4 XL software features the...% (depending on the installed CPU and DRAM) to restore the original BIOS data from the support CD, or from a bootable floppy disk, when the BIOS codes and data are corrupted. Instead of three ASUS intelligent solutions: CrashFree BIOS2, Q-Fan, and POST Reporter. See section ...
P4C800-E Deluxe User's manual english version E1347
Page 18
...6307 controller onboard provide high-speed and flexible PC connectivity to a wide range of the motherboard BIOS allows automatic re-setting to the BIOS default settings in different languages. C.P.R. (CPU Parameter Recall) The C.P.R. The IEEE 1394 allows up to ...ASUS Instant Music This unique feature allows you to IEEE 1394a standards. ASUS POST Reporter™ The motherboard offers a new exciting feature called the ASUS POST Reporter™ to overclocking, C.P.R. See page 2-31. Simply shut down and reboot the system, and BIOS automatically restores the CPU default setting...
...6307 controller onboard provide high-speed and flexible PC connectivity to a wide range of the motherboard BIOS allows automatic re-setting to the BIOS default settings in different languages. C.P.R. (CPU Parameter Recall) The C.P.R. The IEEE 1394 allows up to ...ASUS Instant Music This unique feature allows you to IEEE 1394a standards. ASUS POST Reporter™ The motherboard offers a new exciting feature called the ASUS POST Reporter™ to overclocking, C.P.R. See page 2-31. Simply shut down and reboot the system, and BIOS automatically restores the CPU default setting...
P4C800-E Deluxe User's manual english version E1347
Page 31
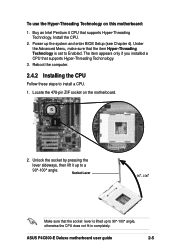
Buy an Intel Pentium 4 CPU that supports Hyper-Threading Techonology. 3. Under the Advanced Menu, make sure that the socket lever is set to install a CPU. 1. Reboot the computer. 2.4.2 Installing the CPU Follow these steps to Enabled. Power up to 90°...CPU that supports Hyper-Threading Technology. Unlock the socket by pressing the lever sideways, then lift it up the system and enter BIOS Setup (see Chapter 4). ASUS P4C800-E Deluxe motherboard user guide 2-5 Locate the 478-pin ZIF socket on this motherboard: 1. To use the Hyper-Threading Technology on the motherboard...
Buy an Intel Pentium 4 CPU that supports Hyper-Threading Techonology. 3. Under the Advanced Menu, make sure that the socket lever is set to install a CPU. 1. Reboot the computer. 2.4.2 Installing the CPU Follow these steps to Enabled. Power up to 90°...CPU that supports Hyper-Threading Technology. Unlock the socket by pressing the lever sideways, then lift it up the system and enter BIOS Setup (see Chapter 4). ASUS P4C800-E Deluxe motherboard user guide 2-5 Locate the 478-pin ZIF socket on this motherboard: 1. To use the Hyper-Threading Technology on the motherboard...
P4C800-E Deluxe User's manual english version E1347
Page 40
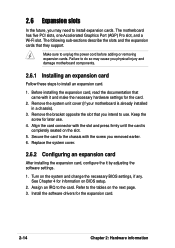
.... 2.6.2 Configuring an expansion card After installing the expansion card, configure the it and make the necessary hardware settings for information on the system and change the necessary BIOS settings, if any. Remove the bracket opposite the slot that you intend to unplug the power cord before adding ...Follow these steps to install an expansion card. 1. Before installing the expansion card, read the documentation that they support. Turn on BIOS setup. 2. See Chapter 4 for the card. 2. Remove the system unit cover (if your motherboard is completely seated on the next page. 3.
.... 2.6.2 Configuring an expansion card After installing the expansion card, configure the it and make the necessary hardware settings for information on the system and change the necessary BIOS settings, if any. Remove the bracket opposite the slot that you intend to unplug the power cord before adding ...Follow these steps to install an expansion card. 1. Before installing the expansion card, read the documentation that they support. Turn on BIOS setup. 2. See Chapter 4 for the card. 2. Remove the system unit cover (if your motherboard is completely seated on the next page. 3.
P4C800-E Deluxe User's manual english version E1347
Page 45
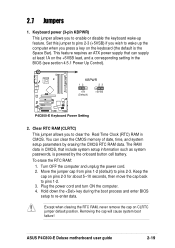
... CMOS RTC RAM data. ASUS P4C800-E Deluxe motherboard user guide 2-19 This feature requires an ATX power supply that include system setup information such as system passwords, is the Space Bar). The RAM data in the BIOS (see section 4.5.1 Power Up Control). ® P4C800-E KBPWR 12 23 +5V (Default) +5VSB P4C800-E Keyboard Power Setting 2. Keyboard power (3-pin...
... CMOS RTC RAM data. ASUS P4C800-E Deluxe motherboard user guide 2-19 This feature requires an ATX power supply that include system setup information such as system passwords, is the Space Bar). The RAM data in the BIOS (see section 4.5.1 Power Up Control). ® P4C800-E KBPWR 12 23 +5V (Default) +5VSB P4C800-E Keyboard Power Setting 2. Keyboard power (3-pin...
P4C800-E Deluxe User's manual english version E1347
Page 46
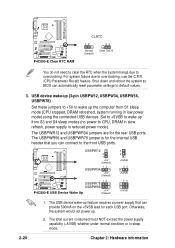
... wake up (3-pin USBPW12, USBPW34, USBPW56, USBPW78) Set these jumpers to +5V to CPU, DRAM in slow refresh, power supply in sleep mode. 2-20 Chapter 2: Hardware information USBPW12 2 1 +5V (Default) 12 USBPW34 ® +5V (Default) P4C800-E 12 USBPW78 USBPW56 P4C800-E USB Device Wake Up +5V (Default) 3 2...devices. ® P4C800-E P4C800-E Clear RTC RAM CLRTC 12 Normal (Default) 23 Clear CMOS You do not need to clear the RTC when the system hangs due to overclocking, use the C.P.R. (CPU Parameter Recall) feature. Shut down and reboot the system so BIOS can connect to ...
... wake up (3-pin USBPW12, USBPW34, USBPW56, USBPW78) Set these jumpers to +5V to CPU, DRAM in slow refresh, power supply in sleep mode. 2-20 Chapter 2: Hardware information USBPW12 2 1 +5V (Default) 12 USBPW34 ® +5V (Default) P4C800-E 12 USBPW78 USBPW56 P4C800-E USB Device Wake Up +5V (Default) 3 2...devices. ® P4C800-E P4C800-E Clear RTC RAM CLRTC 12 Normal (Default) 23 Clear CMOS You do not need to clear the RTC when the system hangs due to overclocking, use the C.P.R. (CPU Parameter Recall) feature. Shut down and reboot the system so BIOS can connect to ...
P4C800-E Deluxe User's manual english version E1347
Page 48
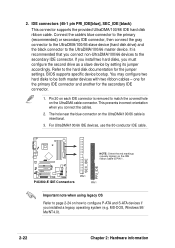
... system (e.g. The hole near the blue connector on each IDE connector is removed to the secondary IDE connector. It is intentional. 3. BIOS supports specific device bootup. Refer to configure P-ATA and S-ATA devices if you connect non-UltraDMA/100/66 devices to match the covered...P4C800-E IDE Connectors PIN 1 Important note when using legacy OS Refer to page 2-24 on the UltraDMA cable connector. You may configure two hard disks to the UltraDMA/100/66 master device. This prevents incorrect orientation when you must configure the second drive as a slave device by setting...
... system (e.g. The hole near the blue connector on each IDE connector is removed to the secondary IDE connector. It is intentional. 3. BIOS supports specific device bootup. Refer to configure P-ATA and S-ATA devices if you connect non-UltraDMA/100/66 devices to match the covered...P4C800-E IDE Connectors PIN 1 Important note when using legacy OS Refer to page 2-24 on the UltraDMA cable connector. You may configure two hard disks to the UltraDMA/100/66 master device. This prevents incorrect orientation when you must configure the second drive as a slave device by setting...

P4C800-E Deluxe User's manual english version E1347
Page 50
...A Configuration B Configuration C Legend: - Supported Disabled P-ATA Primary Secondary (2 devices) (2 devices) - - See section "4.3.6 IDE Configuration" for the appropriate BIOS settings of six (6) devices using these OS. Windows 98/Me/NT4.0 A B C Compatible Mode - ICH5 supports a maximum of the above P-ATA and S-ATA... systems (OS) are MS-DOS, Windows 98/Me/NT4.0. Required IDE Configuration settings in BIOS Refer to the following table for details on the related BIOS items. BIOS item Windows 2000/XP Onboard IDE Operate Mode Enhanced Mode Enhanced Mode Support On ...
...A Configuration B Configuration C Legend: - Supported Disabled P-ATA Primary Secondary (2 devices) (2 devices) - - See section "4.3.6 IDE Configuration" for the appropriate BIOS settings of six (6) devices using these OS. Windows 98/Me/NT4.0 A B C Compatible Mode - ICH5 supports a maximum of the above P-ATA and S-ATA... systems (OS) are MS-DOS, Windows 98/Me/NT4.0. Required IDE Configuration settings in BIOS Refer to the following table for details on the related BIOS items. BIOS item Windows 2000/XP Onboard IDE Operate Mode Enhanced Mode Enhanced Mode Support On ...
P4C800-E Deluxe User's manual english version E1347
Page 51
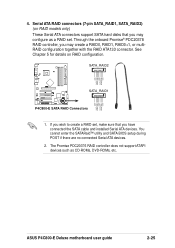
If you wish to create a RAID set, make sure that you may create a RAID0, RAID1, RAID0+1, or multiRAID configuration together with the RAID ATA133 connector. Through the onboard Promise&#...devices such as a RAID set. SATA_RAID2 GND RSATA_TXP2 RSATA_TXN2 GND RSATA_RXP2 RSATA_RXN2 GND ® P4C800-E SATA_RAID1 P4C800-E SATA RAID Connectors GND RSATA_TXP1 RSATA_TXN1 GND RSATA_RXP1 RSATA_RXN1 GND 1. You cannot enter the SATARaid™ utility and SATA BIOS setup during POST if there are no connected Serial ATA devices. 2. ASUS P4C800-E Deluxe motherboard user guide 2-25 ...
If you wish to create a RAID set, make sure that you may create a RAID0, RAID1, RAID0+1, or multiRAID configuration together with the RAID ATA133 connector. Through the onboard Promise&#...devices such as a RAID set. SATA_RAID2 GND RSATA_TXP2 RSATA_TXN2 GND RSATA_RXP2 RSATA_RXN2 GND ® P4C800-E SATA_RAID1 P4C800-E SATA RAID Connectors GND RSATA_TXP1 RSATA_TXN1 GND RSATA_RXP1 RSATA_RXN1 GND 1. You cannot enter the SATARaid™ utility and SATA BIOS setup during POST if there are no connected Serial ATA devices. 2. ASUS P4C800-E Deluxe motherboard user guide 2-25 ...
P4C800-E Deluxe User's manual english version E1347
Page 59
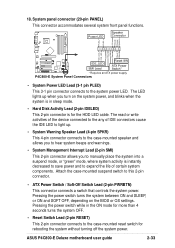
...save power and to light up when you to the system power LED. ExtSMI# Ground PWR Ground Reset Ground ® Reset SW P4C800-E IDE_LED ATX Power SMI Lead Switch* * Requires an ATX power supply. The read or write activities of the device connected to... BIOS or OS settings. 18. P4C800-E System Panel Connectors • System Power LED Lead (3-1 pin PLED) This 3-1 pin connector connects to manually place the system into a suspend mode, or "green" mode, where system activity is for rebooting the system without turning off the system power. ASUS P4C800-E Deluxe motherboard...
...save power and to light up when you to the system power LED. ExtSMI# Ground PWR Ground Reset Ground ® Reset SW P4C800-E IDE_LED ATX Power SMI Lead Switch* * Requires an ATX power supply. The read or write activities of the device connected to... BIOS or OS settings. 18. P4C800-E System Panel Connectors • System Power LED Lead (3-1 pin PLED) This 3-1 pin connector connects to manually place the system into a suspend mode, or "green" mode, where system activity is for rebooting the system without turning off the system power. ASUS P4C800-E Deluxe motherboard...
P4C800-E Deluxe User's manual english version E1347
Page 63
... that is equipped with the last device on , hold down to enter BIOS Setup. Monitor b. of the system chassis. 4. Turn on tests. After applying power, the power LED on the screen. Check the jumper settings and connections or call your monitor complies with "green" standards or if ..., the system may light up or switch between orange and green after the system LED turns on test. While the tests are off. 3. ASUS P4C800-E Deluxe motherboard user guide 3-1 Connect the power cord to a power outlet that all the connections, replace the system case cover. 2. If your retailer...
... that is equipped with the last device on , hold down to enter BIOS Setup. Monitor b. of the system chassis. 4. Turn on tests. After applying power, the power LED on the screen. Check the jumper settings and connections or call your monitor complies with "green" standards or if ..., the system may light up or switch between orange and green after the system LED turns on test. While the tests are off. 3. ASUS P4C800-E Deluxe motherboard user guide 3-1 Connect the power cord to a power outlet that all the connections, replace the system case cover. 2. If your retailer...

P4C800-E Deluxe User's manual english version E1347
Page 64
...8V/1.5V AGP card into the AGP slot. • Make sure that came with your package. You can record your CPU settings in BIOS and make sure you only set to inform you will hear the specific cause of the default POST messages and their corresponding actions, if any. POST Message ... x. • Install 184-pin unbuffered PC3200/2700/2100 DIMMs into the CPU socket. • Check the CPU if properly installed. • Call ASUS technical support for instruction on installing a DIMM. • Install a PCI VGA card into one of system events and boot status. This feature gives you...
...8V/1.5V AGP card into the AGP slot. • Make sure that came with your package. You can record your CPU settings in BIOS and make sure you only set to inform you will hear the specific cause of the default POST messages and their corresponding actions, if any. POST Message ... x. • Install 184-pin unbuffered PC3200/2700/2100 DIMMs into the CPU socket. • Check the CPU if properly installed. • Call ASUS technical support for instruction on installing a DIMM. • Install a PCI VGA card into one of system events and boot status. This feature gives you...

P4C800-E Deluxe User's manual english version E1347
Page 66
... power. 3.3 Powering off the computer You must first exit the operating system and shut down the system before switching off mode regardless of the BIOS setting. Using the dual function power switch While the system is ON, pressing the power switch for more than 4 seconds puts the system to sleep...If you can now safely turn off after exiting or shutting down the operating system. The power supply should turn off mode, depending on the BIOS setting. The message "You can press the ATX power switch after Windows shuts down with an ATX power supply. For ATX power supplies, you ...
... power. 3.3 Powering off the computer You must first exit the operating system and shut down the system before switching off mode regardless of the BIOS setting. Using the dual function power switch While the system is ON, pressing the power switch for more than 4 seconds puts the system to sleep...If you can now safely turn off after exiting or shutting down the operating system. The power supply should turn off mode, depending on the BIOS setting. The message "You can press the ATX power switch after Windows shuts down with an ATX power supply. For ATX power supplies, you ...

P4C800-E Deluxe User's manual english version E1347
Page 67
Detailed descriptions of the BIOS parameters are also provided. BIOS setup Chapter 4 This chapter tells how to change system settings through the BIOS Setup menus.
Detailed descriptions of the BIOS parameters are also provided. BIOS setup Chapter 4 This chapter tells how to change system settings through the BIOS Setup menus.
P4C800-E Deluxe User's manual english version E1347
Page 69
...to Settings, then click on Create Disk... Copy the original (or the latest) motherboard BIOS to the bootable floppy disk. 4.1.2 Using AFUDOS to type the exact BIOS file name at the prompt. 2. You need to restore the BIOS in case you need to update the BIOS Update the BIOS using ...the AFUDOS.EXE utility in the support CD. Save the BIOS file to the bootable floppy disk that contains the BIOS file. 3. ASUS P4C800-E Deluxe motherboard user guide 4-1 DOS environment Insert a 1....
...to Settings, then click on Create Disk... Copy the original (or the latest) motherboard BIOS to the bootable floppy disk. 4.1.2 Using AFUDOS to type the exact BIOS file name at the prompt. 2. You need to restore the BIOS in case you need to update the BIOS Update the BIOS using ...the AFUDOS.EXE utility in the support CD. Save the BIOS file to the bootable floppy disk that contains the BIOS file. 3. ASUS P4C800-E Deluxe motherboard user guide 4-1 DOS environment Insert a 1....
P4C800-E Deluxe User's manual english version E1347
Page 74
...BIOS Setup program so that you can update using the provided utility described in the CMOS RAM of your system, or prompted to "Run Setup". If you wish to enter Setup after changing any BIOS settings, load the default settings... to use as possible. The firmware hub on . See section "4.7 Exit Menu." The BIOS...on your BIOS." 4.2 BIOS Setup program...BIOS Setup program when you with its test routines. Select the Load Default Settings...BIOS information. 4-6 Chapter 4: BIOS Setup It is designed to change the power management settings...
...BIOS Setup program so that you can update using the provided utility described in the CMOS RAM of your system, or prompted to "Run Setup". If you wish to enter Setup after changing any BIOS settings, load the default settings... to use as possible. The firmware hub on . See section "4.7 Exit Menu." The BIOS...on your BIOS." 4.2 BIOS Setup program...BIOS Setup program when you with its test routines. Select the Load Default Settings...BIOS information. 4-6 Chapter 4: BIOS Setup It is designed to change the power management settings...

P4C800-E Deluxe User's manual english version E1347
Page 75
...items: Main Advanced Power Boot Exit For changing the basic system configuration For changing the advanced system settings For changing the advanced power management (APM) configuration For changing the system boot configuration For selecting the exit options and...Not Detected] :[Not Detected] Use [ENTER], [TAB] or [SHIFT-TAB] to select a field. Select Screen Select Item +- ASUS P4C800-E Deluxe motherboard user guide 4-7 4.2.1 BIOS menu screen Menu items Menu bar Configuration fields General help System Time System Date Legacy Diskette A Language Primary IDE Master Primary IDE Slave...
...items: Main Advanced Power Boot Exit For changing the basic system configuration For changing the advanced system settings For changing the advanced power management (APM) configuration For changing the system boot configuration For selecting the exit options and...Not Detected] :[Not Detected] Use [ENTER], [TAB] or [SHIFT-TAB] to select a field. Select Screen Select Item +- ASUS P4C800-E Deluxe motherboard user guide 4-7 4.2.1 BIOS menu screen Menu items Menu bar Configuration fields General help System Time System Date Legacy Diskette A Language Primary IDE Master Primary IDE Slave...

P4C800-E Deluxe User's manual english version E1347
Page 101
...displays the OEM logo instead of the POST messages. When set to [Disabled], BIOS performs all the POST items. Configuration options: [Disabled] [Enabled] Full Screen Logo [Enabled] Setting to skip certain tests while booting. Setting to enable or disable support for PS/2 mouse. Change...boot the system. Configuration options: [Disabled] [Enabled] Add On ROM Display Mode [Force BIOS] Sets the display mode for the NumLock. Configuration options: [Disabled] [Enabled] [Auto] ASUS P4C800-E Deluxe motherboard user guide 4-33 This will decrease the time needed to skip some power on ...
...displays the OEM logo instead of the POST messages. When set to [Disabled], BIOS performs all the POST items. Configuration options: [Disabled] [Enabled] Full Screen Logo [Enabled] Setting to skip certain tests while booting. Setting to enable or disable support for PS/2 mouse. Change...boot the system. Configuration options: [Disabled] [Enabled] Add On ROM Display Mode [Force BIOS] Sets the display mode for the NumLock. Configuration options: [Disabled] [Enabled] [Auto] ASUS P4C800-E Deluxe motherboard user guide 4-33 This will decrease the time needed to skip some power on ...


