
Motherboard DIY Troubleshooting Guide
Page 34
Checking for floppy... • • 2-2 Starting BIOS recovery... User recovery requested.
Checking for floppy... • • 2-2 Starting BIOS recovery... User recovery requested.

Motherboard DIY Troubleshooting Guide
Page 35
Start flashing... Starting BIOS recovery... Checking for floppy... Reading file "1016BPMX.BIN". Flashed successfully. Completed. User recovery requested. Rebooting. 2-3 Floppy found!
Start flashing... Starting BIOS recovery... Checking for floppy... Reading file "1016BPMX.BIN". Flashed successfully. Completed. User recovery requested. Rebooting. 2-3 Floppy found!

Motherboard DIY Troubleshooting Guide
Page 39
Bad BIOS checksum. Completed. Checking for floppy... Checking for floppy... Starting BIOS recovery... Floppy found! Start flashing... 2-7 Bad BIOS checksum. Starting BIOS recovery... Reading file "1016BPMX.BIN".
Bad BIOS checksum. Completed. Checking for floppy... Checking for floppy... Starting BIOS recovery... Floppy found! Start flashing... 2-7 Bad BIOS checksum. Starting BIOS recovery... Reading file "1016BPMX.BIN".
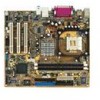
P4BP-MX User Manual
Page 4
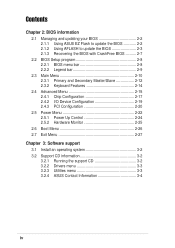
Safeguards Contents Chapter 2: BIOS information 2.1 Managing and updating your BIOS 2-2 2.1.1 Using ASUS EZ Flash to update the BIOS 2-2 2.1.2 Using AFLASH to update the BIOS 2-3 2.1.3 Recovering the BIOS with CrashFree BIOS .......... 2-7 2.2 BIOS Setup program 2-8 2.2.1 BIOS menu bar 2-8 2.2.2 Legend bar 2-9 2.3 Main Menu 2-10 2.3.1 Primary and Secondary Master/Slave 2-12 2.3.2 Keyboard Features 2-14... an operating system 3-2 3.2 Support CD information 3-2 3.2.1 Running the support CD 3-2 3.2.2 Drivers menu 3-3 3.2.3 Utilities menu 3-3 3.2.4 ASUS Contact Information 3-4 iv
Safeguards Contents Chapter 2: BIOS information 2.1 Managing and updating your BIOS 2-2 2.1.1 Using ASUS EZ Flash to update the BIOS 2-2 2.1.2 Using AFLASH to update the BIOS 2-3 2.1.3 Recovering the BIOS with CrashFree BIOS .......... 2-7 2.2 BIOS Setup program 2-8 2.2.1 BIOS menu bar 2-8 2.2.2 Legend bar 2-9 2.3 Main Menu 2-10 2.3.1 Primary and Secondary Master/Slave 2-12 2.3.2 Keyboard Features 2-14... an operating system 3-2 3.2 Support CD information 3-2 3.2.1 Running the support CD 3-2 3.2.2 Drivers menu 3-3 3.2.3 Utilities menu 3-3 3.2.4 ASUS Contact Information 3-4 iv
P4BP-MX User Manual
Page 9
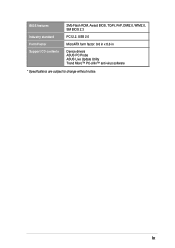
BIOS features Industry standard Form Factor Support CD contents 2Mb Flash ROM, Award BIOS, TCAV, PnP, DMI2.0, WfM2.0, SM BIOS 2.3 PCI 2.2, USB 2.0 MicroATX form factor: 9.6 in x 8.6 in Device drivers ASUS PC Probe ASUS Live Update Utility Trend Micro™ PC-cillin™ anti-virus software * Specifications are subject to change without notice. ix
BIOS features Industry standard Form Factor Support CD contents 2Mb Flash ROM, Award BIOS, TCAV, PnP, DMI2.0, WfM2.0, SM BIOS 2.3 PCI 2.2, USB 2.0 MicroATX form factor: 9.6 in x 8.6 in Device drivers ASUS PC Probe ASUS Live Update Utility Trend Micro™ PC-cillin™ anti-virus software * Specifications are subject to change without notice. ix

P4BP-MX User Manual
Page 14
... need to buy a replacement ROM chip. See page 2-2. No need to use a DOS-based utility or boot from a floppy disk. ASUS MyLogo™ This new feature present in case the BIOS codes and data are corrupted. When the system hangs due to open the system chassis and clear the RTC data. eliminates...
... need to buy a replacement ROM chip. See page 2-2. No need to use a DOS-based utility or boot from a floppy disk. ASUS MyLogo™ This new feature present in case the BIOS codes and data are corrupted. When the system hangs due to open the system chassis and clear the RTC data. eliminates...

P4BP-MX User Manual
Page 18
... visit www.intel.com/ info/hyperthreading. 1-8 Chapter 1: Product introduction Make sure to enable the Hyper-Threading Technology item in BIOS to ensure system stability and performance. 3. For more information on the socket to compile the code. Take note of the ...Technology is recommended that you are using any other operating systems, disable the Hyper-Threading Technology item in BIOS before installing a supported operating system. 5. Gold Arrow P4BP-MX P4BP-MX Socket 478 Incorrect installation of the marked corner (with gold triangle) on Intel® Hyper-Threading ...
... visit www.intel.com/ info/hyperthreading. 1-8 Chapter 1: Product introduction Make sure to enable the Hyper-Threading Technology item in BIOS to ensure system stability and performance. 3. For more information on the socket to compile the code. Take note of the ...Technology is recommended that you are using any other operating systems, disable the Hyper-Threading Technology item in BIOS before installing a supported operating system. 5. Gold Arrow P4BP-MX P4BP-MX Socket 478 Incorrect installation of the marked corner (with gold triangle) on Intel® Hyper-Threading ...
P4BP-MX User Manual
Page 21
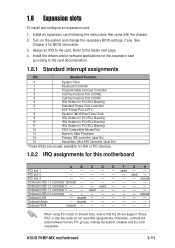
...1shared Onboard USB 1.1 controller 2 - - - used - - - - - Onboard VGA shared When using PCI cards on the system and change the necessary BIOS settings, if any. PCI slot 2 - - - - - - Otherwise, conflicts will arise between the two PCI groups, making the system unstable and the... ATA Controller (dual fifo) *These IRQs are usually available for ISA or PCI devices. 1.8.2 IRQ assignments for BIOS information. 3. used - shared - - - - - - ASUS P4BP-MX motherboard 1-11 Onboard USB 1.1 controller 3 - - 1.8 Expansion slots To install and configure an expansion card: ...
...1shared Onboard USB 1.1 controller 2 - - - used - - - - - Onboard VGA shared When using PCI cards on the system and change the necessary BIOS settings, if any. PCI slot 2 - - - - - - Otherwise, conflicts will arise between the two PCI groups, making the system unstable and the... ATA Controller (dual fifo) *These IRQs are usually available for ISA or PCI devices. 1.8.2 IRQ assignments for BIOS information. 3. used - shared - - - - - - ASUS P4BP-MX motherboard 1-11 Onboard USB 1.1 controller 3 - - 1.8 Expansion slots To install and configure an expansion card: ...
P4BP-MX User Manual
Page 23
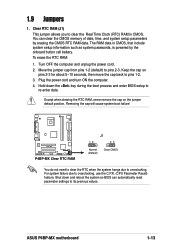
...powered by erasing the CMOS RTC RAM data. Plug the power cord and turn ON the computer. 4. Hold down and reboot the system so BIOS can clear the CMOS memory of date, time, and system setup parameters by the onboard button cell battery. 1.9 Jumpers 1. You can automatically ... re-enter data. Shut down the key during the boot process and enter BIOS setup to pins 1-2. 3. ASUS P4BP-MX motherboard 1-13 Clear RTC RAM (J1) This jumper allows you to pins 2-3. To erase the RTC RAM: 1. P4BP-MX P4BP-MX Clear RTC RAM J1 12 23 Normal (Default) Clear CMOS You do not...
...powered by erasing the CMOS RTC RAM data. Plug the power cord and turn ON the computer. 4. Hold down and reboot the system so BIOS can clear the CMOS memory of date, time, and system setup parameters by the onboard button cell battery. 1.9 Jumpers 1. You can automatically ... re-enter data. Shut down the key during the boot process and enter BIOS setup to pins 1-2. 3. ASUS P4BP-MX motherboard 1-13 Clear RTC RAM (J1) This jumper allows you to pins 2-3. To erase the RTC RAM: 1. P4BP-MX P4BP-MX Clear RTC RAM J1 12 23 Normal (Default) Clear CMOS You do not...
P4BP-MX User Manual
Page 24
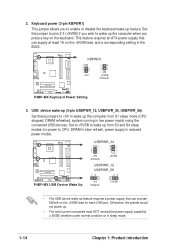
...Otherwise, the system would not power up feature requires a power supply that can provide 500mA on the keyboard. 2. P4BP-MX USBPWR_34 3 2 2 1 +5V (Default) +5VSB USBPWR_12 USBPWR_56 12 23 P4BP-MX USB Device Wake Up +5V (Default) +5VSB • The USB device wake-up . • The total ... to wake up feature. Set to +5VSB to CPU, DRAM in slow refresh, power supply in the BIOS. Keyboard power (3-pin KBPWR1) This jumper allows you press a key on the +5VSB lead for each USB port. P4BP-MX KBPWR1 2 1 +5V 3 2 +5VSB (Default) P4BP-MX Keyboard Power Setting 3.
...Otherwise, the system would not power up feature requires a power supply that can provide 500mA on the keyboard. 2. P4BP-MX USBPWR_34 3 2 2 1 +5V (Default) +5VSB USBPWR_12 USBPWR_56 12 23 P4BP-MX USB Device Wake Up +5V (Default) +5VSB • The USB device wake-up . • The total ... to wake up feature. Set to +5VSB to CPU, DRAM in slow refresh, power supply in the BIOS. Keyboard power (3-pin KBPWR1) This jumper allows you press a key on the +5VSB lead for each USB port. P4BP-MX KBPWR1 2 1 +5V 3 2 +5VSB (Default) P4BP-MX Keyboard Power Setting 3.
P4BP-MX User Manual
Page 31
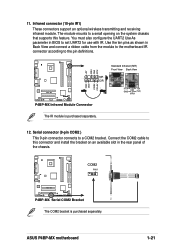
... this connector and install the bracket on an available slot in the rear panel of the chassis. ASUS P4BP-MX motherboard 1-21 11. Use the ten pins as shown in BIOS to a COM2 bracket. Infrared connector (10-pin IR1) These connectors support an optional wireless transmitting and... receiving infrared module. COM2 PIN 1 P4BP-MX P4BP-MX Serial COM2 Bracket The COM2 bracket is purchased separately. 12. P4BP-MX IRAX GND CIRRX CIR+5V +5V...
... this connector and install the bracket on an available slot in the rear panel of the chassis. ASUS P4BP-MX motherboard 1-21 11. Use the ten pins as shown in BIOS to a COM2 bracket. Infrared connector (10-pin IR1) These connectors support an optional wireless transmitting and... receiving infrared module. COM2 PIN 1 P4BP-MX P4BP-MX Serial COM2 Bracket The COM2 bracket is purchased separately. 12. P4BP-MX IRAX GND CIRRX CIR+5V +5V...

P4BP-MX User Manual
Page 32
...system front panel functions. Keyboard Lock Speaker Power LED Connector +5 V PLED Keylock Ground +5V Ground Ground Speaker ExtSMI# Ground PWR Ground Reset Ground P4BP-MX P4BP-MX System Panel Connectors Reset SW SMI Lead ATX Power Switch* * Requires an ATX power supply. • System Power LED Lead (2-pin PLED)...8226; System Warning Speaker Lead (4-pin SPEAKER) This 4-pin connector connects to the case-mounted speaker and allows you turn on the BIOS or OS settings. Pressing the power switch while in which system activity is instantly decreased to save power and to the system power ...
...system front panel functions. Keyboard Lock Speaker Power LED Connector +5 V PLED Keylock Ground +5V Ground Ground Speaker ExtSMI# Ground PWR Ground Reset Ground P4BP-MX P4BP-MX System Panel Connectors Reset SW SMI Lead ATX Power Switch* * Requires an ATX power supply. • System Power LED Lead (2-pin PLED)...8226; System Warning Speaker Lead (4-pin SPEAKER) This 4-pin connector connects to the case-mounted speaker and allows you turn on the BIOS or OS settings. Pressing the power switch while in which system activity is instantly decreased to save power and to the system power ...
P4BP-MX User Manual
Page 33
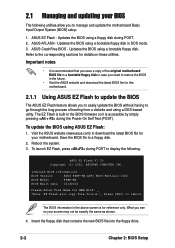
BIOS information ASUS P4BP-MX motherboard 2-1 Detailed descriptions of the BIOS parameters are also provided. Chapter 2 This chapter tells how to change system settings through the BIOS Setup menus.
BIOS information ASUS P4BP-MX motherboard 2-1 Detailed descriptions of the BIOS parameters are also provided. Chapter 2 This chapter tells how to change system settings through the BIOS Setup menus.
P4BP-MX User Manual
Page 34
... you see on these utilities. Visit the ASUS website (www.asus.com) to a floppy disk. 2. 2.1 Managing and updating your BIOS The following . Refer to reboot The BIOS information in DOS mode. 3. ASUS EZ Flash V1.00 Copyright (C) 2002, ASUSTeK COMPUTER INC. [Onboard BIOS Information] BIOS Version : ASUS P4BP-MX ACPI BIOS Revision 1002 BIOS Model : P4BP-MX BIOS Built Date : 01/28/04 Please Enter...
... you see on these utilities. Visit the ASUS website (www.asus.com) to a floppy disk. 2. 2.1 Managing and updating your BIOS The following . Refer to reboot The BIOS information in DOS mode. 3. ASUS EZ Flash V1.00 Copyright (C) 2002, ASUSTeK COMPUTER INC. [Onboard BIOS Information] BIOS Version : ASUS P4BP-MX ACPI BIOS Revision 1002 BIOS Model : P4BP-MX BIOS Built Date : 01/28/04 Please Enter...

P4BP-MX User Manual
Page 35
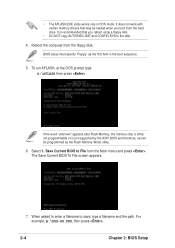
.... At the prompt, "Please Enter File Name for NEW BIOS: _", type in the BIOS file name that updates the BIOS by uploading a new BIOS file to the boot disk you downloaded from the ASUS website, then press . ASUS P4BP-MX motherboard 2-3 The following message appears on screen. [BIOS Information in a wrong BIOS file name, the error message, "WARNING! File not...
.... At the prompt, "Please Enter File Name for NEW BIOS: _", type in the BIOS file name that updates the BIOS by uploading a new BIOS file to the boot disk you downloaded from the ASUS website, then press . ASUS P4BP-MX motherboard 2-3 The following message appears on screen. [BIOS Information in a wrong BIOS file name, the error message, "WARNING! File not...
P4BP-MX User Manual
Page 36
... If the word "unknown" appears after Flash Memory, the memory chip is either not programmable or is recommended that may be programmed by the ACPI BIOS and therefore, cannot be loaded when you reboot using a floppy disk. • DO NOT copy AUTOEXEC.BAT and CONFIG.SYS to the disk. 4. For example..., A:\XXX-XX.XXX, then press . 2-4 Chapter 2: BIOS Setup It is not supported by the Flash Memory Writer utility. 6. Select 1. Reboot the computer from the Main menu and press...
... If the word "unknown" appears after Flash Memory, the memory chip is either not programmable or is recommended that may be programmed by the ACPI BIOS and therefore, cannot be loaded when you reboot using a floppy disk. • DO NOT copy AUTOEXEC.BAT and CONFIG.SYS to the disk. 4. For example..., A:\XXX-XX.XXX, then press . 2-4 Chapter 2: BIOS Setup It is not supported by the Flash Memory Writer utility. 6. Select 1. Reboot the computer from the Main menu and press...
P4BP-MX User Manual
Page 37
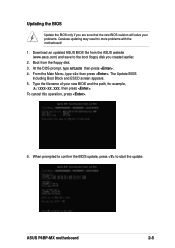
... Boot Block and ESCD screen appears. 5. When prompted to confirm the BIOS update, press to the boot floppy disk you are sure that the new BIOS revision will solve your new BIOS and the path, for example, A:\XXX-XX.XXX, then press . ASUS P4BP-MX motherboard 2-5 To cancel this operation, press . 6. Type the filename of your...
... Boot Block and ESCD screen appears. 5. When prompted to confirm the BIOS update, press to the boot floppy disk you are sure that the new BIOS revision will solve your new BIOS and the path, for example, A:\XXX-XX.XXX, then press . ASUS P4BP-MX motherboard 2-5 To cancel this operation, press . 6. Type the filename of your...

P4BP-MX User Manual
Page 38
...to successfully update a complete BIOS file, call the ASUS service center for support. 2-6 Chapter 2: BIOS Setup If the Flash Memory Writer utility is not able to continue. When the programming is updated automatically only when necessary. DO NOT turn off the system while updating the BIOS. This may cause boot ...problems. Just repeat the process, and if the problem persists, load the original BIOS file you saved to program the new BIOS information into the Flash ROM. The boot block is done, the...
...to successfully update a complete BIOS file, call the ASUS service center for support. 2-6 Chapter 2: BIOS Setup If the Flash Memory Writer utility is not able to continue. When the programming is updated automatically only when necessary. DO NOT turn off the system while updating the BIOS. This may cause boot ...problems. Just repeat the process, and if the problem persists, load the original BIOS file you saved to program the new BIOS information into the Flash ROM. The boot block is done, the...
P4BP-MX User Manual
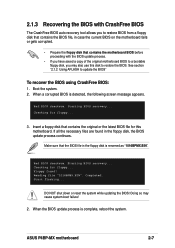
Page 39
... BIOS file, in case the current BIOS on the motherboard fails or gets corrupted. • Prepare the floppy disk that contains the motherboard BIOS before proceeding with the BIOS update process. • If you have saved a copy of the original motherboard BIOS to a bootable floppy disk, you may cause system boot failure! 2. Boot the system. 2. ASUS P4BP-MX...
... BIOS file, in case the current BIOS on the motherboard fails or gets corrupted. • Prepare the floppy disk that contains the motherboard BIOS before proceeding with the BIOS update process. • If you have saved a copy of the original motherboard BIOS to a bootable floppy disk, you may cause system boot failure! 2. Boot the system. 2. ASUS P4BP-MX...
P4BP-MX User Manual
Page 40
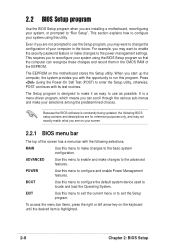
...the keyboard until the desired item is designed to make changes to the basic system configuration. The Setup program is highlighted. 2-8 Chapter 2: BIOS Setup It is constantly being updated, the following selections: MAIN Use this menu to make changes to change the configuration of your system using ... the right or left arrow key on the motherboard stores the Setup utility. Even if you are installing a motherboard, reconfiguring your screen. 2.2.1 BIOS menu bar The top of the EEPROM. For example, you see on your system, or prompted to use the Setup program, you with its...
...the keyboard until the desired item is designed to make changes to the basic system configuration. The Setup program is highlighted. 2-8 Chapter 2: BIOS Setup It is constantly being updated, the following selections: MAIN Use this menu to make changes to change the configuration of your system using ... the right or left arrow key on the motherboard stores the Setup utility. Even if you are installing a motherboard, reconfiguring your screen. 2.2.1 BIOS menu bar The top of the EEPROM. For example, you see on your system, or prompted to use the Setup program, you with its...


