Motherboard DIY Troubleshooting Guide
Page 4
... Powering up 3-1 3.1 Starting up for the first time 3-1 3.3 Powering off the computer 3-2 Chapter 4: BIOS setup 4-1 4.1 Managing and updating your BIOS 4-1 4.1.1 Using the computer system for the first time 4-1 4.1.2 Updating BIOS procedures 4-3 4.2 BIOS Setup program 4-5 4.2.1 BIOS menu bar 4-6 4.2.2 Legend bar 4-6 4.3 Main menu 4-8 4.3.1 Primary & Secondary Master/Slave 4-9 4.3.2 ... Support CD information 5-1 5.2.1 Running the support CD 5-1 5.2.2 Main menu 5-2 5.2.3 Software menu 5-3 5.2.4 Drivers menu 5-5 5.2.5 DOS Utilities menu 5-6 5.2.6 ASUS Contact Information 5-6 iv
... Powering up 3-1 3.1 Starting up for the first time 3-1 3.3 Powering off the computer 3-2 Chapter 4: BIOS setup 4-1 4.1 Managing and updating your BIOS 4-1 4.1.1 Using the computer system for the first time 4-1 4.1.2 Updating BIOS procedures 4-3 4.2 BIOS Setup program 4-5 4.2.1 BIOS menu bar 4-6 4.2.2 Legend bar 4-6 4.3 Main menu 4-8 4.3.1 Primary & Secondary Master/Slave 4-9 4.3.2 ... Support CD information 5-1 5.2.1 Running the support CD 5-1 5.2.2 Main menu 5-2 5.2.3 Software menu 5-3 5.2.4 Drivers menu 5-5 5.2.5 DOS Utilities menu 5-6 5.2.6 ASUS Contact Information 5-6 iv
Motherboard DIY Troubleshooting Guide
Page 8
...comes with the motherboard package. • Glossary This part lists the technical terms that you have to change system settings through the BIOS Setup menus. How this guide This user guide contains the information you may encounter when reading this document. • Index This...technology it supports. • Chapter 2: Hardware information This chapter lists the hardware setup procedures that you need when installing the ASUS P4B-LX motherboard. About this guide is organized This manual contains the following parts: • Chapter 1: Product introduction This chapter describes the features ...
...comes with the motherboard package. • Glossary This part lists the technical terms that you have to change system settings through the BIOS Setup menus. How this guide This user guide contains the information you may encounter when reading this document. • Index This...technology it supports. • Chapter 2: Hardware information This chapter lists the hardware setup procedures that you need when installing the ASUS P4B-LX motherboard. About this guide is organized This manual contains the following parts: • Chapter 1: Product introduction This chapter describes the features ...
Motherboard DIY Troubleshooting Guide
Page 16
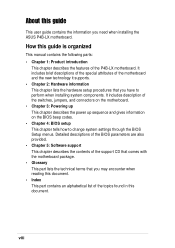
..., Ultra ATA/100, Low Pin Count (LPC) interface, Universal Serial Bus (USB) 1.1 interface, and PCI interface. 10 Flash EEPROM. This 2Mb firmware contains the programmable BIOS program. 11 PCI-based IEEE 1394 host controller. The codec includes analog-to support digital electronic devices. 12 Audio CODEC. This Line Out (lime) jack...
..., Ultra ATA/100, Low Pin Count (LPC) interface, Universal Serial Bus (USB) 1.1 interface, and PCI interface. 10 Flash EEPROM. This 2Mb firmware contains the programmable BIOS program. 11 PCI-based IEEE 1394 host controller. The codec includes analog-to support digital electronic devices. 12 Audio CODEC. This Line Out (lime) jack...
Motherboard DIY Troubleshooting Guide
Page 34
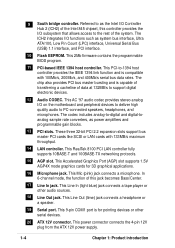
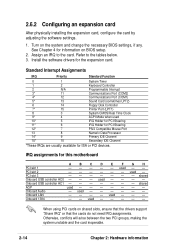
...arise between the two PCI groups, making the system unstable and the card inoperable. 2-14 Chapter 2: Hardware information Install the software drivers for information on BIOS setup. 2. Onboard USB controller HC1 shared AGP used - used - - - - - See Chapter 4 for the expansion card. Refer to the ...8 3 System CMOS/Real Time Clock 9* 4 ACPI Mode when used - - - - When using PCI cards on the system and change the necessary BIOS settings, if any. PCI slot 3 shared Onboard USB controller HC0 - - - Turn on shared slots, ensure that the drivers support "Share IRQ" ...
...arise between the two PCI groups, making the system unstable and the card inoperable. 2-14 Chapter 2: Hardware information Install the software drivers for information on BIOS setup. 2. Onboard USB controller HC1 shared AGP used - used - - - - - See Chapter 4 for the expansion card. Refer to the ...8 3 System CMOS/Real Time Clock 9* 4 ACPI Mode when used - - - - When using PCI cards on the system and change the necessary BIOS settings, if any. PCI slot 3 shared Onboard USB controller HC0 - - - Turn on shared slots, ensure that the drivers support "Share IRQ" ...
Motherboard DIY Troubleshooting Guide
Page 36
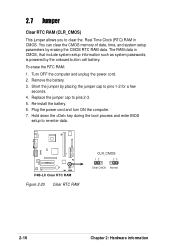
... key during the boot process and enter BIOS setup to clear the Real Time Clock (RTC) RAM in CMOS, that include system setup information such as system passwords, is powered by placing the jumper cap to pins 2-3. 5. The RAM data in CMOS. Remove the battery. 3. P4B-LX P4B-LX Clear RTC RAM Figure 2-20 Clear...
... key during the boot process and enter BIOS setup to clear the Real Time Clock (RTC) RAM in CMOS, that include system setup information such as system passwords, is powered by placing the jumper cap to pins 2-3. 5. The RAM data in CMOS. Remove the battery. 3. P4B-LX P4B-LX Clear RTC RAM Figure 2-20 Clear...
Motherboard DIY Troubleshooting Guide
Page 38
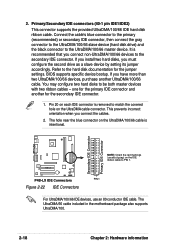
...supports UltraDMA/100. 2-18 Chapter 2: Hardware information If you install two hard disks, you connect the cables. 2. Secondary IDE Connector Primary IDE Connector P4B-LX NOTE: Orient the red markings (usually zigzag) on each IDE connector is intentional. This prevents incorrect orientation when you must configure the second drive .... It is recommended that you have more than two UltraDMA/100/66 devices, purchase another for the jumper settings. Refer to PIN 1. BIOS supports specific device bootup. one for the primary IDE connector and another UltraDMA/100/66 cable.
...supports UltraDMA/100. 2-18 Chapter 2: Hardware information If you install two hard disks, you connect the cables. 2. Secondary IDE Connector Primary IDE Connector P4B-LX NOTE: Orient the red markings (usually zigzag) on each IDE connector is intentional. This prevents incorrect orientation when you must configure the second drive .... It is recommended that you have more than two UltraDMA/100/66 devices, purchase another for the jumper settings. Refer to PIN 1. BIOS supports specific device bootup. one for the primary IDE connector and another UltraDMA/100/66 cable.
Motherboard DIY Troubleshooting Guide
Page 43
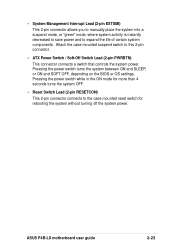
Pressing the power switch turns the system between ON and SLEEP, or ON and SOFT OFF, depending on the BIOS or OS settings. • System Management Interrupt Lead (2-pin EXTSMI) This 2-pin connector allows you to manually place the system into a suspend mode, or "... than 4 seconds turns the system OFF. • Reset Switch Lead (2-pin RESETCON) This 2-pin connector connects to expand the life of certain system components. ASUS P4B-LX motherboard user guide 2-23 Attach the case-mounted suspend switch to this 2-pin connector. • ATX Power Switch / Soft-Off Switch Lead (2-pin PWRBTN) ...
Pressing the power switch turns the system between ON and SLEEP, or ON and SOFT OFF, depending on the BIOS or OS settings. • System Management Interrupt Lead (2-pin EXTSMI) This 2-pin connector allows you to manually place the system into a suspend mode, or "... than 4 seconds turns the system OFF. • Reset Switch Lead (2-pin RESETCON) This 2-pin connector connects to expand the life of certain system components. ASUS P4B-LX motherboard user guide 2-23 Attach the case-mounted suspend switch to this 2-pin connector. • ATX Power Switch / Soft-Off Switch Lead (2-pin PWRBTN) ...
Motherboard DIY Troubleshooting Guide
Page 45
Powering up sequence and gives information on the BIOS beep codes. Chapter 3 This chapter describes the power up
Powering up sequence and gives information on the BIOS beep codes. Chapter 3 This chapter describes the power up
Motherboard DIY Troubleshooting Guide
Page 47
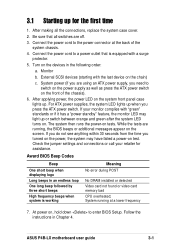
...frequency beeps when system is equipped with the last device on the chain) c. 3.1 Starting up for assistance. Connect the power cord to enter BIOS Setup. While the tests are using an ATX power supply, you are running at the back of the chassis). 6. If you do not ...see anything within 30 seconds from the time you press the ATX power switch. System running , the BIOS beeps or additional messages appear on the front of the system chassis. 4. ASUS P4B-LX motherboard user guide 3-1 External SCSI devices (starting with a surge protector. 5. For ATX power supplies, the ...
...frequency beeps when system is equipped with the last device on the chain) c. 3.1 Starting up for assistance. Connect the power cord to enter BIOS Setup. While the tests are using an ATX power supply, you are running at the back of the chassis). 6. If you do not ...see anything within 30 seconds from the time you press the ATX power switch. System running , the BIOS beeps or additional messages appear on the front of the system chassis. 4. ASUS P4B-LX motherboard user guide 3-1 External SCSI devices (starting with a surge protector. 5. For ATX power supplies, the ...
Motherboard DIY Troubleshooting Guide
Page 49
Chapter 4 This chapter tells how to change system settings through the BIOS Setup menus. BIOS setup Detailed descriptions of the BIOS parameters are also provided.
Chapter 4 This chapter tells how to change system settings through the BIOS Setup menus. BIOS setup Detailed descriptions of the BIOS parameters are also provided.
Motherboard DIY Troubleshooting Guide
Page 51
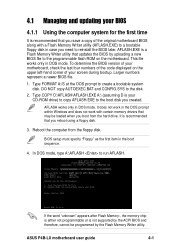
... disk you reboot using a floppy disk. 3. Reboot the computer from the hard drive. In DOS mode, type A:\AFLASH to the disk. 2. ASUS P4B-LX motherboard user guide 4-1 Larger numbers represent a newer BIOS file. 1. It is recommended that you created. It does not work in the DOS prompt within Windows and does not work with...
... disk you reboot using a floppy disk. 3. Reboot the computer from the hard drive. In DOS mode, type A:\AFLASH to the disk. 2. ASUS P4B-LX motherboard user guide 4-1 Larger numbers represent a newer BIOS file. 1. It is recommended that you created. It does not work in the DOS prompt within Windows and does not work with...

Motherboard DIY Troubleshooting Guide
Page 52
The Save Current BIOS To File screen appears. 6. Save Current BIOS to File from the Main menu and press . Type a filename and the path, for example, A:\XXX-XX.XXX, then press . 4-2 Chapter 4: BIOS Setup 5. Select 1.
The Save Current BIOS To File screen appears. 6. Save Current BIOS to File from the Main menu and press . Type a filename and the path, for example, A:\XXX-XX.XXX, then press . 4-2 Chapter 4: BIOS Setup 5. Select 1.
Motherboard DIY Troubleshooting Guide
Page 53
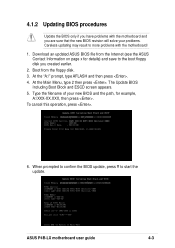
... . 4. Type the filename of your new BIOS and the path, for details) and save to the boot floppy disk you are sure that the new BIOS revision will solve your problems. Careless updating may result to start the update. ASUS P4B-LX motherboard user guide 4-3 When prompted to confirm the... BIOS update, press Y to more problems with the motherboard and you created earlier....
... . 4. Type the filename of your new BIOS and the path, for details) and save to the boot floppy disk you are sure that the new BIOS revision will solve your problems. Careless updating may result to start the update. ASUS P4B-LX motherboard user guide 4-3 When prompted to confirm the... BIOS update, press Y to more problems with the motherboard and you created earlier....
Motherboard DIY Troubleshooting Guide
Page 54
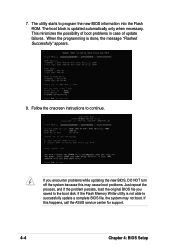
...message "Flashed Successfully" appears. 8. If you encounter problems while updating the new BIOS, DO NOT turn off the system because this happens, call the ASUS service center for support. 4-4 Chapter 4: BIOS Setup This minimizes the possibility of boot problems in case of update failures. The ...utility starts to continue. When the programming is not able to successfully update a complete BIOS file, the system may ...
...message "Flashed Successfully" appears. 8. If you encounter problems while updating the new BIOS, DO NOT turn off the system because this happens, call the ASUS service center for support. 4-4 Chapter 4: BIOS Setup This minimizes the possibility of boot problems in case of update failures. The ...utility starts to continue. When the programming is not able to successfully update a complete BIOS file, the system may ...
Motherboard DIY Troubleshooting Guide
Page 55
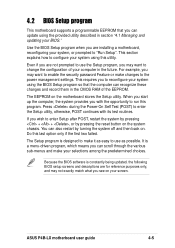
...pressing + + , or by turning the system off and then back on the system chassis. It is constantly being updated, the following BIOS setup screens and descriptions are installing a motherboard, reconfiguring your system, or prompted to reconfigure your screen. If you see on the motherboard ... two failed. When you start up the computer, the system provides you to "Run Setup". ASUS P4B-LX motherboard user guide 4-5 This requires you with its test routines. Because the BIOS software is a menu-driven program, which means you can scroll through the various sub-menus and...
...pressing + + , or by turning the system off and then back on the system chassis. It is constantly being updated, the following BIOS setup screens and descriptions are installing a motherboard, reconfiguring your system, or prompted to reconfigure your screen. If you see on the motherboard ... two failed. When you start up the computer, the system provides you to "Run Setup". ASUS P4B-LX motherboard user guide 4-5 This requires you with its test routines. Because the BIOS software is a menu-driven program, which means you can scroll through the various sub-menus and...
Motherboard DIY Troubleshooting Guide
Page 56
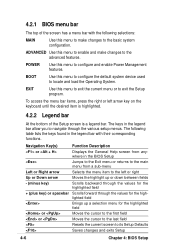
... the first field or Moves the cursor to the last field Resets the current screen to its Setup Defaults Saves changes and exits Setup 4-6 Chapter 4: BIOS Setup To access the menu bar items, press the right or left or right Up or Down arrow Moves the highlight up or down between... desired item is highlighted. 4.2.2 Legend bar At the bottom of the screen has a menu bar with the following table lists the keys found in the BIOS Setup Jumps to the Exit menu or returns to the main menu from a sub-menu Left or Right arrow Selects the menu item to configure...
... the first field or Moves the cursor to the last field Resets the current screen to its Setup Defaults Saves changes and exits Setup 4-6 Chapter 4: BIOS Setup To access the menu bar items, press the right or left or right Up or Down arrow Moves the highlight up or down between... desired item is highlighted. 4.2.2 Legend bar At the bottom of the screen has a menu bar with the following table lists the keys found in the BIOS Setup Jumps to the Exit menu or returns to the main menu from a sub-menu Left or Right arrow Selects the menu item to configure...
Motherboard DIY Troubleshooting Guide
Page 57
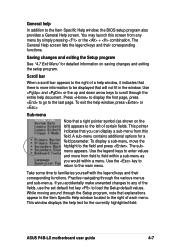
... display the first page, press to go to the Item Specific Help window, the BIOS setup program also provides a General Help screen. General help In addition to the last page. This window displays the help window, press or . ASUS P4B-LX motherboard user guide 4-7 The submenu appears. Scroll bar When a scroll bar appears to...
... display the first page, press to go to the Item Specific Help window, the BIOS setup program also provides a General Help screen. General help In addition to the last page. This window displays the help window, press or . ASUS P4B-LX motherboard user guide 4-7 The submenu appears. Scroll bar When a scroll bar appears to...
Motherboard DIY Troubleshooting Guide
Page 58
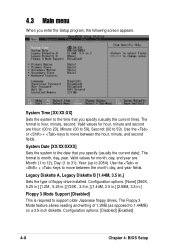
....] [1.44M, 3.5 in.] [2.88M, 3.5 in .] Sets the type of 1.2MB (as opposed to move between the month, day, and year fields. Configuration options: [Disabled] [Enabled] 4-8 Chapter 4: BIOS Setup System Date [XX/XX/XXXX] Sets the system to move between the hour, minute, and second fields. Legacy Diskette A, Legacy Diskette B [1.44M, 3.5 in .] Floppy...
....] [1.44M, 3.5 in.] [2.88M, 3.5 in .] Sets the type of 1.2MB (as opposed to move between the month, day, and year fields. Configuration options: [Disabled] [Enabled] 4-8 Chapter 4: BIOS Setup System Date [XX/XX/XXXX] Sets the system to move between the hour, minute, and second fields. Legacy Diskette A, Legacy Diskette B [1.44M, 3.5 in .] Floppy...
Motherboard DIY Troubleshooting Guide
Page 60
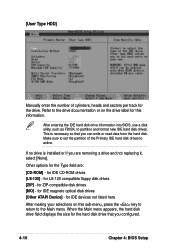
... you are : [CD-ROM] - Other options for the hard disk drive that you configured. 4-10 Chapter 4: BIOS Setup for IDE CD-ROM drives [LS-120] - After entering the IDE hard disk drive information into BIOS, use a disk utility, such as FDISK, to the Main menu. for IDE magneto optical disk drives [Other...
... you are : [CD-ROM] - Other options for the hard disk drive that you configured. 4-10 Chapter 4: BIOS Setup for IDE CD-ROM drives [LS-120] - After entering the IDE hard disk drive information into BIOS, use a disk utility, such as FDISK, to the Main menu. for IDE magneto optical disk drives [Other...
Motherboard DIY Troubleshooting Guide
Page 61
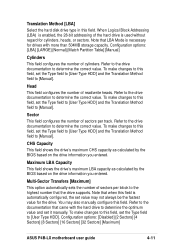
... to this field, set it manually. Configuration options: [Disabled] [2 Sectors] [4 Sectors] [8 Sectors] [16 Sectors] [32 Sectors] [Maximum] ASUS P4B-LX motherboard user guide 4-11 Note that the drive supports. Head This field configures the number of cylinders. Sector This field configures the number of sectors... per track. CHS Capacity This field shows the drive's maximum CHS capacity as calculated by the BIOS based on the drive information you entered. Note that came with more than 504MB storage capacity. To make changes to [Manual...
... to this field, set it manually. Configuration options: [Disabled] [2 Sectors] [4 Sectors] [8 Sectors] [16 Sectors] [32 Sectors] [Maximum] ASUS P4B-LX motherboard user guide 4-11 Note that the drive supports. Head This field configures the number of cylinders. Sector This field configures the number of sectors... per track. CHS Capacity This field shows the drive's maximum CHS capacity as calculated by the BIOS based on the drive information you entered. Note that came with more than 504MB storage capacity. To make changes to [Manual...


