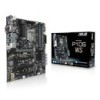
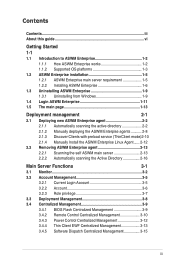
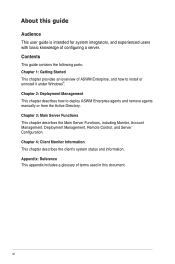
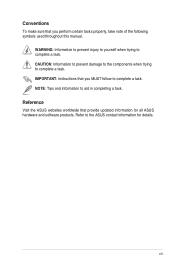
ASWM Enterprise User Manual for English
Page 3
... Enterprise 1-11 1.5 The main page 1-13 Deployment management 2-1 2.1 Deploying new ASWM Enterprise agent 2-2 2.1.1 Automatically scanning the active directory 2-2 2.1.2 Manually deploying the ASWM Enterpise agents 2-8 2.1.3 Discover Clients with preload service (ThinClient mode).2-10 2.1.4 Manually Install the ASWM Enterprise Linux Agent....... 2-12 2.2 Removing ASWM Enterprise agent 2-13 2.2.1 Scanning the self ASWM main server 2-13...
ASWM Enterprise User Manual for English
Page 6
... contains the following parts: Chapter 1: Getting Started This chapter provides an overview of ASWM Enterpirse, and how to deploy ASWM Enterprise agents and remove agents manually or from the Active Directory.
ASWM Enterprise User Manual for English
Page 7
... To make sure that you perform certain tasks properly, take note of the following symbols used throughout this manual. WARNING: Information to prevent injury to yourself when trying to the ASUS contact information for all ASUS hardware and software products. NOTE: Tips and information to complete a task. CAUTION: Information to prevent damage to...
ASWM Enterprise User Manual for English
Page 21
Deployment management Chapter 2 This chapter describes how to deploy ASWM Enterprise agents and remove agents through AD or manually. ASUS System Web-based Management Enterprise
ASWM Enterprise User Manual for English
Page 28
Click Deployment Management on the left. 2. Click Deploy New ASWM Enterprise Agent. 3. The wizard will guide you through the deployment process. Click Start to continue. 2-8 Chapter 2: Deployment Management 2.1.2 Manually deploying the ASWM Enterpise agents To deploy new agents 1.
ASWM Enterprise User Manual for English
Page 29
You can also click the Import button to continue. 5. ASUS System Web-based Management Enterprise 2-9 Select Manual Deploy the ASWM Enterprise Agent and click Next to import a deploy table manually. 6. 4. You can add the target PC through IP Address or Host Name. Click Add Target PC. Fill in the previous section to install the agent when the scanning result is shown. Follow the instructions in the required fileds and click Scan.
ASWM Enterprise User Manual for English
Page 32
... above requriements and the client is connected to the main server before installing ASWM Enterprise Linux Client Agent To install the ASWM Enterprise Linux Agent manually: • Use the root account to login Linux; • Unzip the file, tar -zxvf ASWMLinuxAgent-XXX.tar.gz • Type ...; Input the IP address of your main server • Wait for 1 - 2 minutes for the installation to finish. 2-12 Chapter 2: Deployment Management 2.1.4 Manually Install the ASWM Enterprise Linux Agent OS Support and Requirements • OS Support: RHEL 6.5 32/64 bit RHEL 6.4 32/64 bit CentOS 6.5 32/64 ...
ASWM Enterprise User Manual for English
Page 46
Click "Add New Role" shows as below. 3.3 Deployment Management You can deploy ASWM Enterprise agents and remove agents through AD or manually. Refer to Chapter 2 for details. 3-8 Chapter 3: Main Server Functions
ASWM Enterprise User Manual for English
Page 97
...-based Management Enterprise 4-27 Click BIOS Flash Type > Manual Upload BIOS ROM File to manually upload the BIOS ROM, or select ASUS BIOS Live Update to automatically detect and download the latest BIOS from ASUS Support Website. • Click Reboot After BIOS Flash if you would like to reboot your system after updating the...
ASWM Enterprise User Manual for English
Page 100
Email Setting You can just keep the event logs. 4.10.3 Notification You can set up the notification types, including sending SNMP Traps and Emails, or you have more than one receivers. 4-30 Chapter 3: Client Monitor Information Use semicolons if you can select the E-mail address from your contacts or manually enter the E-mail address. SNMP Trap Setting You can manually enter the Community and Receive Address of SNMP Trap or click the amplifier button to select the built SNMP Trap profile.
ASWM Enterprise User Manual for English
Page 110
Function Category Modules Sub-items Agent Type Win (Server) Win (TC) Linux Automatically Deploy • Deploy New Manually Deploy • Agent Discover Clients with Deployment preload service Management Remove Agent Remove Agent on main server Remove Agent by Scanning the AD • • ...
P10S WS User Guide for English
Page 2
...may be much obliged if you encounter any warranty to Provide Source Code of the product, either (1) for free by ASUS; SPECIFICATIONS AND INFORMATION CONTAINED IN THIS MANUAL ARE FURNISHED FOR INFORMATIONAL USE ONLY, AND ARE SUBJECT TO CHANGE AT ANY TIME WITHOUT NOTICE, AND SHOULD NOT BE...will not be distributed WITHOUT ANY WARRANTY and licensed under various Free Open Source Software licenses. This offer is defaced or missing. ASUS PROVIDES THIS MANUAL "AS IS" WITHOUT WARRANTY OF ANY KIND, EITHER EXPRESS OR IMPLIED, INCLUDING BUT NOT LIMITED TO THE IMPLIED WARRANTIES OR CONDITIONS...
P10S WS User Guide for English
Page 5
... Chapter 4: Software Support 4.1 Installing an operating system 4-1 4.1.1 Windows® 7 and USB 3.0 driver for 100 Series 4-1 4.2 Support DVD information 4-8 4.2.1 Running the support DVD 4-8 4.2.2 Obtaining the software manuals 4-9 4.3 Software information 4-10 4.4 AI Suite 3...4-10 4.4.1 Ai Charger 4-13 4.4.2 USB 3.1 Boost 4-14 4.4.3 EZ Update 4-15 4.4.4 System Information 4-17 4.4.5 Mobo Connect 4-19 4.4.6 USB BIOS Flashback 4-20...
P10S WS User Guide for English
Page 7
..., do not try to the correct voltage in any area where it may become wet. • Place the product on it, carefully read all the manuals that came with the product, contact a qualified service technician or your retailer. Contact a qualified service technician or your retailer. Do not place the product in...
P10S WS User Guide for English
Page 9
... more keys simultaneously, the key names are linked with a plus sign (+). Italics Used to help you MUST follow to complete a task. Keys enclosed in this manual. Example: means that you complete a task. ix NOTE: Tips and additional information to emphasize a word or a phrase. Typography Bold text Indicates a menu or an item...
P10S WS User Guide for English
Page 13
Package contents Check your motherboard package for the following items: User Manual ASUS P10S WS motherboard User manual Support DVD 8 x Serial ATA 6.0 Gb/s cables 1 x COM port bracket 1 x Q-connector 1 x ASUS Q-Shield 2 x M.2 Screw package xiii
P10S WS User Guide for English
Page 27
...! MemOK! button to section 1.2.8 Onboard LEDs for the system to the latest BIOS version from www.asus.com after the whole tuning process, the DRAM_LED lights continuously. function. • The MemOK! ASUS P10S WS 1-13 button lights continuously. Chapter 1 • Refer to boot and load the BIOS default settings.... settings. • We recommend that are not compatible with ones recommended in the Memory QVL (Qualified Vendors Lists) in this user manual or at www.asus.com. • If you download and update to test one set of the DRAM_LED. • The DRAM_LED also lights up due...
P10S WS User Guide for English
Page 37
...using these connectors, set the SATA Mode item in the motherboard support DVD. • These SATA ports are set , refer to [AHCI Mode] by default. ASUS P10S WS 1-23 Intel® C236 Serial ATA 6 Gb/s connectors (7-pin SATA6G_1-8) These connectors connect to [RAID Mode]. Chapter 1 • These connectors are for ... Intel® C236 chipset. Refer to section 3.6.4 PCH Configuration for details. • Before creating a RAID set to section 5.1 RAID configurations or the manual bundled in the BIOS to Serial ATA 6 Gb/s hard disk drives via Serial ATA 6 Gb/s signal cables.
P10S WS User Guide for English
Page 67
Chapter 3 ASUS P10S WS 3-1 You can easily navigate the new UEFI BIOS with the same smoothness as P10SWS.CAP for... a new system component that requires further BIOS settings or update. Chapter 3: BIOS Setup BIOS Setup 3.1 Knowing BIOS 3 The new ASUS UEFI BIOS is a Unified Extensible Interface that complies with UEFI architecture, offering a user-friendly interface that goes beyond the traditional keyboardonly BIOS...configuration, overclocking settings, advanced power management, and boot device configuration that are needed for this user manual refers to ensure optimal performance.
P10S WS User Guide for English
Page 69
...mode for details. Click < or > to the Setup Mode item in section Boot menu for Intel Rapid Storage Technology Displays the CPU Fan's speed. ASUS P10S WS 3-3 To access the Advanced Mode, select Advanced Mode or press the hotkey for entering the BIOS setup program can be changed. The default screen for... the advanced BIOS settings. 3.2.1 EZ Mode By default, the EZ Mode screen appears when you to the system. Click the button to manually tune the fans Loads optimized default settings Saves the changes and resets the system Click to go to Advanced mode Search on the FAQ Click...