ASWM Enterprise User Manual for English
Page 3
... main server 2-13 2.2.2 Automatically scanning the Active Directory 2-16 Main Server Functions 3-1 3.1 Monitor 3-2 3.2 Account Management 3-5 3.2.1 Current Login Account 3-5 3.2.2 Account 3-6 3.2.3 Role privilege 3-7 3.3 Deployment Management 3-8 3.4 Centralized Management 3-9 3.4.1 BIOS Flash Centralized Management 3-9 3.4.2 Remote Control Centralized Management 3-10 3.4.3 Power Control Centralized Management 3-12 3.4.4 Thin Client EWF Centralized Management 3-13 3.4.5 Software Dispatch Centralized Management 3-15 iii
... main server 2-13 2.2.2 Automatically scanning the Active Directory 2-16 Main Server Functions 3-1 3.1 Monitor 3-2 3.2 Account Management 3-5 3.2.1 Current Login Account 3-5 3.2.2 Account 3-6 3.2.3 Role privilege 3-7 3.3 Deployment Management 3-8 3.4 Centralized Management 3-9 3.4.1 BIOS Flash Centralized Management 3-9 3.4.2 Remote Control Centralized Management 3-10 3.4.3 Power Control Centralized Management 3-12 3.4.4 Thin Client EWF Centralized Management 3-13 3.4.5 Software Dispatch Centralized Management 3-15 iii

ASWM Enterprise User Manual for English
Page 19
You cannot flash the BIOS. • Configuration in Monitor is unavailable. You cannot customize the threshold. • You can check the information of starting, restarting or stopping the selected service ... is read -only. Ending process is also unavailable. • Remote Control is dimmed and unavailable. • Deleting SEL information on BMC is not allowed. • BIOS Flash is read -only. You cannot customize the threshold. • You cannot delete the EventLog, but Service of the installed software, but you are available...
You cannot flash the BIOS. • Configuration in Monitor is unavailable. You cannot customize the threshold. • You can check the information of starting, restarting or stopping the selected service ... is read -only. Ending process is also unavailable. • Remote Control is dimmed and unavailable. • Deleting SEL information on BMC is not allowed. • BIOS Flash is read -only. You cannot customize the threshold. • You cannot delete the EventLog, but Service of the installed software, but you are available...

ASWM Enterprise User Manual for English
Page 47
... to view the release note of LatestVersion. 3.4 Centralized Management 3.4.1 BIOS Flash Centralized Management 1. ASUS System Web-based Management Enterprise 3-9 User can simultaneously on ASUS official website and show the latest BIOS version in ASUS support site. System will be controled on the left and select BIOS Flash Centralized Management. 2. Click Centralized Management on the Model with...
... to view the release note of LatestVersion. 3.4 Centralized Management 3.4.1 BIOS Flash Centralized Management 1. ASUS System Web-based Management Enterprise 3-9 User can simultaneously on ASUS official website and show the latest BIOS version in ASUS support site. System will be controled on the left and select BIOS Flash Centralized Management. 2. Click Centralized Management on the Model with...

ASWM Enterprise User Manual for English
Page 48
Click Upadte BIOS button to start BIOS Flash and show all models progress. 3.4.2 Remote Control Centralized Management 1. 2. Click Centralized Management on the left and select Remote Control Centralized Management. 3-10 Chapter 3: Main Server Functions
Click Upadte BIOS button to start BIOS Flash and show all models progress. 3.4.2 Remote Control Centralized Management 1. 2. Click Centralized Management on the left and select Remote Control Centralized Management. 3-10 Chapter 3: Main Server Functions

ASWM Enterprise User Manual for English
Page 66
3.6.5 BIOS The BIOS screen displays all the BIOS cache information. The ASWM Enterprise automatically detect and download the newest BIOS from the ASUS support site. It is more convenient to click the check box on the bottom to select the older version BIOS if you want to remove the older ones. 3.6.6 DataBase You can view the database information of ASWM Enterprise here. 3-28 Chapter 3: Main Server Functions
3.6.5 BIOS The BIOS screen displays all the BIOS cache information. The ASWM Enterprise automatically detect and download the newest BIOS from the ASUS support site. It is more convenient to click the check box on the bottom to select the older version BIOS if you want to remove the older ones. 3.6.6 DataBase You can view the database information of ASWM Enterprise here. 3-28 Chapter 3: Main Server Functions
ASWM Enterprise User Manual for English
Page 97
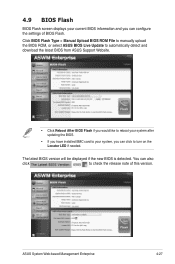
... to check the release note of BIOS Flash. Click BIOS Flash Type > Manual Upload BIOS ROM File to manually upload the BIOS ROM, or select ASUS BIOS Live Update to automatically detect and download the latest BIOS from ASUS Support Website. • Click Reboot After BIOS Flash if you would like to ...have installed BMC card to your current BIOS information and you can click to turn on the Locator LED if needed. ASUS System Web-based Management Enterprise 4-27 The latest BIOS version will be displayed if the new BIOS is detected. 4.9 BIOS Flash BIOS Flash screen displays your system, you...
... to check the release note of BIOS Flash. Click BIOS Flash Type > Manual Upload BIOS ROM File to manually upload the BIOS ROM, or select ASUS BIOS Live Update to automatically detect and download the latest BIOS from ASUS Support Website. • Click Reboot After BIOS Flash if you would like to ...have installed BMC card to your current BIOS information and you can click to turn on the Locator LED if needed. ASUS System Web-based Management Enterprise 4-27 The latest BIOS version will be displayed if the new BIOS is detected. 4.9 BIOS Flash BIOS Flash screen displays your system, you...
ASWM Enterprise User Manual for English
Page 109
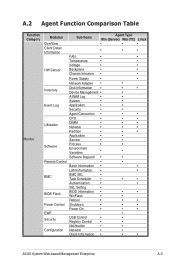
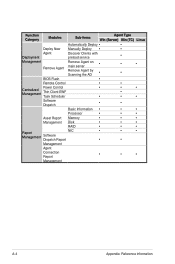
... • • • Authentication • • SEL Setting • BIOS Flash BIOS Information • WinFlash • • • • Reboot • ...• • Power Control Shutdown • • • Power On • • • EWF • Security USB Control • Registry Control • • • Notification • • Configuration Network • • Client Information • • • ASUS...
... • • • Authentication • • SEL Setting • BIOS Flash BIOS Information • WinFlash • • • • Reboot • ...• • Power Control Shutdown • • • Power On • • • EWF • Security USB Control • Registry Control • • • Notification • • Configuration Network • • Client Information • • • ASUS...
ASWM Enterprise User Manual for English
Page 110
... Deploy • Agent Discover Clients with Deployment preload service Management Remove Agent Remove Agent on main server Remove Agent by Scanning the AD • • BIOS Flash • Remote Control • Centralized Management Power Control Thin Client EWF Task Scheduler • • Software Dispatch • Basic Information • Processor • Asset...
... Deploy • Agent Discover Clients with Deployment preload service Management Remove Agent Remove Agent on main server Remove Agent by Scanning the AD • • BIOS Flash • Remote Control • Centralized Management Power Control Thin Client EWF Task Scheduler • • Software Dispatch • Basic Information • Processor • Asset...

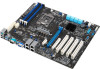
P10S-V4L User Guide
Page 4
... first time 3-2 3.2 Powering off the computer 3-3 3.2.1 Using the OS shut down function 3-3 3.2.2 Using the dual function power switch 3-3 Chapter 4: BIOS Setup 4.1 Managing and updating your BIOS 4-2 4.1.1 ASUS CrashFree BIOS 3 utility 4-2 4.1.2 ASUS EzFlash Utility 4-3 4.1.3 BUPDATER utility 4-4 4.2 BIOS setup program 4-6 4.2.1 BIOS menu screen 4-7 4.2.2 Menu bar 4-7 4.2.3 Menu items 4-8 4.2.4 Submenu items 4-8 4.2.5 Navigation keys 4-8 4.2.6 General help 4-8 4.2.7 Configuration fields 4-8 4.2.8 Pop-up window 4-8 4.2.9 Scroll...
... first time 3-2 3.2 Powering off the computer 3-3 3.2.1 Using the OS shut down function 3-3 3.2.2 Using the dual function power switch 3-3 Chapter 4: BIOS Setup 4.1 Managing and updating your BIOS 4-2 4.1.1 ASUS CrashFree BIOS 3 utility 4-2 4.1.2 ASUS EzFlash Utility 4-3 4.1.3 BUPDATER utility 4-4 4.2 BIOS setup program 4-6 4.2.1 BIOS menu screen 4-7 4.2.2 Menu bar 4-7 4.2.3 Menu items 4-8 4.2.4 Submenu items 4-8 4.2.5 Navigation keys 4-8 4.2.6 General help 4-8 4.2.7 Configuration fields 4-8 4.2.8 Pop-up window 4-8 4.2.9 Scroll...

P10S-V4L User Guide
Page 5
... & Exit menu 4-41 4.10 Event Logs menu 4-42 Chapter 5: RAID Configuration 5.1 Setting up RAID 5-2 5.1.1 RAID definitions 5-2 5.1.2 Installing hard disk drives 5-3 5.1.3 Setting the RAID mode in BIOS 5-3 5.1.4 RAID configuration utilities 5-3 5.2 Intel® Rapid Storage Technology enterprise SATA Option ROM Utility 5-4 5.2.1 Creating a RAID set 5-5 5.2.2 Deleting a RAID set 5-7 5.2.3 5.2.4 Resetting disks to Non-RAID 5-8 Exiting...
... & Exit menu 4-41 4.10 Event Logs menu 4-42 Chapter 5: RAID Configuration 5.1 Setting up RAID 5-2 5.1.1 RAID definitions 5-2 5.1.2 Installing hard disk drives 5-3 5.1.3 Setting the RAID mode in BIOS 5-3 5.1.4 RAID configuration utilities 5-3 5.2 Intel® Rapid Storage Technology enterprise SATA Option ROM Utility 5-4 5.2.1 Creating a RAID set 5-5 5.2.2 Deleting a RAID set 5-7 5.2.3 5.2.4 Resetting disks to Non-RAID 5-8 Exiting...
P10S-V4L User Guide
Page 31
...card. Remove the bracket opposite the slot that the cards do so may need IRQ assignments. Install the software drivers for information on BIOS setup. 2. Remove the system unit cover (if your motherboard is completely seated on shared slots, ensure that the drivers support "Share...the documentation that they support. Keep the screw for the card. 2. Turn on the next page. 3. ASUS P10S-V/4L 2-15 Refer to the tables on the system and change the necessary BIOS settings, if any. Replace the system cover. 2.5.2 Configuring an expansion card After installing the expansion card,...
...card. Remove the bracket opposite the slot that the cards do so may need IRQ assignments. Install the software drivers for information on BIOS setup. 2. Remove the system unit cover (if your motherboard is completely seated on shared slots, ensure that the drivers support "Share...the documentation that they support. Keep the screw for the card. 2. Turn on the next page. 3. ASUS P10S-V/4L 2-15 Refer to the tables on the system and change the necessary BIOS settings, if any. Replace the system cover. 2.5.2 Configuring an expansion card After installing the expansion card,...

P10S-V4L User Guide
Page 37
... powers the RAM data in CMOS, which include system setup information such as system passwords. Hold down the key during the boot process and enter BIOS setup to clear the CMOS memory system setup parameters by erasing the CMOS Real Time Clock (RTC) RAM data. Removing the cap will cause system... from pins 1-2 (default) to clear the CMOS RTC RAM data. Except when clearing the RTC RAM, never remove the cap on CLRTC jumper default position. ASUS P10S-V/4L 2-21
... powers the RAM data in CMOS, which include system setup information such as system passwords. Hold down the key during the boot process and enter BIOS setup to clear the CMOS memory system setup parameters by erasing the CMOS Real Time Clock (RTC) RAM data. Removing the cap will cause system... from pins 1-2 (default) to clear the CMOS RTC RAM data. Except when clearing the RTC RAM, never remove the cap on CLRTC jumper default position. ASUS P10S-V/4L 2-21

P10S-V4L User Guide
Page 49
... puts the system in sleep mode. 2. The speaker allows you turn on the BIOS settings. Power button/soft-off mode depending on the system power, and blinks when the system is controlled by Hardware monitor to the HDD. 5. ASUS P10S-V/4L 2-33 The message LED is in sleep or soft-off button (2-pin PWRSW...
... puts the system in sleep mode. 2. The speaker allows you turn on the BIOS settings. Power button/soft-off mode depending on the system power, and blinks when the system is controlled by Hardware monitor to the HDD. 5. ASUS P10S-V/4L 2-33 The message LED is in sleep or soft-off button (2-pin PWRSW...

P10S-V4L User Guide
Page 54
...the jumper settings and connections or call your monitor complies with the last device on test. After making all switches are running, the BIOS beeps or additional messages appear on , hold down the key to the power connector at the back of the system chassis. 4. ...press the ATX power button. The following order: a. No VGA Detected. Chassis Intrusion. At power on the screen. Connect the power cord to enter the BIOS Setup. Follow the instructions in the following shows the possible beep codes and its corresponding error condition Beep 1 short 1 short 1 short, 2 short 1...
...the jumper settings and connections or call your monitor complies with the last device on test. After making all switches are running, the BIOS beeps or additional messages appear on , hold down the key to the power connector at the back of the system chassis. 4. ...press the ATX power button. The following order: a. No VGA Detected. Chassis Intrusion. At power on the screen. Connect the power cord to enter the BIOS Setup. Follow the instructions in the following shows the possible beep codes and its corresponding error condition Beep 1 short 1 short 1 short, 2 short 1...

P10S-V4L User Guide
Page 55
...is checked. 4. From the Shutdown Event Tracker, select the option that best describes why you want to soft-off mode, depending on the BIOS setting. 3.2 Powering off the computer 3.2.1 Using the OS shut down the computer. 3. Otherwise, select the option that the Planned check box ... Start button, move the cursor to shut down . 4. Select Shut down the computer. 5. ASUS P10S-V/4L 3-3 Ensure that best describes why you want to the triangle on the lower right side of the BIOS setting. Press ++. 2. Click on the Power icon on the right of Log off mode regardless...
...is checked. 4. From the Shutdown Event Tracker, select the option that best describes why you want to soft-off mode, depending on the BIOS setting. 3.2 Powering off the computer 3.2.1 Using the OS shut down the computer. 3. Otherwise, select the option that the Planned check box ... Start button, move the cursor to shut down . 4. Select Shut down the computer. 5. ASUS P10S-V/4L 3-3 Ensure that best describes why you want to the triangle on the lower right side of the BIOS setting. Press ++. 2. Click on the Power icon on the right of Log off mode regardless...

P10S-V4L User Guide
Page 58
... so would cause system boot failure! You can update a corrupted BIOS file using the BUPDATER utility. 4.1.1 ASUS CrashFree BIOS 3 utility The ASUS CrashFree BIOS 3 is an auto recovery tool that contains the updated BIOS file. ASUS EzFlash Updates the BIOS using a bootable USB flash disk drive when the BIOS file fails or gets corrupted. 2. Refer to download the latest...
... so would cause system boot failure! You can update a corrupted BIOS file using the BUPDATER utility. 4.1.1 ASUS CrashFree BIOS 3 utility The ASUS CrashFree BIOS 3 is an auto recovery tool that contains the updated BIOS file. ASUS EzFlash Updates the BIOS using a bootable USB flash disk drive when the BIOS file fails or gets corrupted. 2. Refer to download the latest...
P10S-V4L User Guide
Page 59
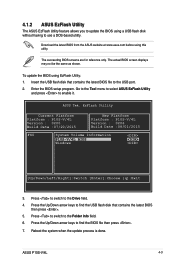
... may not be the same as shown. ASUS P10S-V/4L 4-3 ASUS Tek. Press the Up/Down arrow keys to the Drive field. 4. To update the BIOS using EzFlash Utility: 1. Enter the BIOS setup program. EzFlash Utility Current Platform Platform : P10S-V/4L Version : 0200 Build Date :07/20/2015 New Platform Platform : P10S-V/4L Version : 0206 Build Date :08/01/2015...
... may not be the same as shown. ASUS P10S-V/4L 4-3 ASUS Tek. Press the Up/Down arrow keys to the Drive field. 4. To update the BIOS using EzFlash Utility: 1. Enter the BIOS setup program. EzFlash Utility Current Platform Platform : P10S-V/4L Version : 0200 Build Date :07/20/2015 New Platform Platform : P10S-V/4L Version : 0206 Build Date :08/01/2015...

P10S-V4L User Guide
Page 60
...on the bootable USB flash disk drive, then press . Download the BUPDATER utility (BUPDATER.exe) from the ASUS support website at www.asus.com and download the latest BIOS file for reference only. The BUPDATER utility allows you created earlier. 3. Press and select Yes to the bootable... USB flash disk drive you to prevent system boot failure! Visit the ASUS website at www.asus.com/support to load the BIOS default settings. 4.1.3 BUPDATER utility The succeeding BIOS screens are for the motherboard. • This function can support devices such as shown....
...on the bootable USB flash disk drive, then press . Download the BUPDATER utility (BUPDATER.exe) from the ASUS support website at www.asus.com and download the latest BIOS file for reference only. The BUPDATER utility allows you created earlier. 3. Press and select Yes to the bootable... USB flash disk drive you to prevent system boot failure! Visit the ASUS website at www.asus.com/support to load the BIOS default settings. 4.1.3 BUPDATER utility The succeeding BIOS screens are for the motherboard. • This function can support devices such as shown....

P10S-V4L User Guide
Page 61
... completed. 4. DO NOT SHUTDOWN THE SYSTEM!!! Write 75% DO NOT shut down or reset the system while updating the BIOS to the DOS prompt after the BIOS update process is finished! Please restart your system. Reboot the system from the hard disk drive. C:\> ASUS P10S-V/4L 4-5 The utility verifies the file, then starts updating the...
... completed. 4. DO NOT SHUTDOWN THE SYSTEM!!! Write 75% DO NOT shut down or reset the system while updating the BIOS to the DOS prompt after the BIOS update process is finished! Please restart your system. Reboot the system from the hard disk drive. C:\> ASUS P10S-V/4L 4-5 The utility verifies the file, then starts updating the...

P10S-V4L User Guide
Page 62
... when you are not prompted to use as easy to enter Setup after changing any BIOS settings, load the default settings to reconfigure your screen. • Visit the ASUS website (www.asus.com) to run this utility. Being a menu-driven program, it as possible. Press... during the Power-On Self-Test (POST) to ensure optimum performance. 4.2 BIOS setup program This motherboard supports a programmable firmware chip ...
... when you are not prompted to use as easy to enter Setup after changing any BIOS settings, load the default settings to reconfigure your screen. • Visit the ASUS website (www.asus.com) to run this utility. Being a menu-driven program, it as possible. Press... during the Power-On Self-Test (POST) to ensure optimum performance. 4.2 BIOS setup program This motherboard supports a programmable firmware chip ...


