
NCT-D MB User Manual English Version
Page 3
... guide viii Typography ix NCT-D (A) specifications summary x Chapter 1: Product introduction 1.1 Welcome 1-1 1.2 Package contents 1-1 1.3 Special features 1-2 1.3.1 Product highlights 1-2 1.3.2 Innovative ASUS features 1-4 Chapter 2: Hardware information 2.1 Before you proceed 2-1 2.2 Motherboard overview 2-2 2.2.1 Placement direction 2-2 2.2.2 Screw holes 2-2 2.2.3 Support plates for motherboard 2-3 2.2.4 Motherboard layout 2-7 2.2.5 Layout contents 2-8 2.3 Central Processing Unit (CPU 2-10 2.3.1 Installling the CPU 2-10 2.3.2 Installing the CPU heatsink and fan 2-12...
... guide viii Typography ix NCT-D (A) specifications summary x Chapter 1: Product introduction 1.1 Welcome 1-1 1.2 Package contents 1-1 1.3 Special features 1-2 1.3.1 Product highlights 1-2 1.3.2 Innovative ASUS features 1-4 Chapter 2: Hardware information 2.1 Before you proceed 2-1 2.2 Motherboard overview 2-2 2.2.1 Placement direction 2-2 2.2.2 Screw holes 2-2 2.2.3 Support plates for motherboard 2-3 2.2.4 Motherboard layout 2-7 2.2.5 Layout contents 2-8 2.3 Central Processing Unit (CPU 2-10 2.3.1 Installling the CPU 2-10 2.3.2 Installing the CPU heatsink and fan 2-12...
NCT-D MB User Manual English Version
Page 10
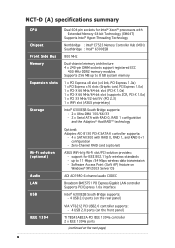
.../5V (PCI 2.3) 1 x WiFi slot (ASUS proprietary) Intel® 6300ESB South Bridge supports: - 2 x Ultra DMA 100/66/33 - 2 x Serial ATA with RAID 0, RAID 1 configuration and the Adaptec® HostRAID™ technology Optional: Adaptec AIC-8130 PCI-X SATA-II controller supports: - 4 x SATAII 300 with RAID 0, RAID 1, and RAID 0+1 configuration - NCT-D (A) specifications summary CPU Chipset Front Side Bus...
.../5V (PCI 2.3) 1 x WiFi slot (ASUS proprietary) Intel® 6300ESB South Bridge supports: - 2 x Ultra DMA 100/66/33 - 2 x Serial ATA with RAID 0, RAID 1 configuration and the Adaptec® HostRAID™ technology Optional: Adaptec AIC-8130 PCI-X SATA-II controller supports: - 4 x SATAII 300 with RAID 0, RAID 1, and RAID 0+1 configuration - NCT-D (A) specifications summary CPU Chipset Front Side Bus...
NCT-D MB User Manual English Version
Page 11
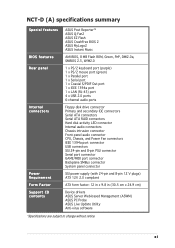
xi NCT-D (A) specifications summary Special features BIOS features Rear panel Internal connectors Power Requirement Form Factor Support CD contents ASUS Post Reporter™ ASUS Q-Fan2 ASUS EZ Flash ASUS CrashFree BIOS 2 ASUS MyLogo2 ASUS Instant Music AMI BIOS, 8 MB Flash ROM, Green, PnP, DMI2.0a, SMBIOS 2.3, WfM2.0 1 x PS/2 keyboard port (purple) 1... ATA RAID connectors Hard disk activity LED connector Internal audio connectors Chassis intrusion connector Front panel audio connector CPU, Chassis, and Power Fan connectors IEEE 1394a port connector USB connectors SSI 24-pin and 8-pin PSU...
xi NCT-D (A) specifications summary Special features BIOS features Rear panel Internal connectors Power Requirement Form Factor Support CD contents ASUS Post Reporter™ ASUS Q-Fan2 ASUS EZ Flash ASUS CrashFree BIOS 2 ASUS MyLogo2 ASUS Instant Music AMI BIOS, 8 MB Flash ROM, Green, PnP, DMI2.0a, SMBIOS 2.3, WfM2.0 1 x PS/2 keyboard port (purple) 1... ATA RAID connectors Hard disk activity LED connector Internal audio connectors Chassis intrusion connector Front panel audio connector CPU, Chassis, and Power Fan connectors IEEE 1394a port connector USB connectors SSI 24-pin and 8-pin PSU...
NCT-D MB User Manual English Version
Page 18
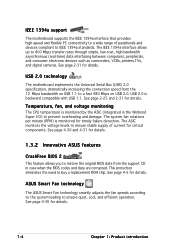
IEEE 1394a support The motherboard supports the IEEE 1394a interface that provides high-speed and flexible PC connectivity to a wide range of current for critical components. USB 2.0 is monitored for details. 1.3.2 Innovative ASUS features CrashFree BIOS 2 This feature allows you to restore the original BIOS data from the 12 Mbps ...ROM chip. This protection eliminates the need to IEEE 1394a standards. See page 2-31 for details. Temperature, fan, and voltage monitoring The CPU temperature is monitored by the ASIC (integrated in case when the BIOS codes and data are corrupted.
IEEE 1394a support The motherboard supports the IEEE 1394a interface that provides high-speed and flexible PC connectivity to a wide range of current for critical components. USB 2.0 is monitored for details. 1.3.2 Innovative ASUS features CrashFree BIOS 2 This feature allows you to restore the original BIOS data from the 12 Mbps ...ROM chip. This protection eliminates the need to IEEE 1394a standards. See page 2-31 for details. Temperature, fan, and voltage monitoring The CPU temperature is monitored by the ASIC (integrated in case when the BIOS codes and data are corrupted.
NCT-D MB User Manual English Version
Page 25
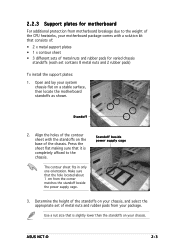
... the height of the standoffs on your chassis. ASUS NCT-D 2-3 Open and lay your system chassis flat on the base of the chassis. Align the holes of the contour sheet with a solution kit that consists of: • 2 x metal support plates • 1 x contour sheet •...Use a nut size that is completely affixed to the weight of the CPU heatsinks, your motherboard package comes with the standoffs on a stable surface, then locate the motherboard standoffs as shown. 2.2.3 Support plates for motherboard For additional protection from motherboard breakage due to the chassis...
... the height of the standoffs on your chassis. ASUS NCT-D 2-3 Open and lay your system chassis flat on the base of the chassis. Align the holes of the contour sheet with a solution kit that consists of: • 2 x metal support plates • 1 x contour sheet •...Use a nut size that is completely affixed to the weight of the CPU heatsinks, your motherboard package comes with the standoffs on a stable surface, then locate the motherboard standoffs as shown. 2.2.3 Support plates for motherboard For additional protection from motherboard breakage due to the chassis...
NCT-D MB User Manual English Version
Page 27
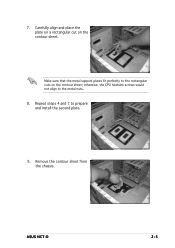
ASUS NCT-D 2-5 7. Carefully align and place the plate on a rectangular cut on the contour sheet; otherwise, the CPU heatsink screws would not align to prepare and install the second plate. 9. Repeat steps 4 and 7 to the metal nuts. 8. Remove the contour sheet from the chassis. Make sure that the metal support plates fit perfectly to the rectangular cuts on the contour sheet.
ASUS NCT-D 2-5 7. Carefully align and place the plate on a rectangular cut on the contour sheet; otherwise, the CPU heatsink screws would not align to prepare and install the second plate. 9. Repeat steps 4 and 7 to the metal nuts. 8. Remove the contour sheet from the chassis. Make sure that the metal support plates fit perfectly to the rectangular cuts on the contour sheet.
NCT-D MB User Manual English Version
Page 28
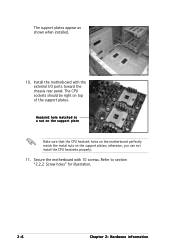
The CPU sockets should be right on the support plates; Secure the motherboard with the external I/O ports toward the chassis rear panel. otherwise, you can not install the CPU heatsinks properly. 11. Heatsink hole matched to section "2.2.2 Screw holes" for illustration. 2-6 Chapter 2: Hardware information Refer to a nut on the support plate Make sure that the CPU heatsink holes on the motherboard perfectly match the metal nuts on top of the support plates. The support plates appear as shown when installed. 10. Install the motherboard with 10 screws.
The CPU sockets should be right on the support plates; Secure the motherboard with the external I/O ports toward the chassis rear panel. otherwise, you can not install the CPU heatsinks properly. 11. Heatsink hole matched to section "2.2.2 Screw holes" for illustration. 2-6 Chapter 2: Hardware information Refer to a nut on the support plate Make sure that the CPU heatsink holes on the motherboard perfectly match the metal nuts on top of the support plates. The support plates appear as shown when installed. 10. Install the motherboard with 10 screws.
NCT-D MB User Manual English Version
Page 32
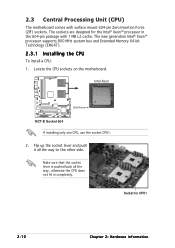
... Intel® Xeon™ processor supports 800 MHz system bus and Extended Memory 64-bit Technology (EM64T). 2.3.1 Installling the CPU To install a CPU: 1. Socket for the Intel® Xeon™ processor in completely. Intel Xeon Gold Arrow NCT-D NCT-D Socket 604 If installing only one CPU, use the socket CPU1. 2. ...Flip up the socket lever and push it all the way, otherwise the CPU does not fit in the 604-pin package with surface mount 604...
... Intel® Xeon™ processor supports 800 MHz system bus and Extended Memory 64-bit Technology (EM64T). 2.3.1 Installling the CPU To install a CPU: 1. Socket for the Intel® Xeon™ processor in completely. Intel Xeon Gold Arrow NCT-D NCT-D Socket 604 If installing only one CPU, use the socket CPU1. 2. ...Flip up the socket lever and push it all the way, otherwise the CPU does not fit in the 604-pin package with surface mount 604...
NCT-D MB User Manual English Version
Page 34
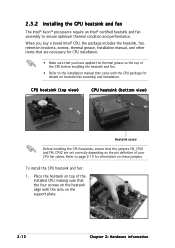
... FM_CPU1 and FM_CPU2 are necessary for details on the support plate. 2-12 Chapter 2: Hardware information To install the CPU heatsink and fan: 1. Refer to the installation manual that came with the CPU package for CPU installation. • Make sure that you buy a boxed Intel® CPU, the package includes the heatsink, fan, retention brackets, screws...
... FM_CPU1 and FM_CPU2 are necessary for details on the support plate. 2-12 Chapter 2: Hardware information To install the CPU heatsink and fan: 1. Refer to the installation manual that came with the CPU package for CPU installation. • Make sure that you buy a boxed Intel® CPU, the package includes the heatsink, fan, retention brackets, screws...

NCT-D MB User Manual English Version
Page 52
... the fan cables to the fan connectors. CPU_FAN1 REAR_FAN1 CPU_FAN1 PWM Control FAN Speed FAN Power GND CPU_FAN2 FRNT_FAN1 FRNT_FAN2 REAR_FAN2 NCT-D NCT-D Fan connectors REAR_FAN1 GND +12V Rotation FRNT_FAN1 Rotation +12V GND CPU_FAN2 PWM Control FAN Speed FAN Power GND REAR_FAN2 GND ...+12V Rotation FRNT_FAN2 Rotation +12V GND 2-30 Chapter 2: Hardware information CPU and system fan connectors (3-pin CPU_FAN1/2, REAR_FAN1/2, FRNT_FAN1/2) The fan connectors support cooling fans of 350 mA ~ 740 mA (8.88 W max.) or a total of the connector. 8...
... the fan cables to the fan connectors. CPU_FAN1 REAR_FAN1 CPU_FAN1 PWM Control FAN Speed FAN Power GND CPU_FAN2 FRNT_FAN1 FRNT_FAN2 REAR_FAN2 NCT-D NCT-D Fan connectors REAR_FAN1 GND +12V Rotation FRNT_FAN1 Rotation +12V GND CPU_FAN2 PWM Control FAN Speed FAN Power GND REAR_FAN2 GND ...+12V Rotation FRNT_FAN2 Rotation +12V GND 2-30 Chapter 2: Hardware information CPU and system fan connectors (3-pin CPU_FAN1/2, REAR_FAN1/2, FRNT_FAN1/2) The fan connectors support cooling fans of 350 mA ~ 740 mA (8.88 W max.) or a total of the connector. 8...
NCT-D MB User Manual English Version
Page 63
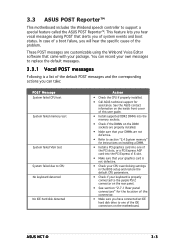
... in the BIOS setup and restore the default CPU parameters. • Check if your package. These POST messages are not defective. • Refer to replace the default messages. 3.3.1 Vocal POST messages Following is properly connected to support a special feature called the ASUS POST Reporter™. ASUS NCT-D 3-3 In case of a boot failure, you can record...
... in the BIOS setup and restore the default CPU parameters. • Check if your package. These POST messages are not defective. • Refer to replace the default messages. 3.3.1 Vocal POST messages Following is properly connected to support a special feature called the ASUS POST Reporter™. ASUS NCT-D 3-3 In case of a boot failure, you can record...
NCT-D MB User Manual English Version
Page 64
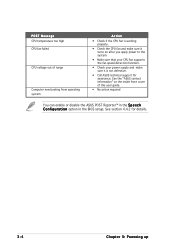
... now booting from operating system Action • Check if the CPU fan is not defective. • Call ASUS technical support for details. 3-4 Chapter 3: Powering up See the "ASUS contact information" on after you apply power to the system. • Make sure that your CPU fan supports the fan speed detection function. • Check your power supply...
... now booting from operating system Action • Check if the CPU fan is not defective. • Call ASUS technical support for details. 3-4 Chapter 3: Powering up See the "ASUS contact information" on after you apply power to the system. • Make sure that your CPU fan supports the fan speed detection function. • Check your power supply...


