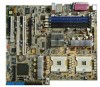
NCT-D MB User Manual English Version
Page 7
... professional assistance before the signal cables are using, contact your retailer. If you add a device. • Before connecting or removing signal cables from connectors, slots, sockets and circuitry. • Avoid dust, humidity, and temperature extremes. These devices could interrupt the grounding circuit. • Make sure that your power supply is set...
NCT-D MB User Manual English Version
Page 10
...MCH) Southbridge : Intel® 6300ESB 800 MHz Dual-channel memory architecture 4 x 240-pin DIMM sockets support registered ECC 400 MHz DDR2 memory modules Supports 256 MB up to 8 GB system memory 1...-bit slot (supports ZCR, PCI-X 1.0a) 1 x PCI 33 MHz/32-bit/5V (PCI 2.3) 1 x WiFi slot (ASUS proprietary) Intel® 6300ESB South Bridge supports: - 2 x Ultra DMA 100/66/33 - 2 x Serial ATA with RAID ...supports: - 4 x SATAII 300 with RAID 0, RAID 1, and RAID 0+1 configuration - NCT-D (A) specifications summary CPU Chipset Front Side Bus Memory Expansion slots Storage Wi-Fi solution (optional) Audio ...
NCT-D MB User Manual English Version
Page 16
1.3 Special features 1.3.1 Product highlights Latest processor technology The motherboard comes with dual 604-pin surface mount ZIF sockets designed for the Intel® Xeon™ processor with lower pin count, reduced voltage requirement, and up to 150 MB/s data transfer rate for Intel...
NCT-D MB User Manual English Version
Page 23
... install or remove any motherboard component. SB_PWR1 NCT-D NCT-D Standby power LED ON Standby Power OFF Powered Off ASUS NCT-D 2-1 The illustration below shows the location of the following precautions before you install motherboard components or change any motherboard settings. • Unplug the power cord from the wall socket before touching any component. • Use...
NCT-D MB User Manual English Version
Page 28
Refer to a nut on the support plate Make sure that the CPU heatsink holes on the motherboard perfectly match the metal nuts on top of the support plates. otherwise, you can not install the CPU heatsinks properly. 11. The CPU sockets should be right on the support plates; Secure the motherboard with the external I/O ports toward the chassis rear panel. The support plates appear as shown when installed. 10. Heatsink hole matched to section "2.2.2 Screw holes" for illustration. 2-6 Chapter 2: Hardware information Install the motherboard with 10 screws.
NCT-D MB User Manual English Version
Page 30
DDR2 DIMM sockets 3. Keyboard power (3-pin KBPWR1) 6. SATA controller setting (3-pin SATA_EN1) 9. USB 2.0 ports 1 and 2 10. PS/2 keyboard port (purple) Page 2-10 2-14 2-18 2-18 Page 2-19 2-20 2-...-Fi slot Jumpers 1. Clear RTC RAM (CLRTC1) 2. Microphone port (pink) 8. Serial (COM1) port 11. Gigabit LAN controller setting (3-pin LAN_EN1) 8. PS/2 mouse port (green) 2. CPU sockets 2.
NCT-D MB User Manual English Version
Page 32
... designed for CPU1 2-10 Chapter 2: Hardware information Locate the CPU sockets on the motherboard. Socket for the Intel® Xeon™ processor in completely. Intel Xeon Gold Arrow NCT-D NCT-D Socket 604 If installing only one CPU, use the socket CPU1. 2. 2.3 Central Processing Unit (CPU) The motherboard comes with 1 MB L2 cache. The new generation Intel...
NCT-D MB User Manual English Version
Page 33
... and damaging the CPU! 5. The lever clicks on the side tab to install a second CPU. The CPU fits only in place. Marked corner (gold arrow) ASUS NCT-D 2-11 Position the CPU above the socket as shown. 4. 3. Repeat steps 1 to 6 if you wish to indicate that it fits in one correct orientation.
NCT-D MB User Manual English Version
Page 36
... notched to the DDR2 Qualified Vendors List on the socket and ensure correct installation. Refer to match the break on the ASUS website (www.asus.com) for details. • This motherboard does not support memory modules made up of the DDR2 DIMM sockets: NCT-D NCT-D DDR2 DIMM sockets 2.4.2 Memory configurations You may install 256 MB, 512 MB...
NCT-D MB User Manual English Version
Page 37
...so that the notch on the 1 DIMM matches the break on the socket such that it 1 flips out with your fingers when pressing the retaining clips. Remove the DIMM from the socket. 2 1 DDR2 DIMM notch ASUS NCT-D 2-15 Support the DIMM lightly with extra force. 2. 2.4.3 Installing... a DIMM Unplug the power supply before adding or removing DIMMs or other system components. Unlock a DIMM socket by pressing the retaining clips outward. ...
NCT-D MB User Manual English Version
Page 63
...the DIMMs on the DIMM sockets are properly installed. • Make sure that your DIMMs are customizable using the Winbond Voice Editor software that your graphics card is properly connected to support a special feature called the ASUS POST Reporter™. ASUS NCT-D 3-3 These POST messages... are not defective. • Refer to one of the IDE connectors on the rear panel. • See section "2.7.1 Rear panel connectors" for assistance. 3.3 ASUS POST Reporter™ This motherboard...