User Manual
Page 6
... a RAID driver disk 6-1 6.1.2 Installing the RAID controller driver 6-2 6.2 LAN driver installation 6-9 6.2.1 Windows® 2000/2003 Server 6-9 6.2.2 Red Hat® Enterprise ver. 3.0 6-11 6.3 VGA driver installation 6-13 6.3.1 Windows® 2000 Server 6-13 6.3.2 Windows® 2003 Server 6-14 6.3.3 Red Hat® Enterprise ver. 3.0 6-14 6.4 Management applications and utilities installation 6-15 6.4.1 Running the support CD 6-15 6.4.2 Drivers menu 6-15 6.4.3 Management Software menu 6-16 6.4.4 Utilities menu 6-16 6.4.5 Contact information 6-16 Appendix: Block diagrams A.1 NCL...
... a RAID driver disk 6-1 6.1.2 Installing the RAID controller driver 6-2 6.2 LAN driver installation 6-9 6.2.1 Windows® 2000/2003 Server 6-9 6.2.2 Red Hat® Enterprise ver. 3.0 6-11 6.3 VGA driver installation 6-13 6.3.1 Windows® 2000 Server 6-13 6.3.2 Windows® 2003 Server 6-14 6.3.3 Red Hat® Enterprise ver. 3.0 6-14 6.4 Management applications and utilities installation 6-15 6.4.1 Running the support CD 6-15 6.4.2 Drivers menu 6-15 6.4.3 Management Software menu 6-16 6.4.4 Utilities menu 6-16 6.4.5 Contact information 6-16 Appendix: Block diagrams A.1 NCL...
User Manual
Page 9
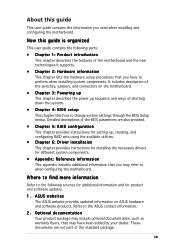
... following parts: • Chapter 1: Product introduction This chapter describes the features of the standard package. ASUS websites The ASUS website provides updated information on the motherboard. • Chapter 3: Powering up This chapter describes the power up , creating, and configuring RAID sets using the available utilities. • Chapter 6: Driver installation This chapter provides instructions for installing the necessary drivers for product and software updates. 1. About this guide is organized This user guide contains...
... following parts: • Chapter 1: Product introduction This chapter describes the features of the standard package. ASUS websites The ASUS website provides updated information on the motherboard. • Chapter 3: Powering up This chapter describes the power up , creating, and configuring RAID sets using the available utilities. • Chapter 6: Driver installation This chapter provides instructions for installing the necessary drivers for product and software updates. 1. About this guide is organized This user guide contains...
User Manual
Page 11
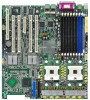
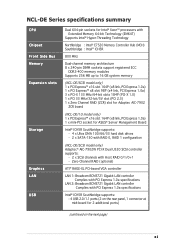
Zero-Channel RAID (optional) ATI® RAGE-XL PCI-based VGA controller LAN 1: Broadcom BCM5721 Gigabit LAN controller Complies with PCI Express 1.0a specifications LAN 2: Broadcom BCM5721 Gigabit LAN controller Complies with Host RAID 0/1/0+1 - NCL-DE Series specifications summary CPU Chipset Front Side Bus Memory Expansion slots Storage Graphics LAN USB Dual 604-pin sockets for Intel® Xeon™ processors with Extended Memory 64-bit Technology (EM64T) Supports Intel® Hyper-Threading Technology Northbridge : Intel® E7520 Memory Controller Hub (MCH) Southbridge : Intel&#...
Zero-Channel RAID (optional) ATI® RAGE-XL PCI-based VGA controller LAN 1: Broadcom BCM5721 Gigabit LAN controller Complies with PCI Express 1.0a specifications LAN 2: Broadcom BCM5721 Gigabit LAN controller Complies with Host RAID 0/1/0+1 - NCL-DE Series specifications summary CPU Chipset Front Side Bus Memory Expansion slots Storage Graphics LAN USB Dual 604-pin sockets for Intel® Xeon™ processors with Extended Memory 64-bit Technology (EM64T) Supports Intel® Hyper-Threading Technology Northbridge : Intel® E7520 Memory Controller Hub (MCH) Southbridge : Intel&#...
User Manual
Page 18
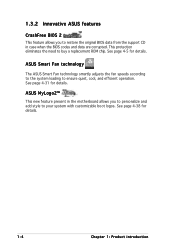
... your system with customizable boot logos. ASUS Smart Fan technology The ASUS Smart Fan technology smartly adjusts the fan speeds according to the system loading to buy a replacement ROM chip. See page 4-5 for details. See page 4-38 for details. 1-4 Chapter 1: Product introduction ASUS MyLogo2™ This new feature present in the motherboard allows you to restore the original BIOS data from the support CD in case when the BIOS codes and data are...
... your system with customizable boot logos. ASUS Smart Fan technology The ASUS Smart Fan technology smartly adjusts the fan speeds according to the system loading to buy a replacement ROM chip. See page 4-5 for details. See page 4-38 for details. 1-4 Chapter 1: Product introduction ASUS MyLogo2™ This new feature present in the motherboard allows you to restore the original BIOS data from the support CD in case when the BIOS codes and data are...
User Manual
Page 37
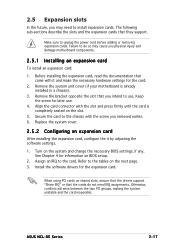
... cards. When using PCI cards on shared slots, ensure that the drivers support "Share IRQ" or that came with it by adjusting the software settings. 1. ASUS NCL-DE Series 2-17 Make sure to the tables on the slot. 5. Keep the screw for the expansion card. Secure the card to the chassis with the slot and press firmly until the card is already installed in a chassis). 3. Turn on BIOS setup. 2. Refer to unplug the power...
... cards. When using PCI cards on shared slots, ensure that the drivers support "Share IRQ" or that came with it by adjusting the software settings. 1. ASUS NCL-DE Series 2-17 Make sure to the tables on the slot. 5. Keep the screw for the expansion card. Secure the card to the chassis with the slot and press firmly until the card is already installed in a chassis). 3. Turn on BIOS setup. 2. Refer to unplug the power...
User Manual
Page 42
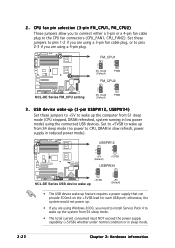
..., DRAM refreshed, system running in reduced power mode). 2 . USBPW12 2 1 +5V (Default) 3 2 +5VSB NCL-DE Series ® NCL-DE Series USB device wake up USBPW34 1 2 +5VSB 2 3 +5V (Default) • The USB device wake-up . • If you are using Windows 2000, you are using a 4-pin plug. Set to +5VSB to wake up from S4 sleep mode (no power to wake up (3-pin USBPW12, USBPW34) Set these jumpers to pins 1-2 if you are using a 3-pin fan cable plug, or to pins 2-3 if you need to install Service Pack 4 to the CPU fan connectors...
..., DRAM refreshed, system running in reduced power mode). 2 . USBPW12 2 1 +5V (Default) 3 2 +5VSB NCL-DE Series ® NCL-DE Series USB device wake up USBPW34 1 2 +5VSB 2 3 +5V (Default) • The USB device wake-up . • If you are using Windows 2000, you are using a 4-pin plug. Set to +5VSB to wake up from S4 sleep mode (no power to wake up (3-pin USBPW12, USBPW34) Set these jumpers to pins 1-2 if you are using a 3-pin fan cable plug, or to pins 2-3 if you need to install Service Pack 4 to the CPU fan connectors...

User Manual
Page 45
... a floppy disk that contains the latest BIOS for the motherboard (xxxx-xxx.ROM) and the AFUDOS.EXE utility. 2. Set the jumper back to update the BIOS. 4. SCSI controller setting (3-pin SCSI_EN1) (NCL-DE/SCSI model only) This jumper allows you to activate the SCSI feature, and support RAID configurations. Set the jumper to enable or disable the onboard Adaptec® AIC-7902W SCSI U320 controller. Turn on the system to pins 1-2. 6. Force BIOS recovery setting (3-pin RECOVERY1) This jumper allows you to pins 2-3. 3. NCL...
... a floppy disk that contains the latest BIOS for the motherboard (xxxx-xxx.ROM) and the AFUDOS.EXE utility. 2. Set the jumper back to update the BIOS. 4. SCSI controller setting (3-pin SCSI_EN1) (NCL-DE/SCSI model only) This jumper allows you to activate the SCSI feature, and support RAID configurations. Set the jumper to enable or disable the onboard Adaptec® AIC-7902W SCSI U320 controller. Turn on the system to pins 1-2. 6. Force BIOS recovery setting (3-pin RECOVERY1) This jumper allows you to pins 2-3. 3. NCL...
User Manual
Page 69
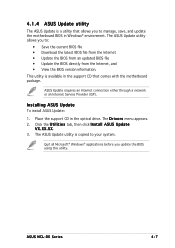
...updated BIOS file • Update the BIOS directly from the Internet, and • View the BIOS version information. The ASUS Update utility allows you to manage, save, and update the motherboard BIOS in Windows® environment. This utility is copied to your system. The D r i v e r s menu appears. 2. X X. 3. ASUS Update requires an Internet connection either through a network or an Internet Service Provider (ISP). Installing ASUS Update To install ASUS Update: 1. ASUS NCL-DE Series 4-7 The ASUS Update utility is available in the optical drive. 4.1.4 ASUS Update utility...
...updated BIOS file • Update the BIOS directly from the Internet, and • View the BIOS version information. The ASUS Update utility allows you to manage, save, and update the motherboard BIOS in Windows® environment. This utility is copied to your system. The D r i v e r s menu appears. 2. X X. 3. ASUS Update requires an Internet connection either through a network or an Internet Service Provider (ISP). Installing ASUS Update To install ASUS Update: 1. ASUS NCL-DE Series 4-7 The ASUS Update utility is available in the optical drive. 4.1.4 ASUS Update utility...

User Manual
Page 74
... the Main menu items. The other items on AC Power Loss Power On by PS/2 Keyboard Power On by PS/2 Mouse Power On Ring Power On PME# Power On RTC Alarm BIOS SETUP UTILITY [Enabled] [Suspend] [Suspend] [Disabled] [50%] [On/Off] [Power Off] [Disabled] [Disabled] [Disabled] [Disabled] [Disabled] Use [ENTER], [TAB], or [SHIFT-TAB] to select a field. Advanced APM Configuration Power Management/APM Video Power Down Mode Hard Disk Power Down Mode Suspend Time Out(Minute) Throttle Slow Clock Ratio Power Button Function Restore...
... the Main menu items. The other items on AC Power Loss Power On by PS/2 Keyboard Power On by PS/2 Mouse Power On Ring Power On PME# Power On RTC Alarm BIOS SETUP UTILITY [Enabled] [Suspend] [Suspend] [Disabled] [50%] [On/Off] [Power Off] [Disabled] [Disabled] [Disabled] [Disabled] [Disabled] Use [ENTER], [TAB], or [SHIFT-TAB] to select a field. Advanced APM Configuration Power Management/APM Video Power Down Mode Hard Disk Power Down Mode Suspend Time Out(Minute) Throttle Slow Clock Ratio Power Button Function Restore...
User Manual
Page 77
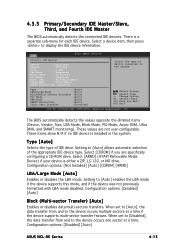
...Item +- Setting to [Auto] allows automatic selection of device connected to the system. Configuration options: [Disabled] [Auto] ASUS NCL-DE Series 4-15 Main BIOS SETUP UTILITY Primary IDE Master Device : Hard Disk Vendor : ST32122A Size : 2.1GB LBA Mode : Supported Block Mode : 16 Sectors PIO Mode : Supported Async DMA : MultiWord DMA-2 Ultra DMA : Ultra DMA-5 SMART Monitoring: Supported Select the type of the appropriate IDE device type. Configuration options: [Not Installed] [Auto] [CDROM] [ARMD] LBA/Large Mode [Auto] Enables or disables the LBA mode...
...Item +- Setting to [Auto] allows automatic selection of device connected to the system. Configuration options: [Disabled] [Auto] ASUS NCL-DE Series 4-15 Main BIOS SETUP UTILITY Primary IDE Master Device : Hard Disk Vendor : ST32122A Size : 2.1GB LBA Mode : Supported Block Mode : 16 Sectors PIO Mode : Supported Async DMA : MultiWord DMA-2 Ultra DMA : Ultra DMA-5 SMART Monitoring: Supported Select the type of the appropriate IDE device type. Configuration options: [Not Installed] [Auto] [CDROM] [ARMD] LBA/Large Mode [Auto] Enables or disables the LBA mode...
User Manual
Page 78
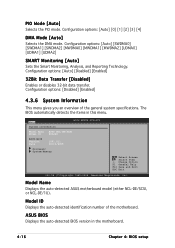
...or disables 32-bit data transfer. Configuration options: [Disabled] [Enabled] 4.3.6 System Information This menu gives you an overview of the motherboard. Model Name Displays the auto-detected ASUS motherboard model (either NCL-DE/SCSI, or NCL-DE/1U). ASUS BIOS Displays the auto-detected BIOS version in this menu. Model ID Displays the auto-detected identification number of the general system specifications. Main System Information BIOS SETUP UTILITY Model Name ASUS NCL-DE/SCSI Model ID 8002A0 ASUS-BIOS Version Date 1001.011 06/10/2005 Processor System Memory Select Screen...
...or disables 32-bit data transfer. Configuration options: [Disabled] [Enabled] 4.3.6 System Information This menu gives you an overview of the motherboard. Model Name Displays the auto-detected ASUS motherboard model (either NCL-DE/SCSI, or NCL-DE/1U). ASUS BIOS Displays the auto-detected BIOS version in this menu. Model ID Displays the auto-detected identification number of the general system specifications. Main System Information BIOS SETUP UTILITY Model Name ASUS NCL-DE/SCSI Model ID 8002A0 ASUS-BIOS Version Date 1001.011 06/10/2005 Processor System Memory Select Screen...
User Manual
Page 81
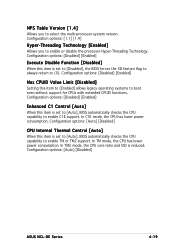
...MPS Table Version [1.4] Allows you to enable TM or TM2 support. Configuration options: [Disabled] [Enabled] Max CPUID Value Limit [Disabled] Setting this item is set to [Auto], BIOS automatically checks the CPU capability to (0). In TM mode, the CPU has lower power consumption. Configuration options: [Auto] [Disabled] CPU Internal Thermal Control [Auto] When this item to [Enabled] allows legacy operating systems to select the multi-processor system version. Configuration options: [1.1] [1.4] Hyper-Threading Technology [Enabled] Allows you to boot even without support for CPUs...
...MPS Table Version [1.4] Allows you to enable TM or TM2 support. Configuration options: [Disabled] [Enabled] Max CPUID Value Limit [Disabled] Setting this item is set to [Auto], BIOS automatically checks the CPU capability to (0). In TM mode, the CPU has lower power consumption. Configuration options: [Auto] [Disabled] CPU Internal Thermal Control [Auto] When this item to [Enabled] allows legacy operating systems to select the multi-processor system version. Configuration options: [1.1] [1.4] Hyper-Threading Technology [Enabled] Allows you to boot even without support for CPUs...
User Manual
Page 82
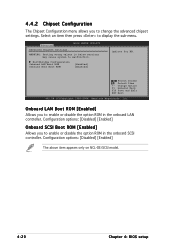
.... Change Option F1 General Help F10 Save and Exit ESC Exit v02.58 (C)Copyright 1985-2004, American Megatrends, Inc. Configuration options: [Disabled] [Enabled] Onboard SCSI Boot ROM [Enabled] Allows you to change the advanced chipset settings. Select an item then press to enable or disable the option ROM in the onboard LAN controller. Select Screen Select Item +- Configuration options: [Disabled] [Enabled] The above item appears only on NCL-DE/SCSI model. 4-20 Chapter 4: BIOS setup 4.4.2 Chipset Configuration The Chipset Configuration menu allows you to display...
.... Change Option F1 General Help F10 Save and Exit ESC Exit v02.58 (C)Copyright 1985-2004, American Megatrends, Inc. Configuration options: [Disabled] [Enabled] Onboard SCSI Boot ROM [Enabled] Allows you to change the advanced chipset settings. Select an item then press to enable or disable the option ROM in the onboard LAN controller. Select Screen Select Item +- Configuration options: [Disabled] [Enabled] The above item appears only on NCL-DE/SCSI model. 4-20 Chapter 4: BIOS setup 4.4.2 Chipset Configuration The Chipset Configuration menu allows you to display...

User Manual
Page 85
...] ASUS NCL-DE Series 4-23 Configuration options: [Enabled] [Disabled] USB 2.0 Controller Mode [HiSpeed] Allows you to set the USB 2.0 controller mode to HiSpeed (480 Mbps) or FullSpeed (12 Mbps). Change Option F1 General Help F10 Save and Exit ESC Exit v02.58 (C)Copyright 1985-2004, American Megatrends, Inc. Select an item then press to detect the presence of seconds POST waits for the USB mass device after start unit command. Legacy USB Support [Auto...
...] ASUS NCL-DE Series 4-23 Configuration options: [Enabled] [Disabled] USB 2.0 Controller Mode [HiSpeed] Allows you to set the USB 2.0 controller mode to HiSpeed (480 Mbps) or FullSpeed (12 Mbps). Change Option F1 General Help F10 Save and Exit ESC Exit v02.58 (C)Copyright 1985-2004, American Megatrends, Inc. Select an item then press to detect the presence of seconds POST waits for the USB mass device after start unit command. Legacy USB Support [Auto...

User Manual
Page 89
... ACPI APIC Support APM Configuration BIOS SETUP UTILITY [Enabled] Include ACPI APIC table pointer to display the configuration options. IMPORTANT!!! Do not change the settings for use PCI bus mastering when reading/writing to IDE devices. Select Screen Select Item +- Configuration options: [Disabled] [Enabled] ASUS NCL-DE Series 4-27 When set to Enabled, the ACPI APIC table pointer is free for the ACPI and Advanced Power Management (APM) features. When set to [PCI Device], the specific IRQ is included in the Advanced Programmable Interrupt Controller...
... ACPI APIC Support APM Configuration BIOS SETUP UTILITY [Enabled] Include ACPI APIC table pointer to display the configuration options. IMPORTANT!!! Do not change the settings for use PCI bus mastering when reading/writing to IDE devices. Select Screen Select Item +- Configuration options: [Disabled] [Enabled] ASUS NCL-DE Series 4-27 When set to Enabled, the ACPI APIC table pointer is free for the ACPI and Advanced Power Management (APM) features. When set to [PCI Device], the specific IRQ is included in the Advanced Programmable Interrupt Controller...
User Manual
Page 95
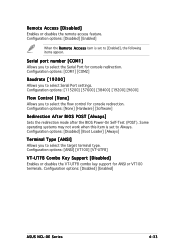
... the flow control for console redirection. Configuration options: [Disabled] [Boot Loader] [Always] Terminal Type [ANSI] Allows you to select the target terminal type. Serial port number [COM1] Allows you to Always. Some operating systems may not work when this item is set to select Serial Port settings. Configuration options: [Disabled] [Enabled] ASUS NCL-DE Series 4-33 Remote Access [Disabled] Enables or disables the remote access feature. Configuration options: [None] [Hardware] [Software] Redirection After BIOS POST [Always] Sets the redirection mode after the BIOS Power-On...
... the flow control for console redirection. Configuration options: [Disabled] [Boot Loader] [Always] Terminal Type [ANSI] Allows you to select the target terminal type. Serial port number [COM1] Allows you to Always. Some operating systems may not work when this item is set to select Serial Port settings. Configuration options: [Disabled] [Enabled] ASUS NCL-DE Series 4-33 Remote Access [Disabled] Enables or disables the remote access feature. Configuration options: [None] [Hardware] [Software] Redirection After BIOS POST [Always] Sets the redirection mode after the BIOS Power-On...
User Manual
Page 96
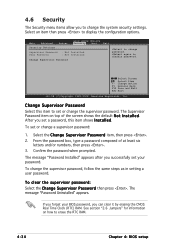
again to display the configuration options. To set or change the system security settings. Confirm the password when prompted. Main Advanced Server Security Settings BIOS SETUP UTILITY Security Boot Supervisor Password : Not Installed User Password : Not Installed Change Supervisor Password Exit to change a supervisor password: 1. Change Supervisor Password Select this item shows I n s t a l l e d. To clear the supervisor password: Select the Change Supervisor Password then press . From the password box, type a password composed of the screen shows the default ...
again to display the configuration options. To set or change the system security settings. Confirm the password when prompted. Main Advanced Server Security Settings BIOS SETUP UTILITY Security Boot Supervisor Password : Not Installed User Password : Not Installed Change Supervisor Password Exit to change a supervisor password: 1. Change Supervisor Password Select this item shows I n s t a l l e d. To clear the supervisor password: Select the Change Supervisor Password then press . From the password box, type a password composed of the screen shows the default ...
User Manual
Page 108
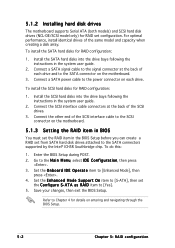
...Connect a SATA power cable to the SCSI connector on entering and navigating through the BIOS Setup. 5-2 Chapter 5: RAID configuration To install the SATA hard disks for RAID set the C o n f i g u r e S - Connect the other end of the same model and capacity when creating a disk array. 5.1.2 Installing hard disk drives The motherboard supports Serial ATA (both models) and SCSI hard disk drives (NCL-DE/SCSI model only) for RAID configuration: 1. Install the SATA hard disks into the drive bays following the instructions in the BIOS Setup before you can create a RAID set from SATA hard...
...Connect a SATA power cable to the SCSI connector on entering and navigating through the BIOS Setup. 5-2 Chapter 5: RAID configuration To install the SATA hard disks for RAID set the C o n f i g u r e S - Connect the other end of the same model and capacity when creating a disk array. 5.1.2 Installing hard disk drives The motherboard supports Serial ATA (both models) and SCSI hard disk drives (NCL-DE/SCSI model only) for RAID configuration: 1. Install the SATA hard disks into the drive bays following the instructions in the BIOS Setup before you can create a RAID set from SATA hard...

User Manual
Page 157
... floppy disk drive. 2. Insert a formatted high-density floppy disk to create the RAID driver disk from the system/motherboard support CD or from the Internet. This part provides instructions on a hard disk drive that is assigned to the independent hard disk drive or bootable array. Red Hat® Enterprise ver. 3.0 To create a RAID driver disk for your server system, you want to create. Windows® 2000/2003 Server A floppy disk with the RAID driver is required when installing Windows...
... floppy disk drive. 2. Insert a formatted high-density floppy disk to create the RAID driver disk from the system/motherboard support CD or from the Internet. This part provides instructions on a hard disk drive that is assigned to the independent hard disk drive or bootable array. Red Hat® Enterprise ver. 3.0 To create a RAID driver disk for your server system, you want to create. Windows® 2000/2003 Server A floppy disk with the RAID driver is required when installing Windows...
User Manual
Page 171
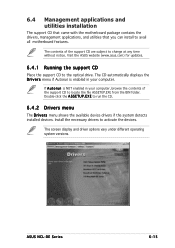
... your computer. The screen display and driver options vary under different operating system versions. The CD automatically displays the D r i v e r s menu if Autorun is NOT enabled in your computer, browse the contents of the support CD are subject to avail all motherboard features. E X E to locate the file ASSETUP.EXE from the BIN folder. ASUS NCL-DE Series 6-15 Install the necessary drivers to the optical drive. Double-click the...
... your computer. The screen display and driver options vary under different operating system versions. The CD automatically displays the D r i v e r s menu if Autorun is NOT enabled in your computer, browse the contents of the support CD are subject to avail all motherboard features. E X E to locate the file ASSETUP.EXE from the BIN folder. ASUS NCL-DE Series 6-15 Install the necessary drivers to the optical drive. Double-click the...


