
User Guide
Page 4
... 3.5.9 PCI Spread Spectrum 3-18 3.5.10 AI Clock Skew for the first time 2-39 2.9 Turning off the computer 2-39 Chapter 3: BIOS setup 3.1 Knowing BIOS 3-1 3.2 Updating BIOS 3-1 3.2.1 ASUS Update utility 3-2 3.2.2 ASUS EZ Flash 2 utility 3-4 3.2.3 ASUS CrashFree BIOS 3 utility 3-5 3.3 BIOS setup program 3-6 3.3.1 BIOS menu screen 3-6 3.3.2 Menu bar 3-6 3.3.3 Navigation keys 3-7 3.3.4 Menu items 3-7 3.3.5 Submenu items 3-7 3.3.6 Configuration fields 3-7 3.3.7 Pop-up window 3-7 3.3.8 Scroll bar 3-7 3.3.9 General help...
... 3.5.9 PCI Spread Spectrum 3-18 3.5.10 AI Clock Skew for the first time 2-39 2.9 Turning off the computer 2-39 Chapter 3: BIOS setup 3.1 Knowing BIOS 3-1 3.2 Updating BIOS 3-1 3.2.1 ASUS Update utility 3-2 3.2.2 ASUS EZ Flash 2 utility 3-4 3.2.3 ASUS CrashFree BIOS 3 utility 3-5 3.3 BIOS setup program 3-6 3.3.1 BIOS menu screen 3-6 3.3.2 Menu bar 3-6 3.3.3 Navigation keys 3-7 3.3.4 Menu items 3-7 3.3.5 Submenu items 3-7 3.3.6 Configuration fields 3-7 3.3.7 Pop-up window 3-7 3.3.8 Scroll bar 3-7 3.3.9 General help...
User Guide
Page 6
Contents 4.4.2 Installing Serial ATA hard disks 4-14 4.4.3 Setting the RAID item in BIOS 4-14 4.4.4 NVIDIA® MediaShield BIOS RAID configurations 4-15 4.5 Creating a RAID driver disk 4-21 4.5.1 Creating a RAID driver disk without entering the OS 4-21 4.5.2 Creating a RAID/SATA driver disk in Windows 4-21 ...
Contents 4.4.2 Installing Serial ATA hard disks 4-14 4.4.3 Setting the RAID item in BIOS 4-14 4.4.4 NVIDIA® MediaShield BIOS RAID configurations 4-15 4.5 Creating a RAID driver disk 4-21 4.5.1 Creating a RAID driver disk without entering the OS 4-21 4.5.2 Creating a RAID/SATA driver disk in Windows 4-21 ...

User Guide
Page 9
... and shows the graphics card installation procedures. Where to find more information Refer to change system settings through the BIOS Setup menus. ASUS websites The ASUS website provides updated information on the motherboard. • Chapter 3: BIOS setup This chapter tells how to the following parts: • Chapter 1: Product introduction This chapter describes the features of...
... and shows the graphics card installation procedures. Where to find more information Refer to change system settings through the BIOS Setup menus. ASUS websites The ASUS website provides updated information on the motherboard. • Chapter 3: BIOS setup This chapter tells how to the following parts: • Chapter 1: Product introduction This chapter describes the features of...
User Guide
Page 12
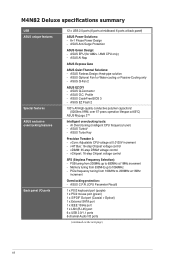
M4N82 Deluxe specifications summary USB ASUS unique features Special features ASUS exclusive overclocking features Back panel I /O ports (continued on the next page) xii ASUS Q-Connector - ASUS EZ Flash 2 100% All High-quality conductive polymer capacitors! (5000hrs VRM, over 57 years operation lifespan at back panel) ASUS... ASUS Anti-Surge Protection ASUS Green Design: - ASUS AI Nap ASUS Express Gate ASUS Quiet Thermal Solutions: - AI Overclocking (intelligent CPU frequency tuner) - ASUS Optional Fan for AM2+ / AM3 CPU only) - ASUS Q-Fan 2 ASUS EZ DIY - ASUS CrashFree BIOS 3...
M4N82 Deluxe specifications summary USB ASUS unique features Special features ASUS exclusive overclocking features Back panel I /O ports (continued on the next page) xii ASUS Q-Connector - ASUS EZ Flash 2 100% All High-quality conductive polymer capacitors! (5000hrs VRM, over 57 years operation lifespan at back panel) ASUS... ASUS Anti-Surge Protection ASUS Green Design: - ASUS AI Nap ASUS Express Gate ASUS Quiet Thermal Solutions: - AI Overclocking (intelligent CPU frequency tuner) - ASUS Optional Fan for AM2+ / AM3 CPU only) - ASUS Q-Fan 2 ASUS EZ DIY - ASUS CrashFree BIOS 3...
User Guide
Page 13
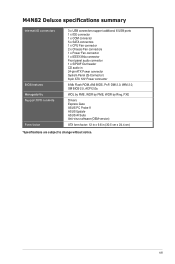
xiii M4N82 Deluxe specifications summary Internal I/O connectors BIOS features Manageability Support DVD contents Form factor 3 x USB connectors support additional 6 USB ports 1 x IDE connector 1 x COM connector 5 x SATA connectors 1 x CPU Fan connector 2 x Chassis Fan connectors 1 x Power Fan connector 1 x IEEE1394a connector Front panel audio connector 1 x S/PDIF Out header CD audio in 24-pin ATX Power connector System Panel...
xiii M4N82 Deluxe specifications summary Internal I/O connectors BIOS features Manageability Support DVD contents Form factor 3 x USB connectors support additional 6 USB ports 1 x IDE connector 1 x COM connector 5 x SATA connectors 1 x CPU Fan connector 2 x Chassis Fan connectors 1 x Power Fan connector 1 x IEEE1394a connector Front panel audio connector 1 x S/PDIF Out header CD audio in 24-pin ATX Power connector System Panel...

User Guide
Page 18
...file, giving users freedom to conveniently store or load multiple BIOS settings. Profile that the groundbreaking fanless design does not have lifetime problems as a chipset fan does. Profile The motherboard features the ASUS O.C. Q-Fan 2 ASUS Q-Fan 2 technology intelligently adjusts both CPU fan and ...chassis fan speeds according to system loading to launch the utility and update the BIOS without preparing a bootable diskette or using an ...
...file, giving users freedom to conveniently store or load multiple BIOS settings. Profile that the groundbreaking fanless design does not have lifetime problems as a chipset fan does. Profile The motherboard features the ASUS O.C. Q-Fan 2 ASUS Q-Fan 2 technology intelligently adjusts both CPU fan and ...chassis fan speeds according to system loading to launch the utility and update the BIOS without preparing a bootable diskette or using an ...
User Guide
Page 19
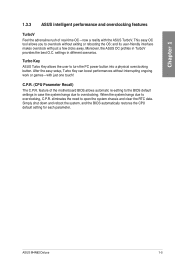
... overclock without interrupting ongoing work or games-with the ASUS TurboV. Chapter 1 1.3.3 ASUS intelligent performance and overclocking features TurboV Feel the adrenaline rush of the motherboard BIOS allows automatic re-setting to the BIOS default settings in different scenarios. settings in case the...physical overclocking button. ASUS M4N82 Deluxe 1-5 and its user-friendly interface makes overclock with just a few clicks away. Simply shut down and reboot the system, and the BIOS automatically restores the CPU default setting for each parameter. Turbo Key ASUS Turbo Key allows the...
... overclock without interrupting ongoing work or games-with the ASUS TurboV. Chapter 1 1.3.3 ASUS intelligent performance and overclocking features TurboV Feel the adrenaline rush of the motherboard BIOS allows automatic re-setting to the BIOS default settings in different scenarios. settings in case the...physical overclocking button. ASUS M4N82 Deluxe 1-5 and its user-friendly interface makes overclock with just a few clicks away. Simply shut down and reboot the system, and the BIOS automatically restores the CPU default setting for each parameter. Turbo Key ASUS Turbo Key allows the...

User Guide
Page 32
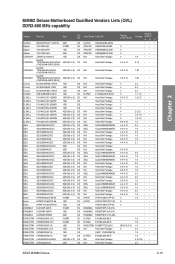
Timing Dimm (Bios) Socket Voltage support A* B* C* Apacer BoxP/N:CH.02GAF.C0KK2 (78.0AG9S.9KF) 2GB (Kit of 2) DS N/A Heat-Sink Package 5-5-5-15 ••• Apacer BoxP/N:CH.... BoxP/N: TXDD4096M1066HC5DC-D (TXDD2048M1066HC5-D) 4GB (Kit of 2) DS N/A Heat-Sink Package 5-5-5-15 2.2-2.3 • • 2-12 Chapter 2: Hardware information Size SS/ DS Chip Brand Chip NO. Chapter 2 M4N82 Deluxe Motherboard Qualified Vendors Lists (QVL) DDR2-1066 MHz capability Vendor Part No.
Timing Dimm (Bios) Socket Voltage support A* B* C* Apacer BoxP/N:CH.02GAF.C0KK2 (78.0AG9S.9KF) 2GB (Kit of 2) DS N/A Heat-Sink Package 5-5-5-15 ••• Apacer BoxP/N:CH.... BoxP/N: TXDD4096M1066HC5DC-D (TXDD2048M1066HC5-D) 4GB (Kit of 2) DS N/A Heat-Sink Package 5-5-5-15 2.2-2.3 • • 2-12 Chapter 2: Hardware information Size SS/ DS Chip Brand Chip NO. Chapter 2 M4N82 Deluxe Motherboard Qualified Vendors Lists (QVL) DDR2-1066 MHz capability Vendor Part No.
User Guide
Page 33
...SS/ DS Chip Brand Chip NO. Chapter 2 M4N82 Deluxe Motherboard Qualified Vendors Lists (QVL) DDR2-800 MHz ... ELPIDA E5108AJBG-8E-E ELPIDA E5108AJBG-8E-E KINGSTON D1288TPFCGL25U N/A Heat-Sink Package V59C1 512804QBF25 ELPIDA E5108AJBG-8E-E N/A Heat-Sink Package N/A Heat-Sink Package Timing Dimm (Bios) 5 5 5 4 Voltage 1.9 Socket support A* B* C 4-4-4-12 2.10 ••• 5-5-5-18 1.80 ••• 5-5-5-18 1.80 ...; 1.8 ••• 1.8 ••• 2.3-2.35 • • 2.0 ••• ASUS M4N82 Deluxe 2-13
...SS/ DS Chip Brand Chip NO. Chapter 2 M4N82 Deluxe Motherboard Qualified Vendors Lists (QVL) DDR2-800 MHz ... ELPIDA E5108AJBG-8E-E ELPIDA E5108AJBG-8E-E KINGSTON D1288TPFCGL25U N/A Heat-Sink Package V59C1 512804QBF25 ELPIDA E5108AJBG-8E-E N/A Heat-Sink Package N/A Heat-Sink Package Timing Dimm (Bios) 5 5 5 4 Voltage 1.9 Socket support A* B* C 4-4-4-12 2.10 ••• 5-5-5-18 1.80 ••• 5-5-5-18 1.80 ...; 1.8 ••• 1.8 ••• 2.3-2.35 • • 2.0 ••• ASUS M4N82 Deluxe 2-13

User Guide
Page 34
Size SS/ DS Chip Brand Chip NO. Chapter 2 M4N82 Deluxe Motherboard Qualified Vendors Lists (QVL) DDR2-800 MHz capability (continued) Vendor Part No. Timing Dimm (Bios) Socket Voltage support A* B* C* KINGSTON KVR800D2N5/2G 2GB DS ELPIDA E1108ACBG-8E-E 1.8 ••• KINGSTON KVR800D2N6/4G 4GB DS ELPIDA E2108ABSE-8G-E ••• ...
Size SS/ DS Chip Brand Chip NO. Chapter 2 M4N82 Deluxe Motherboard Qualified Vendors Lists (QVL) DDR2-800 MHz capability (continued) Vendor Part No. Timing Dimm (Bios) Socket Voltage support A* B* C* KINGSTON KVR800D2N5/2G 2GB DS ELPIDA E1108ACBG-8E-E 1.8 ••• KINGSTON KVR800D2N6/4G 4GB DS ELPIDA E2108ABSE-8G-E ••• ...

User Guide
Page 35
Chapter 2 M4N82 Deluxe Motherboard Qualified Vendors Lists (...N/A N/A N/A N/A ELPIDA G.Skill AM4B5708JQJS7E AM4B5808CQJS7E AM4B5808CQJS7E 64M8CFEG 64M8CFEG Heat-Sink Package Heat-Sink Package Heat-Sink Package Heat-Sink Package E5108AE-6E-E D264M8GCF Timing Dimm (Bios) Voltage 5 5 5 N/A N/A N/A N/A 3 2.2 3 2.2 3 2.2 3 2.2 5 1.7-1.9 5-5-5-15 1.8 N/A Heat-Sink Package 5-5-5-15 N/A Heat-Sink...1.8 1.8 1.8 1.8 1.8 1.8 1.8 1.8 1.8 1.85 1.85 1.8 1.8 1.8 Socket support A* B* C ••• ••• ••• ASUS M4N82 Deluxe 2-15
Chapter 2 M4N82 Deluxe Motherboard Qualified Vendors Lists (...N/A N/A N/A N/A ELPIDA G.Skill AM4B5708JQJS7E AM4B5808CQJS7E AM4B5808CQJS7E 64M8CFEG 64M8CFEG Heat-Sink Package Heat-Sink Package Heat-Sink Package Heat-Sink Package E5108AE-6E-E D264M8GCF Timing Dimm (Bios) Voltage 5 5 5 N/A N/A N/A N/A 3 2.2 3 2.2 3 2.2 3 2.2 5 1.7-1.9 5-5-5-15 1.8 N/A Heat-Sink Package 5-5-5-15 N/A Heat-Sink...1.8 1.8 1.8 1.8 1.8 1.8 1.8 1.8 1.8 1.85 1.85 1.8 1.8 1.8 Socket support A* B* C ••• ••• ••• ASUS M4N82 Deluxe 2-15
User Guide
Page 38
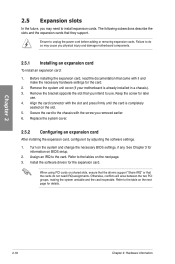
..., conflicts will arise between the two PCI groups, making the system unstable and the card inoperable. Remove the system unit cover (if your motherboard is completely seated on the next page. 3. Remove the bracket opposite the slot that came with the screw you intend to install expansion cards...1. Before installing the expansion card, read the documentation that you removed earlier. 6. When using PCI cards on the system and change the necessary BIOS settings, if any. Keep the screw for the card. 2. Ensure to the card. Assign an IRQ to unplug the power cord before adding ...
..., conflicts will arise between the two PCI groups, making the system unstable and the card inoperable. Remove the system unit cover (if your motherboard is completely seated on the next page. 3. Remove the bracket opposite the slot that came with the screw you intend to install expansion cards...1. Before installing the expansion card, read the documentation that you removed earlier. 6. When using PCI cards on the system and change the necessary BIOS settings, if any. Keep the screw for the card. 2. Ensure to the card. Assign an IRQ to unplug the power cord before adding ...

User Guide
Page 42
.... • Due to the chipset behavior, AC power off and on CLRTC jumper default position. Hold down and reboot the system so the BIOS can clear the CMOS memory of date, time, and system setup parameters by erasing the CMOS RTC RAM data. After the CMOS clearance, reinstall...battery and move the cap back to overclocking, use the C.P.R. (CPU Parameter Recall) feature. function. Shut down the key during the boot process and enter BIOS setup to overclocking. You must turn ON the computer. 4. Chapter 2 To erase the RTC RAM 1. Turn OFF the computer and unplug the power cord....
.... • Due to the chipset behavior, AC power off and on CLRTC jumper default position. Hold down and reboot the system so the BIOS can clear the CMOS memory of date, time, and system setup parameters by erasing the CMOS RTC RAM data. After the CMOS clearance, reinstall...battery and move the cap back to overclocking, use the C.P.R. (CPU Parameter Recall) feature. function. Shut down the key during the boot process and enter BIOS setup to overclocking. You must turn ON the computer. 4. Chapter 2 To erase the RTC RAM 1. Turn OFF the computer and unplug the power cord....

User Guide
Page 43
... setting before you install a new CPU and have not booted for extra-high overvoltage ability, use the BIOS items introduced in BIOS. Read the following information before you change the jumper setting. Doing so may need a better cooling system (for example, a water-cooling system) to pins 1-2 when ... move the cap back to pins 2-3. • The system may cause the system to activate the advanced CPU overvoltage feature. Set to pins 1-2 to halt. ASUS M4N82 Deluxe 2-23 2.
... setting before you install a new CPU and have not booted for extra-high overvoltage ability, use the BIOS items introduced in BIOS. Read the following information before you change the jumper setting. Doing so may need a better cooling system (for example, a water-cooling system) to pins 1-2 when ... move the cap back to pins 2-3. • The system may cause the system to activate the advanced CPU overvoltage feature. Set to pins 1-2 to halt. ASUS M4N82 Deluxe 2-23 2.

User Guide
Page 44
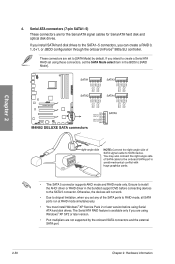
... not supported by the external SATA port. • The external SATA port will be disabled if you set the SATA Mode Select item in the BIOS settings to [AHCI Mode], and then reboot the system. PS/2 keyboard port (purple) 11. 6. PS/2 mouse port (green) 7. 2. USB 2.0 ports 3 and 4 Optical S/PDIF out port... NOT insert a different connector to the external SATA port. • To enable external SATA port hot-plugging, set the SATA Mode Select item in the BIOS settings to [SATA Mode] (or [IDE Mode], depending on the...
... not supported by the external SATA port. • The external SATA port will be disabled if you set the SATA Mode Select item in the BIOS settings to [AHCI Mode], and then reboot the system. PS/2 keyboard port (purple) 11. 6. PS/2 mouse port (green) 7. 2. USB 2.0 ports 3 and 4 Optical S/PDIF out port... NOT insert a different connector to the external SATA port. • To enable external SATA port hot-plugging, set the SATA Mode Select item in the BIOS settings to [SATA Mode] (or [IDE Mode], depending on the...
User Guide
Page 50
... can create a RAID 0, 1, 0+1, or JBOD configuration through the onboard nForce® 980a SLI controller. Ensure to install the AHCI driver or RAID driver in the BIOS to [RAID Mode]. Otherwise, the devices will not work. • Due to chipset limitation, when you set any of the SATA ports to the SATA1...
... can create a RAID 0, 1, 0+1, or JBOD configuration through the onboard nForce® 980a SLI controller. Ensure to install the AHCI driver or RAID driver in the BIOS to [RAID Mode]. Otherwise, the devices will not work. • Due to chipset limitation, when you set any of the SATA ports to the SATA1...

User Guide
Page 55
...;c��o�n�n�e��c�to��r,�s��e�t the Front Panel Type item in the BIOS setup to [AC97]. if you connect a high-definition front panel audio module to this connector, set to this connector is...of the motherboard's high-definition audio capability. By default, this connector. • We recommend that supports either HD Audio or legacy AC`97 audio standard. Front panel audio connector (10-1 pin AAFP) This connector is set the item to [HD Audio]; Chapter 2 ASUS M4N82 Deluxe 2-35
...;c��o�n�n�e��c�to��r,�s��e�t the Front Panel Type item in the BIOS setup to [AC97]. if you connect a high-definition front panel audio module to this connector, set to this connector is...of the motherboard's high-definition audio capability. By default, this connector. • We recommend that supports either HD Audio or legacy AC`97 audio standard. Front panel audio connector (10-1 pin AAFP) This connector is set the item to [HD Audio]; Chapter 2 ASUS M4N82 Deluxe 2-35

User Guide
Page 56
... IDE LED lights up when you to this connector. Connect the chassis power LED cable to hear system beeps and warnings. • ATX power button/soft-off button (2-pin PWRSW) This connector is for the chassis-mounted system warning speaker. The speaker allows you turn on...OFF. • Reset button (2-pin RESET) This 2-pin connector is for the system power LED. 11. Pressing the power button turns the system on the BIOS settings. System panel connector (20-8 pin PANEL) This connector supports several chassis-mounted functions. Chapter 2 • System power LED (2-pin PLED) This 2-...
... IDE LED lights up when you to this connector. Connect the chassis power LED cable to hear system beeps and warnings. • ATX power button/soft-off button (2-pin PWRSW) This connector is for the chassis-mounted system warning speaker. The speaker allows you turn on...OFF. • Reset button (2-pin RESET) This 2-pin connector is for the system power LED. 11. Pressing the power button turns the system on the BIOS settings. System panel connector (20-8 pin PANEL) This connector supports several chassis-mounted functions. Chapter 2 • System power LED (2-pin PLED) This 2-...

User Guide
Page 59
...-off mode, depending on the devices in Chapter 3. 2.9 Turning off the computer While the system is equipped with ATX power supplies, the system LED lights up . ASUS M4N82 Deluxe 2-39 Be sure that is ON, pressing the power switch for assistance. If your retailer for less than four ...One continuous beep followed by three short beeps One continuous beep followed by four short beeps Description VGA detected Quick boot set to enter the BIOS Setup. At power on test. System power 6. While the tests are off mode regardless of the system chassis. 4. Connect the power ...
...-off mode, depending on the devices in Chapter 3. 2.9 Turning off the computer While the system is equipped with ATX power supplies, the system LED lights up . ASUS M4N82 Deluxe 2-39 Be sure that is ON, pressing the power switch for assistance. If your retailer for less than four ...One continuous beep followed by three short beeps One continuous beep followed by four short beeps Description VGA detected Quick boot set to enter the BIOS Setup. At power on test. System power 6. While the tests are off mode regardless of the system chassis. 4. Connect the power ...
User Guide
Page 61
... boot. ASUS CrashFree BIOS 3 utility: Restores the BIOS using a USB flash drive. 3. Save a copy of the BIOS may result in case you change the default BIOS settings except in the future. ASUS M4N82 Deluxe 3-1 However, BIOS updating is no problem using the ASUS Update utility. ASUS Update utility: Updates the BIOS in the motherboard CMOS. ASUS EZ Flash 2 utility: Updates the BIOS using the motherboard support...
... boot. ASUS CrashFree BIOS 3 utility: Restores the BIOS using a USB flash drive. 3. Save a copy of the BIOS may result in case you change the default BIOS settings except in the future. ASUS M4N82 Deluxe 3-1 However, BIOS updating is no problem using the ASUS Update utility. ASUS Update utility: Updates the BIOS in the motherboard CMOS. ASUS EZ Flash 2 utility: Updates the BIOS using the motherboard support...


