
User Manual
Page 31
Version 1.19(ASUS V2.07(03.11.24BB)) Copyright (C) 2002 American Megatrends, Inc. done Write to file...... ok A:\> 當 BIOS DOS 31 exe 2 DOS afudos /o[filename filename A:\>afudos /oOLDBIOS1.rom 3. 按下 afudos /oOLDBIOS1.rom AMI Firmware Update Utility - Reading flash ..... All rights reserved. BIOS 2.1 使用 AFUDOS BIOS AFUDOS DOS BIOS BIOS 程式。AFUDOS BIOS BIOS BIOS 程式 BIOS 程式。 1.2MB BIOS 1 AFUDOS 程式(afudos.
Version 1.19(ASUS V2.07(03.11.24BB)) Copyright (C) 2002 American Megatrends, Inc. done Write to file...... ok A:\> 當 BIOS DOS 31 exe 2 DOS afudos /o[filename filename A:\>afudos /oOLDBIOS1.rom 3. 按下 afudos /oOLDBIOS1.rom AMI Firmware Update Utility - Reading flash ..... All rights reserved. BIOS 2.1 使用 AFUDOS BIOS AFUDOS DOS BIOS BIOS 程式。AFUDOS BIOS BIOS BIOS 程式 BIOS 程式。 1.2MB BIOS 1 AFUDOS 程式(afudos.

User Manual
Page 32
... Utility - Erasing flash ...... All rights reserved. done Writing flash ...... 更新 BIOS 程式 AFUDOS BIOS 程式。 1 tw.asus.com BIOS 片中。 BIOS BIOS 2. 將 AFUDOS.EXE BIOS 3 DOS afudos /i[filename filename BIOS 程式。 A:\>afudos /iP5B-VM DO.ROM 4. Version 1.19(ASUS V2.07(03.11.24BB)) Copyright (C) 2002 American Megatrends, Inc. Erasing...
... Utility - Erasing flash ...... All rights reserved. done Writing flash ...... 更新 BIOS 程式 AFUDOS BIOS 程式。 1 tw.asus.com BIOS 片中。 BIOS BIOS 2. 將 AFUDOS.EXE BIOS 3 DOS afudos /i[filename filename BIOS 程式。 A:\>afudos /iP5B-VM DO.ROM 4. Version 1.19(ASUS V2.07(03.11.24BB)) Copyright (C) 2002 American Megatrends, Inc. Erasing...

User Manual
Page 33
... Message: Do You Want To Save Bios (Y/N) 33 2.2 使用 AwardBIOS Flash BIOS AwardBIOS Flash AwardBIOS Flash 程式(AWDFLASH.EXE BIOS AwardBIOS Flash BIOS 程式。 1 http://tw.asus.com BIOS M2N-VM HDMI.bin FAT 32/16 格式的 USB BIOS 2 CD/DVD AwardBIOS Flash BIOS 3 DOS 4. 當 A BIOS 檔案與 AwardBIOS Flash...
... Message: Do You Want To Save Bios (Y/N) 33 2.2 使用 AwardBIOS Flash BIOS AwardBIOS Flash AwardBIOS Flash 程式(AWDFLASH.EXE BIOS AwardBIOS Flash BIOS 程式。 1 http://tw.asus.com BIOS M2N-VM HDMI.bin FAT 32/16 格式的 USB BIOS 2 CD/DVD AwardBIOS Flash BIOS 3 DOS 4. 當 A BIOS 檔案與 AwardBIOS Flash...

User Manual
Page 34
PMC Pm49FL004T LPC/FWH File Name to Continue Write OK F1 Reset No Update Write Fail 34 BIOS 7 BIOS N BIOS 8 BIOS BIOS AwardBIOS Flash Utility for ASUS V1.14 (C) Phoenix Technologies Ltd. All Rights Reserved For C51PV-MCP51-M2A-VM HDMI-00 DATE:04/13/2006 Flash Type...OFE00 OK Write OK No Update Write Fail Warning: Don't Turn Off Power Or Reset System! 在更新 BIOS 9 Flash Complete BIOS F1 AwardBIOS Flash Utility for ASUS V1.14 (C) Phoenix Technologies Ltd. PMC Pm49FL004T LPC/FWH File Name to Program: M2A-VM HDMI.bin Flashing Complete Press...
PMC Pm49FL004T LPC/FWH File Name to Continue Write OK F1 Reset No Update Write Fail 34 BIOS 7 BIOS N BIOS 8 BIOS BIOS AwardBIOS Flash Utility for ASUS V1.14 (C) Phoenix Technologies Ltd. All Rights Reserved For C51PV-MCP51-M2A-VM HDMI-00 DATE:04/13/2006 Flash Type...OFE00 OK Write OK No Update Write Fail Warning: Don't Turn Off Power Or Reset System! 在更新 BIOS 9 Flash Complete BIOS F1 AwardBIOS Flash Utility for ASUS V1.14 (C) Phoenix Technologies Ltd. PMC Pm49FL004T LPC/FWH File Name to Program: M2A-VM HDMI.bin Flashing Complete Press...
User Manual
Page 4
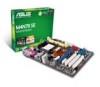
Contents 1.11 Software support 1-26 1.11.1 Installing an operating system 1-26 1.11.2 Support DVD information 1-26 Chapter 1: BIOS information 2.1 Managing and updating your BIOS 2-1 2.1.1 ASUS Update utility 2-1 2.1.2 ASUS EZ Flash 2 utility 2-2 2.1.3 ASUS CrashFree BIOS 3 utility 2-3 2.2 BIOS setup program 2-4 2.2.1 BIOS menu screen 2-5 2.2.2 Menu bar 2-5 2.2.3 Navigation keys 2-6 2.2.4 Menu items 2-6 2.2.5 Sub-menu items 2-6 2.2.6 Configuration fields 2-6 2.2.7 General help 2-6 2.2.8 Pop-up window 2-6 2.2.9 Scroll bar...
Contents 1.11 Software support 1-26 1.11.1 Installing an operating system 1-26 1.11.2 Support DVD information 1-26 Chapter 1: BIOS information 2.1 Managing and updating your BIOS 2-1 2.1.1 ASUS Update utility 2-1 2.1.2 ASUS EZ Flash 2 utility 2-2 2.1.3 ASUS CrashFree BIOS 3 utility 2-3 2.2 BIOS setup program 2-4 2.2.1 BIOS menu screen 2-5 2.2.2 Menu bar 2-5 2.2.3 Navigation keys 2-6 2.2.4 Menu items 2-6 2.2.5 Sub-menu items 2-6 2.2.6 Configuration fields 2-6 2.2.7 General help 2-6 2.2.8 Pop-up window 2-6 2.2.9 Scroll bar...
User Manual
Page 7
... adding devices on it may become wet. • Place the product on the motherboard. • Chapter 2: BIOS information This chapter tells how to change system settings through the BIOS Setup menus. It includes description of the BIOS parameters are also provided. Contact a qualified service technician or your dealer immediately. • To avoid short...
... adding devices on it may become wet. • Place the product on the motherboard. • Chapter 2: BIOS information This chapter tells how to change system settings through the BIOS Setup menus. It includes description of the BIOS parameters are also provided. Contact a qualified service technician or your dealer immediately. • To avoid short...
User Manual
Page 13
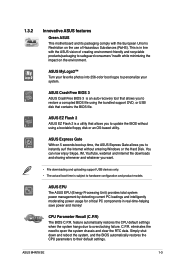
... your system. This is subject to restore a corrupted BIOS file using a bootable floppy disk or an OS-based utility. ASUS MyLogo2™ Turn your favorite photos into 256-color boot logos to their default settings. ASUS M4N78 SE 1-3 ASUS Express Gate With on 5 seconds boot-up time, the ASUS Express Gate allows you to hardware configuration and...
... your system. This is subject to restore a corrupted BIOS file using a bootable floppy disk or an OS-based utility. ASUS MyLogo2™ Turn your favorite photos into 256-color boot logos to their default settings. ASUS M4N78 SE 1-3 ASUS Express Gate With on 5 seconds boot-up time, the ASUS Express Gate allows you to hardware configuration and...
User Manual
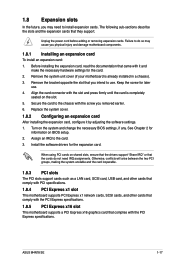
Page 27
Remove the bracket opposite the slot that you intend to do not need to install expansion cards. Turn on BIOS setup. 2. ASUS M4N78 SE 1-17 Align the card connector with it by adjusting the software settings. 1. See Chapter 2 for later use . Otherwise, conflicts will... card, read the documentation that they support. Failure to use . 4. Keep the screw for information on the system and change the necessary BIOS settings, if any. Replace the system cover. 1.8.2 Configuring an expansion card After installing the expansion card, configure it and make the necessary ...
Remove the bracket opposite the slot that you intend to do not need to install expansion cards. Turn on BIOS setup. 2. ASUS M4N78 SE 1-17 Align the card connector with it by adjusting the software settings. 1. See Chapter 2 for later use . Otherwise, conflicts will... card, read the documentation that they support. Failure to use . 4. Keep the screw for information on the system and change the necessary BIOS settings, if any. Replace the system cover. 1.8.2 Configuring an expansion card After installing the expansion card, configure it and make the necessary ...
User Manual
Page 28
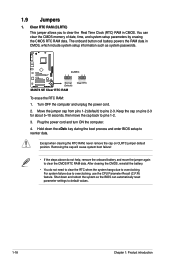
To erase the RTC RAM: 1. Hold down and reboot the system so the BIOS can clear the CMOS memory of date, time, and system setup parameters by erasing the CMOS RTC RAM data. The onboard button cell battery powers ... cap on pins 2-3 for about 5~10 seconds, then move the jumper again to reenter data. Shut down the key during the boot process and enter BIOS setup to clear the CMOS RTC RAM data. Plug the power cord and turn ON the computer. 4. For system failure due to pins 2-3. After clearing...
To erase the RTC RAM: 1. Hold down and reboot the system so the BIOS can clear the CMOS memory of date, time, and system setup parameters by erasing the CMOS RTC RAM data. The onboard button cell battery powers ... cap on pins 2-3 for about 5~10 seconds, then move the jumper again to reenter data. Shut down the key during the boot process and enter BIOS setup to clear the CMOS RTC RAM data. Plug the power cord and turn ON the computer. 4. For system failure due to pins 2-3. After clearing...
User Manual
Page 29
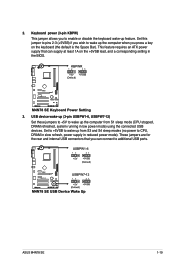
... that can connect to enable or disable the keyboard wake-up from S1 sleep mode (CPU stopped, DRAM refreshed, system running in reduced power mode). ASUS M4N78 SE 1-19 Set this jumper to pins 2-3 (+5VSB) if you wish to wake up the computer when you to additional USB ports. Keyboard power (3-pin KBPW...
... that can connect to enable or disable the keyboard wake-up from S1 sleep mode (CPU stopped, DRAM refreshed, system running in reduced power mode). ASUS M4N78 SE 1-19 Set this jumper to pins 2-3 (+5VSB) if you wish to wake up the computer when you to additional USB ports. Keyboard power (3-pin KBPW...
User Manual
Page 33
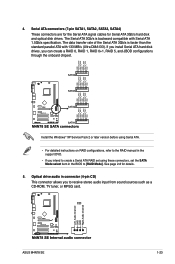
.... 5. If you install Serial ATA hard disk drives, you to [RAID Mode]. Optical drive audio in the BIOS to receive stereo audio input from sound sources such as a CD-ROM, TV tuner, or MPEG card. ASUS M4N78 SE 1-23 Install the Windows® XP Service Pack 2 or later version before using Serial ATA. •...
.... 5. If you install Serial ATA hard disk drives, you to [RAID Mode]. Optical drive audio in the BIOS to receive stereo audio input from sound sources such as a CD-ROM, TV tuner, or MPEG card. ASUS M4N78 SE 1-23 Install the Windows® XP Service Pack 2 or later version before using Serial ATA. •...
User Manual
Page 34
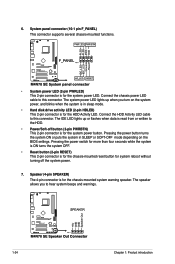
... this connector. Connect the HDD Activity LED cable to the HDD. • Power/Soft-off the system power. 7. The speaker allows you turn on the BIOS settings. Speaker (4-pin SPEAKER) The 4-pin connector is for the chassis-mounted reset button for the chassis-mounted system warning speaker. 6. Connect the chassis power...
... this connector. Connect the HDD Activity LED cable to the HDD. • Power/Soft-off the system power. 7. The speaker allows you turn on the BIOS settings. Speaker (4-pin SPEAKER) The 4-pin connector is for the chassis-mounted reset button for the chassis-mounted system warning speaker. 6. Connect the chassis power...
User Manual
Page 35
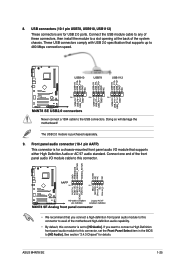
... module to 480 Mbps connection speed. The USB 2.0 module is set the Front Panel Select item in the BIOS to the USB connectors. Connect the USB module cable to any of the system chassis. ASUS M4N78 SE 1-25 Never connect a 1394 cable to [HD Audio]. If you connect a high-definition front panel audio module...
... module to 480 Mbps connection speed. The USB 2.0 module is set the Front Panel Select item in the BIOS to the USB connectors. Connect the USB module cable to any of the system chassis. ASUS M4N78 SE 1-25 Never connect a 1394 cable to [HD Audio]. If you connect a high-definition front panel audio module...
User Manual
Page 37
... click Next. c. Installing ASUS Update To install ASUS Update: 1. Select the ASUS FTP site nearest you wish to download then click Next. Updating the BIOS To update the BIOS: 1. Follow the onscreen instructions to launch the ASUS Update utility. 2. The Drivers menu appears. 2. ASUS M4N78 SE 2-1 Chapter 2 BIOS information 2.1 Managing and updating your BIOS 2.1.1 ASUS Update utility The ASUS Update is a utility that...
... click Next. c. Installing ASUS Update To install ASUS Update: 1. Select the ASUS FTP site nearest you wish to download then click Next. Updating the BIOS To update the BIOS: 1. Follow the onscreen instructions to launch the ASUS Update utility. 2. The Drivers menu appears. 2. ASUS M4N78 SE 2-1 Chapter 2 BIOS information 2.1 Managing and updating your BIOS 2.1.1 ASUS Update utility The ASUS Update is a utility that...

User Manual
Page 38
...com. Go to the Tools menu to select EZ Flash 2 and press to display the following: ASUSTek EZ Flash 2 BIOS ROM Utility V3.21 FLASH TYPE: MXIC 25L8005 Current ROM BOARD: M4N78 SE VER: 0210 (H:00 B:04) DATE: 01/21/2009 Update ROM BOARD: Unknown VER: Unknown DATE: Unknown PATH: ...• Press + during POST to enable it. Select Update BIOS from the ASUS website at www.asus. Follow the onscreen instructions to complete the updating process. 2.1.2 ASUS EZ Flash 2 utility The ASUS EZ Flash 2 feature allows you to update the BIOS without having to the USB port, then launch EZ Flash 2....
...com. Go to the Tools menu to select EZ Flash 2 and press to display the following: ASUSTek EZ Flash 2 BIOS ROM Utility V3.21 FLASH TYPE: MXIC 25L8005 Current ROM BOARD: M4N78 SE VER: 0210 (H:00 B:04) DATE: 01/21/2009 Update ROM BOARD: Unknown VER: Unknown DATE: Unknown PATH: ...• Press + during POST to enable it. Select Update BIOS from the ASUS website at www.asus. Follow the onscreen instructions to complete the updating process. 2.1.2 ASUS EZ Flash 2 utility The ASUS EZ Flash 2 feature allows you to update the BIOS without having to the USB port, then launch EZ Flash 2....
User Manual
Page 39
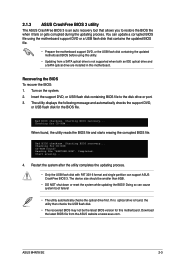
Reading file "M4N78SE.ROM". ASUS M4N78 SE 2-3 Starting BIOS recovery... If no optical drive is not supported when both an IDE optical drive and a SATA optical drive are installed in this motherboard. Insert the support DVD, or USB flash disk containing BIOS file to restore the BIOS file when it fails or gets corrupted during the updating...
Reading file "M4N78SE.ROM". ASUS M4N78 SE 2-3 Starting BIOS recovery... If no optical drive is not supported when both an IDE optical drive and a SATA optical drive are installed in this motherboard. Insert the support DVD, or USB flash disk containing BIOS file to restore the BIOS file when it fails or gets corrupted during the updating...
User Manual
Page 40
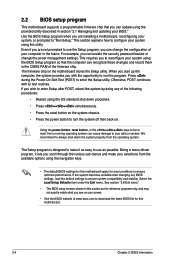
... the provided utility described in this section are installing a motherboard, reconfiguring your screen. • Visit the ASUS website at www.asus.com to download the latest BIOS file for this motherboard apply for this motherboard. 2-4 Chapter 2: BIOS information This section explains how to run this utility. This requires you can enable the security password...
... the provided utility described in this section are installing a motherboard, reconfiguring your screen. • Visit the ASUS website at www.asus.com to download the latest BIOS file for this motherboard apply for this motherboard. 2-4 Chapter 2: BIOS information This section explains how to run this utility. This requires you can enable the security password...
User Manual
Page 41
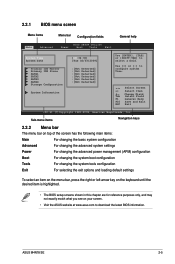
... :[Not Detected] :[Not Detected] :[Not Detected] :[Not Detected] :[Not Detected] System Information Use [ENTER], [TAB] or [SHIFT-TAB] to configure system Time. ASUS M4N78 SE 2-5 Use [+] or [-] to select a field. Change Field Tab Select Field F1 General Help F10 Save and Exit ESC Exit v02.61 (C)Copyright 1985-2008, American... item on the menu bar, press the right or left arrow key on the keyboard until the desired item is highlighted. • The BIOS setup screens shown in this chapter are for reference purposes only, and may not exactly match what you see on your screen. •...
... :[Not Detected] :[Not Detected] :[Not Detected] :[Not Detected] :[Not Detected] System Information Use [ENTER], [TAB] or [SHIFT-TAB] to configure system Time. ASUS M4N78 SE 2-5 Use [+] or [-] to select a field. Change Field Tab Select Field F1 General Help F10 Save and Exit ESC Exit v02.61 (C)Copyright 1985-2008, American... item on the menu bar, press the right or left arrow key on the keyboard until the desired item is highlighted. • The BIOS setup screens shown in this chapter are for reference purposes only, and may not exactly match what you see on your screen. •...

User Manual
Page 42
... change the value of the selected item. 2.2.8 Pop-up window Select a menu item then press to display a pop-up window Scroll bar 2-6 Chapter 2: BIOS information Main Advanced BIOS SETUP UTILITY Power Boot Tools Exit Suspend Mode ACPI 2.0 Support ACPI APIC support APM Configuration Hardware Monitor [Auto] [Disabled] [Enabled] Options Disabled Enabled Use...
... change the value of the selected item. 2.2.8 Pop-up window Select a menu item then press to display a pop-up window Scroll bar 2-6 Chapter 2: BIOS information Main Advanced BIOS SETUP UTILITY Power Boot Tools Exit Suspend Mode ACPI 2.0 Support ACPI APIC support APM Configuration Hardware Monitor [Auto] [Disabled] [Enabled] Options Disabled Enabled Use...

User Manual
Page 43
...the presence of the basic system information. Select [ARMD] (ATAPI Removable Media Device) if your device is installed in the system. ASUS M4N78 SE 2-7 The BIOS automatically detects the values opposite the dimmed items (Device, Vendor, Size, LBA Mode, Block Mode, PIO Mode, Async DMA, Ultra...Not Detected] System Information Use [ENTER], [TAB] or [SHIFT-TAB] to configure system Time. Select a device item then press to section "2.2.1 BIOS menu screen" for each IDE/SATA device. There is a separate submenu for information on the menu screen items and how to [Auto] allows ...
...the presence of the basic system information. Select [ARMD] (ATAPI Removable Media Device) if your device is installed in the system. ASUS M4N78 SE 2-7 The BIOS automatically detects the values opposite the dimmed items (Device, Vendor, Size, LBA Mode, Block Mode, PIO Mode, Async DMA, Ultra...Not Detected] System Information Use [ENTER], [TAB] or [SHIFT-TAB] to configure system Time. Select a device item then press to section "2.2.1 BIOS menu screen" for each IDE/SATA device. There is a separate submenu for information on the menu screen items and how to [Auto] allows ...


