
User Guide
Page 15
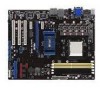
..., 3-pin PWR_FAN) 5. Onboard LED (SB_PWR) 11. Front panel audio connector (10-1 pin AAFP) 18. ATX power connectors (24-pin EATXPWR, 4-pin ATX12V) 3. Clear RTC RAM (CLRTC) 9. IDE connector (40-1 pin PRI_IDE) 8. USB device wake-up (3-pin USBPW1-4, USBPW5-8, USBPW9...ATA connectors (7-pin SATA1-6) 7. System panel connector (10-1 pin PANEL) 10. Optical drive audio in connector (4-pin CD) 17. 1.5.3 Motherboard layout 1.5.4 Layout contents Connectors/Jumpers/Slots 1. CPU socket AM2+/AM2 4. DDR2 DIMM slots 6. USB connectors (10-1 pin USB56, USB78, ...
..., 3-pin PWR_FAN) 5. Onboard LED (SB_PWR) 11. Front panel audio connector (10-1 pin AAFP) 18. ATX power connectors (24-pin EATXPWR, 4-pin ATX12V) 3. Clear RTC RAM (CLRTC) 9. IDE connector (40-1 pin PRI_IDE) 8. USB device wake-up (3-pin USBPW1-4, USBPW5-8, USBPW9...ATA connectors (7-pin SATA1-6) 7. System panel connector (10-1 pin PANEL) 10. Optical drive audio in connector (4-pin CD) 17. 1.5.3 Motherboard layout 1.5.4 Layout contents Connectors/Jumpers/Slots 1. CPU socket AM2+/AM2 4. DDR2 DIMM slots 6. USB connectors (10-1 pin USB56, USB78, ...
User Guide
Page 25
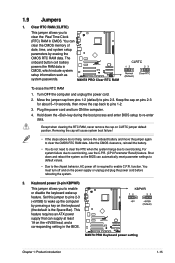
...keyboard (the default is required to wake up feature. Plug the power cord and turn off is the Space Bar). This feature requires an ATX power supply that can automatically reset parameter settings to default values. • Due to overclocking. Move the jumper cap from pins 1-2 (default.... You must turn ON the computer. 4. Set this jumper to pins 2-3 (+5VSB) to enable C.P.R. The onboard button cell battery powers the RAM data in CMOS, which include system setup information such as system passwords. Hold down and reboot the system so the BIOS can supply at least...
...keyboard (the default is required to wake up feature. Plug the power cord and turn off is the Space Bar). This feature requires an ATX power supply that can automatically reset parameter settings to default values. • Due to overclocking. Move the jumper cap from pins 1-2 (default.... You must turn ON the computer. 4. Set this jumper to pins 2-3 (+5VSB) to enable C.P.R. The onboard button cell battery powers the RAM data in CMOS, which include system setup information such as system passwords. Hold down and reboot the system so the BIOS can supply at least...
User Guide
Page 42
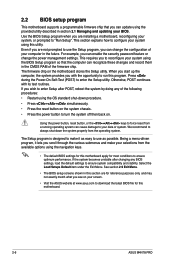
...Exit Menu. • The BIOS setup screens shown in this motherboard. 2-6 ASUS M4N78 PRO 2.2 BIOS setup program This motherboard supports a programmable firmware chip that the computer can recognize these changes and record them in the CMOS RAM of the following procedures: • Restart using the navigation ...keys. • The default BIOS settings for this motherboard apply for this section are installing a motherboard, reconfiguring your BIOS. Otherwise, POST continues ...
...Exit Menu. • The BIOS setup screens shown in this motherboard. 2-6 ASUS M4N78 PRO 2.2 BIOS setup program This motherboard supports a programmable firmware chip that the computer can recognize these changes and record them in the CMOS RAM of the following procedures: • Restart using the navigation ...keys. • The default BIOS settings for this motherboard apply for this section are installing a motherboard, reconfiguring your BIOS. Otherwise, POST continues ...

User Guide
Page 55
...] Enables or disables the DRAM SCRUB REDIRECT feature that allows the hardware to report and correct memory errors. This item allows the L1 Data Cache RAM to be corrected when idle. You may also adjust all sub-items by setting this item to [Super] to adjust the DRAM BG Scrub sub... chip kill feature. NVIDIA Core Calibration [Disabled] Setting this item to [Enabled] to allow ECC mode autoadjustment. This item allows the L2/L3 Data Cache RAM to be corrected when idle.
...] Enables or disables the DRAM SCRUB REDIRECT feature that allows the hardware to report and correct memory errors. This item allows the L1 Data Cache RAM to be corrected when idle. You may also adjust all sub-items by setting this item to [Super] to adjust the DRAM BG Scrub sub... chip kill feature. NVIDIA Core Calibration [Disabled] Setting this item to [Enabled] to allow ECC mode autoadjustment. This item allows the L2/L3 Data Cache RAM to be corrected when idle.

User Guide
Page 61
...the screen shows the default Not Installed. View Only allows access but does not allow you set a password, this item to erase the RTC RAM. The User Password item on how to set or change the user password. Configuration options: [Disabled] [Enabled] 2.7.3 Security The Security menu items...set a User Password: 1. User Access Level [Full Access] This item allows you can clear it by erasing the CMOS Real Time Clock (RTC) RAM. Full Access allows viewing and changing all the fields in setting a supervisor password. If you forget your password. After you have set a supervisor password...
...the screen shows the default Not Installed. View Only allows access but does not allow you set a password, this item to erase the RTC RAM. The User Password item on how to set or change the user password. Configuration options: [Disabled] [Enabled] 2.7.3 Security The Security menu items...set a User Password: 1. User Access Level [Full Access] This item allows you can clear it by erasing the CMOS Real Time Clock (RTC) RAM. Full Access allows viewing and changing all the fields in setting a supervisor password. If you forget your password. After you have set a supervisor password...

User Guide
Page 64
...parameters on even when the PC is turned off. When you select this option only if you do not want to the non-volatile RAM. 2-28 ASUS M4N78 PRO If you attempt to exit the Setup program without saving your changes, the program prompts you with a message asking if you to load... that you made changes to save the changes while exiting. Exit & Save Changes Once you are finished making your changes to the CMOS RAM. Load Setup Defaults This option allows you selected are saved to the BIOS items. BIOS SETUP UTILITY Main Ai Tweaker Advanced Power Boot Tools...
...parameters on even when the PC is turned off. When you select this option only if you do not want to the non-volatile RAM. 2-28 ASUS M4N78 PRO If you attempt to exit the Setup program without saving your changes, the program prompts you with a message asking if you to load... that you made changes to save the changes while exiting. Exit & Save Changes Once you are finished making your changes to the CMOS RAM. Load Setup Defaults This option allows you selected are saved to the BIOS items. BIOS SETUP UTILITY Main Ai Tweaker Advanced Power Boot Tools...


