
User Guide
Page 3
Contents Contents...iii Notices...v Safety information vi About this guide vi M4N78 PRO specifications summary viii Chapter 1 Product introduction 1.1 Welcome 1-1 1.2 Package contents 1-1 1.3 Special features 1-1 1.4 Before you proceed 1-3 1.5 Motherboard overview 1-4 1.5.1 Placement direction 1-4 1.5.2 Screw holes 1-4 1.5.3 Motherboard layout 1-5 1.5.4 Layout contents 1-5 1.6 Central Processing Unit (CPU 1-6 1.6.1 Installing the CPU 1-6 1.6.2 Installing the heatsink and fan 1-7 1.7 System memory 1-9 1.7.1 Overview 1-9 1.7.2 Memory configurations 1-9 1.7.3 ...
Contents Contents...iii Notices...v Safety information vi About this guide vi M4N78 PRO specifications summary viii Chapter 1 Product introduction 1.1 Welcome 1-1 1.2 Package contents 1-1 1.3 Special features 1-1 1.4 Before you proceed 1-3 1.5 Motherboard overview 1-4 1.5.1 Placement direction 1-4 1.5.2 Screw holes 1-4 1.5.3 Motherboard layout 1-5 1.5.4 Layout contents 1-5 1.6 Central Processing Unit (CPU 1-6 1.6.1 Installing the CPU 1-6 1.6.2 Installing the heatsink and fan 1-7 1.7 System memory 1-9 1.7.1 Overview 1-9 1.7.2 Memory configurations 1-9 1.7.3 ...

User Guide
Page 8
Refer to www.asus.com or this user manual for Windows® Vista™ only) -...with max. Supports Microsoft® DirectX 10, OpenGL 2.0, Pixel Shader 4.0 - HyperTransport™ 3.0 interface for AM3 / AM2+ CPU 2000 / 1600 MT/s for one DIMM per channel only. resolution up to OS limitation, when installing total memory of less ...™ Technology with max. resolution up to 16 GB system memory *Due to 1920 x 1200 @ 60Hz - M4N78 PRO specifications summary CPU Chipset System bus Memory VGA Expansion Slots LAN USB AMD® Phenom™ X4 / Phenom™ X3 / Athlon...
Refer to www.asus.com or this user manual for Windows® Vista™ only) -...with max. Supports Microsoft® DirectX 10, OpenGL 2.0, Pixel Shader 4.0 - HyperTransport™ 3.0 interface for AM3 / AM2+ CPU 2000 / 1600 MT/s for one DIMM per channel only. resolution up to OS limitation, when installing total memory of less ...™ Technology with max. resolution up to 16 GB system memory *Due to 1920 x 1200 @ 60Hz - M4N78 PRO specifications summary CPU Chipset System bus Memory VGA Expansion Slots LAN USB AMD® Phenom™ X4 / Phenom™ X3 / Athlon...
User Guide
Page 9
...;d� Front Panel Jack-Retasking - ASUS Noise Filtering ASUS Power Solution: - ASUS Q-Fan 2 ASUS Crystal Sound: - ASUS Fanless Design: Stylish heatsink solution - ASUS Anti-Surge Protection Express Gate ASUS Green Design: - ASUS Q-Connector - vDIMM: 8-step DRAM voltage control - AI Overclocking (Intelligent CPU Frequency Tuner) - M4N78 PRO specifications summary Storage High Definition Audio ASUS Unique Features Special Features ASUS Exclusive Overclocking Features NVIDIA GeForce...
...;d� Front Panel Jack-Retasking - ASUS Noise Filtering ASUS Power Solution: - ASUS Q-Fan 2 ASUS Crystal Sound: - ASUS Fanless Design: Stylish heatsink solution - ASUS Anti-Surge Protection Express Gate ASUS Green Design: - ASUS Q-Connector - vDIMM: 8-step DRAM voltage control - AI Overclocking (Intelligent CPU Frequency Tuner) - M4N78 PRO specifications summary Storage High Definition Audio ASUS Unique Features Special Features ASUS Exclusive Overclocking Features NVIDIA GeForce...
User Guide
Page 10
M4N78 PRO specifications summary Rear panel I/O ports Internal I/O ...connectors support additional 8 USB ports 1 x Floppy disk drive connector 1 x COM connector 1 x IDE connector 6 x SATA connectors 1 x CPU Fan connector 1 x Chassis Fan connector 1 x Power Fan connector 1 x Front panel audio connector 1 x S/PDIF Out Header 1 x Chassis Intrusion connector 1 x...ATX Power connector 1 x 4-pin ATX 12V Power connector 1 x System Panel (Q-Connector) 8 Mb Flash ROM, AMI BIOS, PnP, DMI 2.0, WfM2.0, SM BIOS 2.5, ACPI 2.0, ASUS EZ Flash 2 Drivers Express Gate ASUS PC Probe II ASUS Update Anti-Virus Utility (OEM version) ATX...
M4N78 PRO specifications summary Rear panel I/O ports Internal I/O ...connectors support additional 8 USB ports 1 x Floppy disk drive connector 1 x COM connector 1 x IDE connector 6 x SATA connectors 1 x CPU Fan connector 1 x Chassis Fan connector 1 x Power Fan connector 1 x Front panel audio connector 1 x S/PDIF Out Header 1 x Chassis Intrusion connector 1 x...ATX Power connector 1 x 4-pin ATX 12V Power connector 1 x System Panel (Q-Connector) 8 Mb Flash ROM, AMI BIOS, PnP, DMI 2.0, WfM2.0, SM BIOS 2.5, ACPI 2.0, ASUS EZ Flash 2 Drivers Express Gate ASUS PC Probe II ASUS Update Anti-Virus Utility (OEM version) ATX...
User Guide
Page 12
...ASUS M4N78 PRO ASUS EPU is not needed and enables low-power operation when performance is supported by detecting current PC loadings and intelligently moderating power in 3D graphics and other memory demanding applications. ASUS EPU The ASUS EPU (Energy Processing Unit) provides total system power management by AM3/AM2+ CPU... 1066 support This motherboard supports DDR2 1066, which provides faster data transfer rate and more information. 1.3.2 Innovative ASUS features ASUS 4+1 Phase Power Design Unleashes ultimate memory performances with this series motherboard GPUs. Hybrid SLI...
...ASUS M4N78 PRO ASUS EPU is not needed and enables low-power operation when performance is supported by detecting current PC loadings and intelligently moderating power in 3D graphics and other memory demanding applications. ASUS EPU The ASUS EPU (Energy Processing Unit) provides total system power management by AM3/AM2+ CPU... 1066 support This motherboard supports DDR2 1066, which provides faster data transfer rate and more information. 1.3.2 Innovative ASUS features ASUS 4+1 Phase Power Design Unleashes ultimate memory performances with this series motherboard GPUs. Hybrid SLI...

User Guide
Page 15
ATX power connectors (24-pin EATXPWR, 4-pin ATX12V) 3. DDR2 DIMM slots 6. Serial ATA connectors (7-pin SATA1-6) 7. System panel connector (10-1 pin PANEL) 10. USB device wake-up (3-pin USBPW1-4, USBPW5-8, USBPW9-12) 13. Floppy disk drive connector (34-1 pin FLOPPY) 15. 1.5.3 Motherboard layout 1.5.4 Layout contents Connectors/Jumpers/Slots 1. CPU... audio in connector (4-pin CD) 17. Digital audio connector (4-1 pin SPDIF_OUT) 16. CPU socket AM2+/AM2 4. Chassis intrusion connector (4-1 pin CHASSIS) 12. Onboard LED (SB_PWR) 11. Keyboard power (3-pin KBPWR) 2.
ATX power connectors (24-pin EATXPWR, 4-pin ATX12V) 3. DDR2 DIMM slots 6. Serial ATA connectors (7-pin SATA1-6) 7. System panel connector (10-1 pin PANEL) 10. USB device wake-up (3-pin USBPW1-4, USBPW5-8, USBPW9-12) 13. Floppy disk drive connector (34-1 pin FLOPPY) 15. 1.5.3 Motherboard layout 1.5.4 Layout contents Connectors/Jumpers/Slots 1. CPU... audio in connector (4-pin CD) 17. Digital audio connector (4-1 pin SPDIF_OUT) 16. CPU socket AM2+/AM2 4. Chassis intrusion connector (4-1 pin CHASSIS) 12. Onboard LED (SB_PWR) 11. Keyboard power (3-pin KBPWR) 2.

User Guide
Page 16
... processors and AM2+ / AM2 Phenom™ X4 / Phenom™ X3 / Athlon™ X2 / Athlon™ / Sempron™ processors. The CPU fits only in place. 1.6 Central Processing Unit (CPU) The motherboard comes with AMD® Opteron™ processors. Small triangle Gold triangle 1-6 ASUS M4N78 PRO Press the lever sideways to 90°-100° angle, otherwise the...
... processors and AM2+ / AM2 Phenom™ X4 / Phenom™ X3 / Athlon™ X2 / Athlon™ / Sempron™ processors. The CPU fits only in place. 1.6 Central Processing Unit (CPU) The motherboard comes with AMD® Opteron™ processors. Small triangle Gold triangle 1-6 ASUS M4N78 PRO Press the lever sideways to 90°-100° angle, otherwise the...

User Guide
Page 17
...module base. • The retention module base is already installed on the motherboard upon purchase. • You do not have to remove the retention module base when installing the CPU or installing other motherboard components. • If you fail to section 1.6.2 Installing heatsink and fan ...for instructions. 7. You can occur if you purchased a separate CPU heatsink and fan assembly, ensure that it is locked. ...
...module base. • The retention module base is already installed on the motherboard upon purchase. • You do not have to remove the retention module base when installing the CPU or installing other motherboard components. • If you fail to section 1.6.2 Installing heatsink and fan ...for instructions. 7. You can occur if you purchased a separate CPU heatsink and fan assembly, ensure that it is locked. ...

User Guide
Page 18
...retention bracket is in place. Do not forget to the retention module base. When the fan and heatsink assembly is in place, connect the CPU fan cable to the connector on the retention mechanism to secure the heatsink and fan to the retention module base. 1 2 3 4 ...you cannot snap the retention bracket in this connector. 1-8 ASUS M4N78 PRO Attach one end of the retention bracket to connect the CPU fan connector! Push down the retention bracket lock on the motherboard labeled CPU_FAN. Your boxed CPU heatsink and fan assembly should come with installation instructions for the...
...retention bracket is in place. Do not forget to the retention module base. When the fan and heatsink assembly is in place, connect the CPU fan cable to the connector on the retention mechanism to secure the heatsink and fan to the retention module base. 1 2 3 4 ...you cannot snap the retention bracket in this connector. 1-8 ASUS M4N78 PRO Attach one end of the retention bracket to connect the CPU fan connector! Push down the retention bracket lock on the motherboard labeled CPU_FAN. Your boxed CPU heatsink and fan assembly should come with installation instructions for the...
User Guide
Page 20
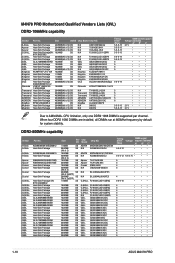
...8226; 5 • 4 • 5 • 4 • 5 • 5 • 5 • 4 • 5 • 4 • 5 • 4 • 5 • 1-10 ASUS M4N78 PRO DDR2-800MHz capability Vendor A-Data A-Data A-Data A-Data Apacer Apacer Corsair Corsair Crucial Crucial G.SKILL G.SKILL G.SKILL G.SKILL G.SKILL G.SKILL GEIL GEIL GEIL GEIL GEIL...; 2.1V • • • 2.1V • Due to AM3/AM2+ CPU limitation, only one DDR2 1066 DIMM is supported per channel. M4N78 PRO Motherboard Qualified Vendors Lists (QVL) DDR2-1066MHz capability Vendor A-Data Part No.
...8226; 5 • 4 • 5 • 4 • 5 • 5 • 5 • 4 • 5 • 4 • 5 • 4 • 5 • 1-10 ASUS M4N78 PRO DDR2-800MHz capability Vendor A-Data A-Data A-Data A-Data Apacer Apacer Corsair Corsair Crucial Crucial G.SKILL G.SKILL G.SKILL G.SKILL G.SKILL G.SKILL GEIL GEIL GEIL GEIL GEIL...; 2.1V • • • 2.1V • Due to AM3/AM2+ CPU limitation, only one DDR2 1066 DIMM is supported per channel. M4N78 PRO Motherboard Qualified Vendors Lists (QVL) DDR2-1066MHz capability Vendor A-Data Part No.
User Guide
Page 25
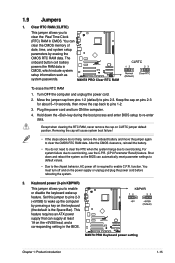
... Space Bar). Set this jumper to pins 2-3 (+5VSB) to enable C.P.R. Move the jumper cap from pins 1-2 (default) to overclocking, use the C.P.R. (CPU Parameter Recall) feature. This feature requires an ATX power supply that can clear the CMOS memory of date, time, and system setup parameters by pressing a key on the keyboard (the...
... Space Bar). Set this jumper to pins 2-3 (+5VSB) to enable C.P.R. Move the jumper cap from pins 1-2 (default) to overclocking, use the C.P.R. (CPU Parameter Recall) feature. This feature requires an ATX power supply that can clear the CMOS memory of date, time, and system setup parameters by pressing a key on the keyboard (the...

User Guide
Page 26
...the computer from S3 and S4 sleep modes (no power to wake up (3-pin USBPW1-4, USBPW5-8, USBPW9-12) Set these jumpers to +5V to CPU, DRAM in slow refresh, power supply in low power mode) using the connected USB devices. The USBPW5-8 and USBPW9-12 jumpers are for the ...activity) OFF OFF Right LED OFF OFF Orange (blinking during data activity) Green (blinking during data activity) Left Right LED LED LAN port 1-16 ASUS M4N78 PRO LAN (RJ-45) port. This port allows Gigabit connection to additional USB ports. 1.10 1.10.1 Connectors Rear panel connectors 1. PS/2 mouse port.
...the computer from S3 and S4 sleep modes (no power to wake up (3-pin USBPW1-4, USBPW5-8, USBPW9-12) Set these jumpers to +5V to CPU, DRAM in slow refresh, power supply in low power mode) using the connected USB devices. The USBPW5-8 and USBPW9-12 jumpers are for the ...activity) OFF OFF Right LED OFF OFF Orange (blinking during data activity) Green (blinking during data activity) Left Right LED LED LAN port 1-16 ASUS M4N78 PRO LAN (RJ-45) port. This port allows Gigabit connection to additional USB ports. 1.10 1.10.1 Connectors Rear panel connectors 1. PS/2 mouse port.

User Guide
Page 28
...while using an HDTV compliance resolution such as a CD-ROM, TV tuner, or MPEG card. 1-18 ASUS M4N78 PRO Use the scroll bar to resize the desktop to receive stereo audio input from the motherboard support DVD. 2. • Playback of HD DVD and Blu-Ray Discs For better playback quality, ...we suggest that you to fit your HDTV desktop: 1. Under Video & Television, select Resize HDTV desktop. 4. Click OK to use an HDCP compliant monitor. CPU DIMM BIOS setup ...
...while using an HDTV compliance resolution such as a CD-ROM, TV tuner, or MPEG card. 1-18 ASUS M4N78 PRO Use the scroll bar to resize the desktop to receive stereo audio input from the motherboard support DVD. 2. • Playback of HD DVD and Blu-Ray Discs For better playback quality, ...we suggest that you to fit your HDTV desktop: 1. Under Video & Television, select Resize HDTV desktop. 4. Click OK to use an HDCP compliant monitor. CPU DIMM BIOS setup ...

User Guide
Page 29
Insufficient air flow inside the system may damage the motherboard components. Only the CPU_FAN and CHA_FAN1 connectors support the ASUS Q FAN 2 feature. 3. Connect one end of the chassis intrusion sensor or switch cable to this connector when a chassis component is... is then generated as a chassis intrusion event. The signal is for a chassis-mounted intrusion detection sensor or switch. Chapter 1: Product introduction 1-19 CPU, Chassis and Power Fan connectors (4-pin CPU_FAN, 3-pin CHA_FAN1, 3-pin PWR_FAN) The fan connectors support cooling fans of 350mA~740mA (8.88W max.) or...
Insufficient air flow inside the system may damage the motherboard components. Only the CPU_FAN and CHA_FAN1 connectors support the ASUS Q FAN 2 feature. 3. Connect one end of the chassis intrusion sensor or switch cable to this connector when a chassis component is... is then generated as a chassis intrusion event. The signal is for a chassis-mounted intrusion detection sensor or switch. Chapter 1: Product introduction 1-19 CPU, Chassis and Power Fan connectors (4-pin CPU_FAN, 3-pin CHA_FAN1, 3-pin PWR_FAN) The fan connectors support cooling fans of 350mA~740mA (8.88W max.) or...

User Guide
Page 48
... the general system specifications. Configuration options: [Manual] [Auto] The following items vary depending on the CPU and memory modules you install on the motherboard. System Memory Displays the auto-detected system memory. 2.4 Ai Tweaker menu The Ai Tweaker menu items ...the relevant parameters will be stable. BIOS Information Displays the auto-detected BIOS information. Frequencies higher than CPU manufacturer recommends are not guaranteed to [Manual]. 2-12 ASUS M4N78 PRO Change Field F1 General Help F10 Save and Exit ESC Exit v02.61 (C)Copyright 1985-2009, American ...
... the general system specifications. Configuration options: [Manual] [Auto] The following items vary depending on the CPU and memory modules you install on the motherboard. System Memory Displays the auto-detected system memory. 2.4 Ai Tweaker menu The Ai Tweaker menu items ...the relevant parameters will be stable. BIOS Information Displays the auto-detected BIOS information. Frequencies higher than CPU manufacturer recommends are not guaranteed to [Manual]. 2-12 ASUS M4N78 PRO Change Field F1 General Help F10 Save and Exit ESC Exit v02.61 (C)Copyright 1985-2009, American ...

User Guide
Page 49
...memory settings. Configuration options: [Disabled] [Address bits 6] [Address bits 12] [XOR of Address bits [20:16, 6] [XOR of the CPU frequency. FSB Frequency [200] Displays the frequency sent by the clock generator to adjust the FSB frequency. The values range from 100 to 200...using the numeric keypad. You can also type the desired FSB frequency using the numeric keypad. Configuration options: [667MHz] [800MHz] [1066MHz] CPU/NB Frequency [Auto] This item appears only when you to select the DRAM frequency control method. Configuration options: [Disabled] [Auto] Channel ...
...memory settings. Configuration options: [Disabled] [Address bits 6] [Address bits 12] [XOR of Address bits [20:16, 6] [XOR of the CPU frequency. FSB Frequency [200] Displays the frequency sent by the clock generator to adjust the FSB frequency. The values range from 100 to 200...using the numeric keypad. You can also type the desired FSB frequency using the numeric keypad. Configuration options: [667MHz] [800MHz] [1066MHz] CPU/NB Frequency [Auto] This item appears only when you to select the DRAM frequency control method. Configuration options: [Disabled] [Auto] Channel ...

User Guide
Page 52
... and press the key. 2.4.4 CPU Voltage [Auto] Allows you to set the CPU voltage. 2.4.5 CPU/NB Voltage [Auto] Allows you set the CS/ODT Setup Time item to [1/2 CLK] or [1 CLK]. The value ranges from 2.50V to 2.80V with a 0.10V interval. 2-16 ASUS M4N78 PRO Addr/Cmd Setup Time [Auto]... Addr/Cmd pins are delayed from the default setup time. The following four (4) items appear only when you set the Ai Overclocking item to [Manual]. 2.4.6 CPU VDDA Voltage [Auto] Allows you set the DQS Timing User Controls item to [DCT 0], [DCT 1] or [Both]. Configuration options: [Auto] [DCT 0]...
... and press the key. 2.4.4 CPU Voltage [Auto] Allows you to set the CPU voltage. 2.4.5 CPU/NB Voltage [Auto] Allows you set the CS/ODT Setup Time item to [1/2 CLK] or [1 CLK]. The value ranges from 2.50V to 2.80V with a 0.10V interval. 2-16 ASUS M4N78 PRO Addr/Cmd Setup Time [Auto]... Addr/Cmd pins are delayed from the default setup time. The following four (4) items appear only when you set the Ai Overclocking item to [Manual]. 2.4.6 CPU VDDA Voltage [Auto] Allows you set the DQS Timing User Controls item to [DCT 0], [DCT 1] or [Both]. Configuration options: [Auto] [DCT 0]...

User Guide
Page 53
... [Auto] Allows you to set the NorthBridge voltage. The values range from 1.100V to 1.400V with a 0.10V interval. 2.4.8 HT Voltage [Auto] Allows you to enhance CPU/LDT overclocking ability or [Enabled] for EMI control. The values range from 1.80V to 2.50V with a 0.10V interval. 2.4.10...
... [Auto] Allows you to set the NorthBridge voltage. The values range from 1.100V to 1.400V with a 0.10V interval. 2.4.8 HT Voltage [Auto] Allows you to enhance CPU/LDT overclocking ability or [Enabled] for EMI control. The values range from 1.80V to 2.50V with a 0.10V interval. 2.4.10...
User Guide
Page 54
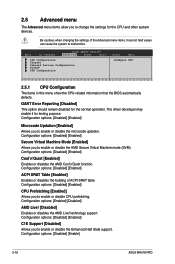
...malfunction. Be cautious when changing the settings of ACPI SRAT table. Configuration options: [Disabled] [Enable] 2-18 ASUS M4N78 PRO technology support. 2.5 Advanced menu The Advanced menu items allow you to enable or disable the microcode updation. BIOS ... UTILITY Main Ai Tweaker Advanced Power Boot Tools Exit CPU Configuration Chipset Onboard Devices Configuration PCIPnP USB Configuration Configure CPU. 2.5.1 CPU Configuration The items in this menu show the CPU-related information that the BIOS automatically detects. Configuration options...
...malfunction. Be cautious when changing the settings of ACPI SRAT table. Configuration options: [Disabled] [Enable] 2-18 ASUS M4N78 PRO technology support. 2.5 Advanced menu The Advanced menu items allow you to enable or disable the microcode updation. BIOS ... UTILITY Main Ai Tweaker Advanced Power Boot Tools Exit CPU Configuration Chipset Onboard Devices Configuration PCIPnP USB Configuration Configure CPU. 2.5.1 CPU Configuration The items in this menu show the CPU-related information that the BIOS automatically detects. Configuration options...

User Guide
Page 59
... you to generate a wake event. Configuration options: [Disabled] [Enabled] Chassis Q-Fan Mode [Silent] Allows you to set to select the CPU fan type you installed on the motherboard. Configuration options: [Disabled] [Enabled] Select Fan Type: [PWM Fan] This item appears only when you set the appropriate performance level of ... you installed may not work , and the fan you install a DC (3-pin) fan but set to the motherboard, the field shows N/A. If the fan is set to [PWM Fan], the CPU Q-Fan function will not work . • If you install will always run at full speed. Set this item...
... you to generate a wake event. Configuration options: [Disabled] [Enabled] Chassis Q-Fan Mode [Silent] Allows you to set to select the CPU fan type you installed on the motherboard. Configuration options: [Disabled] [Enabled] Select Fan Type: [PWM Fan] This item appears only when you set the appropriate performance level of ... you installed may not work , and the fan you install a DC (3-pin) fan but set to the motherboard, the field shows N/A. If the fan is set to [PWM Fan], the CPU Q-Fan function will not work . • If you install will always run at full speed. Set this item...


