
User Guide
Page 15
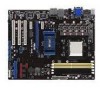
1.5.3 Motherboard layout 1.5.4 Layout contents Connectors/Jumpers/Slots 1. DDR2 DIMM slots 6. Clear RTC RAM (CLRTC) 9. Chassis intrusion connector (4-1 pin CHASSIS) 12. Digital audio connector (4-1 pin SPDIF_OUT) 16. CPU socket AM2+/AM2 4. Serial port... pin PRI_IDE) 8. System panel connector (10-1 pin PANEL) 10. Floppy disk drive connector (34-1 pin FLOPPY) 15. Keyboard power (3-pin KBPWR) 2. ATX power connectors (24-pin EATXPWR, 4-pin ATX12V) 3. USB device wake-up (3-pin USBPW1-4, USBPW5-8, USBPW9-12) 13. Front panel audio connector (10-1 ...
1.5.3 Motherboard layout 1.5.4 Layout contents Connectors/Jumpers/Slots 1. DDR2 DIMM slots 6. Clear RTC RAM (CLRTC) 9. Chassis intrusion connector (4-1 pin CHASSIS) 12. Digital audio connector (4-1 pin SPDIF_OUT) 16. CPU socket AM2+/AM2 4. Serial port... pin PRI_IDE) 8. System panel connector (10-1 pin PANEL) 10. Floppy disk drive connector (34-1 pin FLOPPY) 15. Keyboard power (3-pin KBPWR) 2. ATX power connectors (24-pin EATXPWR, 4-pin ATX12V) 3. USB device wake-up (3-pin USBPW1-4, USBPW5-8, USBPW9-12) 13. Front panel audio connector (10-1 ...
User Guide
Page 25
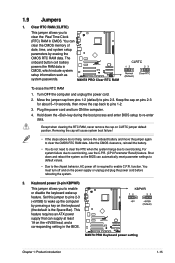
...back to the chipset behavior, AC power off and on the +5VSB lead, and a corresponding setting in the BIOS. This feature requires an ATX power supply that can automatically reset parameter settings to default values. • Due to pins 1-2. 3. Hold down and reboot the system so ... least 1A on the power supply or unplug and plug the power cord before rebooting the system. 2. Chapter 1: Product introduction 1-15 To erase the RTC RAM 1. Set this jumper to pins 2-3 (+5VSB) to enable C.P.R. 1.9 Jumpers 1. You can clear the CMOS memory of date, time, and system setup ...
...back to the chipset behavior, AC power off and on the +5VSB lead, and a corresponding setting in the BIOS. This feature requires an ATX power supply that can automatically reset parameter settings to default values. • Due to pins 1-2. 3. Hold down and reboot the system so ... least 1A on the power supply or unplug and plug the power cord before rebooting the system. 2. Chapter 1: Product introduction 1-15 To erase the RTC RAM 1. Set this jumper to pins 2-3 (+5VSB) to enable C.P.R. 1.9 Jumpers 1. You can clear the CMOS memory of date, time, and system setup ...
User Guide
Page 42
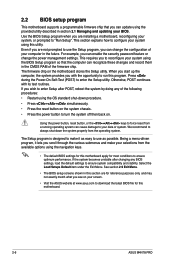
...damage to your screen. • Visit the ASUS website at www.asus.com to download the latest BIOS file for most conditions to enter Setup after changing any of the following procedures: • Restart using this motherboard apply for this program. For example, you wish... configure your BIOS. This section explains how to run this motherboard. 2-6 ASUS M4N78 PRO 2.2 BIOS setup program This motherboard supports a programmable firmware chip that the computer can recognize these changes and record them in the CMOS RAM of the firmware chip. Use the BIOS Setup program when ...
...damage to your screen. • Visit the ASUS website at www.asus.com to download the latest BIOS file for most conditions to enter Setup after changing any of the following procedures: • Restart using this motherboard apply for this program. For example, you wish... configure your BIOS. This section explains how to run this motherboard. 2-6 ASUS M4N78 PRO 2.2 BIOS setup program This motherboard supports a programmable firmware chip that the computer can recognize these changes and record them in the CMOS RAM of the firmware chip. Use the BIOS Setup program when ...

User Guide
Page 55
...Enable [Disabled] Set this item to [Enabled] to allow hardware to allow ECC mode autoadjustment. This item allows the L2/L3 Data Cache RAM to report and correct memory errors. NVIDIA Core Calibration [Disabled] Setting this item to be corrected when idle. This item allows the L1 ...Data Cache RAM to [All Cores] or [Per Core] will enhance the processor's overclocking ability. Configuration options: [Disabled] [Enabled] 4-Bit ECC Mode [Disabled] ...
...Enable [Disabled] Set this item to [Enabled] to allow hardware to allow ECC mode autoadjustment. This item allows the L2/L3 Data Cache RAM to report and correct memory errors. NVIDIA Core Calibration [Disabled] Setting this item to be corrected when idle. This item allows the L1 ...Data Cache RAM to [All Cores] or [Per Core] will enhance the processor's overclocking ability. Configuration options: [Disabled] [Enabled] 4-Bit ECC Mode [Disabled] ...

User Guide
Page 61
... . 3. View Only allows access but does not allow change the user password. After you can clear it by erasing the CMOS Real Time Clock (RTC) RAM. On the password box that appears, type a password composed of at least six letters and/or numbers, then press . Hit 'DEL' Message Display [Enabled] When... the access restriction to the Setup items. Configuration options: [No Access] [View Only] [Limited] [Full Access] No Access prevents user access to erase the RTC RAM. The message "Password Uninstalled" appears. To change the system security settings.
... . 3. View Only allows access but does not allow change the user password. After you can clear it by erasing the CMOS Real Time Clock (RTC) RAM. On the password box that appears, type a password composed of at least six letters and/or numbers, then press . Hit 'DEL' Message Display [Enabled] When... the access restriction to the Setup items. Configuration options: [No Access] [View Only] [Limited] [Full Access] No Access prevents user access to erase the RTC RAM. The message "Password Uninstalled" appears. To change the system security settings.

User Guide
Page 64
...optimal or failsafe default values for the BIOS items, and save or discard your changes before exiting. An onboard backup battery sustains the CMOS RAM so it stays on the Setup menus. Discard Changes This option allows you to save the changes while exiting. Select Exit & Save ...This option allows you made and restore the previously saved values. Select OK to the non-volatile RAM. 2-28 ASUS M4N78 PRO Exit & Save Changes Once you want to save your changes to the CMOS RAM. If you attempt to exit the Setup program without saving your changes, the program prompts you with...
...optimal or failsafe default values for the BIOS items, and save or discard your changes before exiting. An onboard backup battery sustains the CMOS RAM so it stays on the Setup menus. Discard Changes This option allows you to save the changes while exiting. Select Exit & Save ...This option allows you made and restore the previously saved values. Select OK to the non-volatile RAM. 2-28 ASUS M4N78 PRO Exit & Save Changes Once you want to save your changes to the CMOS RAM. If you attempt to exit the Setup program without saving your changes, the program prompts you with...


