User Manual
Page 8
...service technician or your dealer immediately. • To avoid short circuits, keep paper clips, screws, and staples away from connectors, slots, sockets and circuitry. • Avoid dust, humidity, and temperature extremes. If possible, disconnect all cables are correctly connected and the power cables ...assistance before the signal cables are not damaged. Do not place the product in municipal waste. Operation safety • Before installing the motherboard and adding devices on a stable surface. • If you detect any area where it may become wet. • Place the ...
...service technician or your dealer immediately. • To avoid short circuits, keep paper clips, screws, and staples away from connectors, slots, sockets and circuitry. • Avoid dust, humidity, and temperature extremes. If possible, disconnect all cables are correctly connected and the power cables ...assistance before the signal cables are not damaged. Do not place the product in municipal waste. Operation safety • Before installing the motherboard and adding devices on a stable surface. • If you detect any area where it may become wet. • Place the ...
User Manual
Page 11
... SB750 chipset: - 1 x Ultra DMA 133 / 100 / 66 for one DIMM per channel only. one at midboard; ASUS Noise Filtering VIA® VT6315N controller supports 2 x IEEE 1394a ports (one at back panel) 12 x USB 2.0/1.1 ports ... 3 GB is supported by AM2+ / AM3 CPU for up to 5200 MT/s; M4A79 Deluxe specifications summary CPU Chipset System bus Memory Expansion slots Storage LAN Audio IEEE 1394 USB ...X4 / Phenom™ X3 / Athlon™ X2 / Athlon™ / Sempron™ processors (socket AM2+/AM2) Compatible with Phenom™ II / Athlon™ X4 / Athlon™ X3 / Athlon...
... SB750 chipset: - 1 x Ultra DMA 133 / 100 / 66 for one DIMM per channel only. one at midboard; ASUS Noise Filtering VIA® VT6315N controller supports 2 x IEEE 1394a ports (one at back panel) 12 x USB 2.0/1.1 ports ... 3 GB is supported by AM2+ / AM3 CPU for up to 5200 MT/s; M4A79 Deluxe specifications summary CPU Chipset System bus Memory Expansion slots Storage LAN Audio IEEE 1394 USB ...X4 / Phenom™ X3 / Athlon™ X2 / Athlon™ / Sempron™ processors (socket AM2+/AM2) Compatible with Phenom™ II / Athlon™ X4 / Athlon™ X3 / Athlon...
User Manual
Page 16
... AMD® Phenom™ X4 / Phenom™ X3 / Athlon™ X2 / Athlon™ / Sempron™ processors (socket AM2+/AM2) This motherboard supports AMD® Socket AM2+ multi-core processors. It features dual-channel DDR2 1066 memory support, data transfer rate up to 5200MT/s HyperTransport™ 3.0 ... to 5200MT/s via HyperTransport™ 3.0 based system bus, and AMD® Cool 'n' Quiet™ Technology. Green ASUS This motherboard and its packaging comply with rendering speed, eliminating the need to scale down screen resolution to provide excellent system performance and...
... AMD® Phenom™ X4 / Phenom™ X3 / Athlon™ X2 / Athlon™ / Sempron™ processors (socket AM2+/AM2) This motherboard supports AMD® Socket AM2+ multi-core processors. It features dual-channel DDR2 1066 memory support, data transfer rate up to 5200MT/s HyperTransport™ 3.0 ... to 5200MT/s via HyperTransport™ 3.0 based system bus, and AMD® Cool 'n' Quiet™ Technology. Green ASUS This motherboard and its packaging comply with rendering speed, eliminating the need to scale down screen resolution to provide excellent system performance and...

User Manual
Page 21
Chapter 2 ASUS M4A79 Deluxe 2-1 Chapter 2: Chapter 2 2.1 Before you proceed Hardware information Take note of the following precautions before you install or remove any component, ensure that came with the component. • Before you install motherboard components or change any component. • Before handling components, use a ...place it on a grounded antistatic pad or in the bag that the ATX power supply is switched off or the power cord is detached from the wall socket before touching any motherboard settings. • Unplug the power cord from the power supply. ...
Chapter 2 ASUS M4A79 Deluxe 2-1 Chapter 2: Chapter 2 2.1 Before you proceed Hardware information Take note of the following precautions before you install or remove any component, ensure that came with the component. • Before you install motherboard components or change any component. • Before handling components, use a ...place it on a grounded antistatic pad or in the bag that the ATX power supply is switched off or the power cord is detached from the wall socket before touching any motherboard settings. • Unplug the power cord from the power supply. ...
User Manual
Page 23
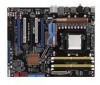
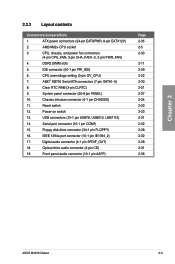
...2-32 2-28 2-32 2-28 2-31 2-36 Chapter 2 ASUS M4A79 Deluxe 2-3 Reset switch 12. DDR2 DIMM slots 5. Floppy disk drive connector (34-1 pin FLOPPY) 16. ATX power connectors (24-pin EATXPWR, 8-pin EATX12V) 2. AMD...® SB750 Serial ATA connectors (7-pin SATA1-5) 8. CPU overvoltage setting (3-pin OV_CPU) 7. Power-on switch 13. Serial port connector (10-1 pin COM1) 15. Chassis intrusion connector (4-1 pin CHASSIS) 11. 2.2.2 Layout contents Connectors/Jumpers/Slots 1. AM2/AM2+ CPU socket...
...2-32 2-28 2-32 2-28 2-31 2-36 Chapter 2 ASUS M4A79 Deluxe 2-3 Reset switch 12. DDR2 DIMM slots 5. Floppy disk drive connector (34-1 pin FLOPPY) 16. ATX power connectors (24-pin EATXPWR, 8-pin EATX12V) 2. AMD...® SB750 Serial ATA connectors (7-pin SATA1-5) 8. CPU overvoltage setting (3-pin OV_CPU) 7. Power-on switch 13. Serial port connector (10-1 pin COM1) 15. Chassis intrusion connector (4-1 pin CHASSIS) 11. 2.2.2 Layout contents Connectors/Jumpers/Slots 1. AM2/AM2+ CPU socket...
User Manual
Page 25
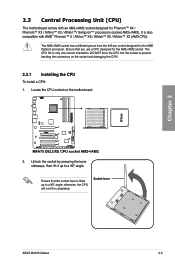
... on the motherboard. 2.3 Central Processing Unit (CPU) The motherboard comes with AMD® Phenom™ II / Athlon™ X4 / Athlon™ X3 / Athlon™ X2 (AM3 CPU). Locate the CPU socket on the socket and damaging the...socket designed for Phenom™ X4 / Phenom™ X3 / Athlon™ X2 / Athlon™/ Sempron™ processors (socket AM2+/AM2). Ensure that the socket lever is also compatible with an AM2+/AM2 socket designed for the AMD Opteron processor. otherwise, the CPU will not fit in only one correct orientation. Socket lever ASUS M4A79 Deluxe...
... on the motherboard. 2.3 Central Processing Unit (CPU) The motherboard comes with AMD® Phenom™ II / Athlon™ X4 / Athlon™ X3 / Athlon™ X2 (AM3 CPU). Locate the CPU socket on the socket and damaging the...socket designed for Phenom™ X4 / Phenom™ X3 / Athlon™ X2 / Athlon™/ Sempron™ processors (socket AM2+/AM2). Ensure that the socket lever is also compatible with an AM2+/AM2 socket designed for the AMD Opteron processor. otherwise, the CPU will not fit in only one correct orientation. Socket lever ASUS M4A79 Deluxe...
User Manual
Page 26
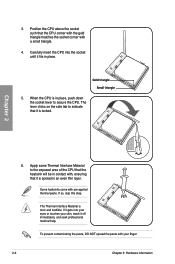
... Interface Material is in place. If it gets into the socket until it fits in place, push down the socket lever to indicate that it is locked. Position the CPU above the socket such that the CPU corner with the gold triangle matches the socket corner with pre-applied thermal paste. If so, skip...
... Interface Material is in place. If it gets into the socket until it fits in place, push down the socket lever to indicate that it is locked. Position the CPU above the socket such that the CPU corner with the gold triangle matches the socket corner with pre-applied thermal paste. If so, skip...

User Manual
Page 30
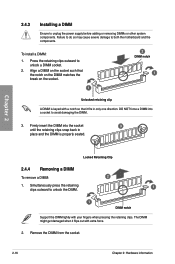
The figure illustrates the location of the DDR2 DIMM sockets: Chapter 2 2-10 Chapter 2: Hardware information A DDR2 module has the same physical dimensions as a DDR DIMM but has a 240-pin footprint compared to prevent installation on a DDR DIMM socket. DDR2 DIMMs are notched differently to the 184-pin DDR DIMM. 2.4 System memory 2.4.1 Overview The motherboard comes with four Double Data Rate 2 (DDR2) Dual Inline Memory Modules (DIMM) sockets.
The figure illustrates the location of the DDR2 DIMM sockets: Chapter 2 2-10 Chapter 2: Hardware information A DDR2 module has the same physical dimensions as a DDR DIMM but has a 240-pin footprint compared to prevent installation on a DDR DIMM socket. DDR2 DIMMs are notched differently to the 184-pin DDR DIMM. 2.4 System memory 2.4.1 Overview The motherboard comes with four Double Data Rate 2 (DDR2) Dual Inline Memory Modules (DIMM) sockets.

User Manual
Page 31
... is supported by AM3/AM2+ CPU for the dual-channel configuration. Chapter 2 ASUS M4A79 Deluxe 2-11 Any excess memory from the same vendor. • Due to install 4GB or more on the motherboard. • This motherboard does not support DIMMs made up of 256 megabit (Mb) chips or less....-marked value. 2.4.2 Memory configurations You may install 512MB, 1GB, 2GB and 4GB unbuffered ECC and non‑ECC DDR2 DIMMs into the DIMM sockets. • You may operate at a higher frequency, see section 3.6 Advanced menu for manual memory frequency adjustment. • For system stability,...
... is supported by AM3/AM2+ CPU for the dual-channel configuration. Chapter 2 ASUS M4A79 Deluxe 2-11 Any excess memory from the same vendor. • Due to install 4GB or more on the motherboard. • This motherboard does not support DIMMs made up of 256 megabit (Mb) chips or less....-marked value. 2.4.2 Memory configurations You may install 512MB, 1GB, 2GB and 4GB unbuffered ECC and non‑ECC DDR2 DIMMs into the DIMM sockets. • You may operate at a higher frequency, see section 3.6 Advanced menu for manual memory frequency adjustment. • For system stability,...

User Manual
Page 32
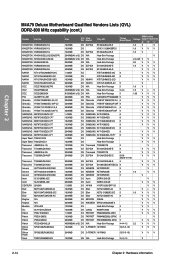
DIMM socket Size SS/ Chip DS Brand Chip NO. Timing Dimm (Bios) Voltage support (Optional) A* B* C* A-DATA ADQYE1A08 1024MB SS N/A Heat-Sink Package 5 V V A-DATA ADQYE1B16 2048MB DS N/A Apacer ...-D) 4096MB (Kit of 2) DS N/A Heat-Sink Package Heat-Sink Package Heat-Sink Package Heat-Sink Package 5-5-5-15 5-5-5-15 5-5-5-15 5-5-5-15 2.0-2.1 V V V 2.2-2.3 V V V 2.2-2.3 V V 2.2-2.3 V 2-12 Chapter 2: Hardware information Chapter 2 M4A79 Deluxe Motherboard Qualified Vendors Lists (QVL) DDR2-1066 MHz capability Vendor Part No.
DIMM socket Size SS/ Chip DS Brand Chip NO. Timing Dimm (Bios) Voltage support (Optional) A* B* C* A-DATA ADQYE1A08 1024MB SS N/A Heat-Sink Package 5 V V A-DATA ADQYE1B16 2048MB DS N/A Apacer ...-D) 4096MB (Kit of 2) DS N/A Heat-Sink Package Heat-Sink Package Heat-Sink Package Heat-Sink Package 5-5-5-15 5-5-5-15 5-5-5-15 5-5-5-15 2.0-2.1 V V V 2.2-2.3 V V V 2.2-2.3 V V 2.2-2.3 V 2-12 Chapter 2: Hardware information Chapter 2 M4A79 Deluxe Motherboard Qualified Vendors Lists (QVL) DDR2-1066 MHz capability Vendor Part No.
User Manual
Page 33
... Heat-Sink Package E5108AJBG-8E-E E5108AJBG-8E-E Heat-Sink Package HY5PS1GB31CFP-S5 Heat-Sink Package Timing Dimm (Bios) 5 5 5 4 4-4-4-12 DIMM socket Voltage support (Optional) A* B* C* VV V VV V VV V VV V 1.9 VV V 2.10 V V V 5-5-5-18 1.80 V ...1.8 V 1.8 VV 2.0 VV 1.8 VV 2.0 VV V 1.8 VV V 2.0 VV V 1.8 VV V 1.8 VV V VV V V VV VV V 1.95 V V 1.8 Vv V 1.8 Vv V 2.0 VV V 1.8 VV V 2.0 VV V ASUS M4A79 Deluxe 2-13 Size SS/ Chip DS Brand Chip NO. Chapter 2 M4A79 Deluxe Motherboard Qualified Vendors Lists (QVL) DDR2-800 MHz capability Vendor Part No.
... Heat-Sink Package E5108AJBG-8E-E E5108AJBG-8E-E Heat-Sink Package HY5PS1GB31CFP-S5 Heat-Sink Package Timing Dimm (Bios) 5 5 5 4 4-4-4-12 DIMM socket Voltage support (Optional) A* B* C* VV V VV V VV V VV V 1.9 VV V 2.10 V V V 5-5-5-18 1.80 V ...1.8 V 1.8 VV 2.0 VV 1.8 VV 2.0 VV V 1.8 VV V 2.0 VV V 1.8 VV V 1.8 VV V VV V V VV VV V 1.95 V V 1.8 Vv V 1.8 Vv V 2.0 VV V 1.8 VV V 2.0 VV V ASUS M4A79 Deluxe 2-13 Size SS/ Chip DS Brand Chip NO. Chapter 2 M4A79 Deluxe Motherboard Qualified Vendors Lists (QVL) DDR2-800 MHz capability Vendor Part No.
User Manual
Page 34
Chapter 2 M4A79 Deluxe Motherboard Qualified Vendors Lists (QVL) DDR2-800 MHz capability (cont.) Vendor Part No. KINGSTON KVR800D2N5/1G KINGSTON KVR800D2N5/1G KINGSTON KVR800D2N6/1G ...-25C M2Y2G64TU8HD4B-AC N/A N/A XP2-6400 04701G16CZ5D2A PSD2 51280081 PSD21G8002 PSD22GB002 PDC24G6400LLK SP001GBLRU800S02 SP002GBLRU800S02 TEDD1024M800HC5 Size SS/ Chip DS Brand Chip NO. Timing Dimm (Bios) DIMM socket Voltage support (Optional) A* B* C* 1024MB DS ELPIDA E5108AJBG-8E-E 1.8 V V 1024MB DS V59C1 512804QBF25 1.8 VV V 1024MB DS ELPIDA E5108AJBG-8E-E 1.8 V 2048MB(Kit of 2) ...
Chapter 2 M4A79 Deluxe Motherboard Qualified Vendors Lists (QVL) DDR2-800 MHz capability (cont.) Vendor Part No. KINGSTON KVR800D2N5/1G KINGSTON KVR800D2N5/1G KINGSTON KVR800D2N6/1G ...-25C M2Y2G64TU8HD4B-AC N/A N/A XP2-6400 04701G16CZ5D2A PSD2 51280081 PSD21G8002 PSD22GB002 PDC24G6400LLK SP001GBLRU800S02 SP002GBLRU800S02 TEDD1024M800HC5 Size SS/ Chip DS Brand Chip NO. Timing Dimm (Bios) DIMM socket Voltage support (Optional) A* B* C* 1024MB DS ELPIDA E5108AJBG-8E-E 1.8 V V 1024MB DS V59C1 512804QBF25 1.8 VV V 1024MB DS ELPIDA E5108AJBG-8E-E 1.8 V 2048MB(Kit of 2) ...

User Manual
Page 35
...V VV KINGSTON KVR667D2N5/1G 1024MB DS ELPIDA E5108AJBG-8E-E 1.8 V SS - Visit the ASUS website at www.asus.com for the latest QVL. M4A79 Deluxe Motherboard Qualified Vendors Lists (QVL) DDR2-667 MHz capability Vendor Part No. Timing Dimm (Bios) Voltage DIMM socket support (Optional) A* B* C* Apacer 78.01G9O.9K5 1024MB SS APACER AM4B5808CQJS7E 5 VV... 5-5-5-15 1.8 V GEIL GX22GB5300LX 2048MB DS N/A Heat-Sink Package 5-5-5-15 VV GEIL GX24GB5300LDC 4096MB(Kit of dual‑channel memory configuration. Chapter 2 ASUS M4A79 Deluxe 2-15 Single-sided DS -
...V VV KINGSTON KVR667D2N5/1G 1024MB DS ELPIDA E5108AJBG-8E-E 1.8 V SS - Visit the ASUS website at www.asus.com for the latest QVL. M4A79 Deluxe Motherboard Qualified Vendors Lists (QVL) DDR2-667 MHz capability Vendor Part No. Timing Dimm (Bios) Voltage DIMM socket support (Optional) A* B* C* Apacer 78.01G9O.9K5 1024MB SS APACER AM4B5808CQJS7E 5 VV... 5-5-5-15 1.8 V GEIL GX22GB5300LX 2048MB DS N/A Heat-Sink Package 5-5-5-15 VV GEIL GX24GB5300LDC 4096MB(Kit of dual‑channel memory configuration. Chapter 2 ASUS M4A79 Deluxe 2-15 Single-sided DS -
User Manual
Page 36
Failure to do so may cause severe damage to unlock a DIMM socket. 2. To install a DIMM: 1. Press the retaining clips outward to both the motherboard and the components. DO NOT force a DIMM into the socket 3 until the retaining clips snap back in only one direction. Chapter 2 Locked Retaining Clip 2.4.4... 1 DIMM notch Support the DIMM lightly with extra force. 2. Remove the DIMM from the socket. 2-16 Chapter 2: Hardware information Firmly insert the DIMM into a socket to unplug the power supply before adding or removing DIMMs or other system components. The DIMM ...
Failure to do so may cause severe damage to unlock a DIMM socket. 2. To install a DIMM: 1. Press the retaining clips outward to both the motherboard and the components. DO NOT force a DIMM into the socket 3 until the retaining clips snap back in only one direction. Chapter 2 Locked Retaining Clip 2.4.4... 1 DIMM notch Support the DIMM lightly with extra force. 2. Remove the DIMM from the socket. 2-16 Chapter 2: Hardware information Firmly insert the DIMM into a socket to unplug the power supply before adding or removing DIMMs or other system components. The DIMM ...


