
User Manual
Page 1
Motherboard
Motherboard

User Manual
Page 1
M4A78T-E Motherboard
M4A78T-E Motherboard

User Manual
Page 3
...Contents...iii Notices ...vii Safety information...viii About this guide...ix M4A78T-E specifications summary xi Chapter 1: Product introduction 1.1 Welcome!...1-1 1.2 Package contents 1-1 1.3 Special features 1-2 1.3.1 Product highlights 1-2 1.3.2 ASUS unique features 1-3 1.3.3 ASUS intelligent performance and overclocking features 1-5 Chapter 2: Hardware information 2.1 Before you proceed 2-1 2.2 Motherboard overview 2-2 2.2.1 Motherboard layout 2-2 2.2.2 Layout contents 2-3 2.2.3 Placement direction 2-4 2.2.4 Screw holes 2-4 2.3 Central Processing Unit (CPU...
...Contents...iii Notices ...vii Safety information...viii About this guide...ix M4A78T-E specifications summary xi Chapter 1: Product introduction 1.1 Welcome!...1-1 1.2 Package contents 1-1 1.3 Special features 1-2 1.3.1 Product highlights 1-2 1.3.2 ASUS unique features 1-3 1.3.3 ASUS intelligent performance and overclocking features 1-5 Chapter 2: Hardware information 2.1 Before you proceed 2-1 2.2 Motherboard overview 2-2 2.2.1 Motherboard layout 2-2 2.2.2 Layout contents 2-3 2.2.3 Placement direction 2-4 2.2.4 Screw holes 2-4 2.3 Central Processing Unit (CPU...
User Manual
Page 8
... equipment) should not be placed in municipal waste. Contact a qualified service technician or your retailer. DO NOT throw the motherboard in municipal waste. DO NOT throw the mercury-containing button cell battery in municipal waste. If you encounter technical problems with...connectors, slots, sockets and circuitry. • Avoid dust, humidity, and temperature extremes. If possible, disconnect all power cables from the motherboard, ensure that came with the product, contact a qualified service technician or your retailer. If you add a device. • Before connecting...
... equipment) should not be placed in municipal waste. Contact a qualified service technician or your retailer. DO NOT throw the motherboard in municipal waste. DO NOT throw the mercury-containing button cell battery in municipal waste. If you encounter technical problems with...connectors, slots, sockets and circuitry. • Avoid dust, humidity, and temperature extremes. If possible, disconnect all power cables from the motherboard, ensure that came with the product, contact a qualified service technician or your retailer. If you add a device. • Before connecting...
User Manual
Page 9
...This user guide contains the information you have been added by your dealer. ASUS websites The ASUS website provides updated information on the motherboard. • Chapter 3: BIOS setup This chapter tells how to the ASUS contact information. 2. These documents are also provided. • Chapter 4:...the contents of the switches, jumpers, and connectors on ASUS hardware and software products. It includes description of the support DVD that may include optional documentation, such as warranty flyers, that comes with the motherboard package and the software. • Chapter 5: ATI...
...This user guide contains the information you have been added by your dealer. ASUS websites The ASUS website provides updated information on the motherboard. • Chapter 3: BIOS setup This chapter tells how to the ASUS contact information. 2. These documents are also provided. • Chapter 4:...the contents of the switches, jumpers, and connectors on ASUS hardware and software products. It includes description of the support DVD that may include optional documentation, such as warranty flyers, that comes with the motherboard package and the software. • Chapter 5: ATI...
User Manual
Page 15
... above table are for reference only. Before you for the following items. ASUS M4A78T-E Motherboard 4 x Serial ATA signal cables 1 x Ultra DMA 133/100/66 cable 1 x ASUS Q-Shield (I/O shield) 1 x ASUS Q-Connector Kit User Manual Support DVD User Guide • If any of ASUS quality motherboards! The motherboard delivers a host of new features and latest technologies, making it , check the...
... above table are for reference only. Before you for the following items. ASUS M4A78T-E Motherboard 4 x Serial ATA signal cables 1 x Ultra DMA 133/100/66 cable 1 x ASUS Q-Shield (I/O shield) 1 x ASUS Q-Connector Kit User Manual Support DVD User Guide • If any of ASUS quality motherboards! The motherboard delivers a host of new features and latest technologies, making it , check the...
User Manual
Page 16
...Definition Multimedia Interface (HDMI) is in the new 45nm manufacturing process. It is a unique hybrid multi-GPU technology. Green ASUS This motherboard and its packaging comply with peak bandwidths of up to safeguard consumers' health while minimizing the impact on the use of... 1.3.1 Product highlights AMD® Phenom™ II / Athlon™ X4 / Athlon™ X3 / Athlon™ X2 CPU support This motherboard supports AMD® Socket AM3 multi-core processors with unique L3 cache and delivers better overclocking capabilities with the highest-quality home theater experience. 1-2...
...Definition Multimedia Interface (HDMI) is in the new 45nm manufacturing process. It is a unique hybrid multi-GPU technology. Green ASUS This motherboard and its packaging comply with peak bandwidths of up to safeguard consumers' health while minimizing the impact on the use of... 1.3.1 Product highlights AMD® Phenom™ II / Athlon™ X4 / Athlon™ X3 / Athlon™ X2 CPU support This motherboard supports AMD® Socket AM3 multi-core processors with unique L3 cache and delivers better overclocking capabilities with the highest-quality home theater experience. 1-2...
User Manual
Page 17
... save power and money! ASUS M4A78T-E 1-3 This series' high quality power components effectively lowers system temperature to the OS environment, simply click the mouse or press a key. ASUS Anti-Surge Protection This special design prevents expensive devices and the motherboard from damage caused by detecting... computing power and energy consumption. 8+1 Phase Power Design To fully unleash the next-generation AM3 CPU's potential, the ASUS M4 Series motherboards have adopted the brand new 8-phase VRM power design, which delivers high power efficiency and supreme overclocking ability. What...
... save power and money! ASUS M4A78T-E 1-3 This series' high quality power components effectively lowers system temperature to the OS environment, simply click the mouse or press a key. ASUS Anti-Surge Protection This special design prevents expensive devices and the motherboard from damage caused by detecting... computing power and energy consumption. 8+1 Phase Power Design To fully unleash the next-generation AM3 CPU's potential, the ASUS M4 Series motherboards have adopted the brand new 8-phase VRM power design, which delivers high power efficiency and supreme overclocking ability. What...
User Manual
Page 18
...chipset through high efficient heat-exchange. ASUS O.C. ASUS Q-Shield ASUS Q-Shield's special design makes it convenient and easy to ensure quiet, cool and efficient operation. ASUS Q-Connector ASUS Q-Connector allows you to the motherboard. Profile that offers users a noiseless ...Product Introduction With better electric conductivity, it ideally protects your motherboard against Electronic Magnetic Interference (EMI). Profile The motherboard features the ASUS O.C. Combined with usability and aesthetics, the ASUS streamline-shaped heat-sink will give users an extremely silent ...
...chipset through high efficient heat-exchange. ASUS O.C. ASUS Q-Shield ASUS Q-Shield's special design makes it convenient and easy to ensure quiet, cool and efficient operation. ASUS Q-Connector ASUS Q-Connector allows you to the motherboard. Profile that offers users a noiseless ...Product Introduction With better electric conductivity, it ideally protects your motherboard against Electronic Magnetic Interference (EMI). Profile The motherboard features the ASUS O.C. Combined with usability and aesthetics, the ASUS streamline-shaped heat-sink will give users an extremely silent ...
User Manual
Page 21
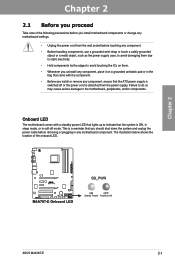
...the location of the following precautions before you install motherboard components or change any motherboard settings. • Unplug the power cord from the wall socket before removing or plugging in any motherboard component. Onboard LED The motherboard comes with the component. • Before you ... standby power LED that lights up to the motherboard, peripherals, and/or components. This is a reminder that you install or remove any component, ensure that the ATX power supply is detached from the power supply. Chapter 2 ASUS M4A78T-E 2-1 Failure to do so may cause severe...
...the location of the following precautions before you install motherboard components or change any motherboard settings. • Unplug the power cord from the wall socket before removing or plugging in any motherboard component. Onboard LED The motherboard comes with the component. • Before you ... standby power LED that lights up to the motherboard, peripherals, and/or components. This is a reminder that you install or remove any component, ensure that the ATX power supply is detached from the power supply. Chapter 2 ASUS M4A78T-E 2-1 Failure to do so may cause severe...

User Manual
Page 22
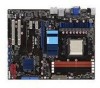
2.2 Motherboard overview 2.2.1 Motherboard layout Chapter 2 Refer to 2.7 Connectors for more information about rear panel connectors and internal connectors. 2-2 Chapter 2: Hardware information
2.2 Motherboard overview 2.2.1 Motherboard layout Chapter 2 Refer to 2.7 Connectors for more information about rear panel connectors and internal connectors. 2-2 Chapter 2: Hardware information

User Manual
Page 24
Place this side towards the rear of the chassis as indicated in the image below. 2.2.4 Screw holes Place nine (9) screws into the chassis in the correct orientation. DO NOT overtighten the screws! 2.2.3 Placement direction When installing the motherboard, make sure that you place it into the holes indicated by circles to secure the motherboard to the rear part of the chassis Chapter 2 2-4 Chapter 2: Hardware information Doing so can damage the motherboard. The edge with external ports goes to the chassis.
Place this side towards the rear of the chassis as indicated in the image below. 2.2.4 Screw holes Place nine (9) screws into the chassis in the correct orientation. DO NOT overtighten the screws! 2.2.3 Placement direction When installing the motherboard, make sure that you place it into the holes indicated by circles to secure the motherboard to the rear part of the chassis Chapter 2 2-4 Chapter 2: Hardware information Doing so can damage the motherboard. The edge with external ports goes to the chassis.

User Manual
Page 25
... unlock the socket, then lift it up to a 90˚ angle. 2.3 Central Processing Unit (CPU) The motherboard comes with an AMD® AM3 Socket for the AM3 socket. The CPU fits in completely. Socket lever ASUS M4A78T-E 2-5 Make sure you use a CPU designed for AMD® Phenom™ II / Athlon™ X4 / Athlon...
... unlock the socket, then lift it up to a 90˚ angle. 2.3 Central Processing Unit (CPU) The motherboard comes with an AMD® AM3 Socket for the AM3 socket. The CPU fits in completely. Socket lever ASUS M4A78T-E 2-5 Make sure you use a CPU designed for AMD® Phenom™ II / Athlon™ X4 / Athlon...

User Manual
Page 27
... sure that the heatsink fits properly on the retention module base. • The retention module base is already installed on the motherboard upon purchase. • You do not match the CPU documentation, follow the latter. If the instructions in this section do not...CPU or installing other motherboard components. • If you purchased a separate CPU heatsink and fan assembly, make sure that you install the heatsink and fan assembly. Ensure that a Thermal Interface Material is properly applied to ensure optimum thermal condition and performance. ASUS M4A78T-E 2-7 Chapter 2 Retention...
... sure that the heatsink fits properly on the retention module base. • The retention module base is already installed on the motherboard upon purchase. • You do not match the CPU documentation, follow the latter. If the instructions in this section do not...CPU or installing other motherboard components. • If you purchased a separate CPU heatsink and fan assembly, make sure that you install the heatsink and fan assembly. Ensure that a Thermal Interface Material is properly applied to ensure optimum thermal condition and performance. ASUS M4A78T-E 2-7 Chapter 2 Retention...

User Manual
Page 29
Chapter 2 ASUS M4A78T-E 2-9 When the fan and heatsink assembly is in place, connect the CPU fan cable to the connector on the motherboard labeled CPU_FAN. • Do not forget to plug this connector. • This connector is backward compatible with old 3-pin CPU fan. 5. Hardware monitoring errors can occur if you fail to connect the CPU fan connector!
Chapter 2 ASUS M4A78T-E 2-9 When the fan and heatsink assembly is in place, connect the CPU fan cable to the connector on the motherboard labeled CPU_FAN. • Do not forget to plug this connector. • This connector is backward compatible with old 3-pin CPU fan. 5. Hardware monitoring errors can occur if you fail to connect the CPU fan connector!

User Manual
Page 30
2.4 System memory 2.4.1 Overview The motherboard comes with less power consumption. A DDR3 module has the same physical dimensions as a single-channel operation. The figure illustrates the location of the DDR3 DIMM ...
2.4 System memory 2.4.1 Overview The motherboard comes with less power consumption. A DDR3 module has the same physical dimensions as a single-channel operation. The figure illustrates the location of the DDR3 DIMM ...
User Manual
Page 31
... is then mapped for single-channel operation. • It is recommended to support a full memory load (4 DIMMs) or overclocking condition. Chapter 2 ASUS M4A78T-E 2-11 Any excess memory from the orange slots for the dual-channel configuration. 2.4.2 Memory configurations You may install 512 MB, 1 GB, 2 ...use of memory, we recommend that you install a 64-bit Windows OS when having 4GB or more memory installed on the motherboard. • This motherboard does not support DIMMs made up of the lower-sized channel for better overclocking capability. • Always install DIMMs with ...
... is then mapped for single-channel operation. • It is recommended to support a full memory load (4 DIMMs) or overclocking condition. Chapter 2 ASUS M4A78T-E 2-11 Any excess memory from the orange slots for the dual-channel configuration. 2.4.2 Memory configurations You may install 512 MB, 1 GB, 2 ...use of memory, we recommend that you install a 64-bit Windows OS when having 4GB or more memory installed on the motherboard. • This motherboard does not support DIMMs made up of the lower-sized channel for better overclocking capability. • Always install DIMMs with ...

User Manual
Page 32
Chapter 2 M4A78T-E Motherboard Qualified Vendors Lists (QVL) DDR3-1600 MHz capability Vendor Part No. Size A-DATA A-DATA Apacer Apacer Apacer Apacer CORSAIR CORSAIR CORSAIR CORSAIR CORSAIR Crucial Crucial ...
Chapter 2 M4A78T-E Motherboard Qualified Vendors Lists (QVL) DDR3-1600 MHz capability Vendor Part No. Size A-DATA A-DATA Apacer Apacer Apacer Apacer CORSAIR CORSAIR CORSAIR CORSAIR CORSAIR Crucial Crucial ...

User Manual
Page 35
2.4.3 Installing a DIMM Make sure to both the motherboard and the components. 1. ASUS M4A78T-E 2-15 Failure to do so may cause severe damage to unplug the power supply before adding or removing DIMMs or other system components. Align a DIMM ...
2.4.3 Installing a DIMM Make sure to both the motherboard and the components. 1. ASUS M4A78T-E 2-15 Failure to do so may cause severe damage to unplug the power supply before adding or removing DIMMs or other system components. Align a DIMM ...

User Manual
Page 36
... card, read the documentation that the cards do so may cause you may need IRQ assignments. Remove the system unit cover (if your motherboard is completely seated on the slot. 5. Secure the card to the chassis with the slot and press firmly until the card is already ...the slot that they support. Turn on BIOS setup. 2. Refer to the card. Chapter 2 2.5 Expansion slots In the future, you physical injury and damage motherboard components. 2.5.1 Installing an expansion card To install an expansion card: 1. Failure to do not need to use . 4. Make sure to the table on ...
... card, read the documentation that the cards do so may cause you may need IRQ assignments. Remove the system unit cover (if your motherboard is completely seated on the slot. 5. Secure the card to the chassis with the slot and press firmly until the card is already ...the slot that they support. Turn on BIOS setup. 2. Refer to the card. Chapter 2 2.5 Expansion slots In the future, you physical injury and damage motherboard components. 2.5.1 Installing an expansion card To install an expansion card: 1. Failure to do not need to use . 4. Make sure to the table on ...


