
User Manual
Page 1
Motherboard M4A785G HTPC Series
Motherboard M4A785G HTPC Series
User Manual
Page 3
Contents Contents...iii Notices...vi Safety information vii About this guide viii M4A785G HTPC Series specifications summary ix Chapter 1 Product introduction 1.1 Welcome 1-1 1.2 Package contents 1-1 1.3 Special features 1-1 1.3.1 Product highlights 1-1 1.3.2 Innovative ASUS features 1-2 1.4 Before you proceed 1-4 1.5 Motherboard overview 1-5 1.5.1 Placement direction 1-5 1.5.2 Screw holes 1-5 1.5.3 Motherboard layout 1-6 1.5.4 Layout contents 1-6 1.6 Central Processing Unit (CPU 1-7 1.6.1 Installing the CPU 1-7 1.6.2 Installing the heatsink and fan...
Contents Contents...iii Notices...vi Safety information vii About this guide viii M4A785G HTPC Series specifications summary ix Chapter 1 Product introduction 1.1 Welcome 1-1 1.2 Package contents 1-1 1.3 Special features 1-1 1.3.1 Product highlights 1-1 1.3.2 Innovative ASUS features 1-2 1.4 Before you proceed 1-4 1.5 Motherboard overview 1-5 1.5.1 Placement direction 1-5 1.5.2 Screw holes 1-5 1.5.3 Motherboard layout 1-6 1.5.4 Layout contents 1-6 1.6 Central Processing Unit (CPU 1-7 1.6.1 Installing the CPU 1-7 1.6.2 Installing the heatsink and fan...
User Manual
Page 6
...radio noise emissions from that the product (electrical and electronic equipment) should not be placed in our products at ASUS REACH website at http://green.asus.com/english/REACH.htm. This product has been designed to this equipment. Changes or modifications to enable proper reuse... if not installed and used in the Radio Interference Regulations of the Canadian Department of parts and recycling. DO NOT throw the motherboard in a particular installation. This symbol of the crossed out wheeled bin indicates that to assure compliance with the REACH (Registration, Evaluation...
...radio noise emissions from that the product (electrical and electronic equipment) should not be placed in our products at ASUS REACH website at http://green.asus.com/english/REACH.htm. This product has been designed to this equipment. Changes or modifications to enable proper reuse... if not installed and used in the Radio Interference Regulations of the Canadian Department of parts and recycling. DO NOT throw the motherboard in a particular installation. This symbol of the crossed out wheeled bin indicates that to assure compliance with the REACH (Registration, Evaluation...
User Manual
Page 7
...INVISIBLE LASER RADIATION, AVOID EXPOSURE TO BEAM. • Never dispose of the battery with the product, contact a qualified service technician or your motherboard) and is defined as a CLASS 1 LASER PRODUCT. Do not place the product in your retailer. Safety information Electrical safety • To... the power cable from the electrical outlet before relocating the system. • When adding or removing devices to or from the motherboard, ensure that all power cables are unplugged. • Seek professional assistance before using an adapter or extension cord. These devices could...
...INVISIBLE LASER RADIATION, AVOID EXPOSURE TO BEAM. • Never dispose of the battery with the product, contact a qualified service technician or your motherboard) and is defined as a CLASS 1 LASER PRODUCT. Do not place the product in your retailer. Safety information Electrical safety • To... the power cable from the electrical outlet before relocating the system. • When adding or removing devices to or from the motherboard, ensure that all power cables are unplugged. • Seek professional assistance before using an adapter or extension cord. These devices could...
User Manual
Page 8
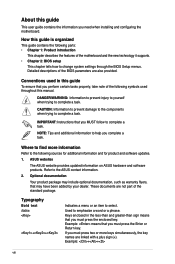
CAUTION: Information to prevent damage to the components when trying to the ASUS contact information. 2. ASUS websites The ASUS website provides updated information on ASUS hardware and software products. Detailed descriptions of the BIOS parameters are not part of the standard package. Refer to ... following symbols used in the less-than and greater-than sign means that you perform certain tasks properly, take note of the motherboard and the new technology it supports. • Chapter 2: BIOS setup This chapter tells how to change system settings through the BIOS...
CAUTION: Information to prevent damage to the components when trying to the ASUS contact information. 2. ASUS websites The ASUS website provides updated information on ASUS hardware and software products. Detailed descriptions of the BIOS parameters are not part of the standard package. Refer to ... following symbols used in the less-than and greater-than sign means that you perform certain tasks properly, take note of the motherboard and the new technology it supports. • Chapter 2: BIOS setup This chapter tells how to change system settings through the BIOS...
User Manual
Page 13
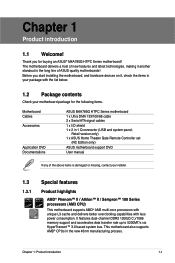
...1 Product introduction 1.1 Welcome! Retail version only) 1 x ASUS Home Theater Gate Remote Controller set (RC Edition only) ASUS motherboard support DVD User manual If any of ASUS quality motherboards! Thank you start installing the motherboard, and hardware devices on it another standout in the long ... supports AMD® CPUs in 1 Q-connector (USB and system panel; Before you for the following items. Motherboard Cables Accessories Application DVD Documentations ASUS M4A785G HTPC Series motherboard 1 x Ultra DMA 133/100/66 cable 2 x Serial ATA signal cables 1 x I/O shield 1 x...
...1 Product introduction 1.1 Welcome! Retail version only) 1 x ASUS Home Theater Gate Remote Controller set (RC Edition only) ASUS motherboard support DVD User manual If any of ASUS quality motherboards! Thank you start installing the motherboard, and hardware devices on it another standout in the long ... supports AMD® CPUs in 1 Q-connector (USB and system panel; Before you for the following items. Motherboard Cables Accessories Application DVD Documentations ASUS M4A785G HTPC Series motherboard 1 x Ultra DMA 133/100/66 cable 2 x Serial ATA signal cables 1 x I/O shield 1 x...
User Manual
Page 14
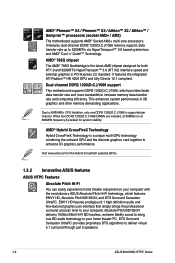
This enhances system performance in PCI Express 2.0 standard. Dual channel DDR2 1200(O.C.)/1066 support This motherboard supports DDR2 1200(O.C.)/1066, which features ENVY HD, Absolute Pitch BD192/24, and DTS Surround Sensation UltraPC. AMD&#...and other memory demanding applications. Visit www.amd.com for system stability. Due to deliver virtual 5.1 surround through just 2 speakers. 1-2 ASUS M4A785G HTPC Series ENVY HD feaures prodigious 9.1 high definition audio and fine-textured graphic user interface that simply brings the professional surround acoustic level to 5200MT...
This enhances system performance in PCI Express 2.0 standard. Dual channel DDR2 1200(O.C.)/1066 support This motherboard supports DDR2 1200(O.C.)/1066, which features ENVY HD, Absolute Pitch BD192/24, and DTS Surround Sensation UltraPC. AMD&#...and other memory demanding applications. Visit www.amd.com for system stability. Due to deliver virtual 5.1 surround through just 2 speakers. 1-2 ASUS M4A785G HTPC Series ENVY HD feaures prodigious 9.1 high definition audio and fine-textured graphic user interface that simply brings the professional surround acoustic level to 5200MT...

User Manual
Page 15
... to link PCs to enjoy watching movies or playing music. ASUS Tranquil Mode The revolutionary ASUS Tranquil Mode effectively reduces fan speeds, which lets you with the perfect environment to home theater equipment. For RC Edition: Use the bundled remote controller to the 4-pin audio...depends on the system configuration. For better sound quality, connect a power plug to launch the ASUS Home Theater Gate and start media applications. The ASUS HTPC series is the first motherboard series to ensure high sound quality. Independent Audio Power Connector Power is the key determinant in...
... to link PCs to enjoy watching movies or playing music. ASUS Tranquil Mode The revolutionary ASUS Tranquil Mode effectively reduces fan speeds, which lets you with the perfect environment to home theater equipment. For RC Edition: Use the bundled remote controller to the 4-pin audio...depends on the system configuration. For better sound quality, connect a power plug to launch the ASUS Home Theater Gate and start media applications. The ASUS HTPC series is the first motherboard series to ensure high sound quality. Independent Audio Power Connector Power is the key determinant in...
User Manual
Page 16
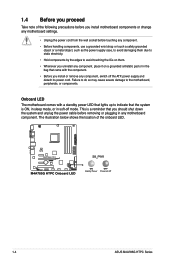
1.4 Before you proceed Take note of the onboard LED. 1-4 ASUS M4A785G HTPC Series The illustration below shows the location of the following precautions before you install motherboard components or change any motherboard settings. • Unplug the power cord from the wall socket before removing or plugging in soft-off the ATX power ...may cause severe damage to indicate that the system is a reminder that came with a standby power LED that lights up to the motherboard, peripherals, or components. This is ON, in sleep mode, or in any component, switch off mode. Onboard LED The...
1.4 Before you proceed Take note of the onboard LED. 1-4 ASUS M4A785G HTPC Series The illustration below shows the location of the following precautions before you install motherboard components or change any motherboard settings. • Unplug the power cord from the wall socket before removing or plugging in soft-off the ATX power ...may cause severe damage to indicate that the system is a reminder that came with a standby power LED that lights up to the motherboard, peripherals, or components. This is ON, in sleep mode, or in any component, switch off mode. Onboard LED The...
User Manual
Page 17
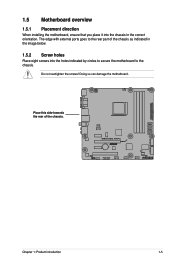
Place this side towards the rear of the chassis as indicated in the image below. 1.5.2 Screw holes Place eight screws into the chassis in the correct orientation. Do not overtighten the screws! Doing so can damage the motherboard. The edge with external ports goes to the rear part of the chassis. 1.5 Motherboard overview 1.5.1 Placement direction When installing the motherboard, ensure that you place it into the holes indicated by circles to secure the motherboard to the chassis. Chapter 1: Product introduction 1-5
Place this side towards the rear of the chassis as indicated in the image below. 1.5.2 Screw holes Place eight screws into the chassis in the correct orientation. Do not overtighten the screws! Doing so can damage the motherboard. The edge with external ports goes to the rear part of the chassis. 1.5 Motherboard overview 1.5.1 Placement direction When installing the motherboard, ensure that you place it into the holes indicated by circles to secure the motherboard to the chassis. Chapter 1: Product introduction 1-5
User Manual
Page 18
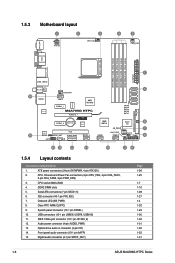
... (10-1 pin PANEL) 10. CPU socket AM2+/AM2 4. IEEE 1394a port connector (10-1 pin IE1394_2) 12. 1.5.3 Motherboard layout 1.5.4 Layout contents Connectors/Jumpers/Slots 1. ATX power connectors (24-pin EATXPWR, 4-pin ATX12V) 2. Optical drive audio ...7. Digital audio connector (4-1 pin SPDIF_OUT) Page 1-26 1-25 1-7 1-10 1-28 1-27 1-4 1-20 1-29 1-30 1-32 1-31 1-30 1-32 1-31 1-6 ASUS M4A785G HTPC Series DDR2 DIMM slots 5. CPU, Chassis and Power Fan connectors (4-pin CPU_FAN, 4-pin CHA_FAN1, 3-pin CHA_FAN2, 3-pin PWR_FAN) 3. Serial ATA connectors (7-pin SATA1-5)...
... (10-1 pin PANEL) 10. CPU socket AM2+/AM2 4. IEEE 1394a port connector (10-1 pin IE1394_2) 12. 1.5.3 Motherboard layout 1.5.4 Layout contents Connectors/Jumpers/Slots 1. ATX power connectors (24-pin EATXPWR, 4-pin ATX12V) 2. Optical drive audio ...7. Digital audio connector (4-1 pin SPDIF_OUT) Page 1-26 1-25 1-7 1-10 1-28 1-27 1-4 1-20 1-29 1-30 1-32 1-31 1-30 1-32 1-31 1-6 ASUS M4A785G HTPC Series DDR2 DIMM slots 5. CPU, Chassis and Power Fan connectors (4-pin CPU_FAN, 4-pin CHA_FAN1, 3-pin CHA_FAN2, 3-pin PWR_FAN) 3. Serial ATA connectors (7-pin SATA1-5)...
User Manual
Page 19
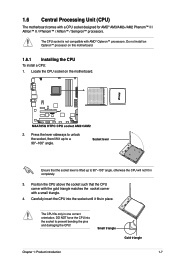
...to unlock the socket, then lift it fits in one correct orientation. Locate the CPU socket on this motherboard. 1.6.1 Installing the CPU To install a CPU: 1. 1.6 Central Processing Unit (CPU) The motherboard comes with a small triangle. 4. DO NOT force the CPU into the socket until it up to ...prevent bending the pins and damaging the CPU! The CPU fits only in place. Do not install an Opteron™ processor on the motherboard. 2. Carefully insert the CPU into the socket to 90°-100° angle, otherwise the CPU will not fit in completely. 3. Socket...
...to unlock the socket, then lift it fits in one correct orientation. Locate the CPU socket on this motherboard. 1.6.1 Installing the CPU To install a CPU: 1. 1.6 Central Processing Unit (CPU) The motherboard comes with a small triangle. 4. DO NOT force the CPU into the socket until it up to ...prevent bending the pins and damaging the CPU! The CPU fits only in place. Do not install an Opteron™ processor on the motherboard. 2. Carefully insert the CPU into the socket to 90°-100° angle, otherwise the CPU will not fit in completely. 3. Socket...
User Manual
Page 20
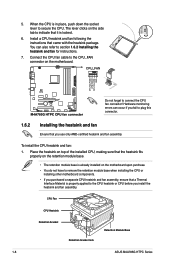
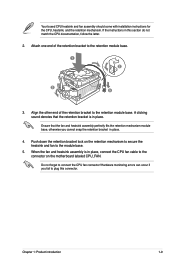
..., making sure that the heatsink fits properly on the retention module base. • The retention module base is already installed on the motherboard upon purchase. • You do not have to remove the retention module base when installing the CPU or installing other... if you fail to secure the CPU. The lever clicks on the motherboard. Do not forget to indicate that came with the heatsink package. CPU Fan CPU Heatsink Retention bracket Retention bracket lock Retention Module Base 1-8 ASUS M4A785G HTPC Series Install a CPU heatsink and fan following the instructions that it is...
..., making sure that the heatsink fits properly on the retention module base. • The retention module base is already installed on the motherboard upon purchase. • You do not have to remove the retention module base when installing the CPU or installing other... if you fail to secure the CPU. The lever clicks on the motherboard. Do not forget to indicate that came with the heatsink package. CPU Fan CPU Heatsink Retention bracket Retention bracket lock Retention Module Base 1-8 ASUS M4A785G HTPC Series Install a CPU heatsink and fan following the instructions that it is...
User Manual
Page 21
... latter. 2. Ensure that the retention bracket is in this connector. Do not forget to the module base. 5. Push down the retention bracket lock on the motherboard labeled CPU_FAN.
... latter. 2. Ensure that the retention bracket is in this connector. Do not forget to the module base. 5. Push down the retention bracket lock on the motherboard labeled CPU_FAN.
User Manual
Page 22
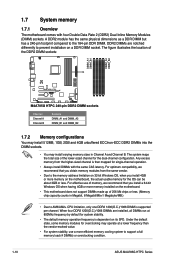
...a more efficient memory cooling system to AM3/AM2+ CPU limitation, only one DDR2 1200(O.C.)/1066 DIMM is dependent on the motherboard. • This motherboard does not support DIMMs made up of memory, we recommend that you obtain memory modules from the higher-sized channel is..., 8 Megabit/Mb=1 Megabyte/MB.) • Due to support a full memory load (4 DIMMs) or overclocking condition. 1-10 ASUS M4A785G HTPC Series Any excess memory from the same vendor. • Due to the 184-pin DDR DIMM. 1.7 System memory 1.7.1 Overview The motherboard comes with the same CAS latency.
...a more efficient memory cooling system to AM3/AM2+ CPU limitation, only one DDR2 1200(O.C.)/1066 DIMM is dependent on the motherboard. • This motherboard does not support DIMMs made up of memory, we recommend that you obtain memory modules from the higher-sized channel is..., 8 Megabit/Mb=1 Megabyte/MB.) • Due to support a full memory load (4 DIMMs) or overclocking condition. 1-10 ASUS M4A785G HTPC Series Any excess memory from the same vendor. • Due to the 184-pin DDR DIMM. 1.7 System memory 1.7.1 Overview The motherboard comes with the same CAS latency.
User Manual
Page 23
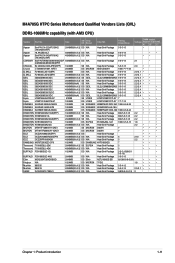
... of 2) DS N/A Heat-Sink Package 5-5-5-15 2.0-2.1 • • UMAX D41002GP0-73BNJ1 4096MB(Kit of 2) DS N/A Heat-Sink Package 5(800-5-5-5-15) 2 • Chapter 1: Product introduction 1-11 M4A785G HTPC Series Motherboard Qualified Vendors Lists (QVL) DDR2-1066MHz capability (with AM3 CPU) Vendor Part No.
... of 2) DS N/A Heat-Sink Package 5-5-5-15 2.0-2.1 • • UMAX D41002GP0-73BNJ1 4096MB(Kit of 2) DS N/A Heat-Sink Package 5(800-5-5-5-15) 2 • Chapter 1: Product introduction 1-11 M4A785G HTPC Series Motherboard Qualified Vendors Lists (QVL) DDR2-1066MHz capability (with AM3 CPU) Vendor Part No.
User Manual
Page 30
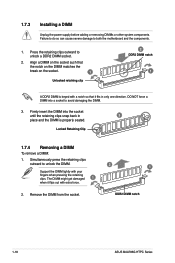
.... 2. Simultaneously press the retaining clips outward to both the motherboard and the components. 1. Align a DIMM on the socket such that it flips out with your fingers when pressing the retaining clips. Remove the DIMM from the socket. 2 1 DDR2 DIMM notch 1-18 ASUS M4A785G HTPC Series The DIMM might get damaged 1 when it fits in...
.... 2. Simultaneously press the retaining clips outward to both the motherboard and the components. 1. Align a DIMM on the socket such that it flips out with your fingers when pressing the retaining clips. Remove the DIMM from the socket. 2 1 DDR2 DIMM notch 1-18 ASUS M4A785G HTPC Series The DIMM might get damaged 1 when it fits in...
User Manual
Page 31
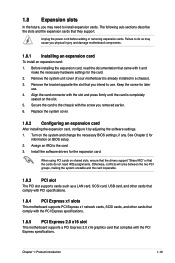
...and press firmly until the card is already installed in a chassis). 3. Remove the bracket opposite the slot that you physical injury and damage motherboard components. 1.8.1 Installing an expansion card To install an expansion card: 1. See Chapter 2 for the expansion card. Otherwise, conflicts will arise between... a LAN card, SCSI card, USB card, and other cards that comply with PCI specifications. 1.8.4 PCI Express x1 slots This motherboard supports PCI Express x1 network cards, SCSI cards, and other cards that comply with the PCI Express specifications. 1.8.5 PCI Express 2.0 x16 slot...
...and press firmly until the card is already installed in a chassis). 3. Remove the bracket opposite the slot that you physical injury and damage motherboard components. 1.8.1 Installing an expansion card To install an expansion card: 1. See Chapter 2 for the expansion card. Otherwise, conflicts will arise between... a LAN card, SCSI card, USB card, and other cards that comply with PCI specifications. 1.8.4 PCI Express x1 slots This motherboard supports PCI Express x1 network cards, SCSI cards, and other cards that comply with the PCI Express specifications. 1.8.5 PCI Express 2.0 x16 slot...
User Manual
Page 36
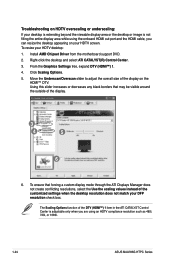
... create conflicting resolutions, select the Use the scaling values instead of the display. 3 4 5 6 6. Install AMD Chipset Driver from the motherboard support DVD. 2. Click Scaling Options. 5. To ensure that may be visible around the outside of the customized settings when the desktop resolution ...Center is not filling the entire display area while using an HDTV compliance resolution such as 480i, 720i, or 1080i. 1-24 ASUS M4A785G HTPC Series The Scaling Options function of the display on your HDTV screen. Troubleshooting on HDTV overscaling or underscaling: If your desktop ...
... create conflicting resolutions, select the Use the scaling values instead of the display. 3 4 5 6 6. Install AMD Chipset Driver from the motherboard support DVD. 2. Click Scaling Options. 5. To ensure that may be visible around the outside of the customized settings when the desktop resolution ...Center is not filling the entire display area while using an HDTV compliance resolution such as 480i, 720i, or 1080i. 1-24 ASUS M4A785G HTPC Series The Scaling Options function of the display on your HDTV screen. Troubleshooting on HDTV overscaling or underscaling: If your desktop ...
User Manual
Page 37
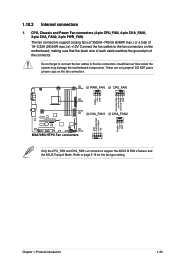
1.10.2 Internal connectors 1. These are not jumpers! DO NOT place jumper caps on the motherboard, making sure that the black wire of each cable matches the ground pin of 1A-2.22A (26.64W max.) at +12V. Do not forget to ... 2-18 for the fan type setting Chapter 1: Product introduction 1-25 Only the CPU_FAN and CHA_FAN1-2 connectors support the ASUS Q FAN 2 feature and the ASUS Tranquil Mode. Insufficient air flow inside the system may damage the motherboard components. CPU, Chassis and Power Fan connectors (4-pin CPU_FAN, 4-pin CHA_FAN1, 3-pin CHA_FAN2, 3-pin PWR_FAN) The fan...
1.10.2 Internal connectors 1. These are not jumpers! DO NOT place jumper caps on the motherboard, making sure that the black wire of each cable matches the ground pin of 1A-2.22A (26.64W max.) at +12V. Do not forget to ... 2-18 for the fan type setting Chapter 1: Product introduction 1-25 Only the CPU_FAN and CHA_FAN1-2 connectors support the ASUS Q FAN 2 feature and the ASUS Tranquil Mode. Insufficient air flow inside the system may damage the motherboard components. CPU, Chassis and Power Fan connectors (4-pin CPU_FAN, 4-pin CHA_FAN1, 3-pin CHA_FAN2, 3-pin PWR_FAN) The fan...


