
User Manual
Page 31
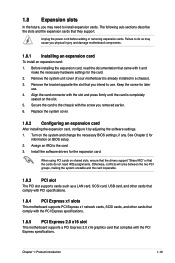
... adjusting the software settings. 1. Chapter 1: Product introduction 1-19 Before installing the expansion card, read the documentation that came with the PCI Express specifications. 1.8.5 PCI Express 2.0 x16 slot This motherboard supports a PCI Express 2.0 x16 graphics card that they support. Secure the card to the card. 3. Assign an IRQ to the chassis with the slot and press firmly until the card is already installed in a chassis). 3. When using PCI cards on BIOS setup. 2. Unplug the power cord before adding or removing expansion cards. Keep...
... adjusting the software settings. 1. Chapter 1: Product introduction 1-19 Before installing the expansion card, read the documentation that came with the PCI Express specifications. 1.8.5 PCI Express 2.0 x16 slot This motherboard supports a PCI Express 2.0 x16 graphics card that they support. Secure the card to the card. 3. Assign an IRQ to the chassis with the slot and press firmly until the card is already installed in a chassis). 3. When using PCI cards on BIOS setup. 2. Unplug the power cord before adding or removing expansion cards. Keep...
User Manual
Page 34
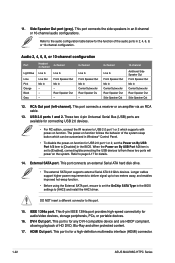
... Speaker Out Front Speaker Out Mic In Center/Subwoofer Rear Speaker Out Side Speaker Out 12. Refer to [AHCI] and install the AHCI driver. DO NOT insert a different connector to USB 2.0 port 1 or 2 which can be customized in an 8-channel or 10-channel audio configurations. This port is for a high-definition multimedia interface (HDMI) connector. 1-22 ASUS M4A785G HTPC Series This port connects the side speakers in Windows® Control Panel. • To disable the power-on function. Rear Speaker Out - This port connects...
... Speaker Out Front Speaker Out Mic In Center/Subwoofer Rear Speaker Out Side Speaker Out 12. Refer to [AHCI] and install the AHCI driver. DO NOT insert a different connector to USB 2.0 port 1 or 2 which can be customized in an 8-channel or 10-channel audio configurations. This port is for a high-definition multimedia interface (HDMI) connector. 1-22 ASUS M4A785G HTPC Series This port connects the side speakers in Windows® Control Panel. • To disable the power-on function. Rear Speaker Out - This port connects...
User Manual
Page 36
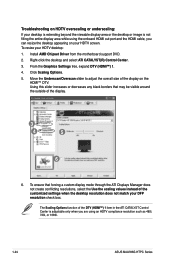
The Scaling Options function of the display. 3 4 5 6 6. Troubleshooting on HDTV overscaling or underscaling: If your desktop is extending beyond the viewable display area or the desktop or image is adjustable only when you are using the onboard HDMI out port and the HDMI cable, you can resize the desktop appearing on the HDMI™ DTV. Install AMD Chipset Driver from the motherboard support DVD. 2. Right-click the desktop and select ATI CATALYST(R) Control Center...
The Scaling Options function of the display. 3 4 5 6 6. Troubleshooting on HDTV overscaling or underscaling: If your desktop is extending beyond the viewable display area or the desktop or image is adjustable only when you are using the onboard HDMI out port and the HDMI cable, you can resize the desktop appearing on the HDMI™ DTV. Install AMD Chipset Driver from the motherboard support DVD. 2. Right-click the desktop and select ATI CATALYST(R) Control Center...
User Manual
Page 46
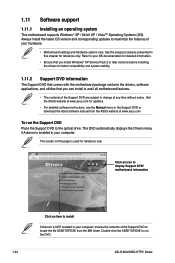
... ASUS website at www.asus.com. Use the setup procedures presented in your hardware. • Motherboard settings and hardware options vary. The DVD automatically displays the Drivers menu if Autorun is enabled in this page is NOT enabled in the Support DVD or download the latest software manual from the BIN folder. 1.11 Software support 1.11.1 Installing an operating system This motherboard supports Windows® XP / 64-bit XP / Vista™ Operating Systems (OS). The screen...
... ASUS website at www.asus.com. Use the setup procedures presented in your hardware. • Motherboard settings and hardware options vary. The DVD automatically displays the Drivers menu if Autorun is enabled in this page is NOT enabled in the Support DVD or download the latest software manual from the BIN folder. 1.11 Software support 1.11.1 Installing an operating system This motherboard supports Windows® XP / 64-bit XP / Vista™ Operating Systems (OS). The screen...
User Manual
Page 48
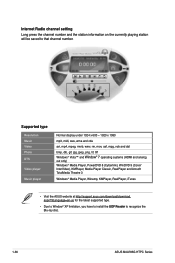
...-us for the latest supported type. • Due to Window® XP limitation, you have to install the UDF Reader to that channel number. Internet Radio channel setting Long press the channel number and the station information on the currently playing station will be saved to recognize the Blu-ray disc. 1-36 ASUS M4A785G HTPC Series Supported type Resolution Music Video Photo DTS Video player Music player...
...-us for the latest supported type. • Due to Window® XP limitation, you have to install the UDF Reader to that channel number. Internet Radio channel setting Long press the channel number and the station information on the currently playing station will be saved to recognize the Blu-ray disc. 1-36 ASUS M4A785G HTPC Series Supported type Resolution Music Video Photo DTS Video player Music player...
User Manual
Page 51
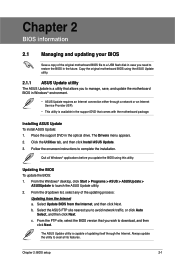
... the BIOS in Windows® environment. • ASUS Update requires an Internet connection either through the Internet. Updating the BIOS To update the BIOS: 1. From the dropdown list, select any of the original motherboard BIOS file to a USB flash disk in case you need to manage, save, and update the motherboard BIOS in the future. The ASUS Update utility is capable of updating itself through a network or an Internet Service Provider (ISP). • This utility is a utility that...
... the BIOS in Windows® environment. • ASUS Update requires an Internet connection either through the Internet. Updating the BIOS To update the BIOS: 1. From the dropdown list, select any of the original motherboard BIOS file to a USB flash disk in case you need to manage, save, and update the motherboard BIOS in the future. The ASUS Update utility is capable of updating itself through a network or an Internet Service Provider (ISP). • This utility is a utility that...
User Manual
Page 52
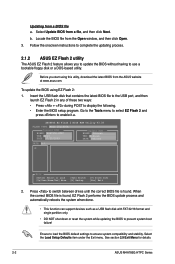
... down or reset the system while updating the BIOS to display the following. • Enter the BIOS setup program. Go to the Tools menu to select EZ Flash 2 and press to ensure system compatibility and stability. Ensure to load the BIOS default settings to enable it.a. See section 2.9 Exit Menu for details. 2-2 ASUS M4A785G HTPC Series To update the BIOS using this utility, download the latest BIOS from a file, and then click Next. Press to use a bootable floppy disk or...
... down or reset the system while updating the BIOS to display the following. • Enter the BIOS setup program. Go to the Tools menu to select EZ Flash 2 and press to ensure system compatibility and stability. Ensure to load the BIOS default settings to enable it.a. See section 2.9 Exit Menu for details. 2-2 ASUS M4A785G HTPC Series To update the BIOS using this utility, download the latest BIOS from a file, and then click Next. Press to use a bootable floppy disk or...
User Manual
Page 53
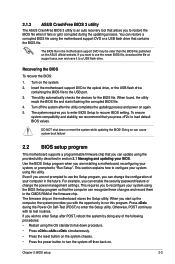
... 2: BIOS setup 2-3 2.1.3 ASUS CrashFree BIOS 3 utility The ASUS CrashFree BIOS 3 utility is an auto recovery tool that allows you to restore the BIOS file when it to a USB flash drive. Insert the motherboard support DVD to the optical drive, or the USB flash drive containing the BIOS file to enter the Setup utility. The system requires you can enable the security password feature or change the configuration of your BIOS. The utility automatically checks the devices for the BIOS file. When found, the utility reads the BIOS file and starts flashing...
... 2: BIOS setup 2-3 2.1.3 ASUS CrashFree BIOS 3 utility The ASUS CrashFree BIOS 3 utility is an auto recovery tool that allows you to restore the BIOS file when it to a USB flash drive. Insert the motherboard support DVD to the optical drive, or the USB flash drive containing the BIOS file to enter the Setup utility. The system requires you can enable the security password feature or change the configuration of your BIOS. The utility automatically checks the devices for the BIOS file. When found, the utility reads the BIOS file and starts flashing...

User Manual
Page 55
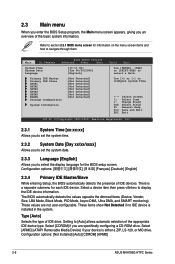
... of the navigation keys differ from one screen to display a list of the field opposite the item. A configurable field is enclosed in the menu and change the value of options. Main Ai Tweaker BIOS SETUP UTILITY Advanced Power Boot Suspend Mode ACPI Version Features ACPI APIC support APM Configuration Hardware Monitor [Auto] [Disabled] [EDniasbalbelde]d Enabled Tools Exit Use [ENTER], [TAB] or [SHIFT-TAB] to configure system Time. Use the navigation keys to display the other items (Advanced, Power, Boot, Tools, and Exit...
... of the navigation keys differ from one screen to display a list of the field opposite the item. A configurable field is enclosed in the menu and change the value of options. Main Ai Tweaker BIOS SETUP UTILITY Advanced Power Boot Suspend Mode ACPI Version Features ACPI APIC support APM Configuration Hardware Monitor [Auto] [Disabled] [EDniasbalbelde]d Enabled Tools Exit Use [ENTER], [TAB] or [SHIFT-TAB] to configure system Time. Use the navigation keys to display the other items (Advanced, Power, Boot, Tools, and Exit...
User Manual
Page 56
... [ARMD] (ATAPI Removable Media Device) if your device is installed in the system. Refer to section 2.2.1 BIOS menu screen for information on the menu screen items and how to display the IDE device information. Setting to select the display language for each IDE device. Select a device item then press to navigate through them. Select [CDROM] if you are not user-configurable. Configuration options: [Not Installed] [Auto] [CDROM] [ARMD] 2-6 ASUS M4A785G HTPC Series Main Ai Tweaker BIOS SETUP UTILITY Advanced Power Boot System Time...
... [ARMD] (ATAPI Removable Media Device) if your device is installed in the system. Refer to section 2.2.1 BIOS menu screen for information on the menu screen items and how to display the IDE device information. Setting to select the display language for each IDE device. Select a device item then press to navigate through them. Select [CDROM] if you are not user-configurable. Configuration options: [Not Installed] [Auto] [CDROM] [ARMD] 2-6 ASUS M4A785G HTPC Series Main Ai Tweaker BIOS SETUP UTILITY Advanced Power Boot System Time...
User Manual
Page 57
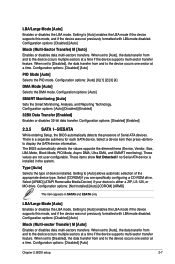
...: [Auto] SMART Monitoring [Auto] Sets the Smart Monitoring, Analysis, and Reporting Technology. Configuration options: [Disabled] [Enabled] 2.3.5 SATA 1-5/ESATA While entering Setup, the BIOS automatically detects the presence of device installed. Select [ARMD] (ATAPI Removable Media Device) if your device is installed in SATA5 and ESATA only. LBA/Large Mode [Auto] Enables or disables the LBA mode. Select a device item then press to [Auto] allows automatic selection of the appropriate device type. Setting to display the SATA device information. Setting to the device...
...: [Auto] SMART Monitoring [Auto] Sets the Smart Monitoring, Analysis, and Reporting Technology. Configuration options: [Disabled] [Enabled] 2.3.5 SATA 1-5/ESATA While entering Setup, the BIOS automatically detects the presence of device installed. Select [ARMD] (ATAPI Removable Media Device) if your device is installed in SATA5 and ESATA only. LBA/Large Mode [Auto] Enables or disables the LBA mode. Select a device item then press to [Auto] allows automatic selection of the appropriate device type. Setting to display the SATA device information. Setting to the device...
User Manual
Page 58
... Technology. The AHCI allows the onboard storage driver to enable advanced Serial ATA features that increases storage performance on the setting of the general system specifications. Configuration options: [Disabled] [Enabled] 2.3.6 Storage Configuration This menu allows you to configure the storage devices. Port4 [IDE] Allows you to select the SATA type for SATA port 5/6. Configuration options: [IDE] [RAID] [AHCI] SATA Port5 - Processor Displays the auto-detected CPU specification. System Memory Displays the auto-detected system memory. 2-8 ASUS M4A785G HTPC Series SATA...
... Technology. The AHCI allows the onboard storage driver to enable advanced Serial ATA features that increases storage performance on the setting of the general system specifications. Configuration options: [Disabled] [Enabled] 2.3.6 Storage Configuration This menu allows you to configure the storage devices. Port4 [IDE] Allows you to select the SATA type for SATA port 5/6. Configuration options: [IDE] [RAID] [AHCI] SATA Port5 - Processor Displays the auto-detected CPU specification. System Memory Displays the auto-detected system memory. 2-8 ASUS M4A785G HTPC Series SATA...

User Manual
Page 59
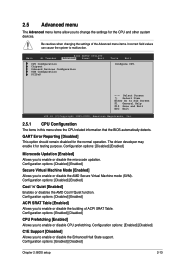
... frequency using the numeric keypad. Selecting a very high DRAM frequency may cause the system to the default setting. The values range from 100 to 150. 2.4.2 CPU Ratio [Auto] Allows you to set the Ai Overclock Tuner item to [Manual]. Main Ai Tweaker BIOS SETUP UTILITY Advanced Power Boot Configure System Frequency/Voltage Ai Overclock Tuner [Auto] CPU Ratio [Auto] DRAM Frequency [Auto] CPU/NB Frequency [Auto] HT Link Frequency [Auto] Memory Configuration DRAM Timing Configuration ******* Please key in numbers directly! ******* CPU Voltage [Auto] CPU...
... frequency using the numeric keypad. Selecting a very high DRAM frequency may cause the system to the default setting. The values range from 100 to 150. 2.4.2 CPU Ratio [Auto] Allows you to set the Ai Overclock Tuner item to [Manual]. Main Ai Tweaker BIOS SETUP UTILITY Advanced Power Boot Configure System Frequency/Voltage Ai Overclock Tuner [Auto] CPU Ratio [Auto] DRAM Frequency [Auto] CPU/NB Frequency [Auto] HT Link Frequency [Auto] Memory Configuration DRAM Timing Configuration ******* Please key in numbers directly! ******* CPU Voltage [Auto] CPU...
User Manual
Page 63
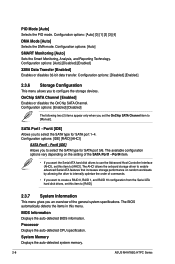
...Tweaker BIOS SETUP UTILITY Advanced Power Boot CPU Configuration Chipset Onboard Devices Configuration USB Configuration PCIPnP Tools Exit Configure CPU. ←→ Select Screen ↑↓ Select Item Enter Go to malfunction. Configuration options: [Enabled] [Disabled] C1E Support [Disabled] Allows you to change the settings for the CPU and other system devices. Configuration options: [Disabled] [Enabled] Secure Virtual Machine Mode [Enabled] Allows you to enable or disable the AMD Secure Virtual Machine mode (SVM). Configuration options: [Disabled] [Enabled] ACPI...
...Tweaker BIOS SETUP UTILITY Advanced Power Boot CPU Configuration Chipset Onboard Devices Configuration USB Configuration PCIPnP Tools Exit Configure CPU. ←→ Select Screen ↑↓ Select Item Enter Go to malfunction. Configuration options: [Enabled] [Disabled] C1E Support [Disabled] Allows you to change the settings for the CPU and other system devices. Configuration options: [Disabled] [Enabled] Secure Virtual Machine Mode [Enabled] Allows you to enable or disable the AMD Secure Virtual Machine mode (SVM). Configuration options: [Disabled] [Enabled] ACPI...
User Manual
Page 64
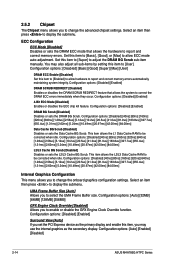
... options: [Disabled] [Enabled] DRAM SCRUB REDIRECT [Disabled] Enables or disables the DRAM SCRUB REDIRECT feature that allows the hardware to report and correct memory errors. This item allows the L1 Data Cache RAM to display the submenu. Configuration options: [Disabled] [Basic] [Good] [Super] [Max] [User] DRAM ECC Enable [Disabled] Set this item to [Basic], [Good], or [Max] to allow hardware to report and correct memory errors automatically, maintaining system integrity. Configuration options: [Auto] [Enabled] [Disabled] 2-14 ASUS M4A785G HTPC Series Configuration...
... options: [Disabled] [Enabled] DRAM SCRUB REDIRECT [Disabled] Enables or disables the DRAM SCRUB REDIRECT feature that allows the hardware to report and correct memory errors. This item allows the L1 Data Cache RAM to display the submenu. Configuration options: [Disabled] [Basic] [Good] [Super] [Max] [User] DRAM ECC Enable [Disabled] Set this item to [Basic], [Good], or [Max] to allow hardware to report and correct memory errors automatically, maintaining system integrity. Configuration options: [Auto] [Enabled] [Disabled] 2-14 ASUS M4A785G HTPC Series Configuration...
User Manual
Page 65
... detected, the USB controller legacy mode is plugged in this function. Configuration options: [PCI-E] [PCI] [Onboard] 2.5.3 Onboard Devices Configuration Onboard HD Audio [Enabled] Allows you to set the front panel audio connector (AAFP) mode to legacy AC'97 or high-definition audio depending on legacy operating systems (OS). Configuration options: [Disabled] [Enabled] [Auto] Chapter 2: BIOS setup 2-15 FB Location [Above 4G] Allows you to enable or disable the onboard LAN Boot ROM. Configuration options: [Enabled] [Disabled] Onboard LAN Boot ROM [Disabled] Allows you...
... detected, the USB controller legacy mode is plugged in this function. Configuration options: [PCI-E] [PCI] [Onboard] 2.5.3 Onboard Devices Configuration Onboard HD Audio [Enabled] Allows you to set the front panel audio connector (AAFP) mode to legacy AC'97 or high-definition audio depending on legacy operating systems (OS). Configuration options: [Disabled] [Enabled] [Auto] Chapter 2: BIOS setup 2-15 FB Location [Above 4G] Allows you to enable or disable the onboard LAN Boot ROM. Configuration options: [Enabled] [Disabled] Onboard LAN Boot ROM [Disabled] Allows you...
User Manual
Page 66
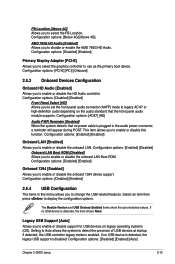
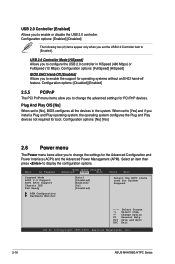
...ASUS M4A785G HTPC Series Select an item then press to [No], BIOS configures all the devices in HiSpeed (480 Mbps) or FullSpeed (12 Mbps). USB 2.0 Controller [Enabled] Allows you set the USB 2.0 Controller item to [Enabled]. Configuration options: [Enabled] [Disabled] The following two (2) items appear only when you to configure the USB 2.0 controller in the system. Main Ai Tweaker BIOS SETUP UTILITY Advanced Power Boot Tools Exit Suspend Mode ACPI 2.0 Support ACPI APIC support Chassis LED EuP Ready [Auto] [Disabled] [Enabled] [On] [Disabled] Select the ACPI...
...ASUS M4A785G HTPC Series Select an item then press to [No], BIOS configures all the devices in HiSpeed (480 Mbps) or FullSpeed (12 Mbps). USB 2.0 Controller [Enabled] Allows you set the USB 2.0 Controller item to [Enabled]. Configuration options: [Enabled] [Disabled] The following two (2) items appear only when you to configure the USB 2.0 controller in the system. Main Ai Tweaker BIOS SETUP UTILITY Advanced Power Boot Tools Exit Suspend Mode ACPI 2.0 Support ACPI APIC support Chassis LED EuP Ready [Auto] [Disabled] [Enabled] [On] [Disabled] Select the ACPI...
User Manual
Page 67
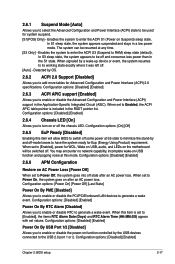
.... Configuration options: [Disabled] [Enabled] Power On By USB Port 1/2 [Disabled] Allows you to enable or disable the power-on function controlled by OS. 2.6.2 ACPI 2.0 Support [Disabled] Allows you to select the Advanced Configuration and Power Interface (ACPI) state to be resumed at this mode. Configuration options: [Disabled] [Enabled] 2.6.3 ACPI APIC support [Enabled] Allows you to enable or disable the PCI/PCIE/onboard LAN devices to generate a wake event. You may encounter no network capability, incomplete wake-on or off state after an AC power loss. When set to...
.... Configuration options: [Disabled] [Enabled] Power On By USB Port 1/2 [Disabled] Allows you to enable or disable the power-on function controlled by OS. 2.6.2 ACPI 2.0 Support [Disabled] Allows you to select the Advanced Configuration and Power Interface (ACPI) state to be resumed at this mode. Configuration options: [Disabled] [Enabled] 2.6.3 ACPI APIC support [Enabled] Allows you to enable or disable the PCI/PCIE/onboard LAN devices to generate a wake event. You may encounter no network capability, incomplete wake-on or off state after an AC power loss. When set to...

User Manual
Page 69
... BIOS] Sets the display mode for the F1 key to use the ASUS MyLogo 2™ feature. A virtual floppy disk drive (Floppy Drive B: ) may appear when you to boot the system. When set to skip some power on state for the NumLock. Configuration options: [Disabled] [Enabled] Set this item allows the BIOS to [Enabled], the system waits for option ROM. The number of device items that appears on the screen depends on the number of the following: - Configuration options: [Removable Dev.] [Hard Drive...
... BIOS] Sets the display mode for the F1 key to use the ASUS MyLogo 2™ feature. A virtual floppy disk drive (Floppy Drive B: ) may appear when you to boot the system. When set to skip some power on state for the NumLock. Configuration options: [Disabled] [Enabled] Set this item allows the BIOS to [Enabled], the system waits for option ROM. The number of device items that appears on the screen depends on the number of the following: - Configuration options: [Removable Dev.] [Hard Drive...
User Manual
Page 71
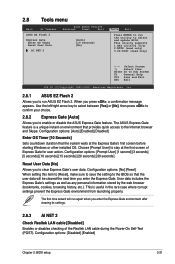
2.8 Tools menu Main Ai Tweaker BIOS SETUP UTILITY Advanced Power Boot ASUS EZ Flash 2 Express Gate Enter OS Timer Reset User Data AI NET 2 [Auto] [10 Seconds] [No] Tools Exit Press ENTER to run the utility to clear Express Gate's user data. Choose [Prompt User] to stay at the Express Gate's first screen before starting Windows or other installed OS. This is a unique instant-on environment that provides quick access to the BIOS so that the system waits...
2.8 Tools menu Main Ai Tweaker BIOS SETUP UTILITY Advanced Power Boot ASUS EZ Flash 2 Express Gate Enter OS Timer Reset User Data AI NET 2 [Auto] [10 Seconds] [No] Tools Exit Press ENTER to run the utility to clear Express Gate's user data. Choose [Prompt User] to stay at the Express Gate's first screen before starting Windows or other installed OS. This is a unique instant-on environment that provides quick access to the BIOS so that the system waits...


