User Manual
Page 11
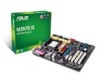
...items in the long line of the above items is damaged or missing, contact your motherboard package for buying an ASUS® M3N78 SE motherboard! It features dual-channel DDR2 1066 memory support and accelerates data transfer rate up to 5200MT/s via HyperTransport&#...Serial ATA power cable 1 x Ultra DMA 133/100/66 cable Accessories 1 x I/O shield Application DVD ASUS motherboard support DVD Documentation User guide If any of ASUS quality motherboards! ASUS M3N78 SE 1-1 Thank you start installing the motherboard, and hardware devices on it another standout in your package with the...
...items in the long line of the above items is damaged or missing, contact your motherboard package for buying an ASUS® M3N78 SE motherboard! It features dual-channel DDR2 1066 memory support and accelerates data transfer rate up to 5200MT/s via HyperTransport&#...Serial ATA power cable 1 x Ultra DMA 133/100/66 cable Accessories 1 x I/O shield Application DVD ASUS motherboard support DVD Documentation User guide If any of ASUS quality motherboards! ASUS M3N78 SE 1-1 Thank you start installing the motherboard, and hardware devices on it another standout in your package with the...
User Manual
Page 13
... the European Union's Restriction on just one computer. ASUS M3N78 SE 1-3 This utility saves you the cost and hassle of Hazardous Substances (RoHS). Innovative ASUS features Green ASUS This motherboard and its packaging comply with the ASUS vision of creating environment-friendly and recyclable products/packaging ...to your favorite photos into 256-color boot logos to clear CMOS data. See page 2-20 for details. ASUS CrashFree BIOS 3 The ASUS CrashFree BIOS 3 allows you do multiple tasks, such as talking to safeguard consumers' health while minimizing the impact on...
... the European Union's Restriction on just one computer. ASUS M3N78 SE 1-3 This utility saves you the cost and hassle of Hazardous Substances (RoHS). Innovative ASUS features Green ASUS This motherboard and its packaging comply with the ASUS vision of creating environment-friendly and recyclable products/packaging ...to your favorite photos into 256-color boot logos to clear CMOS data. See page 2-20 for details. ASUS CrashFree BIOS 3 The ASUS CrashFree BIOS 3 allows you do multiple tasks, such as talking to safeguard consumers' health while minimizing the impact on...
User Manual
Page 15
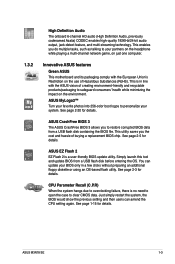
Do not overtighten the screws! The edge with external ports goes to the chassis. Doing so can damage the motherboard. M3N78 SE ASUS M3N78 SE 1-5 Place this side towards the rear of the chassis as indicated in the image below. 1.5.2 Screw holes Place six (6) screws into the chassis in the correct orientation. 1.5 Motherboard overview 1.5.1 Placement direction When installing the motherboard, ensure that you place it into the holes indicated by circles to secure the motherboard to the rear part of the chassis.
Do not overtighten the screws! The edge with external ports goes to the chassis. Doing so can damage the motherboard. M3N78 SE ASUS M3N78 SE 1-5 Place this side towards the rear of the chassis as indicated in the image below. 1.5.2 Screw holes Place six (6) screws into the chassis in the correct orientation. 1.5 Motherboard overview 1.5.1 Placement direction When installing the motherboard, ensure that you place it into the holes indicated by circles to secure the motherboard to the rear part of the chassis.
User Manual
Page 17
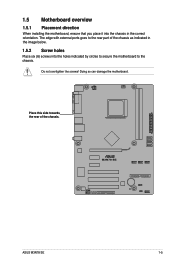
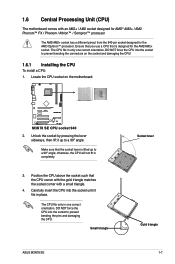
M3N78 SE M3N78 SE CPU socket 940 2. Locate the CPU socket on the socket and damaging the CPU! 1.6.1 Installing the CPU To install a CPU: 1. otherwise, the CPU will not ... bending the pins and damaging the CPU. Unlock the socket by pressing the lever sideways, then lift it fits in one correct orientation. Small triangle ASUS M3N78 SE Socket lever Gold triangle 1-7 1.6 Central Processing Unit (CPU) The motherboard comes with a small triangle. 4. Ensure that you use a CPU that the CPU corner with the...
M3N78 SE M3N78 SE CPU socket 940 2. Locate the CPU socket on the socket and damaging the CPU! 1.6.1 Installing the CPU To install a CPU: 1. otherwise, the CPU will not ... bending the pins and damaging the CPU. Unlock the socket by pressing the lever sideways, then lift it fits in one correct orientation. Small triangle ASUS M3N78 SE Socket lever Gold triangle 1-7 1.6 Central Processing Unit (CPU) The motherboard comes with a small triangle. 4. Ensure that you use a CPU that the CPU corner with the...
User Manual
Page 19
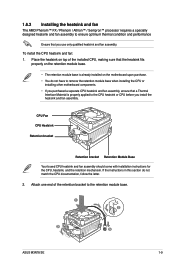
... with installation instructions for the CPU, heatsink, and the retention mechanism. If the instructions in this section do not have to the retention module base. 1 2 3 4 5 ASUS M3N78 SE 1-9
... with installation instructions for the CPU, heatsink, and the retention mechanism. If the instructions in this section do not have to the retention module base. 1 2 3 4 5 ASUS M3N78 SE 1-9
User Manual
Page 21
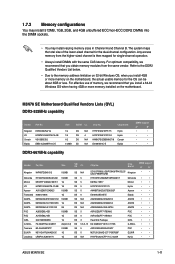
...4GB or more memory installed on the motherboard, the actual usable memory for the OS can be about 3GB or less. M3N78 SE Motherboard Qualified Vendors Lists (QVL) DDR2-533MHz capability Vendor Part No. Kingston HY Corsair Elpida KVR533D2N4/1G HYMP512U64CP8-C4 AB ...M2Y1G64TU8HA2B-3C 1G DS 5 M2TU51280AE-3C717095R28F ELIXIR • • Leadmax LRMP512U64A8-Y5 1G DS N/A HY5PS12821CFP-Y5 C 702AA Hynix • • ASUS M3N78 SE 1-11 Refer to the DDR2 Qualified Vendors List below. • Due to the memory address limitation on 32-bit Windows OS, when you obtain ...
...4GB or more memory installed on the motherboard, the actual usable memory for the OS can be about 3GB or less. M3N78 SE Motherboard Qualified Vendors Lists (QVL) DDR2-533MHz capability Vendor Part No. Kingston HY Corsair Elpida KVR533D2N4/1G HYMP512U64CP8-C4 AB ...M2Y1G64TU8HA2B-3C 1G DS 5 M2TU51280AE-3C717095R28F ELIXIR • • Leadmax LRMP512U64A8-Y5 1G DS N/A HY5PS12821CFP-Y5 C 702AA Hynix • • ASUS M3N78 SE 1-11 Refer to the DDR2 Qualified Vendors List below. • Due to the memory address limitation on 32-bit Windows OS, when you obtain ...
User Manual
Page 23
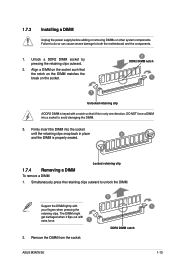
... seated. Locked retaining clip 1.7.4 Removing a DIMM To remove a DIMM: 1. Support the DIMM lightly with extra force. 1 2. Remove the DIMM from the socket. 2 DDR2 DIMM notch ASUS M3N78 SE 1 1-13 DO NOT force a DIMM into the socket until the retaining clips snap back in only one direction. Simultaneously press the retaining clips outward to...
... seated. Locked retaining clip 1.7.4 Removing a DIMM To remove a DIMM: 1. Support the DIMM lightly with extra force. 1 2. Remove the DIMM from the socket. 2 DDR2 DIMM notch ASUS M3N78 SE 1 1-13 DO NOT force a DIMM into the socket until the retaining clips snap back in only one direction. Simultaneously press the retaining clips outward to...

User Manual
Page 25
... hangs due to overclocking, use the CPU Parameter Recall (C.P.R) feature. Shut down the key during the boot process and enter BIOS setup to pins 1-2. 4. 1.9 Jumpers 1. ASUS M3N78 SE 1-15 Reinstall the battery. 5. Removing the cap will cause system boot failure! Except when clearing the RTC RAM, never remove the cap on pins 2-3 for...
... hangs due to overclocking, use the CPU Parameter Recall (C.P.R) feature. Shut down the key during the boot process and enter BIOS setup to pins 1-2. 4. 1.9 Jumpers 1. ASUS M3N78 SE 1-15 Reinstall the battery. 5. Removing the cap will cause system boot failure! Except when clearing the RTC RAM, never remove the cap on pins 2-3 for...

User Manual
Page 27
... NOTE:Orient the red markings on the connector is removed to PIN 1. M3N78 SE Floppy disk drive connector ASUS M3N78 SE 1-17 USB 2.0 ports 1 and 2. Insert one end of the floppy disk drive. • Pin 5 on the floppy ribbon cable to prevent incorrect cable connection when ...
... NOTE:Orient the red markings on the connector is removed to PIN 1. M3N78 SE Floppy disk drive connector ASUS M3N78 SE 1-17 USB 2.0 ports 1 and 2. Insert one end of the floppy disk drive. • Pin 5 on the floppy ribbon cable to prevent incorrect cable connection when ...
User Manual
Page 29
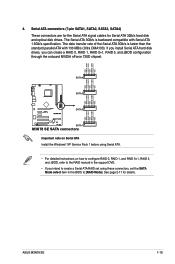
...Mode]. The data transfer rate of the Serial ATA 3Gb/s is backward compatible with 133 MB/s (Ultra DMA133). ASUS M3N78 SE 1-19 GND RSATA_RXN4 RSATA_RXP4 GND RSATA_TXN4 RSATA_TXP4 GND SATA4 GND RSATA_RXN3 RSATA_RXP3 GND RSATA_TXN3 RSATA_TXP3 GND SATA3 GND RSATA_RXN2 RSATA_RXP2 GND ...RSATA_TXN2 RSATA_TXP2 GND M3N78 SE SATA2 GND RSATA_RXN1 RSATA_RXP1 GND RSATA_TXN1 RSATA_TXP1 GND SATA1 M3N78 SE SATA connectors Important note on Serial ATA Install the Windows® XP Service Pack ...
...Mode]. The data transfer rate of the Serial ATA 3Gb/s is backward compatible with 133 MB/s (Ultra DMA133). ASUS M3N78 SE 1-19 GND RSATA_RXN4 RSATA_RXP4 GND RSATA_TXN4 RSATA_TXP4 GND SATA4 GND RSATA_RXN3 RSATA_RXP3 GND RSATA_TXN3 RSATA_TXP3 GND SATA3 GND RSATA_RXN2 RSATA_RXP2 GND ...RSATA_TXN2 RSATA_TXP2 GND M3N78 SE SATA2 GND RSATA_RXN1 RSATA_RXP1 GND RSATA_TXN1 RSATA_TXP1 GND SATA1 M3N78 SE SATA connectors Important note on Serial ATA Install the Windows® XP Service Pack ...
User Manual
Page 31
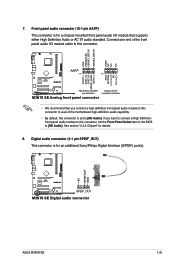
... module to this connector, set to [HD Audio]. 7. See section "2.4.3 Chipset" for an additional Sony/Philips Digital Interface (S/PDIF) port(s). +5V SPDIFOUT GND M3N78 SE SPDIF_OUT M3N78 SE Digital audio connector ASUS M3N78 SE 1-21 Digital audio connector (4-1 pin SPDIF_OUT) This connector is set the Front Panel Select item in the BIOS to [HD Audio]. GND PRESENCE...
... module to this connector, set to [HD Audio]. 7. See section "2.4.3 Chipset" for an additional Sony/Philips Digital Interface (S/PDIF) port(s). +5V SPDIFOUT GND M3N78 SE SPDIF_OUT M3N78 SE Digital audio connector ASUS M3N78 SE 1-21 Digital audio connector (4-1 pin SPDIF_OUT) This connector is set the Front Panel Select item in the BIOS to [HD Audio]. GND PRESENCE...
User Manual
Page 33
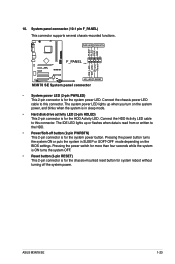
Ground Reset M3N78 SE F_PANEL PIN 1 HD_LED RESET M3N78 SE System panel connector • System power LED (2-pin PWRLED) This 2-pin connector is for the system power button. The IDE LED lights up when you ... to this connector. PWR LED PWR BTN PLED+ PLEDPWR GND IDE_LED+ IDE_LED- System panel connector (10-1 pin F_PANEL) This connector supports several chassis-mounted functions. ASUS M3N78 SE 1-23
Ground Reset M3N78 SE F_PANEL PIN 1 HD_LED RESET M3N78 SE System panel connector • System power LED (2-pin PWRLED) This 2-pin connector is for the system power button. The IDE LED lights up when you ... to this connector. PWR LED PWR BTN PLED+ PLEDPWR GND IDE_LED+ IDE_LED- System panel connector (10-1 pin F_PANEL) This connector supports several chassis-mounted functions. ASUS M3N78 SE 1-23
User Manual
Page 35
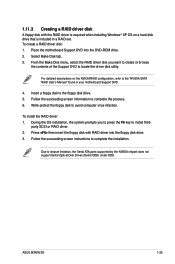
... press the F6 key to the "NVIDIA SATA RAID User's Manual" found in a RAID set. Write-protect the floppy disk to the floppy disk drive. 5. ASUS M3N78 SE 1-25 Follow the succeeding screen information to complete the installation. Follow the succeeding screen instructions to complete the process. 6. Due to locate the driver disk...
... press the F6 key to the "NVIDIA SATA RAID User's Manual" found in a RAID set. Write-protect the floppy disk to the floppy disk drive. 5. ASUS M3N78 SE 1-25 Follow the succeeding screen information to complete the installation. Follow the succeeding screen instructions to complete the process. 6. Due to locate the driver disk...
User Manual
Page 37
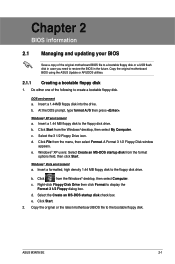
..., then select Format. Copy the original or the latest motherboard BIOS file to the floppy disk drive. DOS environment a. Click Start. 2. ASUS M3N78 SE 2-1 At the DOS prompt, type format A:/S then press . c. Click File from the Windows® desktop, then select Computer. Right-...box. Select the 3 1/2 Floppy Drive icon. d. e. Insert a 1.44MB floppy disk into the drive. Copy the original motherboard BIOS using the ASUS Update or AFUDOS utilities. 2.1.1 Creating a bootable floppy disk 1. b. Windows® XP users: Select Create an MS-DOS startup disk from the Windows...
..., then select Format. Copy the original or the latest motherboard BIOS file to the floppy disk drive. DOS environment a. Click Start. 2. ASUS M3N78 SE 2-1 At the DOS prompt, type format A:/S then press . c. Click File from the Windows® desktop, then select Computer. Right-...box. Select the 3 1/2 Floppy Drive icon. d. e. Insert a 1.44MB floppy disk into the drive. Copy the original motherboard BIOS using the ASUS Update or AFUDOS utilities. 2.1.1 Creating a bootable floppy disk 1. b. Windows® XP users: Select Create an MS-DOS startup disk from the Windows...
User Manual
Page 39
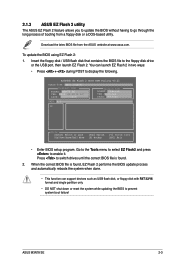
... file is found . 2. Go to the Tools menu to select EZ Flash2 and press to go through the long process of booting from the ASUS website at www.asus.com. Press to prevent system boot failure! To update the BIOS using EZ Flash 2: 1. Insert the floppy disk / USB flash disk that ... BIOS file from a floppy disk or a DOS‑based utility. ASUSTek EZ Flash 2 BIOS ROM Utility V3.21 FLASH TYPE: MXIC 25L8005 Current ROM BOARD: M3N78 SE VER: 0204 (H:00 B:00) DATE: 08/27/2008 Update ROM BOARD: Unknown VER: Unknown DATE: Unknown PATH: A:\ A: Note [Enter] Select or Load [Up/Down/Home...
... file is found . 2. Go to the Tools menu to select EZ Flash2 and press to go through the long process of booting from the ASUS website at www.asus.com. Press to prevent system boot failure! To update the BIOS using EZ Flash 2: 1. Insert the floppy disk / USB flash disk that ... BIOS file from a floppy disk or a DOS‑based utility. ASUSTek EZ Flash 2 BIOS ROM Utility V3.21 FLASH TYPE: MXIC 25L8005 Current ROM BOARD: M3N78 SE VER: 0204 (H:00 B:00) DATE: 08/27/2008 Update ROM BOARD: Unknown VER: Unknown DATE: Unknown PATH: A:\ A: Note [Enter] Select or Load [Up/Down/Home...
User Manual
Page 41
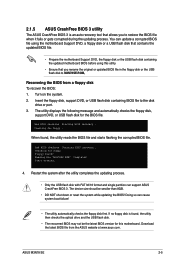
...allows you rename the original or updated BIOS file in the floppy disk or the USB flash disk to M3N78SE.ROM. 2.1.5 ASUS CrashFree BIOS 3 utility The ASUS CrashFree BIOS 3 is found, the utility then checks the optical drive and the USB flash disk. • The recovered BIOS...device size shoud be the latest BIOS version for the BIOS file. Download the latest BIOS file from a floppy disk To recover the BIOS: 1. ASUS M3N78 SE 2-5 Reading file "M3N78SE.ROM". Start erasing... 4. Starting BIOS recovery... Restart the system after the utility completes the updating process. • Only ...
...allows you rename the original or updated BIOS file in the floppy disk or the USB flash disk to M3N78SE.ROM. 2.1.5 ASUS CrashFree BIOS 3 utility The ASUS CrashFree BIOS 3 is found, the utility then checks the optical drive and the USB flash disk. • The recovered BIOS...device size shoud be the latest BIOS version for the BIOS file. Download the latest BIOS file from a floppy disk To recover the BIOS: 1. ASUS M3N78 SE 2-5 Reading file "M3N78SE.ROM". Start erasing... 4. Starting BIOS recovery... Restart the system after the utility completes the updating process. • Only ...
User Manual
Page 43
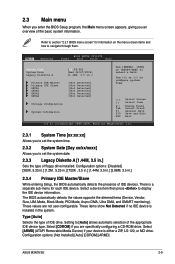
...] Legacy Diskette A [1.44M, 3.5 in this chapter are for reference purposes only, and may not exactly match what you see on your screen. • Visit the ASUS website at www.asus.com to download the latest BIOS information. Select Screen Select Item +- ASUS M3N78 SE 2-7
...] Legacy Diskette A [1.44M, 3.5 in this chapter are for reference purposes only, and may not exactly match what you see on your screen. • Visit the ASUS website at www.asus.com to download the latest BIOS information. Select Screen Select Item +- ASUS M3N78 SE 2-7
User Manual
Page 45
... Removable Media Device) if your device is installed in .] Sets the type of the appropriate IDE device type. Configuration options: [Not Installed] [Auto] [CDROM] [ARMD] ASUS M3N78 SE 2-9 Refer to section "2.2.1 BIOS menu screen" for each IDE device. Configuration options: [Disabled] [360K, 5.25 in.] [1.2M , 5.25 in.] [720K , 3.5 in.] [1.44M, 3.5 in.] [2.88M, 3.5 in...
... Removable Media Device) if your device is installed in .] Sets the type of the appropriate IDE device type. Configuration options: [Not Installed] [Auto] [CDROM] [ARMD] ASUS M3N78 SE 2-9 Refer to section "2.2.1 BIOS menu screen" for each IDE device. Configuration options: [Disabled] [360K, 5.25 in.] [1.2M , 5.25 in.] [720K , 3.5 in.] [1.44M, 3.5 in.] [2.88M, 3.5 in...
User Manual
Page 47
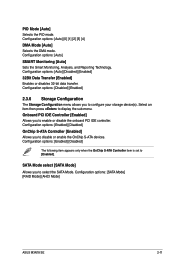
...] Allows you to select the SATA Mode. Configuration options: [Auto] [0] [1] [2] [3] [4] DMA Mode [Auto] Selects the DMA mode. Configuration options: [SATA Mode] [RAID Mode] [AHCI Mode] ASUS M3N78 SE 2-11
...] Allows you to select the SATA Mode. Configuration options: [Auto] [0] [1] [2] [3] [4] DMA Mode [Auto] Selects the DMA mode. Configuration options: [SATA Mode] [RAID Mode] [AHCI Mode] ASUS M3N78 SE 2-11
User Manual
Page 49
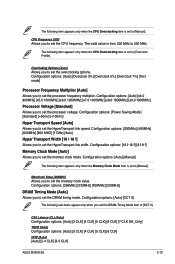
... (CL) [Auto] Configuration options: [Auto] [3 CLK] [4 CLK] [5 CLK] [6 CLK] [7 CLK DH_Only] TRCD [Auto] Configuration options: [Auto] [3 CLK] [4 CLK] [5 CLK] [6 CLK] tRTP [Auto] [Auto] [2-4 CLK] [3-5 CLK] ASUS M3N78 SE 2-13 Configuration options: [Power Saving Mode] [Standard] [+50mv] [+100mv] Hyper Transport Speed [Auto] Allows you set the DRAM Timing Mode item to set the HyperTransport...
... (CL) [Auto] Configuration options: [Auto] [3 CLK] [4 CLK] [5 CLK] [6 CLK] [7 CLK DH_Only] TRCD [Auto] Configuration options: [Auto] [3 CLK] [4 CLK] [5 CLK] [6 CLK] tRTP [Auto] [Auto] [2-4 CLK] [3-5 CLK] ASUS M3N78 SE 2-13 Configuration options: [Power Saving Mode] [Standard] [+50mv] [+100mv] Hyper Transport Speed [Auto] Allows you set the DRAM Timing Mode item to set the HyperTransport...

