
User Manual
Page 31
done Write to file...... All rights reserved. exe 2 DOS afudos /o[filename filename A:\>afudos /oOLDBIOS1.rom 3. 按下 afudos /oOLDBIOS1.rom AMI Firmware Update Utility - Version 1.19(ASUS V2.07(03.11.24BB)) Copyright (C) 2002 American Megatrends, Inc. ok A:\> 當 BIOS DOS 31 Reading flash ..... BIOS 2.1 使用 AFUDOS BIOS AFUDOS DOS BIOS BIOS 程式。AFUDOS BIOS BIOS BIOS 程式 BIOS 程式。 1.2MB BIOS 1 AFUDOS 程式(afudos.
done Write to file...... All rights reserved. exe 2 DOS afudos /o[filename filename A:\>afudos /oOLDBIOS1.rom 3. 按下 afudos /oOLDBIOS1.rom AMI Firmware Update Utility - Version 1.19(ASUS V2.07(03.11.24BB)) Copyright (C) 2002 American Megatrends, Inc. ok A:\> 當 BIOS DOS 31 Reading flash ..... BIOS 2.1 使用 AFUDOS BIOS AFUDOS DOS BIOS BIOS 程式。AFUDOS BIOS BIOS BIOS 程式 BIOS 程式。 1.2MB BIOS 1 AFUDOS 程式(afudos.

User Manual
Page 32
... reserved. done Reading flash ...... done Writing flash ...... done Advance Check ...... done Advance Check ...... WARNING!! Erasing flash ...... done Please restart your computer A:\> 32 BIOS 更新 BIOS 程式 AFUDOS BIOS 程式。 1 tw.asus.com BIOS 片中。 BIOS BIOS 2. 將 AFUDOS.EXE BIOS 3 DOS afudos /i[filename filename BIOS 程式。 A:\>afudos /iP5B-VM DO.ROM 4.
... reserved. done Reading flash ...... done Writing flash ...... done Advance Check ...... done Advance Check ...... WARNING!! Erasing flash ...... done Please restart your computer A:\> 32 BIOS 更新 BIOS 程式 AFUDOS BIOS 程式。 1 tw.asus.com BIOS 片中。 BIOS BIOS 2. 將 AFUDOS.EXE BIOS 3 DOS afudos /i[filename filename BIOS 程式。 A:\>afudos /iP5B-VM DO.ROM 4.

User Manual
Page 33
... 程式(AWDFLASH.EXE BIOS AwardBIOS Flash BIOS 程式。 1 http://tw.asus.com BIOS M2N-VM HDMI.bin FAT 32/16 格式的 USB BIOS 2 CD/DVD AwardBIOS Flash BIOS 3 DOS 4. 當 A BIOS 檔案與 AwardBIOS Flash 5 A awdflash 並按下 鍵。 AwardBIOS Flash Utility for ASUS V1.14 (C) Phoenix Technologies Ltd...
... 程式(AWDFLASH.EXE BIOS AwardBIOS Flash BIOS 程式。 1 http://tw.asus.com BIOS M2N-VM HDMI.bin FAT 32/16 格式的 USB BIOS 2 CD/DVD AwardBIOS Flash BIOS 3 DOS 4. 當 A BIOS 檔案與 AwardBIOS Flash 5 A awdflash 並按下 鍵。 AwardBIOS Flash Utility for ASUS V1.14 (C) Phoenix Technologies Ltd...

User Manual
Page 34
... Flash Memory - OFE00 OK Write OK No Update Write Fail Warning: Don't Turn Off Power Or Reset System! 在更新 BIOS 9 Flash Complete BIOS F1 AwardBIOS Flash Utility for ASUS V1.14 (C) Phoenix Technologies Ltd. PMC Pm49FL004T LPC/FWH File Name to Continue Write OK F1 Reset No Update Write Fail 34...
... Flash Memory - OFE00 OK Write OK No Update Write Fail Warning: Don't Turn Off Power Or Reset System! 在更新 BIOS 9 Flash Complete BIOS F1 AwardBIOS Flash Utility for ASUS V1.14 (C) Phoenix Technologies Ltd. PMC Pm49FL004T LPC/FWH File Name to Continue Write OK F1 Reset No Update Write Fail 34...

User Manual
Page 4
Contents 1.11 Software support 1-27 1.11.1 Installing an operating system 1-27 1.11.2 Support DVD information 1-27 Chapter 2: BIOS information 2.1 Managing and updating your BIOS 2-1 2.1.1 ASUS Update utility 2-1 2.1.2 ASUS EZ Flash 2 utility 2-2 2.1.3 ASUS CrashFree BIOS 3 utility 2-3 2.2 BIOS setup program 2-4 2.2.1 BIOS menu screen 2-5 2.2.2 Menu bar 2-5 2.2.3 Navigation keys 2-6 2.2.4 Menu items 2-6 2.2.5 Submenu items 2-6 2.2.6 Configuration fields 2-6 2.2.7 General help 2-6 2.2.8 Pop-up window 2-6 2.2.9 Scroll bar 2-6 2.3 Main...
Contents 1.11 Software support 1-27 1.11.1 Installing an operating system 1-27 1.11.2 Support DVD information 1-27 Chapter 2: BIOS information 2.1 Managing and updating your BIOS 2-1 2.1.1 ASUS Update utility 2-1 2.1.2 ASUS EZ Flash 2 utility 2-2 2.1.3 ASUS CrashFree BIOS 3 utility 2-3 2.2 BIOS setup program 2-4 2.2.1 BIOS menu screen 2-5 2.2.2 Menu bar 2-5 2.2.3 Navigation keys 2-6 2.2.4 Menu items 2-6 2.2.5 Submenu items 2-6 2.2.6 Configuration fields 2-6 2.2.7 General help 2-6 2.2.8 Pop-up window 2-6 2.2.9 Scroll bar 2-6 2.3 Main...
User Manual
Page 7
Contact a qualified service technician or your retailer. Do not place the product in your area. Detailed descriptions of the motherboard and the new technology it supports. • Chapter 2: BIOS information This chapter tells how to fix it may become wet. • Place the product on it, carefully read... this guide is broken, do not try to change system settings through the BIOS Setup menus. How this guide This user guide contains the information you need when installing and configuring the motherboard. If you are not sure about the voltage of the electrical outlet you encounter...
Contact a qualified service technician or your retailer. Do not place the product in your area. Detailed descriptions of the motherboard and the new technology it supports. • Chapter 2: BIOS information This chapter tells how to fix it may become wet. • Place the product on it, carefully read... this guide is broken, do not try to change system settings through the BIOS Setup menus. How this guide This user guide contains the information you need when installing and configuring the motherboard. If you are not sure about the voltage of the electrical outlet you encounter...
User Manual
Page 10
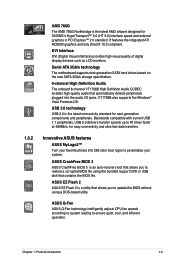
...@85Hz Supports single-link DVI interface ASUS Q-Fan ASUS CrashFree BIOS3 ASUS EZ Flash2 ASUS MyLogo2 ASUS AI NET2 ASUS Express Gate SFS (Stepless Frequency Selection) from 200MHz to 550MHz at 1MHz increment Adjustable DRAM voltage ASUS CPR (CPU Parameter Recall) 8Mb Flash ROM, AMI BIOS, PnP, DMI2.0, WfM2.0, ACPI2...pin ATX 12V power connector Integrated ATI Radeon 3000 Supports maximum shared memory up to 1920 x 1200 @60Hz dual-link Supports RGB with max. M3A76-CM specifications summary Internal I /O shield uATX Form factor: 9.6'' x 9.6'' (24.4cm x 24.4cm) Drivers ASUS PC Probe II ASUS ...
...@85Hz Supports single-link DVI interface ASUS Q-Fan ASUS CrashFree BIOS3 ASUS EZ Flash2 ASUS MyLogo2 ASUS AI NET2 ASUS Express Gate SFS (Stepless Frequency Selection) from 200MHz to 550MHz at 1MHz increment Adjustable DRAM voltage ASUS CPR (CPU Parameter Recall) 8Mb Flash ROM, AMI BIOS, PnP, DMI2.0, WfM2.0, ACPI2...pin ATX 12V power connector Integrated ATI Radeon 3000 Supports maximum shared memory up to 1920 x 1200 @60Hz dual-link Supports RGB with max. M3A76-CM specifications summary Internal I /O shield uATX Form factor: 9.6'' x 9.6'' (24.4cm x 24.4cm) Drivers ASUS PC Probe II ASUS ...
User Manual
Page 13
... Interface) provides high visual quality of digital display devices such as LCD monitors. Serial ATA 3Gb/s technology The motherboard supports next-generation SATA hard drives based on the new SATA 3Gb/s storage specification. 8-channel High Definition Audio The...3.0 (HT 3.0) interface speed and external graphics in PCI Express™ 2.0 standard. ASUS CrashFree BIOS 3 ASUS CrashFree BIOS 3 is the latest connectivity standard for next generation components and peripherals. Innovative ASUS features ASUS MyLogo2™ Turn your favorite photos into the audio I/O jacks. Chapter 1: Product ...
... Interface) provides high visual quality of digital display devices such as LCD monitors. Serial ATA 3Gb/s technology The motherboard supports next-generation SATA hard drives based on the new SATA 3Gb/s storage specification. 8-channel High Definition Audio The...3.0 (HT 3.0) interface speed and external graphics in PCI Express™ 2.0 standard. ASUS CrashFree BIOS 3 ASUS CrashFree BIOS 3 is the latest connectivity standard for next generation components and peripherals. Innovative ASUS features ASUS MyLogo2™ Turn your favorite photos into the audio I/O jacks. Chapter 1: Product ...

User Manual
Page 26
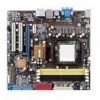
...the card connector with the PCI Express specifications. 1-16 ASUS M3A76-CM Install the software drivers for information on shared slots, ensure that the drivers support "Share IRQ" or that the cards do so may need IRQ assignments. When using PCI cards on BIOS setup. 2. Failure to use . 4. Unplug the ...as a LAN card, SCSI card, USB card, and other cards that comply with PCI specifications. 1.8.5 PCI Express x1 slot This motherboard supports PCI Express x1 network cards, SCSI cards, and other cards that comply with the PCI Express specifications. 1.8.6 PCI Express x16 slot This...
...the card connector with the PCI Express specifications. 1-16 ASUS M3A76-CM Install the software drivers for information on shared slots, ensure that the drivers support "Share IRQ" or that the cards do so may need IRQ assignments. When using PCI cards on BIOS setup. 2. Failure to use . 4. Unplug the ...as a LAN card, SCSI card, USB card, and other cards that comply with PCI specifications. 1.8.5 PCI Express x1 slot This motherboard supports PCI Express x1 network cards, SCSI cards, and other cards that comply with the PCI Express specifications. 1.8.6 PCI Express x16 slot This...

User Manual
Page 27
... 5~10 seconds, then move the jumper again to overclocking. Shut down the key during the boot process and enter BIOS setup to default values. Hold down and reboot the system so the BIOS can clear the CMOS memory of date, time, and system setup parameters by erasing the CMOS RTC RAM data...
... 5~10 seconds, then move the jumper again to overclocking. Shut down the key during the boot process and enter BIOS setup to default values. Hold down and reboot the system so the BIOS can clear the CMOS memory of date, time, and system setup parameters by erasing the CMOS RTC RAM data...

User Manual
Page 33
Connect the HDD Activity LED cable to hear system beeps and warnings. The speaker allows you turn on the BIOS settings. The IDE LED lights up when you to this connector. Pressing the power button turns the system ON or puts the system in SLEEP ...
Connect the HDD Activity LED cable to hear system beeps and warnings. The speaker allows you turn on the BIOS settings. The IDE LED lights up when you to this connector. Pressing the power button turns the system ON or puts the system in SLEEP ...

User Manual
Page 35
..., set to [HD Audio]. Front panel audio connector (10-1 pin AAFP) This connector is set the Front Panel Select item in the BIOS to [HD Audio]. Chapter 1: Product introduction 1-25 The S/PDIF module is for an additional Sony/Philips Digital Interface (S/PDIF) ports. See..."2.4.3 Chipset" for a chassis-mounted front panel audio I /O module cable to this connector is for details. 11. Connect one end of the motherboard high-definition audio capability. • By default, this connector. • We recommend that supports either High Definition Audio or AC`97 audio standard...
..., set to [HD Audio]. Front panel audio connector (10-1 pin AAFP) This connector is set the Front Panel Select item in the BIOS to [HD Audio]. Chapter 1: Product introduction 1-25 The S/PDIF module is for an additional Sony/Philips Digital Interface (S/PDIF) ports. See..."2.4.3 Chipset" for a chassis-mounted front panel audio I /O module cable to this connector is for details. 11. Connect one end of the motherboard high-definition audio capability. • By default, this connector. • We recommend that supports either High Definition Audio or AC`97 audio standard...
User Manual
Page 39
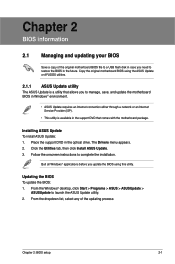
.... Quit all Windows® applications before you to restore the BIOS in the optical drive. Chapter 2 BIOS information 2.1 Managing and updating your BIOS Save a copy of the updating process: Chapter 2: BIOS setup 2-1 Copy the original motherboard BIOS using the ASUS Update or AFUDOS utilities. 2.1.1 ASUS Update utility The ASUS Update is available in the support DVD that allows you...
.... Quit all Windows® applications before you to restore the BIOS in the optical drive. Chapter 2 BIOS information 2.1 Managing and updating your BIOS Save a copy of the updating process: Chapter 2: BIOS setup 2-1 Copy the original motherboard BIOS using the ASUS Update or AFUDOS utilities. 2.1.1 ASUS Update utility The ASUS Update is available in the support DVD that allows you...

User Manual
Page 40
... complete the updating process. 2.1.2 ASUS EZ Flash 2 utility The ASUS EZ Flash 2 feature allows you to update the BIOS without having to display the following: ASUSTek EZ Flash 2 BIOS ROM Utility V3.32 FLASH TYPE: MXIC 25L8005 Current ROM BOARD: M3A76-CM VER: 0304 DATE: 01/002... Select or Load [Up/Down/Home/End] Move [Tab] Switch [B] Backup [V] Drive Info [ESC] Exit 2-2 ASUS M3A76-CM To update the BIOS using this utility, download the latest BIOS file from a BIOS file a. c. Always update the utility to avoid network traffic, or click Auto Select then click Next. Insert the...
... complete the updating process. 2.1.2 ASUS EZ Flash 2 utility The ASUS EZ Flash 2 feature allows you to update the BIOS without having to display the following: ASUSTek EZ Flash 2 BIOS ROM Utility V3.32 FLASH TYPE: MXIC 25L8005 Current ROM BOARD: M3A76-CM VER: 0304 DATE: 01/002... Select or Load [Up/Down/Home/End] Move [Tab] Switch [B] Backup [V] Drive Info [ESC] Exit 2-2 ASUS M3A76-CM To update the BIOS using this utility, download the latest BIOS file from a BIOS file a. c. Always update the utility to avoid network traffic, or click Auto Select then click Next. Insert the...

User Manual
Page 41
... shut down or reset the system while updating the BIOS to prevent system boot failure! 2.1.3 ASUS CrashFree BIOS 3 utility The ASUS CrashFree BIOS 3 is an auto recovery tool that contains the updated BIOS file. • Prepare the motherboard support DVD or the USB flash disk containing the updated motherboard BIOS before using this utility. • Always connect the SATA...
... shut down or reset the system while updating the BIOS to prevent system boot failure! 2.1.3 ASUS CrashFree BIOS 3 utility The ASUS CrashFree BIOS 3 is an auto recovery tool that contains the updated BIOS file. • Prepare the motherboard support DVD or the USB flash disk containing the updated motherboard BIOS before using this utility. • Always connect the SATA...

User Manual
Page 42
... This motherboard supports a programmable Serial Peripheral Interface (SPI) chip that the computer can support ASUS CrashFree BIOS 3. Being a menu-driven program, it as possible. 4. Download the latest BIOS file from a running operating system can update using the provided utility described in the CMOS RAM of the following procedures: • Restart using the navigation keys. 2-4 ASUS M3A76-CM...
... This motherboard supports a programmable Serial Peripheral Interface (SPI) chip that the computer can support ASUS CrashFree BIOS 3. Being a menu-driven program, it as possible. 4. Download the latest BIOS file from a running operating system can update using the provided utility described in the CMOS RAM of the following procedures: • Restart using the navigation keys. 2-4 ASUS M3A76-CM...
User Manual
Page 43
..., press the right or left arrow key on the keyboard until the desired item is highlighted. • The BIOS setup screens shown in this motherboard apply for this motherboard. Change Field Tab Select Field F1 General Help F10 Save and Exit ESC Exit v02.61 (C)Copyright 1985-2008,... for reference purposes only, and may not exactly match what you see on your screen. • Visit the ASUS website at www.asus.com to download the latest BIOS file for most conditions to ensure system compatibility and stability. Tools For changing the system tools configuration. Exit For...
..., press the right or left arrow key on the keyboard until the desired item is highlighted. • The BIOS setup screens shown in this motherboard apply for this motherboard. Change Field Tab Select Field F1 General Help F10 Save and Exit ESC Exit v02.61 (C)Copyright 1985-2008,... for reference purposes only, and may not exactly match what you see on your screen. • Visit the ASUS website at www.asus.com to download the latest BIOS file for most conditions to ensure system compatibility and stability. Tools For changing the system tools configuration. Exit For...

User Manual
Page 44
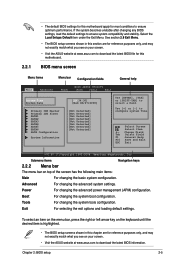
... shows the Main menu items. The other items on the screen. Use [+] or [-] to display a pop-up window Scroll bar 2-6 ASUS M3A76-CM You cannot select an item that particular menu. Main Advanced BIOS SETUP UTILITY Power Boot Tools Exit Suspend Mode ACPI 2.0 Features ACPI APIC support APM Configuration Hardware Monitor [Auto] [Disabled] [EDniOsapabtbilloendesd...
... shows the Main menu items. The other items on the screen. Use [+] or [-] to display a pop-up window Scroll bar 2-6 ASUS M3A76-CM You cannot select an item that particular menu. Main Advanced BIOS SETUP UTILITY Power Boot Tools Exit Suspend Mode ACPI 2.0 Features ACPI APIC support APM Configuration Hardware Monitor [Auto] [Disabled] [EDniOsapabtbilloendesd...
User Manual
Page 45
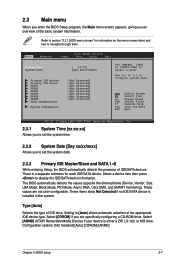
...] Allows you to set the system time. 2.3.2 System Date [Day xx/xx/xxxx] Allows you an overview of the basic system information. The BIOS automatically detects the values opposite the dimmed items (Device, Vendor, Size, LBA Mode, Block Mode, PIO Mode, Async DMA, Ultra DMA, and ...]] oorr [[SSHHIIFFTT--TTAABB]] ttoo sseelleecctt aa ffiieelldd.. Select a device item then press to navigate through them. 2.3 Main menu When you enter the BIOS Setup program, the Main menu screen appears, giving you to set the system date. 2.3.3 Primary IDE Master/Slave and SATA 1~6 While entering Setup, the...
...] Allows you to set the system time. 2.3.2 System Date [Day xx/xx/xxxx] Allows you an overview of the basic system information. The BIOS automatically detects the values opposite the dimmed items (Device, Vendor, Size, LBA Mode, Block Mode, PIO Mode, Async DMA, Ultra DMA, and ...]] oorr [[SSHHIIFFTT--TTAABB]] ttoo sseelleecctt aa ffiieelldd.. Select a device item then press to navigate through them. 2.3 Main menu When you enter the BIOS Setup program, the Main menu screen appears, giving you to set the system date. 2.3.3 Primary IDE Master/Slave and SATA 1~6 While entering Setup, the...

User Manual
Page 47
...The Advanced menu items allow you to malfunction. Loads the optimal settings for the system. • Overclock Profile - The BIOS automatically detects the items in this menu. Change Field Tab Select Field F1 General Help F10 Save and Exit ESC Exit v02... achieve desired CPU internal frequency. Allows you an overview of the preset overclocking. • Manual - Chapter 2: BIOS setup 2-9 BIOS Information Displays the auto-detected BIOS information. Select any of the general system specifications. 2.3.5 System Information This menu gives you to set the overclocking parameters...
...The Advanced menu items allow you to malfunction. Loads the optimal settings for the system. • Overclock Profile - The BIOS automatically detects the items in this menu. Change Field Tab Select Field F1 General Help F10 Save and Exit ESC Exit v02... achieve desired CPU internal frequency. Allows you an overview of the preset overclocking. • Manual - Chapter 2: BIOS setup 2-9 BIOS Information Displays the auto-detected BIOS information. Select any of the general system specifications. 2.3.5 System Information This menu gives you to set the overclocking parameters...


