
User Manual
Page 4
... and updating your BIOS 2-2 2.1.1 Creating a bootable floppy disk 2-3 2.1.2 ASUS EZ Flash 2 utility 2-4 2.1.3 AFUDOS utility 2-5 2.1.4 ASUS Update utility 2-7 2.2 BIOS setup program 2-10 2.2.1 BIOS menu screen 2-11 2.2.2 Menu bar 2-11 2.2.3 Navigation keys 2-11 2.2.4 Menu items 2-12 2.2.5 Sub-menu items 2-12 2.2.6 Configuration fields 2-12 2.2.7 Pop-up window 2-12 2.2.8 Scroll bar 2-12 2.2.9 General help 2-12 2.3 Main menu...
... and updating your BIOS 2-2 2.1.1 Creating a bootable floppy disk 2-3 2.1.2 ASUS EZ Flash 2 utility 2-4 2.1.3 AFUDOS utility 2-5 2.1.4 ASUS Update utility 2-7 2.2 BIOS setup program 2-10 2.2.1 BIOS menu screen 2-11 2.2.2 Menu bar 2-11 2.2.3 Navigation keys 2-11 2.2.4 Menu items 2-12 2.2.5 Sub-menu items 2-12 2.2.6 Configuration fields 2-12 2.2.7 Pop-up window 2-12 2.2.8 Scroll bar 2-12 2.2.9 General help 2-12 2.3 Main menu...

User Manual
Page 10
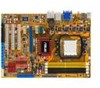
...65533;ti�o�n�,�M��u�l�ti�- resolution up to 1920 x 1200 (1080P) - M3A-H/HDMI specifications summary CPU Chipset System bus Memory VGA Expansion slots Storage LAN High Definition Audio USB AMD® Socket AM2+ Phenom...65533;�em��o�ry�m��o�d�ul�e�s - Hybrid CrossFire™ support (For Windows Vista only) - resolution up to 1600 x 1200 @ 60Hz - R��e�f�e�r�t�o��w�...
...65533;ti�o�n�,�M��u�l�ti�- resolution up to 1920 x 1200 (1080P) - M3A-H/HDMI specifications summary CPU Chipset System bus Memory VGA Expansion slots Storage LAN High Definition Audio USB AMD® Socket AM2+ Phenom...65533;�em��o�ry�m��o�d�ul�e�s - Hybrid CrossFire™ support (For Windows Vista only) - resolution up to 1600 x 1200 @ 60Hz - R��e�f�e�r�t�o��w�...

User Manual
Page 18
... cable connections. Profile The motherboard features the ASUS O.C. ASUS Q-Connector ASUS Q-Connector allows you to boot up your motherboard against Electronic Magnetic Interference (EMI). ASUS O.C. ASUS Express Gate Lite Just 5 seconds to instantly surf the Internet without the usual "fingers"- ASUS Q-Shield The specially designed ASUS Q-Shield does without entering Windows. With better electric conductivity, it against static...
... cable connections. Profile The motherboard features the ASUS O.C. ASUS Q-Connector ASUS Q-Connector allows you to boot up your motherboard against Electronic Magnetic Interference (EMI). ASUS O.C. ASUS Express Gate Lite Just 5 seconds to instantly surf the Internet without the usual "fingers"- ASUS Q-Shield The specially designed ASUS Q-Shield does without entering Windows. With better electric conductivity, it against static...

User Manual
Page 19
... feature allows you can easily monitor the critical components of the motherboard BIOS allows automatic re-setting to the BIOS default settings in Windows environment without entering the OS. eliminates the need to know which drivers are already installed, as well as those that allows the...RTC data. Smart Support DVD This feature provides a checklist that are not. C.P.R. (CPU Parameter Recall) The C.P.R. feature of the computer. ASUS M3A-H/HDMI 1-7 Simply press the predefined hotkey to overclocking. ASUS EZ Flash 2 ASUS EZ Flash 2 is a user-friendly BIOS update utility.
... feature allows you can easily monitor the critical components of the motherboard BIOS allows automatic re-setting to the BIOS default settings in Windows environment without entering the OS. eliminates the need to know which drivers are already installed, as well as those that allows the...RTC data. Smart Support DVD This feature provides a checklist that are not. C.P.R. (CPU Parameter Recall) The C.P.R. feature of the computer. ASUS M3A-H/HDMI 1-7 Simply press the predefined hotkey to overclocking. ASUS EZ Flash 2 ASUS EZ Flash 2 is a user-friendly BIOS update utility.

User Manual
Page 28
... systems listed below for third party comments on each slot. 64-bit Windows® XP Professional x64 Edition Windows® Vista x64 Edition M3A-H/HDMI Motherboard Qualified Vendors Lists (QVL) DDR2-1066 MHz capability Size Vendor Chip... No. 512MB KINGSTON 1GB KINGSTON E5108AJBG-1J-E E5108AJBG-1J-E CL Chip Brand SS/ DS Part No. The excess memory installation will not give users the benefit of manipulating this issue: http://dlsvr01.asus.com/pub/ASUS...
... systems listed below for third party comments on each slot. 64-bit Windows® XP Professional x64 Edition Windows® Vista x64 Edition M3A-H/HDMI Motherboard Qualified Vendors Lists (QVL) DDR2-1066 MHz capability Size Vendor Chip... No. 512MB KINGSTON 1GB KINGSTON E5108AJBG-1J-E E5108AJBG-1J-E CL Chip Brand SS/ DS Part No. The excess memory installation will not give users the benefit of manipulating this issue: http://dlsvr01.asus.com/pub/ASUS...

User Manual
Page 35
... Express x16 graphic cards that comply with PCI specifications. ASUS M3A-H/HDMI 1-23 Refer to the figure below for more information about Hybrid Crossfire™ support. PCIe x1_1 slot PCIe 2.0 x16 slot PCIe x1_2 slot PCI_1 slot PCI_2 slot PCI_3 slot • Currently, only Windows® Vista operation system supports Hybird CrossFire mode. •...
... Express x16 graphic cards that comply with PCI specifications. ASUS M3A-H/HDMI 1-23 Refer to the figure below for more information about Hybrid Crossfire™ support. PCIe x1_1 slot PCIe 2.0 x16 slot PCIe x1_2 slot PCI_1 slot PCI_2 slot PCI_3 slot • Currently, only Windows® Vista operation system supports Hybird CrossFire mode. •...

User Manual
Page 42
...signal cable to SATA device. GND RSATA_RXN4 RSATA_TXP4 GND RSATA_TXN4 RSATA_TXP4 GND GND RSATA_RXN3 RSATA_TXP3 GND RSATA_TXN3 RSATA_TXP3 GND M3A-H/HDMI ® GND RSATA_RXN2 RSATA_TXP2 GND RSATA_TXN2 RSATA_TXP2 GND SATA3 SATA2 GND RSATA_RXN5 RSATA_TXP5 GND RSATA_TXN5 RSATA_TXP5 GND SATA4 ...SATA5 GND RSATA_RXN6 RSATA_TXP6 GND RSATA_TXN6 RSATA_TXP6 GND GND RSATA_RXN1 RSATA_TXP1 GND RSATA_TXN1 RSATA_TXP1 GND M3A-H/HDMI SATA connectors SATA1 SATA6 Important note on Serial ATA Install the Windows® XP Service Pack 1 before using Serial ATA. • For detailed instructions on...
...signal cable to SATA device. GND RSATA_RXN4 RSATA_TXP4 GND RSATA_TXN4 RSATA_TXP4 GND GND RSATA_RXN3 RSATA_TXP3 GND RSATA_TXN3 RSATA_TXP3 GND M3A-H/HDMI ® GND RSATA_RXN2 RSATA_TXP2 GND RSATA_TXN2 RSATA_TXP2 GND SATA3 SATA2 GND RSATA_RXN5 RSATA_TXP5 GND RSATA_TXN5 RSATA_TXP5 GND SATA4 ...SATA5 GND RSATA_RXN6 RSATA_TXP6 GND RSATA_TXN6 RSATA_TXP6 GND GND RSATA_RXN1 RSATA_TXP1 GND RSATA_TXN1 RSATA_TXP1 GND M3A-H/HDMI SATA connectors SATA1 SATA6 Important note on Serial ATA Install the Windows® XP Service Pack 1 before using Serial ATA. • For detailed instructions on...

User Manual
Page 50
... copy of the original motherboard BIOS file to a bootable floppy disk in case you to the corresponding sections for details on these utilities. ASUS Update (Updates the BIOS in the future. Copy the original motherboard BIOS using a floppy disk, USB Flash, or the motherboard support DVD...allow you need to restore the BIOS in Windows® environment.) Refer to manage and update the motherboard Basic Input/Output System (BIOS) setup. 1. ASUS EZ Flash 2 (Updates the BIOS using the ASUS Update or AFUDOS utilities. 2-2 Chapter 2: BIOS setup ASUS AFUDOS (Updates the BIOS in DOS mode...
... copy of the original motherboard BIOS file to a bootable floppy disk in case you to the corresponding sections for details on these utilities. ASUS Update (Updates the BIOS in the future. Copy the original motherboard BIOS using a floppy disk, USB Flash, or the motherboard support DVD...allow you need to restore the BIOS in Windows® environment.) Refer to manage and update the motherboard Basic Input/Output System (BIOS) setup. 1. ASUS EZ Flash 2 (Updates the BIOS using the ASUS Update or AFUDOS utilities. 2-2 Chapter 2: BIOS setup ASUS AFUDOS (Updates the BIOS in DOS mode...
User Manual
Page 51
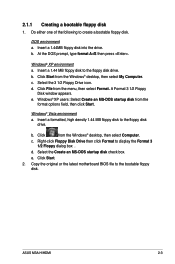
... Format 3 1/2 Floppy dialog box . Click File from the format options field, then click Start. e. d. e. ASUS M3A-H/HDMI 2-3 2.1.1 Creating a bootable floppy disk 1. Do either one of the following to the floppy disk drive. DOS environment a. b. Click Start from the Windows® desktop, then select Computer. c. Insert a formatted, high density 1.44 MB floppy disk to create...
... Format 3 1/2 Floppy dialog box . Click File from the format options field, then click Start. e. d. e. ASUS M3A-H/HDMI 2-3 2.1.1 Creating a bootable floppy disk 1. Do either one of the following to the floppy disk drive. DOS environment a. b. Click Start from the Windows® desktop, then select Computer. c. Insert a formatted, high density 1.44 MB floppy disk to create...

User Manual
Page 55
.... 2.1.4 ASUS Update utility The ASUS Update is a utility that comes with the motherboard package. Quit all Windows® applications before you to your system. Installing ASUS Update To install ASUS Update: 1. See page 3-4 for the Utilities screen menu. 3. The ASUS Update utility...ASUS Update. This utility is copied to : • Save the current BIOS file • Download the latest BIOS file from the Internet • Update the BIOS from an updated BIOS file • Update the BIOS directly from the Internet, and • View the BIOS version information. ASUS M3A-H/HDMI...
.... 2.1.4 ASUS Update utility The ASUS Update is a utility that comes with the motherboard package. Quit all Windows® applications before you to your system. Installing ASUS Update To install ASUS Update: 1. See page 3-4 for the Utilities screen menu. 3. The ASUS Update utility...ASUS Update. This utility is copied to : • Save the current BIOS file • Download the latest BIOS file from the Internet • Update the BIOS from an updated BIOS file • Update the BIOS directly from the Internet, and • View the BIOS version information. ASUS M3A-H/HDMI...

User Manual
Page 56
The ASUS Update main window appears. 2. Select the ASUS FTP site nearest the Internet option from 3. click Auto Select. Click Next. 2-8 Chapter 2: BIOS setup Updating the BIOS through the Internet To update the BIOS through the Internet: 1. Select Update BIOS from the you to avoid network traffic, or drop‑down menu, then click Next. Launch the ASUS Update utility from the Windows® desktop by clicking Start > Programs > ASUS > ASUSUpdate > ASUSUpdate.
The ASUS Update main window appears. 2. Select the ASUS FTP site nearest the Internet option from 3. click Auto Select. Click Next. 2-8 Chapter 2: BIOS setup Updating the BIOS through the Internet To update the BIOS through the Internet: 1. Select Update BIOS from the you to avoid network traffic, or drop‑down menu, then click Next. Launch the ASUS Update utility from the Windows® desktop by clicking Start > Programs > ASUS > ASUSUpdate > ASUSUpdate.

User Manual
Page 57
... the drop‑down menu, then click Next. 3. Follow the screen instructions to avail all its features. The ASUS Update main window appears. 2. Always update the utility to complete the update process. From the FTP site, select the BIOS version ...to complete the update process. Select Update BIOS from a file option from the Open window, then click Open. 4. Launch the ASUS Update utility from the Windows® desktop by clicking Start > Programs > ASUS > ASUSUpdate > ASUSUpdate. Follow the screen instructions to download. 4. M3A-H-HDMI.ROM M3A-H-HDMI ASUS M3A-H/HDMI 2-9
... the drop‑down menu, then click Next. 3. Follow the screen instructions to avail all its features. The ASUS Update main window appears. 2. Always update the utility to complete the update process. From the FTP site, select the BIOS version ...to complete the update process. Select Update BIOS from a file option from the Open window, then click Open. 4. Launch the ASUS Update utility from the Windows® desktop by clicking Start > Programs > ASUS > ASUSUpdate > ASUSUpdate. Follow the screen instructions to download. 4. M3A-H-HDMI.ROM M3A-H-HDMI ASUS M3A-H/HDMI 2-9

User Manual
Page 60
...an item that the iteam has a sub-menu. Use [+] or [-] to select a field. Refer to 2.2.7 Pop-up window. 2.2.7 Pop-up window Select a menu item then press to display a pop-up window Scroll bar 2-12 Chapter 2: BIOS setup Press the Up/Down arrow keys or / keys to display a list of the ...selected item. To display the sub-menu, select the item and press . 2.2.6 Configuration fields These fields show the values for that menu. Pop-up window with the configuration options for that item. 2.2.8 Scroll bar A scroll bar appears on the right side of a menu screen when there are items that...
...an item that the iteam has a sub-menu. Use [+] or [-] to select a field. Refer to 2.2.7 Pop-up window. 2.2.7 Pop-up window Select a menu item then press to display a pop-up window Scroll bar 2-12 Chapter 2: BIOS setup Press the Up/Down arrow keys or / keys to display a list of the ...selected item. To display the sub-menu, select the item and press . 2.2.6 Configuration fields These fields show the values for that menu. Pop-up window with the configuration options for that item. 2.2.8 Scroll bar A scroll bar appears on the right side of a menu screen when there are items that...

User Manual
Page 88
... Gate Lite application from launching properly. The ASUS Express Gate Lite is useful in the rare case where corrupt settings prevent the Express Gate Lite environment from the support DVD first before starting Windows or other installed OS. Configuration options: [Enabled] [Disabled] Boot Out Timer [10...Gate Lite environment after clearing its settings. 2-40 Chapter 2: BIOS setup Express Gate Lite [Disabled] Allows you to enable or disable the ASUS Express Gate Lite feature. Reset User Data [No] Allows you to clear Express Gate Lite's user data. Choose [Disabled] to the ...
... Gate Lite application from launching properly. The ASUS Express Gate Lite is useful in the rare case where corrupt settings prevent the Express Gate Lite environment from the support DVD first before starting Windows or other installed OS. Configuration options: [Enabled] [Disabled] Boot Out Timer [10...Gate Lite environment after clearing its settings. 2-40 Chapter 2: BIOS setup Express Gate Lite [Disabled] Allows you to enable or disable the ASUS Express Gate Lite feature. Reset User Data [No] Allows you to clear Express Gate Lite's user data. Choose [Disabled] to the ...

User Manual
Page 90
...when the PC is turned off. When you made and restore the previously saved values. Exit & Discard Changes Select this option, a confirmation window appears. Discard Changes This option allows you to discard the selections you to load the default values for each of the options from this ...Load Setup Defaults This option allows you made to the Setup program. Pressing does not immediately exit this option or if you press , a confirmation window appears. Select OK to load default values. If you attempt to exit the Setup program without saving your changes, the program prompts you with ...
...when the PC is turned off. When you made and restore the previously saved values. Exit & Discard Changes Select this option, a confirmation window appears. Discard Changes This option allows you to discard the selections you to load the default values for each of the options from this ...Load Setup Defaults This option allows you made to the Setup program. Pressing does not immediately exit this option or if you press , a confirmation window appears. Select OK to load default values. If you attempt to exit the Setup program without saving your changes, the program prompts you with ...
User Manual
Page 92
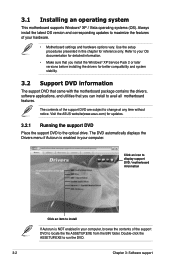
...folder. The DVD automatically displays the Drivers menu if Autorun is NOT enabled in your computer. 3.1 Installing an operating system This motherboard supports Windows® XP / Vista operating systems (OS). Click an icon to display support DVD / motherboard information Click an item to install If...the setup procedures presented in your computer, browse the contents of the support DVD to avail all motherboard features. Visit the ASUS website(www.asus.com) for reference only. Always install the latest OS version and corresponding updates to maximize the features of the support DVD...
...folder. The DVD automatically displays the Drivers menu if Autorun is NOT enabled in your computer. 3.1 Installing an operating system This motherboard supports Windows® XP / Vista operating systems (OS). Click an icon to display support DVD / motherboard information Click an item to install If...the setup procedures presented in your computer, browse the contents of the support DVD to avail all motherboard features. Visit the ASUS website(www.asus.com) for reference only. Always install the latest OS version and corresponding updates to maximize the features of the support DVD...

User Manual
Page 94
... the previous screen AMD OverDrive Utility (AOD) Installs the AMD OverDrive Utility which allows configuration of system and overclocking settings in a Windows® environment. ASUS Cool 'n' Quiet Utility This item installs the ASUS Cool 'n' Quiet utility. 3.2.3 Utilities menu The Utilities menu shows the applications and other software that the motherboard supports. Click to...
... the previous screen AMD OverDrive Utility (AOD) Installs the AMD OverDrive Utility which allows configuration of system and overclocking settings in a Windows® environment. ASUS Cool 'n' Quiet Utility This item installs the ASUS Cool 'n' Quiet utility. 3.2.3 Utilities menu The Utilities menu shows the applications and other software that the motherboard supports. Click to...

User Manual
Page 96
ATI RAID/AHCI 32/64bit Vista Driver Allows you to create an ATI RAID/AHCI driver disk for 32/64bit Windows® Vista operating system. 3-6 Chapter 3: Software support ATI RAID/AHCI 32/64bit WinXP Driver Allows you to make a RAID driver disk. 3.2.4 Make Disk menu The Make Disk menu allows you to create an ATI RAID/AHCI driver disk for 32/64bit Windows® XP operating system.
ATI RAID/AHCI 32/64bit Vista Driver Allows you to create an ATI RAID/AHCI driver disk for 32/64bit Windows® Vista operating system. 3-6 Chapter 3: Software support ATI RAID/AHCI 32/64bit WinXP Driver Allows you to make a RAID driver disk. 3.2.4 Make Disk menu The Make Disk menu allows you to create an ATI RAID/AHCI driver disk for 32/64bit Windows® XP operating system.

User Manual
Page 101
...OS after you don't make a selection. Once inside the "boot to it without any of the screen, to your installed OS such as Windows), enter BIOS setup, or power off. From here, you can also right-click anywhere on -screen inside the Express Gate LIte environment, ...First Screen Express Gate Lite's first screen appears within it . Besides using the LaunchBar, you through basic Express Gate Lite configurations. ASUS M3A-H/HDMI 3-11 Re-size a window by launching either web or Skype from the first screen), a first time wizard will automatically exit and boot to launch or switch ...
...OS after you don't make a selection. Once inside the "boot to it without any of the screen, to your installed OS such as Windows), enter BIOS setup, or power off. From here, you can also right-click anywhere on -screen inside the Express Gate LIte environment, ...First Screen Express Gate Lite's first screen appears within it . Besides using the LaunchBar, you through basic Express Gate Lite configurations. ASUS M3A-H/HDMI 3-11 Re-size a window by launching either web or Skype from the first screen), a first time wizard will automatically exit and boot to launch or switch ...

User Manual
Page 103
...choose input language and method as well as offering affordable, high quality voice communications to change volume. click to open the File Manager window, which lets you conveniently access the files on any of the four sides of the screen. Starts the Chat instant messaging tool. ...statuses and let you want more screen space for your display. • Volume Control: Control the volume for the softwares. Shows network status; ASUS M3A-H/HDMI 3-13 If a USB device is detected, the icon contains a green arrow. The smaller icons on the right side of the above softwares ...
...choose input language and method as well as offering affordable, high quality voice communications to change volume. click to open the File Manager window, which lets you conveniently access the files on any of the four sides of the screen. Starts the Chat instant messaging tool. ...statuses and let you want more screen space for your display. • Volume Control: Control the volume for the softwares. Shows network status; ASUS M3A-H/HDMI 3-13 If a USB device is detected, the icon contains a green arrow. The smaller icons on the right side of the above softwares ...


